UFlyMike Harmony User manual

Harmony
User’s Guide
™
™

Contents
General ......................................................................3
Microphone Boom ....................................................4
Basic Positioning ...........................................................4
Connecting & Disconnecting.....................................4
Headphone Cable (Pro only) ..................................6
Connecting & Disconnecting.....................................6
In-line Controller ...........................................................7
Aviation Application .................................................8
Controls & Jacks...........................................................8
Basic Settings ................................................................9
Auxiliary Jack ..............................................................10
Troubleshooting ..........................................................11
Smart Phone Application .......................................12
USB Computer Application ....................................13
Care and Maintenance..........................................14
Cable Wrapping ........................................................14
Storage........................................................................14
Warranty & Repair ...................................................14

General
Thank you for purchasing the UFlyMike™HARMONY™!
HARMONY is a headset system designed to use your favorite
pair of headphones (sold separately) as a full headset with a variety
of devices.
HARMONY LIGHT is xed setup made to be used with a single
headphone and a single application. It has all the same features
as HARMONY Pro, but without the modularity.
HARMONY PRO is modular and consists of separate components
that can be mixed and matched to create different headset
congurations for use with multiple headphones and devices.
The modular design of HARMONY Pro makes it the most
versatile, upgradeable, and user repairable headset available.
• Versatility - A single component can be added to the
HARMONY PRO headset to make it compatible with additional
headphones and devices. New Headphones Cables and
Application Cables will be added regularly.
• Upgradeability - Only a single component needs to be
replaced in order to make the HARMONY PRO headset
compatible with a new headphone or device. There is no
need to re-purchase the entire headset.
• User Repairable - Damaged or broken components of
HARMONY PRO can be easily replaced without requiring
service of the entire headset. Simply re-purchase the
damaged or broken component and install it yourself.
3
MiCrophone BooM
The noise canceling Microphone Boom provides clear
communications in noisy environments with 360 degrees of
rotation and disconnects for easy replacement or upgrade.
Basic Positioning of the Noise Canceling MicrophoneBasic Positioning of the Noise Canceling Microphone
The Microphone Boom should be placed between the corner
and center of the mouth. If placed directly in front of the mouth,
wind noise from the mouth and nostrils may occur. Too far away,
and the microphone output will lose volume. Proper placement
requires a little trial and error to nd the “sweet spot” of high
output volume with low noise.
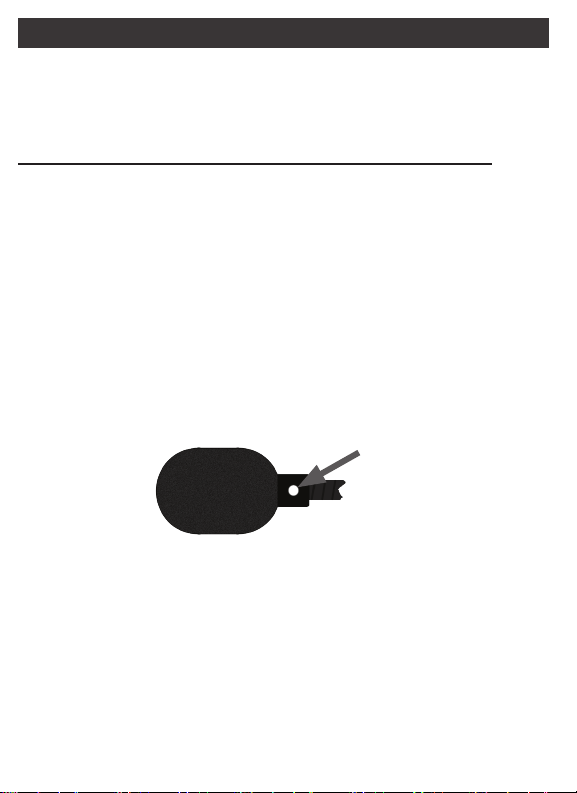
For best performance:
1. Position the microphone so that the ‘Talk’ side (marked with a
solid white dot) is pointed directly toward your mouth. If the
‘Talk’ side of the microphone points up or down, it will begin to
cancel your voice resulting in weak transmissions.
2. Position the microphone so that the windscreen barely
touches your lips when pursed. Moving the microphone
farther from the mouth will reduce wind noise from breathing,
but will also lower output volume and increase environmental
noise. Louder noise environments may require positioning
the microphone closer to the mouth to acheive proper output
volume. Proper placement should balance between loud
output volume and low environmental noise and wind noise.
talk
4

Caution: The Microphone Boom is not designed to be repeatedly
removed and reattached to the Headphone Cable. The Microphone
Boom should remain attached to the Headphone Cable for all
normal use and during storage.
Disconnecting the Microphone BoomDisconnecting the Microphone Boom
Firmly grasp the plastic housing of the Microphone Boom. Gently
swivel the microphone boom back and forth while applying
pressure away from the Headphone Cable housing. The
microphone should work it’s way loose and disconnect.
Connecting the Microphone Boom to the Headphone CableConnecting the Microphone Boom to the Headphone Cable
When attaching the Microphone Boom to the Headphone Cable,
care must be taken to ensure the components are correctly
aligned to avoid parts being damaged.
1. Center the tip of the gold plug in the Microphone Boom with
the gold jack inside the Headphone Cable.
2. Keep the Microphone Boom and Headphone Cable parallel
to each other and gently press the two components together
while swiveling the microphone 10 degrees back and forth.
3. The two components will pop together with no gap between,
swivel the Microphone Boom around the pivot axis about 90
degrees in both directions to fully seat it. The microphone
should swivel freely but hold position when untouched.
5
keep these
surfaCes
parallel
Center
ConneCtors
headphone CaBle (Pro only)
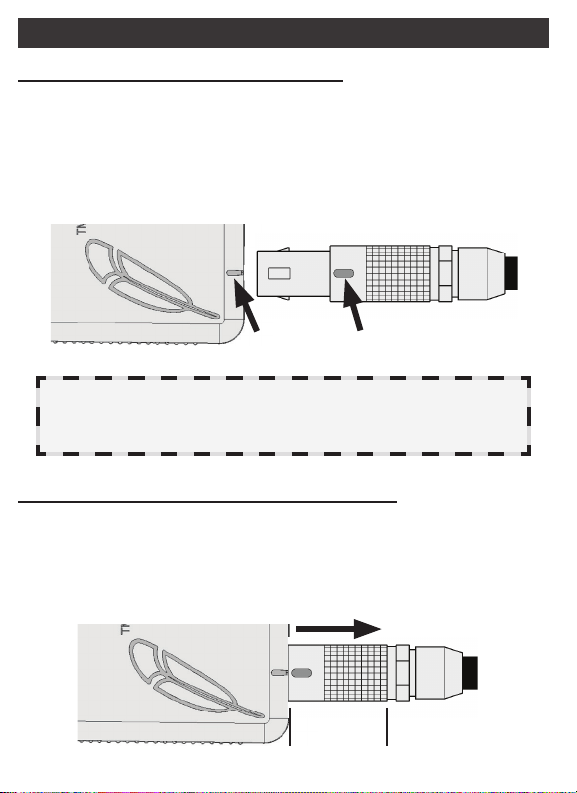
Connecting to the Application CableConnecting to the Application Cable
The LEMO plug is a keyed connector, meaning it will only insert
into the mating jack when properly aligned. To connect, align the
red mark on the Headphone Cable’s plug with the red mark on
the Application Cable’s jack. The LEMO plug should insert easily
and lock securely into place with a click.
Caution: Do not attach the Headphone Cable to anything other
than a Harmony Application Cable or insert anything into the
open end of the LEMO plug, damage can occur.
Disconnecting from the Application CableDisconnecting from the Application Cable
To disconnect, grasp the LEMO plug by the knurled Sliding Sleeve
and gently pull the plug directly away from the jack. The Sliding
Sleeve will move rst, disengaging the locking teeth inside the
jack. The plug should easily slide out of the jack.
slidinG
sleeve
aliGnMent Marks
6

Using the In-line ControllerUsing the In-line Controller
The In-line Controller is a single button remote control activated
by squeezing the middle of the In-line Controller.
The function of this single button remote can be changed by the
switch located on the back of the controller.
•
l
- The standard setting for most applications. This setting
keeps the microphone connected continuously. Squeezing
the controller sends basic commands recognized by most
phones. (For a full list of commands, see the “Smart Phone
Application Cable” section on page 12)
•
O
- This setting is intended for push-to-talk systems
compatible with external PTT switches like Walkie-Talkies
and other hand-held devices. In this setting, the microphone
is normally disconnected and only connects while the In-line
Controller button is held.
Note: Do not use the Osetting on headsets communicating
with ATC in an aircraft with a PTT switch, the microphone will
not transmit unless the In-line button is held. This setting may
be safely used in all other positions in the aircraft.
7
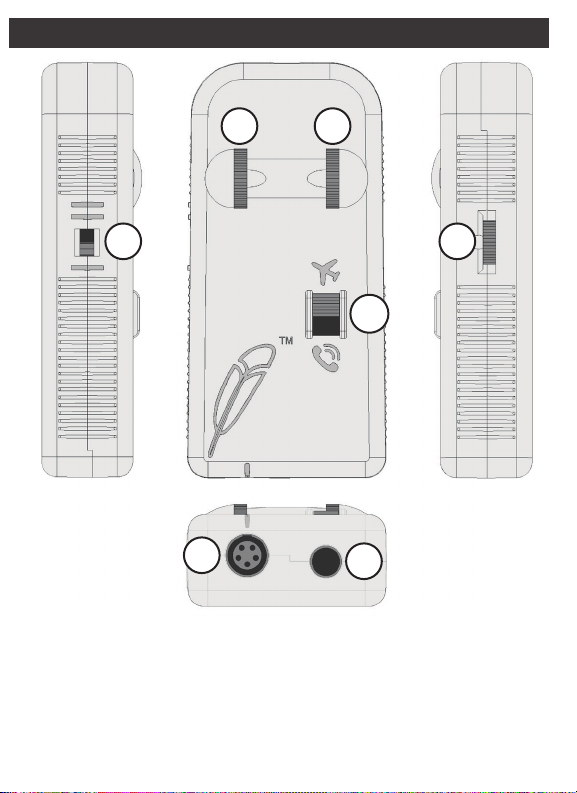
aviation appliCation
1. headphone CaBle JaCk (Pro only)
2. auxiliary JaCk
3. aviation/auxiliary audio
MiCrophone routinG switCh
12
3
4 5
67
8
4. left ear voluMe
5. riGht ear voluMe
6. MiCrophone Gain
7. Mono/stereo switCh

Left & Right Ear Volume ControlsLeft & Right Ear Volume Controls
Adjusts the audio volume coming from the aircraft radio and/or
intercom into the headphones. Use together to change overall
volume or independently as a left and right balance.
Adjusting Microphone SensitivityAdjusting Microphone Sensitivity
In radio systems with voice activation (VOX), adjust the
Microphone Gain to a point low enough that cockpit noise does
not activate the comm but high enough that the comm does not
cut off the beginning or end of your words.
In radio systems without voice activation, adjust the Microphone
Gain to balance between loud microphone transmission volume
and low background noise.
Setting the Mono/Stereo SwitchSetting the Mono/Stereo Switch
The Mono/Stereo Switch splits a single audio channel (mono)
to go to both earphones or routes discrete left and right audio
channels (stereo) to go to the corresponding earphones.
Place the switch in the one bar
|
position for use with mono
comm panels or two bars
||
with stereo comm panels.
Note: Mono panels are the most common type, used in all
Commercial Aviation and most General Aviation aircraft. If you
are unsure which kind you are using, it’s probably mono.
Sidetone VolumeSidetone Volume
Sidetone is a function of the radio, not the headset. Check your
radio documentation for instructions on adjusting sidetone.
9

Connecting a Device to the Auxiliary JackConnecting a Device to the Auxiliary Jack
You can use any standard 3.5mm Stereo (3-conductor) male-to-
male cord to listen to audio from an attached device.
In order to use the microphone with the attached device, you will
need to use a 3.5mm (4-conductor) cord wired properly for your
device. Unless otherwise requested, our products are wired in
the AHJ / CTIA standard. Check your device documentation for
details on the type you need.
WIRING DEVICE PART #
AHJ / CTIA Apple / Android / Windows AC-CORD-AHJ
OMTP Android / Windows AC-CORD-OMTP
Selecting Microphone RoutingSelecting Microphone Routing
The microphone cannot be output to both the aircraft radio and
an attached device simultaneously. Use the Microphone Routing
Switch to direct the microphone output to either to route to the
aircraft or to route to the Auxiliary Jack.
Incoming audio from the aircraft radio and the auxiliary jack will
always be heard simultaneously regardless of the switch position.
Pro Tip: When setting by feel, move the switch towards the cord
of the device you want the microphone to route to.
Auxiliary Jack VolumeAuxiliary Jack Volume
The volume of audio coming through the Auxiliary Jack is controlled
by the volume output of the attached device. HARMONY does not
have an “auto-muting” feature, keep audio at a reasonable volume
to avoid missing radio calls.
10
Table of contents
Other UFlyMike Headset manuals


