Page: 6 < Librae instruction manual Back to contents Back to contents
Back to contents
1 General Librae instruction manual > Page: 7
1 General ................................................................................7
1.1 Principle of Operation...........................................................7
2 Instrument Description ..................................................................7
2.1 Main Unit......................................................................7
2.1.1 Important Notice about Force Range .............................................7
2.1.2 Animal Welfare................................................................8
2.1.3 Touch-screen command/display ................................................8
2.1.4 Notes on Resistive Touch-Pads..................................................9
2.2 Animal Restrainer ..............................................................9
2.3 Librae Features ................................................................9
3 Installation............................................................................10
3.1 Unpackaging & Preliminary Check................................................10
3.2 Note on the Instruction Manual .................................................10
3.3 Safety Instructions ............................................................10
3.4 Assembling the instrument .....................................................11
3.5 Before Applying Power .........................................................11
3.6 Intended Use .................................................................12
3.7 Additional Safety Considerations ................................................12
3.8 Connection...................................................................12
4 Operation .............................................................................14
4.1 Home Page ...................................................................14
4.1.1 Quick setup for first test.......................................................16
4.1.2 System Icons ................................................................17
4.1.3 Home Page Icons.............................................................18
4.2 Experiment ...................................................................18
4.3 Setup........................................................................20
4.4 Start.........................................................................21
4.5 Calibration ...................................................................22
4.6 Set Autostart .................................................................23
4.7 Utilities ......................................................................26
4.7.1 Update......................................................................26
4.7.2 Date-Time ...................................................................27
4.7.3 Advanced Settings............................................................27
4.7.4 Erase DB ....................................................................28
4.7.5 Results .....................................................................28
4.7.6 USB Storage .................................................................29
4.8.1 Communication port connection ...............................................30
5 Maintenance ..........................................................................32
5.1 Electrical .....................................................................32
5.2 Cleaning/disinfection ..........................................................32
5.3 Long Inactivity ................................................................32
5.4 Customr Support ..............................................................32
6 Specifications .........................................................................32
Contents 1 General
The Librae Incapacitance Tester can be used for a number of applications that require animal
weight bearing measurement (hind paw weight distributions).
The most common application is for joint pain studies and related drug candidates, especially
for osteoarthritis.
1.1 Principle of Operation
The Librae Incapacitance Tester provides weight bearing measurement of restrained rats or
mice, by using two force sensors, one per paw. These independently measure the paw weight
over time (the weight averaged over a few seconds is normally used as the data point).
For example, the device provides an index of discomfort in the osteoarthritic knee, normally
expressed as the Let/Right weight ratio or Let/Right weight dierence between the two paws.
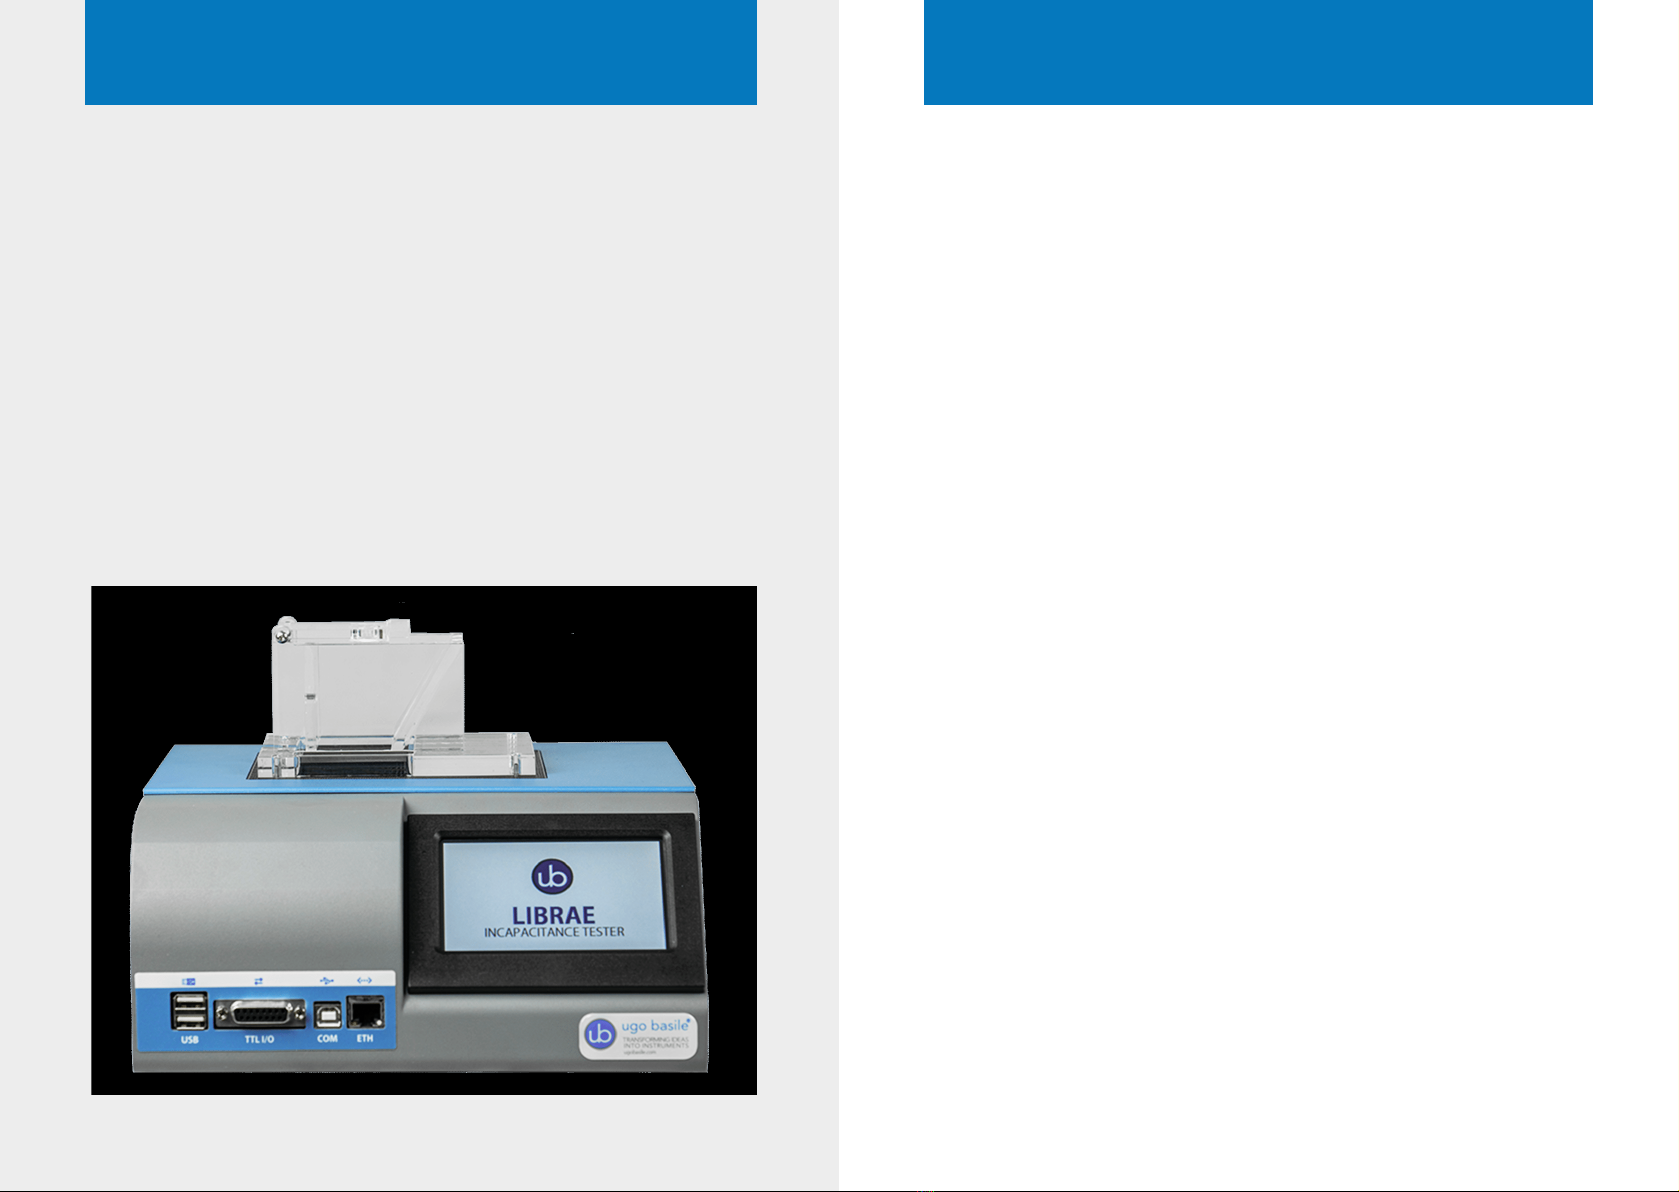
2 Instrument Description
The Instrument comprises:
• The main unit, an original Ugo Basile design, see paragraph 2.1, incorporating the 2 force
sensors, touch screen controls and a display screen for viewing data trends and results
• A Plexiglas restrainer for mouse or rat (or both depending on the model), see paragraph 2.2.
• A pedal switch to start the experiment (or use touch screen to start the experiment)
The Librae Incapacitance Tester provides data files (CSV) that can be transferred to a PC for
analysis using a spreadsheet application such as Microsot Excel.
Data is also saved automatically (e.g. let and right weights, L/R ratio, etc...) and can be retrieved
using the touch screen.
2.1 Main Unit
The measurement plate on the unit is a 10mm aluminium slab, to ensure maximum thermal
and mechanical stability.
High quality force sensors provide the measurement with a resolution of 0.1g. Foot pads are
magnetically attached to make them easy to remove and clean ater every experiment. The foot
pads are flat without any physical protrusions that could cause negative eects on the comfort
or gait of the animal.
Four rubber feet act as dampeners in order to absorb small vibrations from the work bench or
the environment.
2.1.1 Important Notice about the Force Range
The maximum weight the instrument can carry is 2’200g per paw.
Applied forces that are greater than 2’200g per paw, will not be measured.
A mechanical limit switch, avoids a force overload greater than 4’400g.
Do not place animals weighing more than 5’000g on the Librae Incapacitance Tester to avoid
causing any permanent damage to the instrument.