UIC GSM FlexJet User manual

FlexJet Head Assembly FlexJet Head Assembly
FlexJet Head Assembly
FlexJet Head
Assembly
T47541109
Rev. J
01-01djh,fg,djh
This document supports
assembly
47541109 Rev.F

i
FlexJet Head Assembly T47541109 Rev. J
TECHNICAL PUBLICATIONS
This Document Supports Assembly 47541109 Rev. F
Table of Contents
Assembly Drawings....................................................................................................................................................... 1
Notes .................................................................................................................................................................... 9
Lubricants and Adhesives:................................................................................................................................... 9
Bill of Materials ................................................................................................................................................. 10
Functional Description ................................................................................................................................................ 12
Maintenance Concept .................................................................................................................................................. 12
Adjustments and Other Procedures for Maintenance Technicians....................................................................12
Preventive Maintenance..................................................................................................................................... 13
Procedures for Universal Instruments Field-Service Engineers ........................................................................ 13
Calibration Table ......................................................................................................................................................... 14
Prerequisite Information.............................................................................................................................................. 15
Acronyms........................................................................................................................................................... 15
Related Information..................................................................................................................................................... 16
Procedures and Adjustments ....................................................................................................................................... 17
Prepare the Machine for Maintenance ............................................................................................................... 17
Prepare the Machine for Production .................................................................................................................. 17
Installing the FlexJet Head ................................................................................................................................ 18
Prerequisites ............................................................................................................................................. 18
Initial Steps............................................................................................................................................... 19
Mount the FlexJet Head ........................................................................................................................... 19
Attach Pneumatics and Electrical Cables................................................................................................. 19
Final Steps ................................................................................................................................................ 21
Removing the FlexJet Head ............................................................................................................................... 22
Initial Steps............................................................................................................................................... 22
Disconnect the Electrical and Pneumatic Cables ..................................................................................... 22
Remove the Head from the Carriage........................................................................................................ 23
Final Steps ................................................................................................................................................ 23
Head/Changer Nozzle Setup .............................................................................................................................. 23
Verifying the Vacuum Level ............................................................................................................................. 24
Prerequisites ............................................................................................................................................. 24
Verify the Main Vacuum Pressure ........................................................................................................... 24
Access the Pneumatic Panel ........................................................................................................... 24
Install the Panel and Covers ........................................................................................................... 25
Lower the Spindles................................................................................................................................... 25
Install the Vacuum Gauge ........................................................................................................................ 26
Measure the Vacuum Level ..................................................................................................................... 26
Raise the Spindles .................................................................................................................................... 28
Final Steps ................................................................................................................................................ 29
Verifying Air Kiss.............................................................................................................................................. 29
Initial Steps............................................................................................................................................... 29
Check the Air Kiss ................................................................................................................................... 30
Final Steps ................................................................................................................................................ 31
Inspecting the Theta- and Z-Motor Belts........................................................................................................... 31
Initial Steps............................................................................................................................................... 31
Check the Belts......................................................................................................................................... 32
Final Steps ................................................................................................................................................ 33
Verifying the Touch-Down Sensors .................................................................................................................. 33
Move the Head ......................................................................................................................................... 33
Lower the Spindles................................................................................................................................... 33
Check the Signal Strength ........................................................................................................................ 34
Cleaning the Pin Mirrors.................................................................................................................................... 35
Prerequisites ............................................................................................................................................. 35

ii
T47541109 Rev. J FlexJet Head Assembly
TECHNICAL PUBLICATIONS
This Document Supports Assembly 47541109 Rev. F
Position the FlexJet Head ......................................................................................................................... 35
Lower the Spindles................................................................................................................................... 36
Clean the Reflective Surfaces of the Mirrors ........................................................................................... 36
Raise the Spindles .................................................................................................................................... 37
Perform Adjustments and Calibration...................................................................................................... 38
Setting the Touch-Down Sensors ...................................................................................................................... 38
Prerequisites ............................................................................................................................................. 38
Machine Preparation ................................................................................................................................ 39
Sensor Setup ............................................................................................................................................. 39
Install the Impact Sensor Setup Tool.............................................................................................. 39
Lower a Spindle.............................................................................................................................. 41
Adjust the Sensor............................................................................................................................ 42
Setup Verification .................................................................................................................................... 44
Comprehensive Head Maintenance ................................................................................................................... 45
Prerequisites ............................................................................................................................................. 45
Initial Steps............................................................................................................................................... 46
Clean the Pin Mirrors ............................................................................................................................... 46
Verify/Adjust the Camera Mirror Cable .................................................................................................. 49
Inspect the Mirror Spring Shaft................................................................................................................ 50
Inspect the Linear Bearings...................................................................................................................... 51
Verify/Adjust Tension of Spindle Drive Belts ......................................................................................... 51
Inspect Theta and Z-Motor Belts ............................................................................................................. 51
General Inspection ................................................................................................................................... 51
Clean the Camera Mirrors ........................................................................................................................ 52
Install the FlexJet Head ............................................................................................................................ 54
Final Steps ................................................................................................................................................ 54
Zeroing the Theta Encoder ................................................................................................................................ 55
Prerequisites ............................................................................................................................................. 55
Install the Theta Alignment Tool ............................................................................................................. 55
Adjust the Encoder Counts Value ............................................................................................................ 56
Verify the Encoder Counts Value ............................................................................................................ 58
Final Steps ................................................................................................................................................ 58
Verifying/Adjusting the Z-Safe Sensor ............................................................................................................. 59
Prerequisite............................................................................................................................................... 59
Initial Steps............................................................................................................................................... 59
Verify the Z Safe Sensor Signal ............................................................................................................... 61
Adjust the Sensor Signal .......................................................................................................................... 62
Final Steps ................................................................................................................................................ 63
Adjusting the Spindle Drive Belt Tension ......................................................................................................... 64
Prerequisites ............................................................................................................................................. 64
Initial Steps............................................................................................................................................... 64
Procedure.................................................................................................................................................. 64
Final Steps ................................................................................................................................................ 66
Adjusting the Stop Brake Belt Tension ............................................................................................................. 66
Adjusting the Stop Bracket Belt Tension .......................................................................................................... 67
Replacing/Aligning a Coupler Body ................................................................................................................. 67
Prerequisites ............................................................................................................................................. 67
Initial Steps............................................................................................................................................... 68
Replace the Coupler Body ....................................................................................................................... 69
Adjust the Coupler Body.......................................................................................................................... 70
Final Steps ................................................................................................................................................ 70
Replacing the PCA Flex Jet Control.................................................................................................................. 71
Prerequisites ............................................................................................................................................. 71
Initial Steps............................................................................................................................................... 71
Remove the Current PCA FlexJet Control............................................................................................... 71

iii
FlexJet Head Assembly T47541109 Rev. J
TECHNICAL PUBLICATIONS
This Document Supports Assembly 47541109 Rev. F
Install the New PCA FlexJet Control ....................................................................................................... 72
Install the Electrical Cabling .................................................................................................................... 73
Final Steps ................................................................................................................................................ 74
Advanced Support Information ................................................................................................................................... 76
Replacing the Stop Brake Belt........................................................................................................................... 76
Prerequisites ............................................................................................................................................. 76
Initial Steps............................................................................................................................................... 76
Remove the Damaged Belt....................................................................................................................... 77
Install the New Belt.................................................................................................................................. 77
Final Steps ................................................................................................................................................ 78
Replacing the Z Stop Brake Assembly .............................................................................................................. 79
Prerequisites ............................................................................................................................................. 79
Initial Steps............................................................................................................................................... 79
Remove the Faulty Stop Brake Assembly ............................................................................................... 79
Install the New Stop Brake Assembly...................................................................................................... 80
Final Steps ................................................................................................................................................ 81
Replacing a Spindle Touch-Down Sensor ......................................................................................................... 81
Prerequisites ............................................................................................................................................. 81
Initial Steps............................................................................................................................................... 81
Procedure.................................................................................................................................................. 82
Final Steps ................................................................................................................................................ 84
Replacing a Clutch............................................................................................................................................. 85
Prerequisites ............................................................................................................................................. 85
Initial Steps............................................................................................................................................... 85
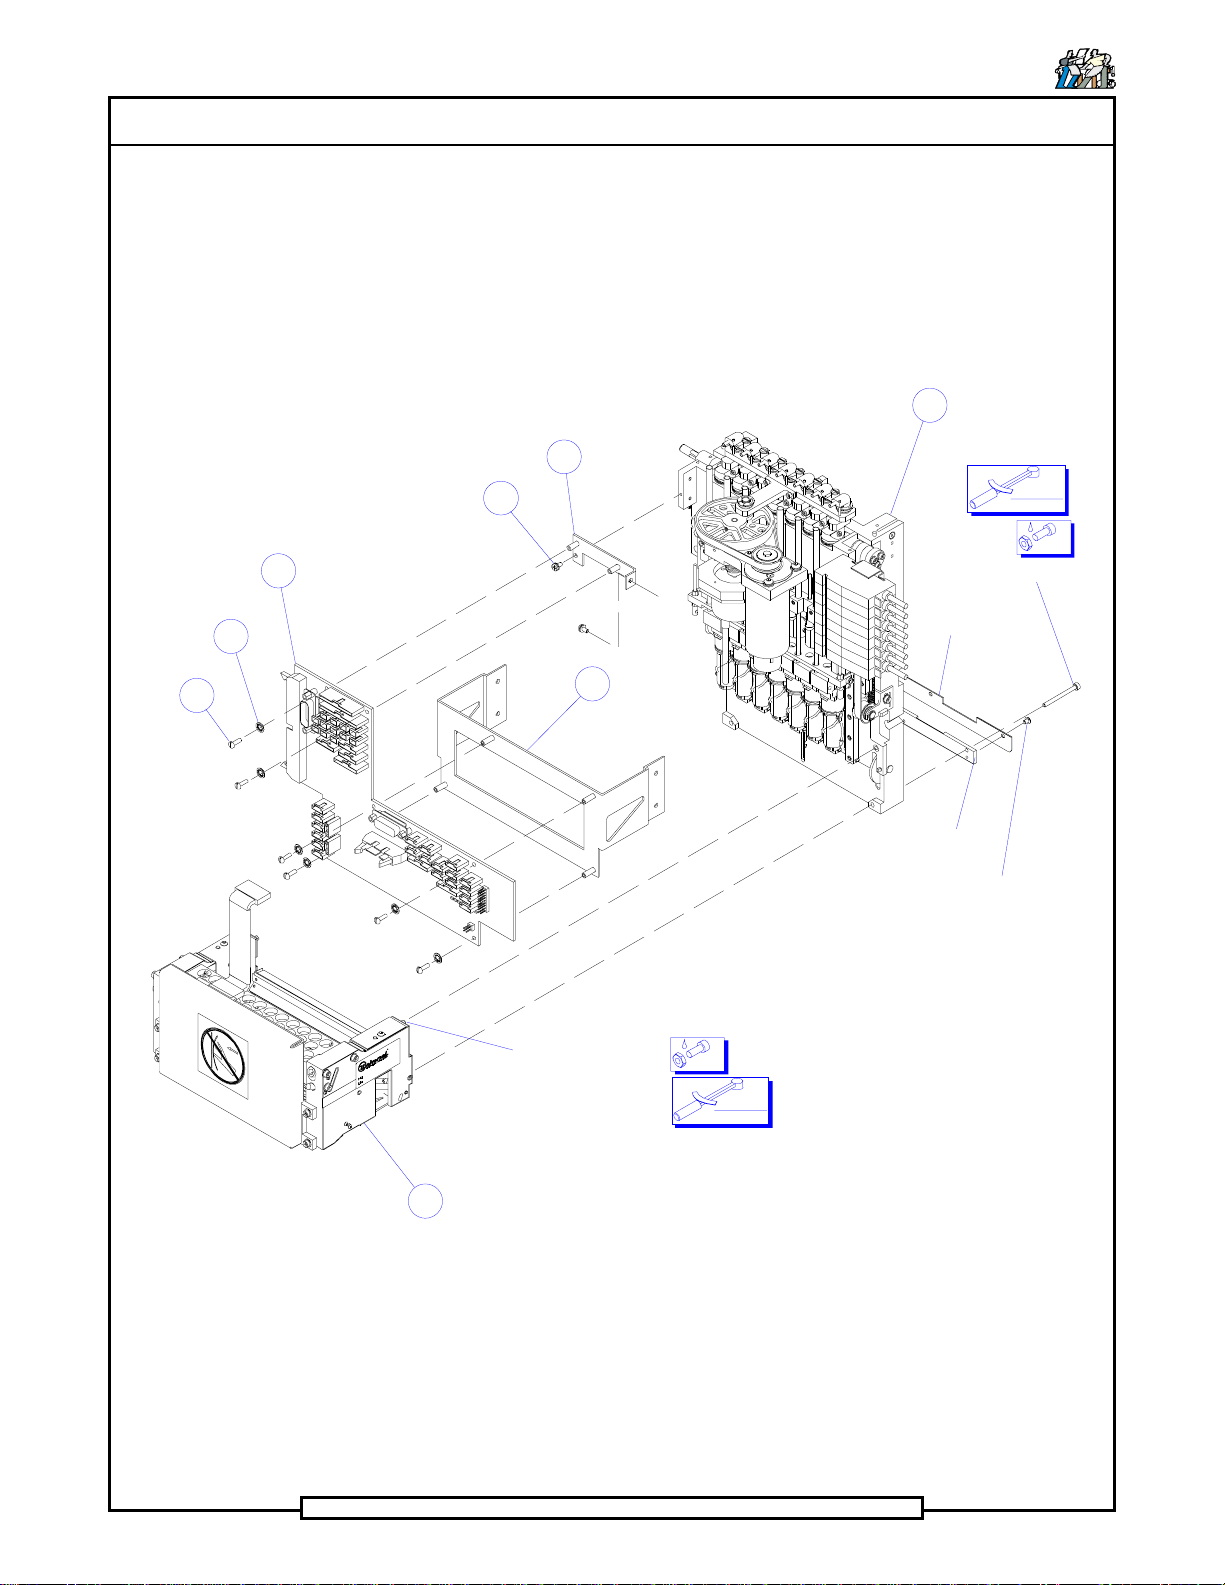
Disassemble the Head .............................................................................................................................. 86
Install the New Clutch.............................................................................................................................. 89
Final Steps ................................................................................................................................................ 91
Replacing a Manifold Tubing ............................................................................................................................ 92
Prerequisite............................................................................................................................................... 92
Initial Steps............................................................................................................................................... 92
Procedure.................................................................................................................................................. 93
Final Steps ................................................................................................................................................ 94
Replacing the Manifold ..................................................................................................................................... 94
Prerequisites ............................................................................................................................................. 94
Initial Steps............................................................................................................................................... 95
Remove the Current Manifold ................................................................................................................. 95
Install the New Manifold.......................................................................................................................... 96
Final Steps ................................................................................................................................................ 98
Replacing a Fiber Optic Cable........................................................................................................................... 98
Prerequisites ............................................................................................................................................. 98
Initial Steps............................................................................................................................................... 98
Disassemble the FlexJet Head .................................................................................................................. 99
Install the New Fiber Optic Cable.......................................................................................................... 100
Install the PCA FlexJet Control ............................................................................................................. 100
Final Steps .............................................................................................................................................. 101
Replacing the Spindle Drive Belt .................................................................................................................... 102
Prerequisites ........................................................................................................................................... 102
Initial Steps............................................................................................................................................. 102
Change the Belt ...................................................................................................................................... 103
Final Steps .............................................................................................................................................. 103
Replacing a FlexJet Spindle Assembly............................................................................................................ 104
Prerequisites ........................................................................................................................................... 104
Initial Steps............................................................................................................................................. 104
Procedure................................................................................................................................................ 104
Disassemble the Head................................................................................................................... 105

iv
T47541109 Rev. J FlexJet Head Assembly
TECHNICAL PUBLICATIONS
This Document Supports Assembly 47541109 Rev. F
Replace the Spindle Assembly ..................................................................................................... 106
Connect the Spindle to the Platform Assembly............................................................................ 106
Perform Final Installations and Adjustments ............................................................................... 108
Final Steps .............................................................................................................................................. 108
Changes To This Revision ........................................................................................................................................ 109

Page 2
T47541109 Rev. J FlexJet Head Assembly
TECHNICAL PUBLICATIONS
This Document Supports Assembly 47541109 Rev. F
(Ref) - 80026907 (2)
(Ref) - 80026810 (2)
4
(6) 15
5
(2) 22
9
10
7
47813303 - (Ref)
(Ref) - 47814003
86
80 IN-OZ
.56 NM
(6) 16
86
20 IN-LB
2.26 NM
(Ref) - 80029805 (3)

Page 4
T47541109 Rev. J FlexJet Head Assembly
TECHNICAL PUBLICATIONS
This Document Supports Assembly 47541109 Rev. F
Detail A
Detail B
(Ref) 47749501 ,Clearflo Tubing
7 x 4in
(Ref) 80031302
(Ref) 80031705
(Ref) 80055601
40659579 (Ref)

Page 6
T47541109 Rev. J FlexJet Head Assembly
TECHNICAL PUBLICATIONS
This Document Supports Assembly 47541109 Rev. F
1
3
(3)12
(4)
13
(7)
6
(7) 17
2
2
86

Page 8
T47541109 Rev. J FlexJet Head Assembly
TECHNICAL PUBLICATIONS
This Document Supports Assembly 47541109 Rev. F
LT1 LT2 LT3 LT4 LT5 LT6 LT7 LT8
Diagnostic
LED Function ON Indicates… OFF Indicates…
LT1 Theta counts value is negative
from the Home Pulse. See Notes 1, 2, and 4 Below See Notes 3 and 5 Below
LT2 Theta Home Pulse See Notes 1, 2, 3, and 6 Below The Theta Encoder counts value
does not equal the Home Pulse.
LT3 Theta counts value is positive
from the Home Pulse. See Notes 1, 2, and 5 Below See Notes 3 and 4 Below
LT4 Touch-Down Sensors Any Touch-Down Sensor is ON. No Touch-Down Sensors are ON.
LT5 Z Home Sensor The Stop Bracket is in the Z
Home or upper-most position.
The Z Home Sensor is not on or
is not functioning correctly.
(Out of adjustment, or failure).
LT6 Z Safe Sensor All Spindles are at the Z Safe or
uppermost positions.
The Z Safe Sensor is not on or is
not functioning correctly.
(Out of adjustment, or failure).
LT7 Mirror In-Range Sensor The OTH Camera Mirror is
positioned below the
components for imaging.
The In-Range Sensor is not on or
is not functioning correctly.
(Out of adjustment, or failure).
LT8 Head Enable (See Note 7) The FlexJet Head has power
and the machine recognizes the
head configuration.
Machine power is off, the head is
disconnected from the machine,
or a fuse is blown.
Diagnostic LED Definitions for PC Boards Mounted on FlexJet Heads
(For Heads with Serial Numbers Beginning with FJ09)
Notes
1 If LEDs 1, 2, and 3 are all ON the Theta Encoder is outside the range of 0 ± 4096 counts (about ± 4 degrees).
2 If LEDs 1 and 2 are ON, but 3 is OFF, the Theta Encoder is within -100 of zero.
3 If LEDs 2 and 3 are ON, but 1 is OFF, the Theta Encoder is within +100 of zero.
4 If only LED 1 is ON, then the Theta Encoder is from -100 to -4096 counts from the Home Pulse.
5 If only LED 3 is ON, then the Theta Encoder is from +100 to +4096 counts from the Home Pulse.
6 If LED 2 is ON, but LEDs 1 and 3 are OFF, the Theta Encoder value equals the Home Pulse when .
7 LED 8 blinks when the machine is initializing after power up. If the LED continues to blink after initialization is
complete, the machine software and/or hardware cannot recognize the FlexJet Head. If the machine power is on but
LED 8 is not on
,
the head power is disconnected or a fuse is blown.

Page 10
T47541109 Rev. J FlexJet Head Assembly
TECHNICAL PUBLICATIONS
This Document Supports Assembly 47541109 Rev. F
DET
NO. ITEM NO. DESCRIPTION QTY U/M
1 13881000 IDENT PLATE 1 EA
3 45854818 LABEL, HEAD 1 EA
4 47443407 CAMERA ASM, 2.6 OTH 1 EA
5 47467504 PCA FLEX JET CONTROL 1 EA
6 47480902 CLAMP, BELT 7 EA
7 47541206 FLEXJET PLATFORM ASSY 1 EA
8 47541306 Z-AXIS INDEX HOUSING ASSY 1 EA
9 47546401 BRACKET 1 EA
10 47546501 BRACKET 1 EA
11 47561904 ASSY, MANIFOLD 1 EA
12 47586101 BELT, TIMING ALTERED 3 EA
13 47586201 BELT, TIMING ALTERED 4 EA
14 47804001 GSM FLEXJET,COVER 1 EA
15 80008407 PHMS 4-40 X 1/2 6 EA
16 80019002 ITLW #4 6 EA
17 80026803 MSHCS M3 X 8MM 12 EA
18 80026806 MSHCS M3 X 16MM 4 EA
19 80026809 MSHCS M3 X 30MM 2 EA
20 80028905 MSCS M3 X 20MM 1 EA
21 80029801 MSBHS M3 X 8MM 2 EA
22 80060201 PPH/ITLW M3X6MM 6 EA
23 47338203 BRACKET, BRAKE 1 EA
24 80031302 MSHCS M2 X 6MM 1 EA
25 80031705 MFW M2 1 EA
26 80055601 MSLW M2 1 EA
27 47629202 Z STOP BRAKE ASSY 1 EA
28 48251203 BRACKET, SHIELD 1 EA
29 80026801 MSHCS M3 X 5MM 5 EA
30 80031704 MFW M3 4 EA
31 80055605 MSLW M3 4 EA

Page 11
FlexJet Head Assembly T47541109 Rev. J
TECHNICAL PUBLICATIONS
This Document Supports Assembly 47541109 Rev. F
32 30885705 TUBING, POLY 1/4 OD-BLUE 2 FT
33 47571101 LABEL, FLEXJET HD 1 EA
34 47612101 AIRKISS HD CABLE ASSY 1 EA
35 47612201 VACUUM HD CABLE ASSY 1 EA
36 T47541109 HEAD ASSY, FLEXJET 1 EA
USED BUT NOT SHOWN ITEMS

Page 12
T47541109 Rev. J FlexJet Head Assembly
TECHNICAL PUBLICATIONS
This Document Supports Assembly 47541109 Rev. F
Functional Description
The FlexJet® Head Assembly is a high-speed, 7-spindle flexible-placement
head. This head can gang pick components up to 12 mm square, inspect
components on the fly using an On-The-Head (OTH) Camera, and place
components in sequential order. All Z axis motion is controlled by one drive
mechanism.
Maintenance Concept
The following Maintenance Concept tables summarize maintenance and
operational procedures for this assembly. For a more detailed explanation of
the Maintenance Concept and its structure refer to the Prerequisite
Information and Introduction module in the platform Maintenance Support
Document.
Ensure that the FlexJet or Platform Tool Kits are available if they are
required for a procedure. These kits contain measurement and setup tools.
Adjustments and Other Procedures for
Maintenance Technicians
The following procedures require a minimum skill level of Maintenance
Technician and should be performed only as required to ensure proper
functioning of the FlexJet Head.
Maintenance Procedures Recommended
Frequency Minimum Skill
Required Spares Kit
Required Universal Tool Kit
Required
Installing a FlexJet Head * As Required Maintenance
Technicia
n
No No
Removing a FlexJet Head As Required Maintenance
Technicia
n
No No
Head/Changer Nozzle Setup As Required Maintenance
Technicia
n
No No
Replacing/Aligning a Coupler Body * As Required Maintenance
Technicia
n
No FlexJet Tool Kit
Zeroing the Theta Encoder As Required Maintenance
Technicia
n
No FlexJet Tool Kit
Adjusting the Z-Safe Sensor As Required Maintenance
Technicia
n
No No
Adjusting the Spindle Drive Belt Tension * As Required Maintenance
Technicia
n
No FlexJet Tool Kit
Setting the Touch-Down Sensors * As Required Maintenance
Technicia
n
No FlexJet Tool Kit
Adjusting the Stop Brake Belt Tension As Required Maintenance
Technicia
n
No No
Replacing the FlexJet PCA Control As Required Maintenance
Technicia
n
No No
* Calibration is required. Refer to the Calibration Table section.

Page 13
FlexJet Head Assembly T47541109 Rev. J
TECHNICAL PUBLICATIONS
This Document Supports Assembly 47541109 Rev. F
Preventive Maintenance
The following procedures should be performed regularly as prescribed in the
table below. All references to hours in the Recommended Frequency column
are equivalent to hours of machine use.
Maintenance Procedures Recommended
Fre
q
uenc
y
Minimum Skill
Re
q
uire
d
Spares Kit
Re
q
uire
d
Universal Tool Kit
Re
q
uire
d
Verifying the Vacuum Level 160 Hours Maintenance
Technicia
n
No Platform Tool Kit
Verifying Air Kiss 160 Hours Maintenance
Technicia
n
No No
Inspecting the Theta- and Z-Motor Belts 160 Hours Maintenance
Technicia
n
No No
Verifying the Touch-Down Sensors 160 Hours Maintenance
Technician No No
Cleaning the Pin Mirrors * 160 Hours Maintenance
Technicia
n
No FlexJet Tool Kit
Comprehensive Head Maintenance * Head is Removed or
1000 Hour
s
Maintenance
Technicia
n
No FlexJet Tool Kit
* Calibration is required. Refer to the Calibration Table section.
Procedures for Universal Instruments Field-
Service Engineers
The following procedures are intended for Universal Instruments Field-
Service Engineers only. These procedures should be performed as required
to ensure proper functioning of the FlexJet Head.
Maintenance Procedures Recommended
Frequenc
y
Minimum Skill
Require
d
Spares Kit
Require
d
Universal Tool Kit
Require
d
Replacing the Stop Brake Belt * As Required Universal Field
Service En
g
inee
r
No No
Replacing the Z Stop Brake Assembly * As Required Universal Field
Service En
g
inee
r
No No
Replacing a Spindle Touch-Down Sensor* As Required Universal Field
Service En
g
inee
r
No FlexJet Tool Kit
Replacing a Spindle Assembly * As Required Universal Field
Service En
g
inee
r
No FlexJet Tool Kit
Replacing a Clutch * As Required Universal Field
Service En
g
inee
r
No FlexJet Tool Kit
Replacing a Manifold Tubing As Required Universal Field
Service En
g
inee
r
Yes No
Replacing the Manifold Assembly As Required Universal Field
Service Engineer No No
Replacing a Fiber Optic Cable * As Required Universal Field
Service Engineer No FlexJet Tool Kit
Replacing a Spindle Drive Belt * As Required Universal Field
Service Engineer No FlexJet Tool Kit
* Calibration is required. Refer to the Calibration Table section.

Page 14
T47541109 Rev. J FlexJet Head Assembly
TECHNICAL PUBLICATIONS
This Document Supports Assembly 47541109 Rev. F
Calibration Table
The following table lists maintenance procedures which require calibrations
after completing the maintenance. Refer to the Calibration, CPE, and
Measurement manual when performing the calibrations required to help
ensure that the component placements are within specifications. (CPE means
Calibration Placement Enhancement.)
Maintenance Procedure Calibrations Required After Maintenance
Installing a FlexJet Head
• Perform Machine Calibration and Calibration Placement
Enhancement (CPE) for a new head installation.
• Perform CPE for an installation to the previous location of the
head.
Replacing/Aligning a Coupler Body CPE
Adjusting the Spindle Drive Belt Tension Spindle Height Calibration and CPE
Setting the Touch-Down Sensors Spindle Height Calibration
Cleaning the Pin Mirrors Spindle Height Calibration
Comprehensive Head Maintenance Spindle Height Calibration, Mirror Calibration, and CPE
Replacing the Stop Brake Belt CPE
Replacing the Z Stop Brake Assembly CPE
Replacing a Spindle Touch-Down Sensor Spindle Height Calibration and CPE
Replacing a Spindle Assembly Machine Calibration and CPE
Replacing a Clutch Spindle Height Calibration, Mirror Calibration, and CPE
Replacing a Fiber Optic Cable Spindle Height Calibration
Replacing a Spindle Drive Belt Spindle Height Calibration and CPE

Page 15
FlexJet Head Assembly T47541109 Rev. J
TECHNICAL PUBLICATIONS
This Document Supports Assembly 47541109 Rev. F
Prerequisite Information
• Refer to the Prerequisite Information and Introduction module for
Adhesive and Lubricant icon information and definitions.
Use Electro-Static Discharge (ESD) precautionary measures when
maintaining, adjusting, or repairing the platform machine and the
FlexJet Head.
Acronyms
The following acronyms are used frequently in this module.
• GSM - General Surface Mount
• UPS - Universal Platform Software
• CPE - Calibration Placement Enhancement
• OTH - On The Head (Camera)
• PC - Printed Circuit (Board)
• SMT - Surface Mount Technology
• ESD - Electro Static Discharge
• PEC - Pattern Error Correction (Camera)
• CCD - Charge Coupled Device
• INTF - Interface
• LED - Light Emitting Diode
Table of contents