manuals.online logo
Brands
  1. Home
  2. •
  3. Brands
  4. •
  5. Ultimate Support
  6. •
  7. Indoor Furnishing
  8. •
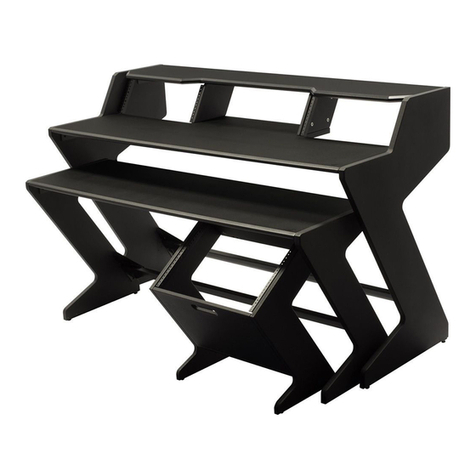
  9. Ultimate Support Nucleus-Z Explorer User manual

Ultimate Support Nucleus-Z Explorer User manual

Nucleus-Z Explorer Parts - BOX 1 & 2
Desk Z-Leg - Left x1
Desk Z-Leg - Right x1
Desk Secondary Support - Left x1
Desk Secondary Support - Right x1
Desk Secondary Surface x1
Desk Main Surface x1
Main Surface Stiffener x1
Cable Tray x1
4 space rack rail x4
Cam Pin x6
Cam Lock x6
Dowel Rod x6
Pan Head Wood Screw - #8 X .75"x67
Pan Head Wood Screw - #8 X 5/8"x8
Bracket x6
Leg Leveler x4
Desk Spreader Bar x1
Instructions for
Assembling Nucleus-Z Explorer
Please check to see you have all parts before starting.
Once all parts are conrmed begin assembly.
970.776.1920 . www.ultimatesupport.com
Copyright 2018, Ultimate Support Systems . All Rights Reserved
Page 2
Lay main desk work surface down
with groove and holes facing up. In
groove place main surface stiffener,
the u-shape Stiffener will fit inside
the desk groove. Use ten pan head
wood screws (#8 X .75") to attach.
Place cable tray on the back of the
main desk surface. Make sure the
large holes on the cable tray are
facing up. Large holes will be closest
to the main surface stiffener. The
opening on the cable tray will point
in the opposite direction. Use five
pan head wood screws (#8 X .75")
to attach.
Lay both Z-legs down with holes
facing up. Attach three brackets to
each of the z-legs. Use three pan
head wood screws (#8 x 75") for
each bracket. At the base of each
z-leg attach leg levelers. Use two
pan head screws (#8 x 75") for each
of the leg levelers.
NOTE:
There are only two holes for each leg
leveler on the z-legs, so not all four
holes on the leg leveler will be used.
Make sure holes on the z-legs line
up with the holes on the leg levelers.
Cable TrayMain Desk Surface
Main Surface Stiffener
Pan Head Wood
Screw (#8 X .75")
Desk Z-Leg
(Left)
Desk Z-Leg
(Right)
Brackets
Pan Head Wood
Screws (#8 x .75")
Leg Levelers
Stand up main desk surface with
cable tray at the top. Stand up left
z-leg, making sure the single bracket
for the desk secondary surface is
at the top. Line up the two brackets
on the left z-leg with the six holes
on the left side of the main desk
surface. Use pan head wood screws
(#8 X .75") to attach left z-leg to
main desk surface. Repeat this with
the right z-leg
Main Desk Surface
Left Z-Leg
Six Hole on
Left Side Pan Head Wood
Screws (#8 x .75")
Cable Tray
Single
Bracket
for Desk
Secondary
Surface
Page 3
While the desk is still laying down,
attach desk spreader bar to both
z-legs. Line up spreader bar with
z-leg holes. Use 4 pan head wood
screws (#8 X .75") on each side.
Main Desk Surface
with Z-Legs
Pan Head Wood
Screws (#8 x .75")
Desk Spreader Bar
Main Desk Surface
Dowel Rods
Cam Pins
On the back end of the main desk
surface find the small holes and
screw in cam pins. In the larger
holes push in dowel rods.
Main Desk Surface
Cam Locks
Desk Secondary
Support (Right)
Cam Pins
Dowel Pins
Slide the desk secondary supports
onto the dowel rods and cam pins.
Place screw driver into cam lock and
turn clock wise to lock cam
pins in place. (2 each, 4 total)
NOTE:
If secondary supports are not
sliding into place, check cam
locks. You may need to
turn them counter clockwise
for cam pin to fall into
place, then turn clock-wise
to lock into place.
Page 4
Pan Head Wood
Screws (#8 x 5/8")
4 Space
Rack Rail
Desk Secondary
Surface
Desk Secondary
Surface (Turned Over)
Cam Pin
Dowel Rods
Main Desk Surface Pan Head Wood
Screws (#8 x .75")
Desk Secondary
Supports
Lay the desk secondary surface on
it’s back. Groove and holes should
be facing up. Find the small holes
and screw in cam pins. In the larger
holes push in dowel rods.
Turn over desk secondary surface
and slide it onto desk secondary
supports. Place screw driver into
cam lock and turn clock wise to lock
cam pins in place. (1 each, 2 total)
Use pan head wood screws (#8 x
.75") to attach secondary surface
to legs
NOTE:
If secondary supports are not
sliding into place, check cam
locks. You may need to
turn them counter clockwise
for cam pin to fall into
place, then turn clock-wise
to lock into place.
In the two side gaps between the
main and secondary desk surfaces,
screw in the rack rails (4 Space)
on either side. Use the shorter pan
head wood screws (#8 X 5/8")
to attach.

This manual suits for next models

1

Other Ultimate Support Indoor Furnishing manuals

Ultimate Support Nucleus-Z Navigator 18116 Installation guide

Ultimate Support

Ultimate Support Nucleus-Z Navigator 18116 Installation guide

Popular Indoor Furnishing manuals by other brands

Regency LWMS3015 Assembly instructions

Regency

Regency LWMS3015 Assembly instructions

Furniture of America CM7751C Assembly instructions

Furniture of America

Furniture of America CM7751C Assembly instructions

Safavieh Furniture Estella CNS5731 manual

Safavieh Furniture

Safavieh Furniture Estella CNS5731 manual

PLACES OF STYLE Ovalfuss Assembly instruction

PLACES OF STYLE

PLACES OF STYLE Ovalfuss Assembly instruction

Trasman 1138 Bo1 Assembly manual

Trasman

Trasman 1138 Bo1 Assembly manual

Costway JV10856 manual

Costway

Costway JV10856 manual

moss DESIGN Caisson Credenza Assembly instructions

moss DESIGN

moss DESIGN Caisson Credenza Assembly instructions

Aquaglide FULL DECK 15.0 owner's manual

Aquaglide

Aquaglide FULL DECK 15.0 owner's manual

AREBOS AR-HE-SW30 user manual

AREBOS

AREBOS AR-HE-SW30 user manual

Till-Hilft Fulda 87005.330 Assembly instructions

Till-Hilft

Till-Hilft Fulda 87005.330 Assembly instructions

Twoey Outside 2010 quick start guide

Twoey Outside

Twoey Outside 2010 quick start guide

Hettich Easys 200 operating instructions

Hettich

Hettich Easys 200 operating instructions

The bedboss RELAX 404 Series owner's manual

The bedboss

The bedboss RELAX 404 Series owner's manual

Oeseder Möbelindustrie Bern 991 720 Assembly instructions

Oeseder Möbelindustrie

Oeseder Möbelindustrie Bern 991 720 Assembly instructions

Costway HW68469 user manual

Costway

Costway HW68469 user manual

Next ALIX A27743 Assembly instructions

Next

Next ALIX A27743 Assembly instructions

BROSA Hans Assembly guide

BROSA

BROSA Hans Assembly guide

Prodigg MINIKA PBA015T-FUR installation manual

Prodigg

Prodigg MINIKA PBA015T-FUR installation manual

manuals.online logo
manuals.online logoBrands
  • About & Mission
  • Contact us
  • Privacy Policy
  • Terms and Conditions

Copyright 2025 Manuals.Online. All Rights Reserved.