Ultradent Products VALO GRAND User manual

CORDED BROADBAND LED CURING LIGHT


3
1. Product Description
With its broadband spectrum, VALO Grand Corded is designed to polymerize all light cured products in the wavelength range of 385-515nm per ISO 10650.
VALO has a medical grade, international power supply and is suitable for power outlets from 100 to 240 volts. The handpiece is designed to rest in a standard dental unit bracket or can
be custom mounted using the bracket included with the kit.
Product Components:
• 1 – VALO Grand Corded curing light with 7-foot / 2.1-meter cord
• 1 – 9-volt, medical grade, international power supply with 6-foot / 1.8-meter cord and universal plugs
• 1 – VALO Barrier Sleeve sample pack
• 1 – Amber colored safety glasses
• 1 – Curing light surface mounting bracket with double stick adhesive tape
Overview of Control:
(Top)(Bottom)
Power Button
Photo Legend
Time/Mode Change Button
Mode/Status Light
Timing Interval Lights
The manufacturer accepts no liability for any damage resulting from the improper use of this unit and/or for any purpose other than those covered by these instructions.
For all products described, carefully read and understand all instructions and SDS information prior to use.
2. Indications for Use/Intended Purpose
The source of illumination for curing photo-activated dental restorative materials and adhesives.
3. Warnings and Precautions
Risk Group 2
CAUTION UV emitted from this product. Eye or skin irritation may result from exposure. Use appropriate shielding.
CAUTION Possibly hazardous optical radiation emitted from this product. Do not stare at operating lamp. May be harmful to the eyes.
• DO NOT look directly into the light output. Patient, clinician, and assistants should always wear amber colored UV eye protection when VALO is in use.
• To prevent the risk of electric shock, no modification of this equipment is allowed. Use only the included Ultradent VALO power supply and plug adapters. If these components
are damaged, do not use and call Ultradent Customer Service to order a replacement.
• Portable RF communications equipment may degrade performance if used closer than 30 cm (12 in”).
• Use only authorized accessories, cables, and power supplies to prevent improper operation, increased electromagnetic emissions or decreased electromagnetic immunity (refer
to Electromagnetic Emissions section).
• To prevent the risk of thermal irritation or injury, avoid back-to-back curing cycles and do not expose oral soft tissues at close proximity for more than 10 seconds in any mode. If
longer curing times are required, use multiple shorter curing cycles or use a dual-cure product to avoid heating soft tissue.
• Use caution when treating patients who suer from adverse photobiological reactions or sensitivities, patients who are undergoing chemotherapy treatment, or patients being
treated with photosensitizing medication.
• This unit may be susceptible to strong magnetic or static electric fields, which could disrupt the programming. If you suspect this has occurred, unplug the unit momentarily and
then re-plug it into the outlet.
• DO NOT wipe down the VALO curing light with caustic or abrasive cleaners, autoclave, or immerse in any kind of ultrasonic bath, disinfectant, cleaning solution, or liquid. Failure
to follow included processing instructions may render device inoperable.
• To help prevent cross contamination and help keep dental composite material from adhering to the surface of the lens and wand body, a barrier sleeve must be used over the
VALO with each use.
• To prevent the risk of cross-contamination, barrier sleeves are single patient use.
• To reduce the risk of corrosion, remove barrier sleeve after use.
• To reduce the risk of under-cured resins, do not use curing light if lens is damaged.
VALOTM GRAND Corded
Curing Light EN

4
4. Stepwise Instructions
Preparation
1. Connect the 9-volt power cord to the handpiece cord.
2. Plug the power cord into any electrical outlet (100-240 VAC). The curing light handpiece will beep twice when powering on, and the timing lights will illuminate indicating the
light is ready for use.
3. Place the curing light into a standard dental unit mounting bracket or accessory mounting bracket until ready for use.
4. Prior to each use, place a new barrier sleeve over the curing light.
Installing Hygienic Barrier Sleeves:
The hygienic barrier sleeve is custom fitted to the curing light and keeps the surface of the curing light clean. The barrier sleeve helps prevent cross contamination, helps keep dental
composite material from adhering to the surface of the lens and curing light, and prevents discoloration and corrosion from cleaning solutions.
Note:
• Using the hygienic barrier sleeve will reduce the light output by 5-10%. Due to the high output power of the curing light, curing has been shown to be substantially equivalent.
• The curing light must be cleaned and sanitized with appropriate cleaning and/or sanitizing agents after each patient. See section titled Processing.
Use 1. Each power mode is used for the curing of dental materials with photo initiators. See Quick Mode Guide for recommended curing times.
NOTE: The curing light is programmed to cycle from the Standard Power to the High-Power Plus to the Xtra Power mode in sequence. For example, to change from the Standard
Power mode to the Xtra Power mode, it is necessary to cycle into the High-Power Plus mode and then to the Xtra Power mode.
2. The curing light stores the most recently used timing interval and mode, and it will default back to this whenever the modes are changed or if the batteries are removed.
Operation
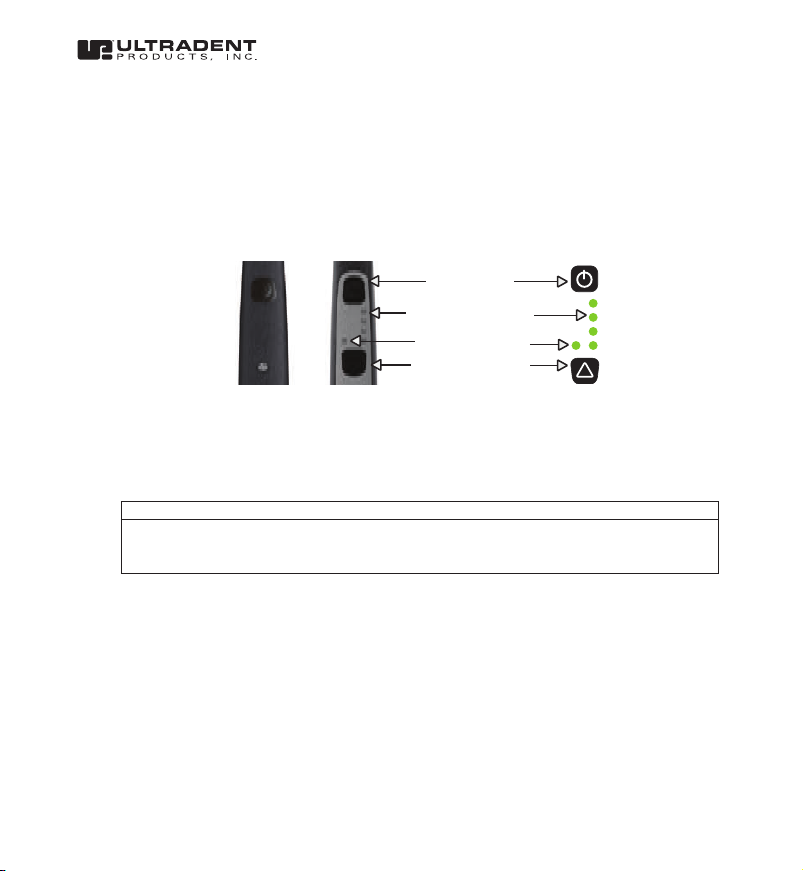
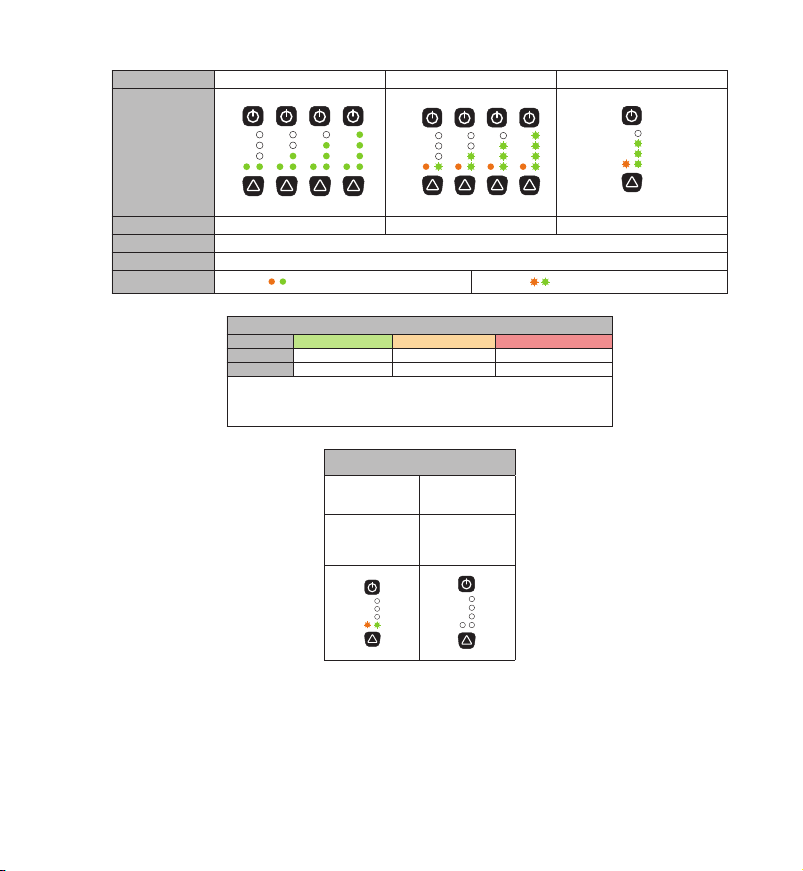
CURING MODE: Standard Power mode
TIMING INTERVALS: 5, 10, 15, 20 seconds.
• The curing light defaults to this mode when it is INITIALLY powered on. The Mode/Status Light will be green and the four green Timing Lights are illuminated, indicating
Standard Power mode.
• To change timing intervals, quickly press the Time/Mode Button.
• Press the Power Button to cure. To stop curing prior to completion of a timing interval, press the Power Button again.
CURING MODE: High Power Plus mode
TIMING INTERVALS: 1, 2, 3, 4 seconds.
• From Standard Power mode, press and hold the Time/Mode Change Button for 2 seconds and release. The Mode/Status Light will be orange, and the four green Timing Lights
will illuminate and flash, indicating High Power mode.
• To change timing intervals, quickly press the Time/Mode Button.
• Press either Power Button to cure. To stop curing prior to the completion of a timing interval, press either Power Button again.
• To return to Standard Power mode, press and hold the Time/Mode Change Button for 2 seconds and release, this will cycle to Xtra Power mode. Press and hold again for 2
seconds, and release. The Mode/Status Light will be green and the four green Timing Lights are illuminated, indicating Standard mode.
CURING MODE: Xtra Power mode
TIMING INTERVAL: 3 seconds only (Note: The Xtra Power mode has a 2 second safety delay at the end of each curing cycle to limit heating during consecutive curing. At the end of the
delay, beeping indicates unit is ready for continued use).
• From Standard Power mode, press the Time/Mode Change Button for 2 seconds, release, press and hold again for 2 seconds, and release. The Mode/Status Light will be orange
and flash, and three of the green Timing Lights will illuminate and flash, indicating Xtra Power mode.
• Press the Power Button to cure. To stop curing prior to the completion of a timing interval, press the Power Button again.
• To return to the Standard Power mode, press and hold the Time/Mode Button for 2 seconds and release. The Mode/Status Light will be green and the green Timing Lights are
illuminated, indicating Standard Power mode.
Sleep Mode: The curing light will go into SLEEP mode after 1 hour of inactivity, as indicated by a slow flashing of the mode/status light. Pressing any button will wake up the curing light
and automatically return it to the last setting used.
Cleanup
1. Discard used barrier sleeves in standard waste after each patient.
2. See Processing Section.
Mounting Bracket Instructions
1. Bracket should be mounted to a flat, oil-free surface.
2. Clean surface with rubbing alcohol.
3. Peel backing o the bracket’s adhesive tape.
4. Position bracket so the curing light lifts upward when removed. Press firmly into place.

5
Quick Mode Guide:
Mode Standard Power High Power Plus Xtra Power
Power Button
Mode/Timing LEDs
Time Buttons
.
Time Options 5s 10s 15s 20s 1s 2s 3s 4s 3s Only
To Change Time Press and release Time Button quickly to cycle through time options.
To Change Modes Press and hold Time Button for 2 seconds and release. VALO GRAND Corded will cycle to next Mode.
Legend Solid LEDs Blinking LEDs
Quick Curing Guide:
Recommended Curing Times for Optimal Results with VALO GRAND Corded
Mode Standard Mode High Power Plus Mode Xtra Power Mode
Per Layer One 10 second cure Two 4 second cures One 3 second cure
Final Cure Two 20 second cures Three 4 second cures -Two 3 second cures
Note: Exposure settings and times may need to be adjusted due to composite reactivity, shade,
distance from the light lens to the composite, and depth of composite layer. It is up to the dental
professional to know the requirement for the material they are using to determine the adequate
time and settings.
Quick Warning Guide:
Warnings
Call Customer Service
for Repair Call Customer Service
for Repair
• No sound
• Flashing, 2 seconds
• Allows operation
• Continuous 3 beeps
• Prohibits opera-
tions
Other manuals for VALO GRAND
3
Table of contents
Languages:
Other Ultradent Products Lighting Equipment manuals