UltraHD 20162 User manual

SC200820
ASSEMBLY INSTRUCTIONS
UltraHD® Tall 30 in. Storage Cabinet (Model No. 20162, 20163)
30 in. W X 18 in. D X 72 in. H
(76.2 cm x 45.72 cm x 1.83 m)
Granite Graphite
Reference page 13 for special care
and maintenance of stainless steel
Includes Engineered
Nylon Anchors for quick
assembly

Includes Engineered
Nylon Anchors for
quick assembly
Includes Engineered
Nylon Anchors for
quick assembly
#63
#63
1

“Quick assembly”
Includes Engineered
Nylon Anchors for
quick assembly
#63
#63
2

(#1-A) Left Side Panel
(#2-A) Right Side Panel
(#6-A) Left Door
(#7-A) Right Door
3

(#4) Bottom Panel x 1 PC
(#5) Middle Shelf x 3 PCS
(#3) Top Panel x 1 PC
(#2-A2) Right Side - Bottom Panel x 1 PC
PARTS LIST
Please check the parts carefully according to the parts list. If you are missing any parts, please contact our
customer service department. (Please refer to page 14.)
(#1-A3) Side Panel Reinforcement Connection Part x 2 PCS
(#2-A1) Right Side - Upper Panel x 1 PC
(#1-A1) Left Side - Upper Panel x 1 PC
(#1-A2) Left Side - Bottom Panel x 1 PC
4

(#6-A1) Left Door - Upper Panel x 1 PC
(#6-A2) Left Door - Bottom Panel x 1 PC
(#7-A3) Key Rod x 1 PC
(#6-A3) Door Panel Connection Part x 2 PCS
(#7-A2) Right Door - Bottom Panel x 1 PC
(#9) Middle Back Panel x 2 PCS
PARTS LIST
Please check the parts carefully according to the parts list. If you are missing any parts, please contact our
customer service department. (Please refer to page 14.)
(#7-A1) Right Door - Upper Panel x 1 PC
(#8) Upper Back Panel x 1 PC
5

(#16) Corner Protection - B x 2 PCS
(#22) Key x 2 PCS
(#23) Magnet x 2 PCS
PARTS LIST
Please check the parts carefully according to the parts list. If you are missing any parts, please contact our
customer service department. (Please refer to page 14.)
(#15) Corner Protection - A x 2 PCS
(#17) Middle Corner Protection x 2 PCS
(#21) Screwdriver x 1 PC
(#10) Bottom Back Panel x 1 PC
(#6) Leveling Feet x 4 PCS
6

(#41) Screw F (M4 x 8L) x 54 PCS
(#54) Screw N (M4 x 10L) x 28 PCS
(#63) Engineered Nylon Anchor x 25 PCS
(#25) Wrench x 1 PC
(#34) Hook x 12 PCS
Included for quick assembly
(#53) Screw L (M4 x 6L) x 1 PC
(#52) Screw K (M5 x 10L) x 8 PCS
(#42) Screw G (M4 x 30L) x 12 PCS
7
PARTS LIST
Please check the parts carefully according to the parts list. If you are missing any parts, please contact our
customer service department. (Please refer to page 14.)

(#55-A) Wall Anchor x 2 PCS
(#27) WASHER (M4) x 2 PCS
(#27-B) WASHER (M8) x 2 PCS
(#61) Screw O (M4 x 12L) x 2 PCS
(#60) Mounting Strap x 2 PCS
(#55) Screw M (M6 x 50L) x 2 PCS
M8X20 pcs
8
PARTS LIST
Please check the parts carefully according to the parts list. If you are missing any parts, please contact our
customer service department. (Please refer to page 14.)

TIP:
WARNING:
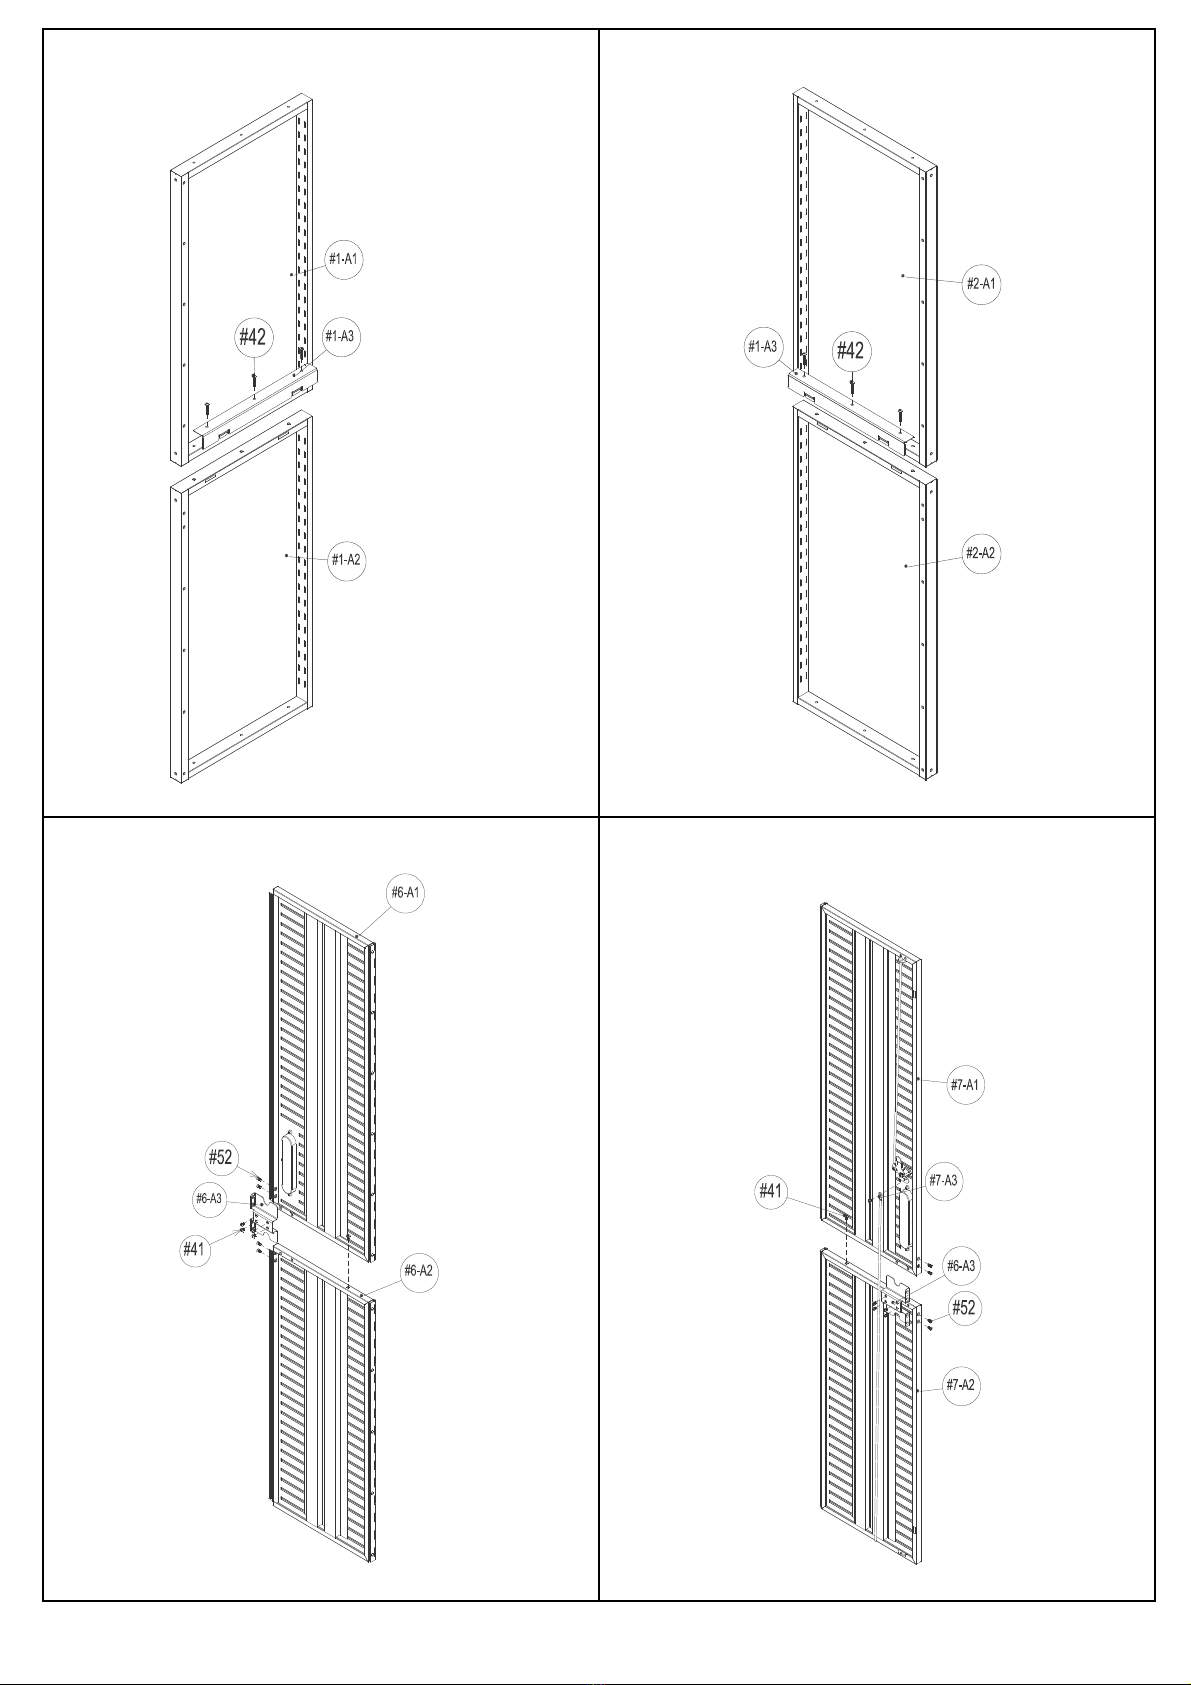
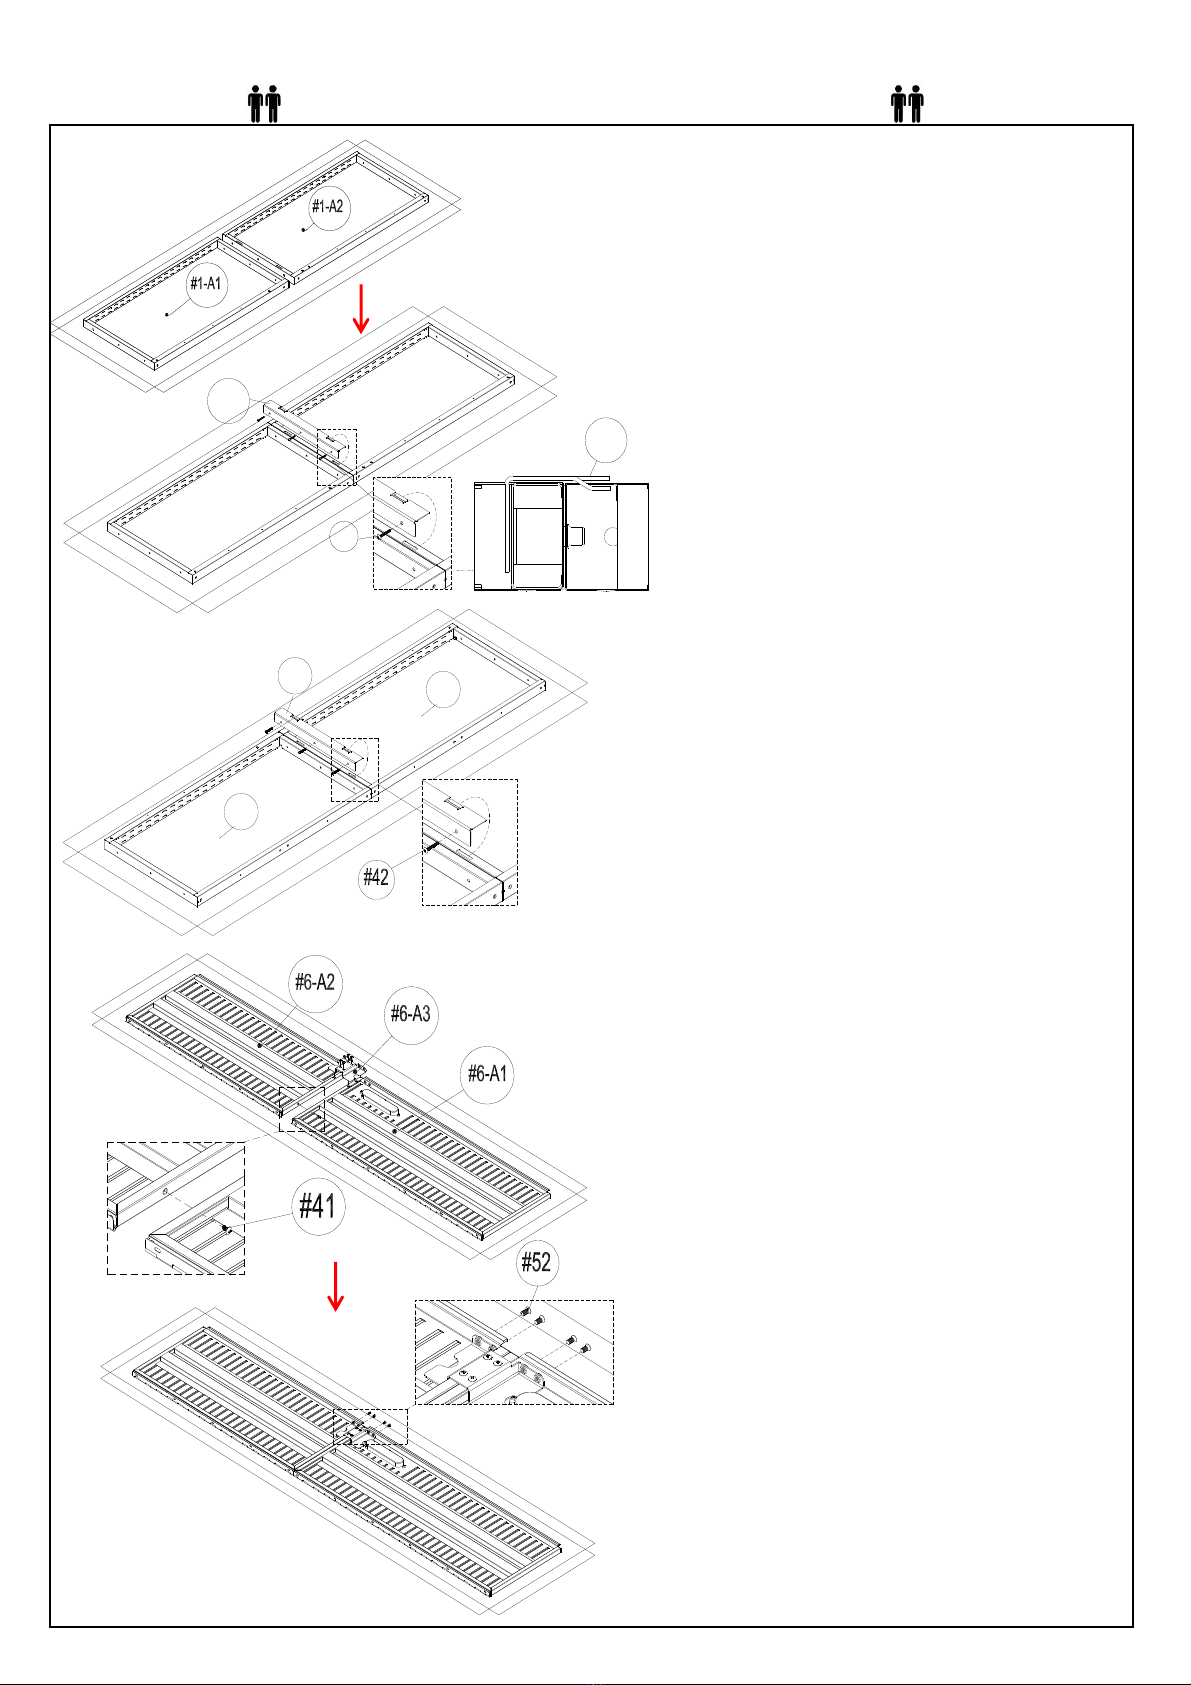
Step 1: Install Left Side Panel (#1-A)
Note:
Step 2: Install Right Side Panel (#2-A)
Step 3: Install Left Door (#6-A)
Note:
Repeat Step 1, use Right Side Upper Panel (#2-A1),
Right Side Bottom Panel (#2-A2), Side Panel
Reinforcement Connection Part (#1-A3), and 3 pcs
Screw G (#42) to install Right Side Panel (#2-A).
Make sure the Left Door - Upper Panel (#6-A1) is
flushed with Left Door - Bottom Panel (#6-A2).
1). Place Left Door - Upper Panel (#6-A1) and Left Door
- Bottom Panel (#6-A2) together, line up screw holes,
use 1 pc Screw F (#41) to tighten from the side.
2). Place the Door Panel Connection Part (#6-A3) over
the touching sides, line up the screw holes, use 4 pcs
Screw F (#41) to tighten from the top, and use 4 pcs
Screw K (#52) to tighten from outside edge.
A magnetic screwdriver is included for your
convenience. If using a power screwdriver,
keep toruqe setting on LOW during assembly.
Make sure the Left Side Upper Panel (#1-A1) is flushed
with Left Side Bottom Panel (#1-A2) .
Place the Left Side - Upper Panel (#1-A1) and Left Side
- Bottom Panel (#1-A2) together. Insert the Side Panel
Reinforcement Connection Part (#1-A3) into the slot of
the Left Side - Upper Panel. Use 3 pcs of Screw G (#42)
to tighten from the top side.
Some parts may have sharp edges. To avoid injury,
wearing gloves is recommended during assembly.
#1-A3
#42
#1-A3
#2-A1
#2-A2
#2-A3
9
UltraHD® Tall 30 in. Storage Cabinet (Model No. 20162, 20163)
*NOTE: We recommend using TWO people to assemble the cabinet.

Step 4:
Install Right Door (#7-A)
Note:
Step 5: Install Key Rod (#7-A3)
Step 6:
Note:
Step 7:
Note:
Attach Bottom Panel (#4) to Left Side Bottom Panel
(#1-A2) and Right Side Bottom Panel (#2-A2), line up
screw holes, use 6 pcs Screw G (#42) to tighten.
Before tightening screws, make sure the bottom
corners of Left Side Bottom Panel and Right Side
Bottom Panels (#1-A2, #2-A2) are completely flushed
with the back and front corners of Bottom Panel (#4).
Before tightening screws, make sure the bottom
corners of Left Side Upper Panel (#1-A1) and Right Side
Upper Panels (#2-A1) are completely flushed with the
back and front corners of Top Panel (#3).
Attach Top Panel (#3) to Left Side Upper Panel (#1-A1)
and Right Side Upper Panel (#2-A1). Make sure the
front of the panel faces downward. Line up screw holes,
use 6 pcs Screw F (#41) to tighten.
Repeat Step 3, use Right Door - Upper Panel (#7-A1),
Right Door - Bottom Panel (#7-A2), Door Panel
Connection Part (#6-A3). Use 1 pc Screw F (#41) to
tighten the touching sides, use 4 pcs Screw F (#41) to
tighten from the top touching side, and 4 pcs Screw K
(#52) to tighten from outside edge.
Make sure the Right Door - Upper Panel (#7-A1) is
flushed with Right Door - Bottom Panel (#7-A2).
Attach and insert Key Rod (#7-A3) into the bottom tab
hole of Right Door - Bottom Panel (#7-A2). Twist out the
pre-assembled Screw L (#53) on the key rod linkage
plate. Attach Key Rod (#7-A3) by lining up the screw
hole and tightening back in the Screw L (#53).
Install Top Panel (#3) to Left Side Upper Panel (#1-A1)
and Right Side Upper Panel (#2-A1)
Install Bottom Panel (#4) to Left Side Bottom Panel
(#1-A2) and Right Side Bottom Panel (#2-A2)
Back
Front
Back
Front
10
UltraHD® Tall 30 in. Storage Cabinet (Model No. 20162, 20163)
*NOTE: We recommend using TWO people to assemble the cabinet.

Step 8:
Install Back Panels (#8, #9 and #10)
NOTE:
Step 9: Install Leveling Feet (#6)
Note:
Step 10: Install Corner Protections (#15, #16 and #17)
1) Attach Corner Protection A, B (#15, #16) onto top
and bottom of the cabinet, use 20 pcs Screw N (#54)
to tighten.
2) Attach Middle Corner Protection (#17) to the
middle of Left Side Panel (#1-A) and Right Side Panel
(#2-A), use 8 pcs Screw N (#54) to tighten.
Rotate/Stand Storage Cabinet upright after this step.
Attach Leveling Feet (#6) to the four side corner of
Bottom Panel (#4). Use Wrench (#25) to tighten.
Wheels are not included with this unit, however there
are 4 screw holes built into Bottom Panel (#4) for
installation. Wheels can be purchased at
www.SevilleClassics.com (WEB128)
1) Attach Bottom Back Panel (#10) onto both bottom of
Left and Right Side Panels (#1-A2 and #2-A2) and Bottom
Panel (#4). Line up screw holes and use 8 pcs Screw F
(#41) in each corner hole to tighten.
2) Attach both Middle Back Panel (#9) above
Bottom Back Panel (#10) the same way. Place the groove
of the Middle Back Panel (#9) onto the top edge of the
Bottom Back Panel (#10). Use 8 pcs Screw F (#41) to
tighten each corner of the panel.
3) Use 8 pcs Screw F (#41) to install Upper Back Panel (#8)
the same way, with a screw in each corner of the panel.
4) Use 13 pcs of Engineered Nylon Anchors (#63) to
secure the back panels. Press the Engineered Nylon
Anchors into the rest of the holes on the back panels to
fasten.
Do not fully tighten Screw F before the
Engineered Nylon Anchors are secured.
Press the
Engineered Nylon
Anchors into the
holes to fasten
#21
#63
11
UltraHD® Tall 30 in. Storage Cabinet (Model No. 20162, 20163)
*NOTE: We recommend using TWO people to assemble the cabinet.

Step 11: Install Magnet (#23)
Step 12:
Step 13:
Place Magnet (#23) onto Top Panel (#3) and Bottom
Panel (#4) facing the front, use 4 pcs Screw F (#41) to
tighten.
Install Middle Shelves (#5)
1) Decide the height for each Middle Shelf (#5).
Place 1 pc of Hook (#34) into the hook slot where
each corner of shelf should be placed. Make sure the
hooks supporting each shelf are at same height.
Note: All Middle Shelves (#5) need a hook at each
corner to support it.
2) Place each Middle Shelf (#5) into cabinet and push
down onto Hooks (#34).
Install Left and Right Doors (#6-A) & (#7-A)
1) Attach Left Door (#6-A) to Left Side Panel (#1-A),
use 5 pcs Screw F (#41) and 6 pcs Engineered Nylon
Anchors (#63). Press the Engineered Nylon Anchors
into the holes to further secure the door panels.
Note: The screw holes on the door hinge have
tolerance, enabling the door to be adjusted and
centered in the door frame. Place top, middle and
bottom screws first. Don't tighten screws completely
- this may save time by avoiding having to make
slight adjustments for leveling door panels later.
2) Install Right Door (#7-A) the same way.
Press the
Engineered Nylon
Anchors into the
holes to fasten
#41
#63
12
UltraHD® Tall 30 in. Storage Cabinet (Model No. 20162, 20163)
*NOTE: We recommend using TWO people to assemble the cabinet.

Step 14: Install Mounting Strap (#60)
• Lightly wipe with warm water and clean microfiber
cloth
• Always wipe in the direction of the surface grain
(NEVER ACROSS)
• Wipe away excess water with dry clean cloth
UltraHD® Stainless Steel Care Instructions
The stainless steel is protected with UltraGuard®
fingerprint resistant finish.
DO NOT use traditional stainless-steel cleaners. To
safely manage unwanted fingerprints and prevent
new stains, perform the following steps once
monthly:
UltraHD® Tall 30 in. Storage Cabinet (Model No. 20162, 20163)
*NOTE: We recommend using TWO people to assemble the cabinet.
1) Remove 1 pc Screw F (#41) from the back corner
protection.
2) Attach the Mounting Strap (#60) to the back
Corner Protection brackets as the left photo shows
using Screw O (#61) and Washer (#27).
3) Drill a hole in the wall with a 5/16" drill bit, insert
the Wall Anchor (#55-A) into the hole.
4) Attach the other end of the Mounting Strap (#60)
to the wall using Screw M (#55) and Washer (#27-B).
Repeat steps A through D to install the other
mounting strap.
13
Installing Wheels (WEB128)
*Sold separately on SevilleClassics.com. Requires 2 pairs.
Step 1: Follow the previous instructions to Step 9.
DO NOT install Leveling Feet (#6).
Step 2: Install 2 pairs of wheels (WEB128) to the
bottom of the cabinet. Use screws included with
wheels to fasten.
WEB128

Seville Classics, Inc.
19401 Harborgate Way Torrance, CA 90501 USA
Telephone: (800) 323-5565 within USA
Fax: (310) 533-3899
Hours: 9:00am - 4:30pm (Pacific Standard Time)
E-mail: support@sevilleclassics.com
Website & Online Store: www.sevilleclassics.com
UltraHD® Tall Storage Cabinet UltraHD® Mega Storage Cabinet
Model No. 16236 (Granite) Model No. 16238 (Granite)
Model No. 20143 (Graphite)
Model No. 20148 (Graphite)
Model No. 20153 (Red) Model No. 20158 (Red)
Model No. 20133 (White)
CONTACT INFORMATION
If you are missing any parts, have any questions, or need additional assistance in assembly, please contact our
bilingual (English and Spanish) customer service department at:
***Please visit our website or call and inquire about our additional UltraHD Line***
UltraHD® Line
14

UltraHD® 4-Drawer Rolling Cabinet UltraHD® 6-Foot Height Adjustable Workbench
Model No. 20205 (Granite)
Model No. 20292 (Granite)
UltraHD® Wall Cabinet with Open Shelf UltraHD® 2-Door Rolling Workbench
Model No. 20230 (Granite) Model No. 20262 (Granite)
Model No. 20140 (Graphite) Model No. 20142 (Graphite)
Model No. 20150 (Red) Model No. 20152 (Red)
UltraHD® Rolling Trash Bin UltraHD® Lighted Workcenter
Model No. 20215
Model No. 20247 (Granite)
Model No. 20246 (Graphite)
Model No. 20157 (Red)
UltraHD® Line
This manual suits for next models
1
Table of contents
Other UltraHD Indoor Furnishing manuals