ULTTY SKJ-CR018H User manual

SKJ-CR018H
Bladeless Heater Fan
Please read and keep it before using the product.

Important Safety Information
1
When using electrical appliances, basic precautions should
always be followed to reduce the risk of fire, electrical shock
and injury to persons,including the following:
WARNING
1.This product is only suitable for indoor use and should not
be used outdoors;
2. Non-professional personnel or unauthorized repair
personnel may not repair or modify the machine by
themselves;
3. Before plugging in the power supply, please check if the
rated voltage matches the voltage in your home;
4. Keep at least 1.5 meters away from fire source or tinder, and
avoid direct sunlight;
5. It is forbidden to be used near objects that are flammable,
explosive, subject to heat, deformation, discoloration or
deterioration. It is forbidden to use in places with severe dust;
6. It is forbidden to replace the power switch by the method of
plugging (unplugging) the power cord plug;
7. To avoid overheating, it is forbidden to cover the heater;
8. It is strictly forbidden to insert any wire or other foreign
matter into any hole in the machine to avoid electric shock;
9. Do not use the heater against the power outlet or under the
power outlet; The power outlet should be placed behind the
fan when the heater is in use.
10. Do not share the socket with other high-power appliances.

11. Do not use this heater around the bathtub, spray head or
swimming pool;
12. This product must be equipped with a CE-approved fixed
socket that is consistent with the rated working current. Do
not use a mobile multi-purpose socket.
13. Fire risk when the heater is covered or incorrectly placed.
Do not use programmer or timer that can be automatically
connect the power supply.
14.If the heater fails, please turn off the power and unplug the
power cord immediately.
15. Before use, check the power cord and the plug. If the
power cord is damaged, in order to avoid danger, the user
must not disassemble or replace the power cord. It must be
replaced by the manufacturer's maintenance department or a
similar professional.
16. Children, elderly people or patients who have lost their
ability to take care of themselves should use this appliance
under the supervision of an adult to prevent accidents;

Product Name:
Rated voltage:
Rated power:1800W
Rated frequency:50/60Hz
Bladeless Heater Fan
220-240V~
Model:SKJ-CR018H
Cool mode Power:30W
Oscillating Angle:80°
Timier:1-8h
Basic Parameters
Product Description
2
Air outlet
Air duct
Body
Display
Air Inlet
Switch
Power button
Base Power Cable
Cover
This product uses PTC heating, send heats by hot air, which can
quickly increase room temperature. No open flame, safe, efficient
and energy saving.

Remote Introduction
3
①
②
③
④
⑤
⑥
⑦
⑧
⑨
Cool Mode Oscillating Air volume Air reduction
Warm Mode Strong Wind Timing Sleep Wind
Add Temperature Reduce temperature
Voice button

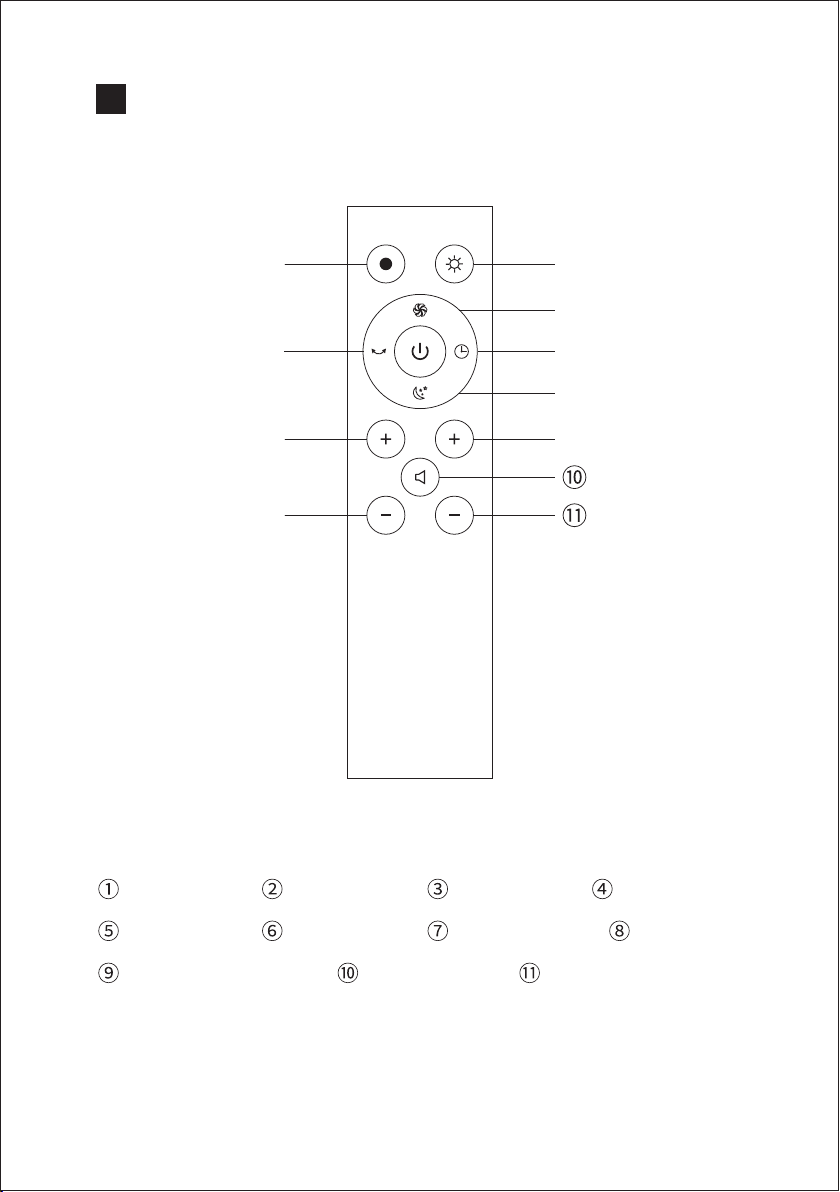
Press the timer button on the remote control to set 1 to 8 hours
of timing.
Press Sleepmode button on the remote control.
The display shows L and the wind speed become minimum.
Press again to exit the sleep mode.
(You can also exit the current mode by pressing the Wind Strength + button.)
Press Strongmode button on the remote control.
The display shows H and the wind speed become max.
Press again to exit the sleep mode.
(You can also exit the current mode by pressing the Wind Strength + button.)
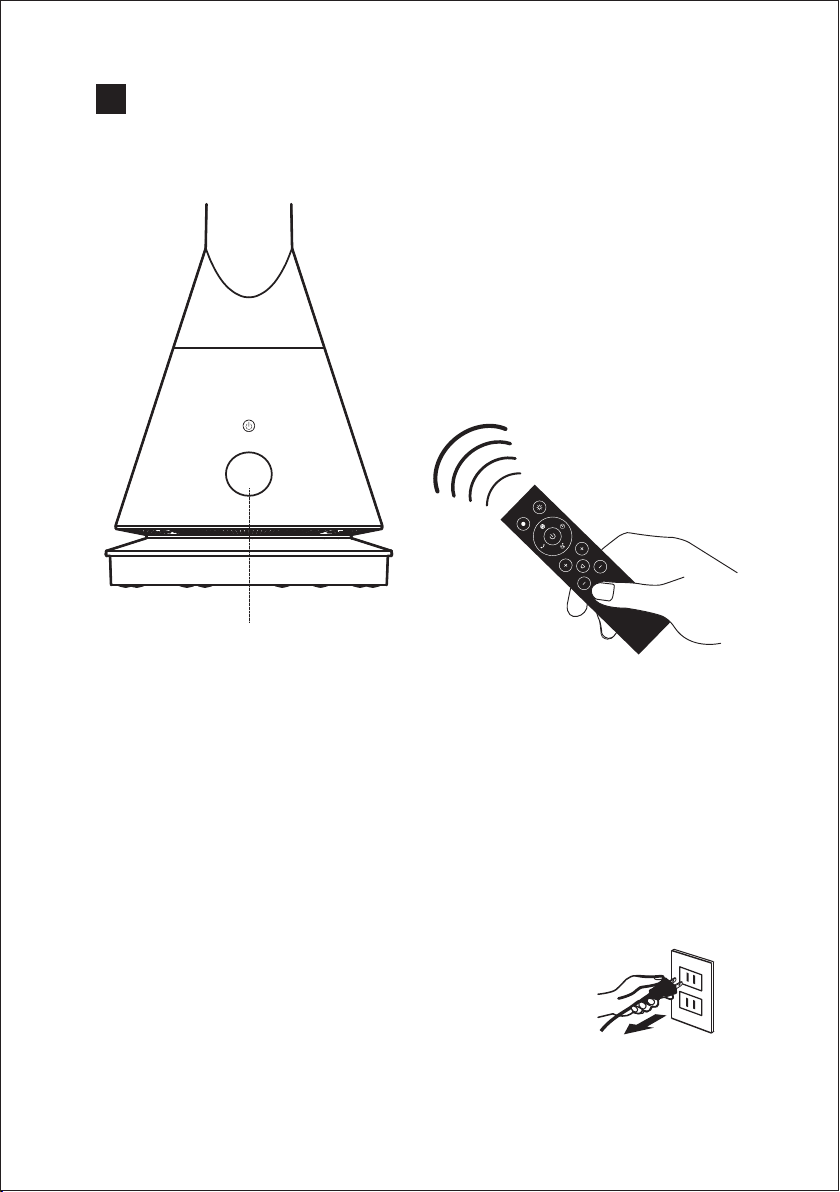
The device can be switched on and off by pressing the
"ON & OFF" button
Press the Oscillation button to turn on the oscillation function.
This fan can swing left and right 80.Press this button again to
stop oscillating.
Press the "+" button on the left side of the remote control
to increase the volume of air, press the "-" button on the
left side of the remote control to decrease the airflow.
Cool mode can be used for 9-level settings,
warm mode can be set for 4 levels.
In warm mode, press the temperature button on the right side
of the remote control to set the temperature. Note:this button
does not work in cool mode.
Press this button to activate the warm mode.
Note: In warm mode there is no strong mode and sleep mode.
Press this button to activate the cooling mode.
Note: The default start mode is the cooling mode.
Press button to turn off tone of fan.The fan cancel“didi"
sound.

Warning:
A phenomenon that occurs due to the overlap of the frequencies of the
remote control, in order to avoid misuse, please operate remotely:
1.This bladeless heater may react when using a remote device for other
appliances.
2.When using the remote control of this bladeless heater, other electrical
appliances may react.
The switch on remote will turn this fan to standby,
not complete shutdown. Use the switch on the main
unit to completely power off when this fan not in use.
If this fan not in use for a long time, please unplug the power cord.
The remote control should be
pointed at the remote control
signal receiver on the display
to maximize the remote control
signal.
Effective distance: 5M
Signal receiver
Remote Operation Introduction
4

Heating Mode Instructions
5
Press the warm mode button and the display shows the ambient
temperature.
Press temperature button to set the temperature, and the display
will flash digitally, which can be set to 1-30 °C.
Set temperature should be higher than the ambient temperature,
so that the heating function will be turned on;
When the ambient temperature reaches the set temperature, the
heating function will stop and keep run for 40s, then turn to
standby mode;
The ambient temperature is lower than the set temperature and
the heating function will automatically activate.
Ambient
Temperature
Set
Temperature
18℃20℃
Set temperature > ambient temperature: heating function on.
Set temperature ≤ ambient temperature: heating function stops
Note: The default setting temperature is 25 °C. In the warm mode,
when the ambient temperature is below 0 °C, the display only
shows 01, do not display negative temperature value. The warm
air mode run over 9 hours, the machine will automatically stop
running. Restart by pressing the host power button or by using the
remote control.
Warm mode: use remote to set temperature, host does not support this operation.

: Turn off
: Turn on
Power Button
Host
6
Inserte the plug into socket, turn on power switch and the
machine enters the standby state:
Click the power button of the host, the buzzer will prompt you to
click, and the fan will start running. Press and hold the power
button for 2 seconds, the buzzer will prompt you twice, and then
stop running after you release the hand.
Air Volume Shift
When host is in operation: click the main power button to switch
the air volume from 1 to 9. In warm mode the air volume can set
from 1 to 4.
Oscillating operation
Press and hold the power button for 1 second, the buzzer will
beep once and fan start oscillating.
Press and hold the power button for 1 second again, the buzzer
will beep once and fan stop oscillating.

Installation location and precautions
7
Location
Please place the fan in a horizontal position. If there is a slope,
should on a soft surface to avoid fan falling over; please do not use
in high temperature and humidity (bathroom, kitchen).
Do not cover,
high temperature!
Do not place anything
within 1 meter
keep distance
Safety System: this heater fan includes an overheat protection
sensor and an automatic fail-safe that cuts power to the unit if it's
accidentally tipped over or overheat. If this sensor is triggered,
unplug the machine and allow the fan cool. Check and remove any
obstructions before restarting the heater fan and be sure to place
them on a hard, level surface.

Machine Malfunction analysis
Malfunction phenomenon
Plug in the power but fan not work
Remote does not work
If the above method can't solve the malfunction, please connect with
ULTTY customer service, do not disassemble, repair and install it yourself.
Cause Analysis
IS the plug properly inserted into the socket?
The battery is dead?
Is the battery installed correctly?
Is the remote control aligned with the signal receiver?
8Battery installation method and troubles
hooting analysis
Please insert the battery correctly
battery cover
Battery installation method
1.Open the remote control
battery cover;
2. Load two new AAA (No. 7)
dry batteries;
3. Close the battery cover of
the remote control.

Please do not put the fan on the water or splash it,
which may cause the machine be damaged.
Do not use banana oil, benzine, alcohol, bleach or metal
objects to wipe the surface of the fan, which may cause
discoloration of the surface.
Unplug the power supply before performing maintenance.
Surface cleaning
Wipe the surface with a soft, dry cloth;
If especially dirty, dilute with a mild detergent and wipe with a soft cloth.
Then wipe with a dry soft cloth.
Air inlet/outlet
Use a soft brush or a vacuum cleaner to clean the
dust at the air inlet and outlet. Please clean it when
there is less dust. Too much dust is not healthy and
will reduce fan efficiency.
Remote contral
Gently wipe the surface of the remote with a soft,
dry cloth.
If you don't use it for a long time, avoid battery
consumption.
Please remove the battery inside the remote control.
Storage
Not used for a long time can be placed in a plastic bag after clean;
Please avoid vibration place(car trunk.) and electrical appliances with
cooling/heating functions;
Please avoid placing it in direct sunlight, high temperature and humidity;
Please keep out of reach of young children.
Maintenance and maintenance
9
Other manuals for SKJ-CR018H
1
Table of contents
Popular Fan manuals by other brands

Milwaukee
Milwaukee M18 AF Operator's manual

Emerson
Emerson CF875 owner's manual

Gree
Gree DUCT09HP230V1BD Installation & owner's manual

Fan-Tastic Vent
Fan-Tastic Vent 3300 Operation guide

Maico
Maico EHD Series Mounting and operating instructions

Turn of the century
Turn of the century SENECA 20306 owner's manual

NSA
NSA Antique DF-1214-BRZ instruction manual

Vent-Axia
Vent-Axia Lo-Carbon Scala Plus Series Installation and wiring instructions

Vent-Axia
Vent-Axia SOLO Plus Installation and wiring instructions

Hunter
Hunter 28543 Parts guide

Honeywell
Honeywell Glencrest user guide

Hunter
Hunter Windspan 59012 Owner's guide and installation manual