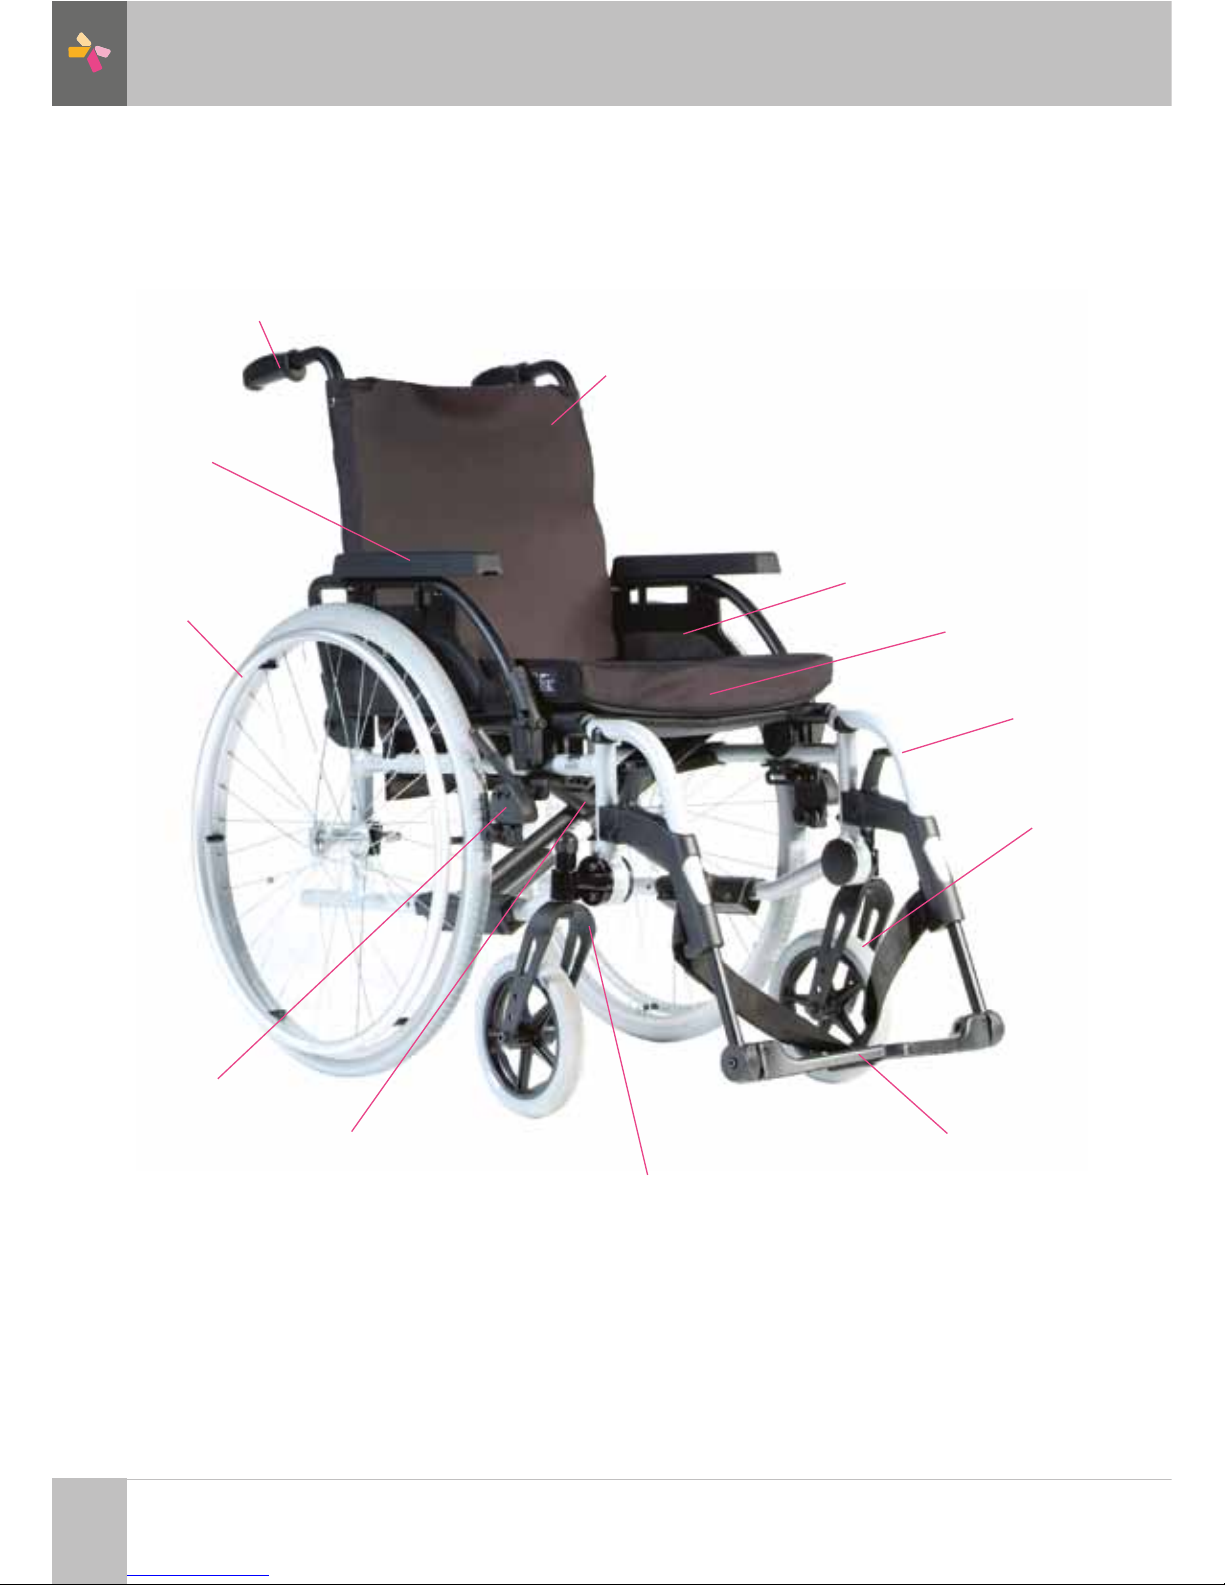
Unicare Health Breezy Basics2 Instruction Manual

Breezy Basics2
Instruction & Safety Manual
Please read this manual before operation, for
maintenance instructions and safe usage
The enabling power
of applied knowledge

1
Breezy Basics2Instruction & Safety Manual
T08 9351 7500 E[email protected] Wwww.unicarehealth.com.au
Introduction
We at Unicare Health have been awarded the ISO-9001 certifi cate, which affi rms the quality of our
products at every stage, from R & D to production. This products meet the requirements in accordance
with EC guidelines. Options or accessories shown are available at extra cost.
1. Push handles
2. Backrest upholstery
3. Sideguard
4. Seat sling
5. Footrest
6. Castors
7. Footplates
8. Castor Fork
9. Folding Frame
10. Wheel locks
11. Rear Wheel
12. Arm Pad
1
2
3
4
5
6
7
8
9
10
11
12

2
T08 9351 7500 E[email protected] Wwww.unicarehealth.com.au

3
Breezy Basics2Instruction & Safety Manual
T08 9351 7500 E[email protected] Wwww.unicarehealth.com.au

4
T08 9351 7500 E[email protected] Wwww.unicarehealth.com.au
Foreword
Dear Customer,
We are very happy that you have decided in favour of a high-quality Unicare Health product.
This user’s manual will provide numerous tips and ideas so that your new wheelchair can become a
trustworthy and reliable partner in your life.
We want you to be satisfi ed with our products and service. Unicare Health has been consistently working
at continuously developing its products, for this reason, changes can occur in our palette of products with
regard to form, technology and equipment. Consequently, no claims can be construed from the data or
pictures contained in this user’s manual. The management system of Unicare Health is certifi ed to ISO
9001, ISO 13485 and ISO 14001.
As the manufacturer, Unicare Health, declares that the wheelchairs conform to the 93/42/
EEC, amended by 2007/47/EC guideline.
In addition, they fulfi l the performance requirements for the “Crash Test” to ISO 7176-19.
Please contact your local, authorised Unicare Health dealer if you have any questions regarding the use,
maintenance or safety of your wheelchair.
Symbol Legend
IMPORTANT: DO NOT USE YOUR WHEELCHAIR UNTIL THIS MANUAL HAS BEEN
READ AND UNDERSTOOD.
DANGER!
Warning messages regarding possible risks of serious accident or death.
WARNING!
Warning messages regarding possible risks of injury.
CAUTION!
Warning messages regarding possible technical damage.
NOTE:
Information for operating the product.

5
Breezy Basics2Instruction & Safety Manual
T08 9351 7500 E[email protected] Wwww.unicarehealth.com.au
Table of Contents
Wheelchair Components 1-2
Foreword 4
Symbol legend 4
Contents 5
Use 6
Area of application 6
General safety notes and driving restrictions 7-9
Warranty 10
Transportability 11
Handling 15
Options – Step Tubes 16
Options - Brakes 16
Options - Footplates 17
Options - Castors 19
Options - Castor Adapter 20
Options - Backrest 20
Options – sideguard 22
Options – Anti-Tip Tubes 23
Options – Lap belt 25
Options – Seat depth 26
Options – Push handles 27
Options - Crutch holder 27
Options - Therapy Table 27
Options - Stabilising Bar 27
Options – Transit wheels 28
Name Plate 28
Tyres and mounting 30
Maintenance and care 30
Trouble shooting 31
Disposal / recycling of materials 31
Technical Data 35

6
T08 9351 7500 E[email protected] Wwww.unicarehealth.com.au
Use
Light-weight wheelchairs are exclusively for a user who is unable to walk or has limited mobility, for their
own personal use in- and outdoor on dry, fi rm and level surface terrains (self propelling or
attendant push).
The maximum weight limit (includes both the user and any weight of accessories fi tted to the wheelchair)
is marked on the serial number label, which is affi xed to the crossbar or stabiliser bar below the seat.
Warranty can only be taken on if the product is used under the specifi ed conditions and for the intended
purposes. The intended lifetime of the wheelchair is 5 years. DO NOT use or fi t any 3rd party components
to the wheelchair unless they are offi cially approved by Unicare Health. Symbol legend
Area of application
The engineering and construction of this wheelchair has been designed to provide maximum safety.
International safety standards currently in force have either been fulfi lled or exceeded in parts.
Nevertheless, users may put themselves at risk by improperly using their wheelchairs. For your own
safety, the following rules must be strictly observed.
Unprofessional or erroneous changes or adjustments increase the risk of accident. As a wheelchair user,
you are also part of the daily traffi c on streets and pavements, just like anyone else. We would like to
remind you that you are therefore also subject to any and all traffi c laws
Be careful during your fi rst ride in this wheelchair. Get to know your wheelchair.
Before each use, the following should be checked:
• Fixed axles or Quick-release axles on the rear wheels.
• Velcro on seats and backrests
• Tyres, tyre pressure and wheel locks.
Before changing any of the adjustments of this wheelchair, it is important to read the corresponding
section of the user’s manual. It is possible that potholes or uneven ground could cause this wheelchair
to tip over, especially when riding uphill or downhill. When riding forwards over a step or up an incline,
the body should be leaning forward.

7
Breezy Basics2Instruction & Safety Manual
T08 9351 7500 E[email protected] Wwww.unicarehealth.com.au
DANGER!
•
• NEVER exceed the maximum load of 125 kg for user
plus any items carried on the wheelchair. If you exceed
the maximum load, this can lead to damage to the
chair, or you may fall or tip over, lose control and may
lead to serious injury of the user and other people.
• When it is dark, please wear light clothing or clothing
with refl ectors, so that you can be seen more easily.
Make sure that the refl ectors on the side and back of
the wheelchair are clearly visible.
• We would also recommend that you fi t an active light.
• To avoid falls and dangerous situations, you should fi rst
practice using your new wheelchair on level ground
with good visibility.
• When getting on or off the wheelchair, do not use the
footboards.
• These should be fl ipped up beforehand and swung to
the outside as far as possible. Always position yourself
as close as possible to the place where you wish to
transfer to.
• Only use your wheelchair with care. For example, avoid
travelling against an obstacle without braking (step,
kerb edge) or dropping down gaps.
• The wheel locks are not intended to stop your wheelchair
in motion. They are only there to ensure that your wheelchair does not begin rolling unintentionally.
When you stop on uneven ground, you should always use the wheel locks to prevent unintended
movement. Always apply both wheel locks; otherwise, your wheelchair could tip over.
• Explore the effects of changing the centre of gravity on the behaviour of the wheelchair in use, for
example on inclines, slopes, all gradients or when overcoming obstacles. Do this with the secure
aid of a helper.
• With extreme settings (e.g. rear wheels in the most forward position) and less than perfect posture,
the wheelchair may tip over even on a level surface.
• Lean your upper body further forward when going up slopes and steps.
• Lean your upper body further back when going down slopes and steps. Never try to climb and
descend a slope diagonally.
• Avoid using an escalator which may lead to serious injury in the event of a fall.
• Do not use the wheelchair on slopes more than 10°. The Dynamic safe slope is dependant on
the chair confi guration, the users abilities and the style of riding. As the users abilities and style
of riding cannot be predetermined then the max safe slope cannot be determined. Therefore this
must be determined by the user with the assistance of an attendant to prevent tipping. It is strongly
recommended that inexperienced users have Anti-tips fi tted.
• It is possible that potholes or uneven ground could cause this wheelchair to tip over, especially
when riding uphill or downhill.

8
T08 9351 7500 E[email protected] Wwww.unicarehealth.com.au
• Do not use your wheelchair on muddy or icy ground.
• Do not use your wheelchair where pedestrians are not allowed.
• To avoid hand injuries do not grab in between the spokes or between the rear wheel and wheel lock
when driving the wheelchair.
• In particular when using lightweight metal handrims, fi ngers will easily become hot when braking
from a high speed or on long inclines.
• Only attempt stairs with the help of an attendant. There is equipment available to help you, e.g.
climbing ramps or lifts, please use them. If there is no such equipment available, then the wheelchair
must be tipped and pushed, never carried, over the steps (2 helpers). We recommend that users
over 100 kg in weight are not transferred in this way. In general, any anti-tip tubes fi tted must be set
beforehand, so that they cannot touch the steps, as otherwise this could lead to a serious tumble.
Afterwards the anti-tip tubes must be set back to their correct position.
• Make sure that the attendant only holds the wheelchair using securely mounted parts. Do not use
removable parts (e.g. not on the footrests or the side guards).
• When using the lifting ramp make sure that the anti-tip tubes fi tted are positioned outside the
danger area.
• Secure your wheelchair on uneven ground or when transferring, e.g. into a car, by using the brakes.
• If and whenever possible, during a journey in a specially fi tted vehicle for disabled people, vehicle
occupants should use the seats in the vehicle and the appropriate restraint system. This is the only
way to ensure that occupants will have the maximum protection if there is an accident.
• Depending on the diameter and setting of the castors, as well as the centre of gravity setting of the
wheelchair, the castors may begin to wobble at high speeds. This can lead to castor seizure and
the wheelchair may tip over. Therefore, please make sure that the castors are adjusted correctly
(see the Chapter “Castors”).
• In particular, do not travel on an incline without brakes, travel at a reduced speed. We recommend
that novice users use anti-tip tubes.
• Anti-tip tubes should prevent the chair tipping over backwards unintentionally. Under no
circumstances should they take the place of transit wheels, and be used to transport a person in a
wheelchair with the rear wheels removed.
• When reaching for objects (which are in front of, to the side or behind the wheelchair) make sure
that you do not lean too far out of the wheelchair, as if you change the centre of gravity there is a
risk of tipping or rolling over. The hanging of additional load (back pack or similar items) onto your
chair back posts can affect the rearward stability of your chair, especially when used in combination
with recliner backrests. This can cause the chair to tip backwards causing injury.
• For thigh amputees you must use anti-tip tubes.
• Before setting off, check that your tyre pressure is correct. For rear wheels it should be at least 3.5
bar ( 350 kPa). The max. pressure is indicated on the tyre.The knee-lever brakes will only work if
there is suffi cient tyre pressure and if the correct setting has been made (see the Chapter on
• “Brakes”).
• If the seat and back sling are damaged, you must replace them immediately.
• Be careful with fi re, in particular with burning cigarettes. Seat and back slings can be set alight.
• If the wheelchair is subject to direct sunlight / cold temperature for a long period of time, then parts
of the wheelchair (e.g. frame, legrests, brakes and side guard) may become hot (>41°C) / very cold
(<0°).

9
Breezy Basics2Instruction & Safety Manual
T08 9351 7500 E[email protected] Wwww.unicarehealth.com.au
• Always make sure that, if fi tted, the quick-release axles on the rear wheels are set properly and
lock in (locking ball bearings are showing completely through the axle sleeve). If the button on the
quick-release axle is not pressed in, the rear wheel cannot be removed.
CAUTION !
• The effect of the knee-lever brake as well as the general driving characteristics are dependant on
tyre pressure. The wheelchair is signifi cantly lighter and easier to manoeuvre when the rear wheels
are pumped up correctly and both wheels have the same pressure.
• Make sure that your tyres have suffi cient tread!
• Please note that you are subject to any and all traffi c laws when driving in public traffi c.
• Always be careful when handling or adjusting the wheelchair!
• Adjustments which require tools should always be done by authorized dealers.
• Clean the wheelchair regularly to avoid rust and salt corrosion.
• Check the rivets, nuts and bolts to make sure they are tight and that no wheelchair parts will come
loose.
CAUTION !
• With all moving parts there is a natural risk of fi nger traps. Please handle with care.
• The products shown and described in this manual may not be exactly the same in every detail as
your own model. However, all instructions are still entirely relevant, irrespective of detai differences.
• The manufacturer reserves the right to alter without notice any weights, measurements or other
technical data shown in this manual. All fi gures, measurements and capacities shown in this
manual are approximate and do not constitute specifi cations.
DANGER!
CHOKING HAZARD – This mobility aid uses small parts which under certain circumstances may present
a choking hazard to young children.
Lifetime
The expected lifetime of this product is 5 years provided that: it is used in strict accordance with the
intended use all service and maintenance requirements are met.

10
T08 9351 7500 E[email protected] Wwww.unicarehealth.com.au
Warranty
Guarantee
THIS GUARANTEE DOES NOT AFFECT YOUR LEGAL RIGHTS IN ANY WAY.
Unicare Health* provides a guarantee, as set out in the warranty conditions, for wheelchairs to its
customers covering the following
Warranty conditions
1. Should a part or parts of the wheelchair require repair or replacement as a result of a manufacturing
and/or material fault within 24 months or for frame and cross-braces within 5 years after delivery to
the customer, then the affected part or parts will be repaired or replaced free of charge. (Batteries
are guaranteed for a period of 12 months subject to the correct battery care plan being followed)
2. To enforce the warranty, please contact Unicare Health Customer Service with the exact details
of the nature of the diffi culty. Should you be using the wheelchair outside the area covered by the
Unicare Health customer service agent, repairs or replacement will be carried out by another agency
as designated by the manufacturer The wheelchair must be repaired by a Unicare Health designated
Customer Service agent, (dealer).
3. For parts, which have been repaired or exchanged within the scope of this warranty, we provide
a warranty in accordance with these warranty conditions for the remaining warranty period for the
wheelchair in accordance with point 1).
4. For original spare parts which have been fi tted at the customer’s expense, these will have a 12
months guarantee, (following the fi tting), in accordance with these warranty conditions.
5. Consumable parts such as pads, tyres, inner tubes and similar parts are excluded from the warranty,
except in the case that premature wear of the part is the direct result of a manufacturing fault.
6. Claims from this warranty shall not arise, if a repair or replacement of a wheelchair or a part is
required for the following reasons:
a) The product or part has not been maintained or serviced in accordance with the manufacturer’s
recommendations as shown in the User Instructions and/or the Service Instructions.
b) Accessories have been used which are not specifi ed as original accessories.
c) The wheelchair or part having been damaged by neglect, accident or improper use.
d) Changes/modifi cations have been made to the wheelchair or parts, which deviate from the
manufacturer’s specifi cations.
e) Repairs have been carried out, before our Customer Service has been informed of the circumstances.
7. This guarantee is subject to the law of the country in which the product was purchased from Unicare
Health“ * Means the Unicare Health facility from which the product was purchased.

11
Breezy Basics2Instruction & Safety Manual
T08 9351 7500 E[email protected] Wwww.unicarehealth.com.au
Additional Notes For Australia Only:
1. For goods provided by Unicare Health Pty Ltd in Australia, our goods come with a guarantee by
Unicare Health that cannot be exclueded under Australian Consumer Law.
2. You are entitled to a replacement or refund for a major failure and for compensation for any
foreseeable loss or damage.
3. You are also entitled to have the goods repaired or replaced if the goods fail to be of acceptable
quality and the failure does not amount to a major failure.
4. The benefi ts to you given by this warranty are in addition to your other rights and remedies under a
law in relation to the goods to which the warranty relates
Transportability
DANGER
There is a risk of serious injury or death if this if this advice is ignored!
Transportation of your wheelchair within a vehicle:
A wheelchair secured in a vehicle will not provide the equivalent level of safety and security as a vehicle
seating system. It is always recommended that the user transfers to the vehicle seating. It is recognised
that this is not always practical for the user to be transferred and in these circumstances, where the user
must be transported whilst in the wheelchair, the following advice must be followed:
1. Confi rm that the vehicle is suitably equipped to transport a passenger in a wheelchair, and ensure
the method of access/ egress is suitable for your wheelchair type. The vehicle should have the fl oor
strength to take the combined weight of the user, the wheel chair and accessories.
2. Suffi cient space should be available around the wheelchair to enable clear access to attach, tighten
and release the wheelchair and occupant tie down restraints and safety belts.
3. The occupied wheelchair must be located in a forward facing position and secured by the wheelchair
tie down and occupant restraint straps (WTORS tie downs meeting the requirements of ISO 10542
or SAE J2249) in accordance with the WTORS manufacturer’s instructions.
4. The wheelchair’s use in other positions within a vehicle has not been tested e.g. transportation in a
side facing position must not be carried out under any circumstances (Fig. A).
5. The wheelchair should be secured by a Tie Down Restraint system, conforming to ISO 10542 or
SAE J2249 with nonadjustable front straps and adjustable rear straps, which typically use Karabiner
clips/S hooks and tongue and buckle fi ttings. These restraints generally comprise of 4 individual
straps that are attached to each corner of the wheelchair.
6. The tie-down restraints should be fi tted to the main frame of the wheelchair as indicated in the
diagram on the following page, and not to any attachments or accessories, e.g. not around the
spokes of wheels, brakes or footrests.

12
T08 9351 7500 E[email protected] Wwww.unicarehealth.com.au
7. The tie–down restraints should be attached as close as possible at an angle of 45 degrees and
tightened securely in accordance with the manufacturer’s instructions.
8. Alterations or substitutions must not be made to the wheelchair securement points or to structural
and frame or components without consulting the manufacturer. Failure to do so will invalidate the
ability of a Unicare Health wheelchair to be transported within a vehicle.
9. Both pelvic and upper torso restraint belts must be used to restrain the occupant to reduce the
possibility of head and chest impacts with the vehicle components and serious risk of injury to the
user and other vehicle occupants. (Fig B) The upper torso restraint belt should be mounted to the
vehicle “B” pillar - failure to do so will increase the risk of serious abdominal injuries to the user.
10. A head restraint suitable for transportation (see label on headrest) must be fi tted and suitably
positioned at all times during transportation.
11. Postural supports (lap straps, lap belts) should not be used or relied on for occupant restraint in a
moving vehicle unless they are labelled as meeting the requirements specifi ed in ISO 7176- 19:2001
or SAE J2249.
12. The safety of the user during transportation depends upon the diligence of the person securing the
tie-down restraints and they should have received appropriate instructions and/or training in their
use.
13. Wherever possible remove and stow safely away from the wheelchair all auxiliary equipment, for
example: Crutches, Loose cushions and Tray Tables.
14. Articulating/elevating leg rest should not be used in the elevated position when the wheelchair
and user are being transported and the wheelchair is restrained using Wheelchair Transport and
Occupant Restraints.
15. Reclining backrests should be returned to an upright position.
16. The manual brakes must be fi rmly applied.
17. Restraints should be mounted to the vehicle “B” pillar and should not be held away from the body by
wheelchair components such as armrest or wheels.

13
Breezy Basics2Instruction & Safety Manual
T08 9351 7500 E[email protected] Wwww.unicarehealth.com.au
Transportability
Occupant Restraints Instructions
1. The pelvic restraint belt must be worn low across the front of the pelvis so that the angle of the pelvic
belt is within the preferred zone of 30 to 75 degrees to the horizontal. A steeper (greater) angle within
the preferred zone is desirable i.e. closer to, but never exceeding 75degrees. (Fig C)
2. The upper torso restraint belt must fi t over the shoulder and across the chest as illustrated Fig d and
e Restraint belts must be adjusted as tightly as possible consistent with user comfort. Restraint belt
webbing must not be twisted when in use. The upper torso restraint belt must fi t over the shoulder
and across the shoulder as illustrated in Fig D and E.
3. The attachment points to the chair are the inner front side frame just above the castor, and the rear
side frame. The straps are fi tted around the side frames at the intersection of the horizontal and
vertical frame tubes. (See Figs G - K)
4. The tie down symbol (Fig F) on the wheelchair frame indicates the position of the wheelchair restraint
straps. The straps are then tensioned after the front straps have been fi tted to secure the wheelchair.
USER WEIGHT LESS THAN 22 kg
When the user being transported is a child, less than 22Kg mass and the vehicle involved has less than
eight (8) seated passengers it is recommended that they be transferred to an UNCE Regulation 44
compliant child restraint system (CRS). This type of restraint system provides a more effective occupant
restraint system than the conventional 3 point occupant restraint system and some CRS systems also
include additional postural supports to assist in maintaining the position of the child when seated.
Parents or care providers may consider the option, in some circumstances, for their child is to remain
in their wheelchair whilst in transport due to the level of posture control and comfort provided by the set
up in the wheelchair.
We would recommend in such circumstances that a risk assessment be carried out by your healthcare
professional and relevant competent persons.
Positioning Of Wheelchair Tie Down Restraints
On Wheelchair:
1. Location of the front and rear tie down labels (Fig. G-H-I).
2. Position of the front, (Fig.G) and rear, (Fig.H-I), wheelchair tie down restraint and the tie down label.
3. Side view of tie down straps, (Fig.J).

14
T08 9351 7500 E[email protected] Wwww.unicarehealth.com.au

15
Breezy Basics2Instruction & Safety Manual
T08 9351 7500 E[email protected] Wwww.unicarehealth.com.au
Handling
Folding Up
First remove the seat cushion and the back seat shell from the wheelchair
and fl ip up the (platform) footplate or the individual footrests. Take hold of
the sling or the seat tubes in the middle, from the back and pull upwards.
The wheelchair will then fold up. To fold your wheelchair so that it is as
small as possible, e.g., to put into a car, you can remove the footrests
(depending on the model). For this purpose, open the latch from the
outside and swing the footrest to the side. Then the footrest only has to be
drawn out of the receiver tube (Fig. 1).
Unfolding
Press down on the seat tube (see fi gure). Your wheelchair is then
unfolded. Now snap the seat tubing into position in the seat saddle. This
can be facilitated by slightly tipping your wheelchair, as this means that
the weight is taken off one of the rear wheels. Be careful not to get your
fi ngers caught in the cross-tube assembly. Refi t the seat and the back seat
shell (Fig. 2).
Quick-release axles on rear wheel
The rear wheels are equipped with quick-release axles. The wheels can
thus be fi tted or removed without
using tools. To remove a wheel, simply depress the quick-release button
on the axle (1) and pull the
wheel off the axle (Fig. 3).
CAUTION:
Hold the quick-release button on the axle depressed when inserting Fig.
3 the axle into the frame to mount the rear wheels. Release the button to
lock the wheel in place. The quick-release button should snap back to its
original position.
Getting Into Your Wheelchair Independently
(FIG. 4.0)
• The wheelchair should be pushed up against a wall or solid piece of furniture;
• The brakes should be on;
• The footplates should be hinged up;
• The user can then lower himself into the chair;
• The footplates should then be pushed down and the feet rested on them in
front of the heel loops.

16
T08 9351 7500 E[email protected] Wwww.unicarehealth.com.au
Getting Out Of Your Wheelchair
Independently (Fig. 4.1)
• The brakes should be on;
• The hinged footplates should be hinged up;
• With one hand on each armrest, the person should bend slightly forward to
bring the body weight to the front of the seat, and with both feet fi rmly on the
ground, one foot well back, push up into the upright position.
WARNING!
• When standing, do not stand on the footplates or the wheelchair will tip up. It is easier and safer
to get into your wheel chair if you turn the footplates up and out of the way or take them off the
wheelchair.
• Always engage the wheel brakes when transfering in or out of the wheelchair.
Options – Step Tubes
STEP TUBES
Tipping tubes are used by attendants to tip a wheelchair over an obstacle Simply
step on the tube to push a wheelchair, for example, over a kerb or step (Fig. 5).
CAUTION!
Unicare Health strongly recommends the use of a step tube on transit wheeled models and also on any
model where attendant use is the predominant intended use, as damage to the backposts may occur if
you pull back on them to tip the wheelchair, in order to overcome obstacles.
Options – Brakes
WHEEL LOCKS
Your wheelchair is equipped with two wheel locks. They are applied directly
against the tyres. To engage,
press both brake levers forward against the stops. To release the locks, pull the
levers back to their
original positions.
Braking power will decrease with:
• Worn tyre tread
• Tyre pressure that is too low
• Wet tyres
• Improperly adjusted wheel locks

17
Breezy Basics2Instruction & Safety Manual
T08 9351 7500 E[email protected] Wwww.unicarehealth.com.au
The wheel locks have not been designed to be used as brakes for a moving wheelchair. The wheel
locks should therefore never be used to brake a moving wheelchair. Always use the hand-rims for
braking. Make sure that the gap between the tyres and wheel locks complies with given specifi cations.
To readjust, loosen the screw and set the appropriate gap. Then re-tighten the screw (Fig. 6-7).
CAUTION!
• After each adjustment of the rear wheels, check the wheel lock gap and re-adjust if necessary.
• Mounting the wheel lock too close towards the wheel will result in a higher effort to operate. This
might cause the brake lever extension to break!
• Leaning onto the brake lever extension while transferring will cause the lever to break! Splashing
water from tyres might cause the wheel lock to malfunction.
Drum Brakes
Drum brakes permit safe and convenient braking for an attendant. They can
also be set with the aid of a locking lever (1) to prevent rolling. The lever must
snap audibly into place. Drum brakes are not infl uenced by air pressure inside
the tyres (Fig.8).
WARNING!
• Drum brakes must only be adjusted by authorised dealers
• Always operate the two brakes simultaneously to guarantee the control of
the driving direction!
• Drum brakes can only be used as a dynamic brake to stop the wheelchair while driving.
• Always engage the wheel locks to secure the wheelchair during a short or long stop, or for transfer.
Options - Footplates
FOOTPLATES:
The footplates can be fl ipped up to make it easier to transfer to/from the chair.
Lower leg length:
For users with longer legs, the leg support can be lowered to the appropriate
level by using the screws (1). Loosen the screws, push the tubes to the desired
position and then re-tighten the screws (see section on torque).
There must always be a minimum gap of 2.5 cm between the footplates and the
ground (Fig. 9).
Angle-adjustable footboard This can be adjusted to alter the angle to the ground. Release screw, pull it
inwards, set the desired angle and then push it on. After making the adjustment, re-tighten the screw.
Make sure that after any adjustment work, all screws are tightened correctly (see the page on torque).
Ensure that you maintain the minimum gap to the fl oor (2.5 cm) (Fig. 10).

18
T08 9351 7500 E[email protected] Wwww.unicarehealth.com.au
CAUTION!
• The legrests must not be used to lift or to carry the wheelchair.
• When getting on or off the wheelchair, do not use the
footboards. These should be fl ipped up beforehand or the
footrest should be swung to the outside as far as possible.
Option Elevating Legrest
(Fig 11-13)
To remove, pull the lever (1), swing the footplate outwards and then lift the
legrest out.
Height Adjustment:
The lower leg length can be adjusted infi nitely by releasing the screw (2). Adjust
the suitable height and tighten the screw again.
CAUTION!
The distance between the footplate and the ground must be at least 40mm.
Angle Adjustment:
Press the lever (3) downward with one hand while supporting the legrest with the
other hand to take the load off. When a suitable angle is achieved, let go of the
lever and the legrest will lock into one of the preset positions.

19
Breezy Basics2Instruction & Safety Manual
T08 9351 7500 E[email protected] Wwww.unicarehealth.com.au
Adjusting The Calf Pad
(Fig 14).
The calf pad can be adjusted as follows:
Height: Open bolt (4) and move the clamping piece to the desired position. By
rotating the clamping piece also the angle can be adjusted.
Depth: Open bolt (5) and move the calf pad into the desired position.
Width: Open bolt (5) and position the spacers (6) behind the pad, to get the desired position.
WARNING!
• Keep hands clear of the adjustable mechanism between the frame and the movable parts of the foot
rest, while elevating or lowering the footrest.
• Always make sure that the fasteners are secure.
• The foot rests must not be used to lift or to carry the wheelchair.
• Risk of trapping fi ngers! When moving the foot rest up or down, do not put your fi ngers in the
adjusting mechanism between the moving parts of the foot rest.
Amputee Support
(Fig.15).
The Amputee Support can be adjusted in every direction as required.
Options - Castors
Castors, Castor Plates, Forks
The wheelchair may veer slightly to the right or left, or the castors may wobble. This may be caused by
the following:
• Forward and/or reverse wheel motion has not been set properly.
• The castor angle has not been set correctly.
• Castor and/or rear wheel air pressure is incorrect; the wheels do not turn smoothly.
The wheelchair will not move in a straight line if the castors have not been properly adjusted. Castors
should always be adjusted by an authorised dealer. The wheel locks must be checked every time the
rear wheel position has been altered.
Table of contents
Other Unicare Health Wheelchair manuals