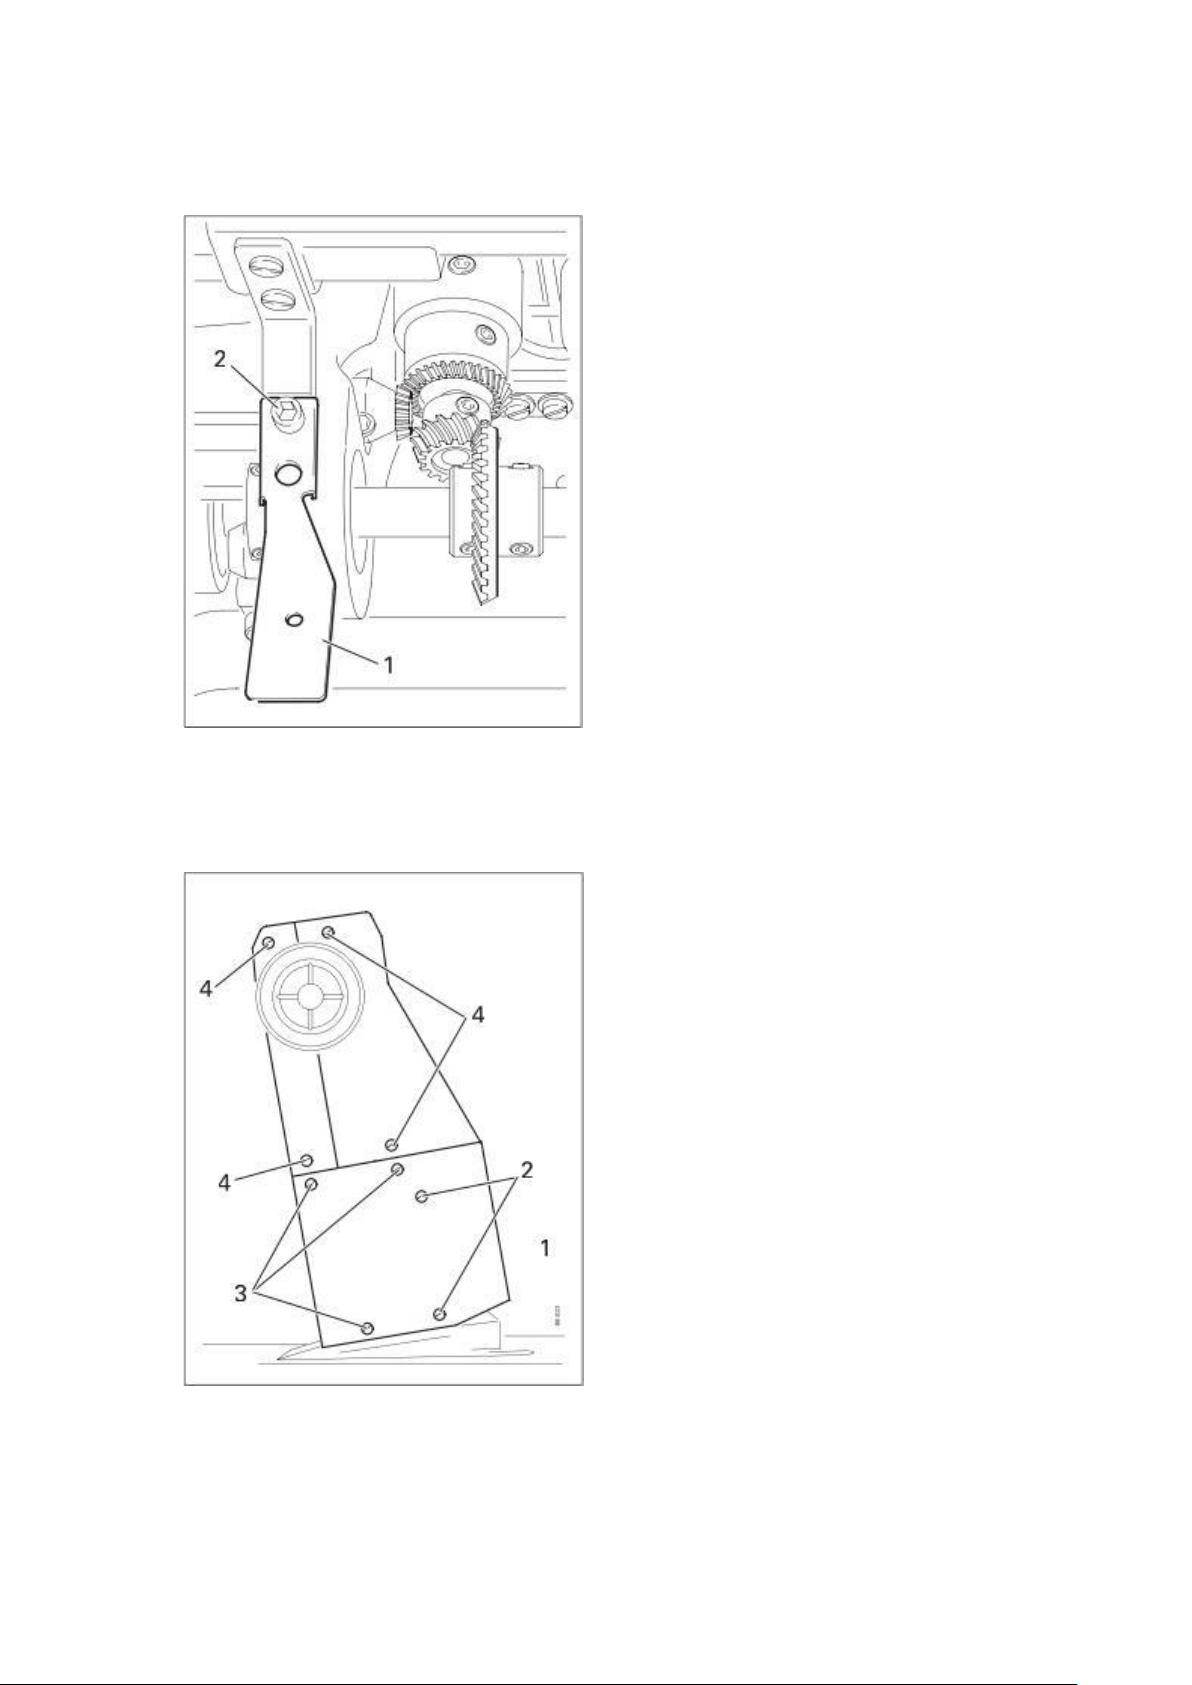
Unicorn LT5-H7600-D-N Series User manual


Contents
Operation declaration
1. Specifications .................................................................................................................................. 2
2. Installation ........................................................................................................................................ 3
3. Controls............................................................................................................................................ 8
4. Preparation .................................................................................................................................... 12
5. Care and maintenance ................................................................................................................ 17
Parts list.............................................................................................................................................. 21
1. Housing sections........................................................................................................................... 22
2. Needle head parts........................................................................................................................ 23
3. Arm parts ....................................................................................................................................... 28
4. Bedplate parts ............................................................................................................................... 32
5. Hook post, left ............................................................................................................................... 37
6. Hook post, right............................................................................................................................. 39
7. Feed wheel post, left.................................................................................................................... 41
8. Feed wheel mounting plate ......................................................................................................... 42
9. Thread trimmer .............................................................................................................................. 43
10. Automatic presser foot lifter ......................................................................................................... 45
11. Backtacking mechanism .............................................................................................................. 46
12. Cable tree to sewing head .......................................................................................................... 50
13. Kit for sewing drive ....................................................................................................................... 51
14. Parts for table top ......................................................................................................................... 52

1
OPERATION DECLARATION

2
1. Specification
Stitch type .................................................................................................................... 301(Lockstitch)
Clearance under roller presser....................................................................................................7mm
Clearance width........................................................................................................................ 245mm
Clearance height ...................................................................................................................... 115mm
Post height ................................................................................................................................ 180mm
Sewing head dimensions
Length.......................................................................................................................... approx..615mm
Width ............................................................................................................................ approx..240mm
Height(above table) .................................................................................................... approx..500mm
Bedplate dimensions ....................................................................................................518 X 177mm
Type
Single needle and double needle
Model A ........................................................................................... For sewing lightweight materials
Model B ..................................................................................For sewing medium-weight materials
Model C ...................................................................................For sewing medium-heavy materials
Thread thickness Nm(max.synthetic)
Model A .......................................................................................................................................... 60/3
Model B .......................................................................................................................................... 40/3
Model C .......................................................................................................................................... 15/3
Needle model
Model A ..................................................................................................................................... 70/134
Model B ..................................................................................................................................... 90/134
Model B ...............................................................................................................................90/134-35
Model C ................................................................................................................................... 120/134
Model C ............................................................................................................................ 120/134-35
Max. speed
A、B ................................................................................................................................... 3,000/spm
C............................................................................................................................................. 2,000spm

3
2. Installation
2. 01 Adjust the table height
The site where the machine is installed must be provided with suitable connections for electric
current.
It must be ensured that the standing surface of the machine site is firm and horizontal, and
that sufficient lighting is provided for.
Loosen screws 1 and 2, and set the table height as required;
Firmly tighten screw 1;
Set the required pedal position and tighten screw 2.

4
2. 02 Fitting the tilt lock
2. 03 Fitting the machine cover
Switch off the machine;
Screw on the tilt lock 1, provided in the
accessories, using screw 2.
Note : Do not operate the machine without tilt
lock 1! Danger of crushing between sewing
head and table top!
Slide the slots of the lower section of the
cover 1 behind the heads of screws 2 and
attach with screws 3, then tighten screws 2
through the holes;
Attach right and left cover sections with
screws 4.

5
2. 04 Mounting the flange motor
2. 05 Mounting the flange motor to the machine
Attach bearing plate 1 to motor 2 with screws 3 as shown in Fig.;
Remove the wedge from motor shaft 4;
Attach angle bracket 5 with screws 6;
Fit toothed belt wheel 7 to the motor shaft 4, so that the point of the screw is located in the
groove of the motor shaft;
Screw threaded stud 8 into the bearing plate 1.
Attach bearing plate 1 of motor 2 to the machine
case with screws 3 (only tighten screws 3
slightly)

6
2. 06 Mounting the toothed belt and adjusting the tension
2. 07 Mounting the belt guard of the flange motor
In this position fit toothed belt 1;
Swing the bearing plate 2 of the motor, so that the toothed belt is tensioned;
In this position tighten screws 3.
Attach belt guard 1 with screws 2 and 3.

7
2. 08 Connecting the safety switch
2. 09 Fitting the reel stand
Connect plug 1 of safety switch in Fig.
Fit the reel stand as shown in Fig.;
Afterwards insert the stand in the hole of the table
top and secure it with the nuts provided.

8
3. Controls
3. 01 Keys on the machine head
3. 02 Bobbin thread monitoring with stitch counting
As long as key 1 is pressed during sewing, the
machine sews in reverse;
Keys 2 can be used for parameter settings,
Instruction Manual of Electronic Control.
About 100 stitches before reaching the preset
number of stitches, diode 1 flashes;
After the thread has been trimmed and the
bobbin changed, the stitch counting begins
anew.

9
3. 03 Pedal
3. 04 Lever for lifting roller presser
0= Neutral position
+1 = Sewing
-1 = Raise roller presser
-2 = Trim sewing threads
The roller presser can be raised by turning
lever 1.

10
3. 05 Knee lever
3. 06 Key for setting stitch length
The roller presser can be raised by pressing
the knee lever 1 in the direction of the arrow.
The stitch length is set by pressing key 1 and
turning the balance wheel.

11
3. 07 Swing out roller presser
When the roller presser is raised, it can be
swung out by pulling it lightly down-wards.

12
4. Preparation
4. 01 Inserting the needle
All instructions and regulations in this instruction manual must be observed, special attention
must be paid to all safety regulations;
All setting-up work must only be carried out by personnel with the appropriate training ;
For all setting-up work the machine must be disconnected from its power supply by turning
off the on/off switch, or removing the plug from the electric power socket.
Raise the roller presser 1 and swing it out;
Loosen screws 2 and insert the needle as far as possible, the long groove must be contrary
to the hook (If the hook is on the left, the long groove must be on the right);
Tighten screw 2 and swing roller presser 1 back into position.

13
4. 02 Winding the bobbin thread, adjusting the thread tension.
Place an empty bobbin 1 onto bobbin shaft 2;
Thread the bobbin in accordance with Fig. And wind it anti-clockwise around bobbin 1 a few
times;
Switch on the bobbin winder while at the same time pressing bobbin winder spindle 2 and
lever 3.
The bobbin fills up during sewing
The tension of the thread on bobbin 1 can be adjusted with knurled nut 4;
The bobbin winder stops automatically when bobbin 1 is full;
If the thread is wound unevenly, loose nut 6 and turn thread guide 7 accordingly.
Retighten nut 6 after the adjustment.

14
4. 03 Removing/Inserting the bobbin case
4. 04 Threading the bobbin case/Adjusting the bobbin thread tension
Removing the bobbin case:
Open the post cap;
Raise latch 1 and remove bobbin case 2.
Inserting the bobbin case:
Insert bobbin case 2;
Close the latch 1 and close the post cap.
Insert the bobbin into the bobbin case;
Pass the thread through the slot under spring 2;
Pass the thread through the notch;
Adjust the thread tension by turning screw 3;

15
4. 05 Threading the needle thread and regulating its tension on the single needle
machine on model single needle.
Tilt up the eye guard 1;
Thread the needle thread as shown in Fig.;
On model left hook the needle is threaded from the right to the left, and on model right hook
from the left to the right;
Adjust the needle thread tension by turning milled nut 2.

16
4. 06 Threading the needle thread and regulating its tension on the single needle
machine on model double needle.
Tilt up the eye guard 1;
Thread the needle thread as shown in Fig.;
The left needle is threaded from the right to the left, and the right needle from the left to the
right;
Adjust the needle thread tension by turning milled nut 2.

17
4. 07 Setting the stitch length
5. Care and maintenance
Press key 1 and at the same time turn the balance wheel until the stitch setter clicks into
position;
Hold down key 1 and turn the balance wheel to and fro until the stitch length required is
shown on the scale 2 opposite the bottom edge 3 of the belt guard recess.
Clean .......................................................................... daily, more frequently if in continuous operation
Oil level (thread lubrication/hook lubrication)..............................................................daily, before use
Oil the hook.....................................................................................................................daily, before use
Lubricate the level gears .......................................................................................................once a year
Check/adjust air pressure .............................................................................................daily, before use
Clean air filter of air filter/lubricator ..................................................................................when required

18
5. 01 Cleaning
5. 02 Oiling the hook
Clean the hook, hook compartment and toothed
wheel 3 every day, several times if in continuous
use.
Bring the needle bar to its highest position;
Open the post cap and remove the bobbin case
cap and the bobbin;
Unscrew hook gib 1;
Turn the hand wheel until the point of bobbin
case 2 penetrates into the groove of the hook
race approx..5mm;
Remove bobbin case 2;
Clean the hook race with paraffin;
When inserting the bobbin case 2, ensure that
the horn of the bobbin case 2 engages in the
groove of the needle plate;
Screw hook gib 1 back on and close the post
cap.
Switch the machine off;
Pour 1-2 drops of oil into hole 1 of the hook gib
daily;
Before commissioning the machine, and after
long periods out of operation, pour a few drops
of oil into the hook race (see arrow).
Table of contents
Other Unicorn Sewing Machine manuals

Unicorn
Unicorn LS2-H550 User manual

Unicorn
Unicorn DB2-H515 User manual

Unicorn
Unicorn LT2-H650 User manual

Unicorn
Unicorn LS2-H6000-D User manual

Unicorn
Unicorn LT5-H710-1 User manual

Unicorn
Unicorn LS2-H520 User manual

Unicorn
Unicorn DB2-H515 User manual

Unicorn
Unicorn DT6-H892?3 User manual

Unicorn
Unicorn LS2-H5300-D User manual

Unicorn
Unicorn LS2-H540 Installation instructions
Popular Sewing Machine manuals by other brands

Singer
Singer 831U instruction manual

Singer
Singer 46W61 Instructions for using and adjusting

John Lewis
John Lewis JL 300 manual

JUKI
JUKI Union Special 36200 CLASS Series Adjusting instructions and illustrated parts list

Passap
Passap E 8000 Mounting instruction

Janome
Janome MY LOCK 734D instruction manual