Unicorn LS2-H6000-D User manual


CONTENTS 목차
사용설명서 INSTRUCTION MANUAL
1. SPECIFICATIONS 사양............................................................................................................................................................ 1
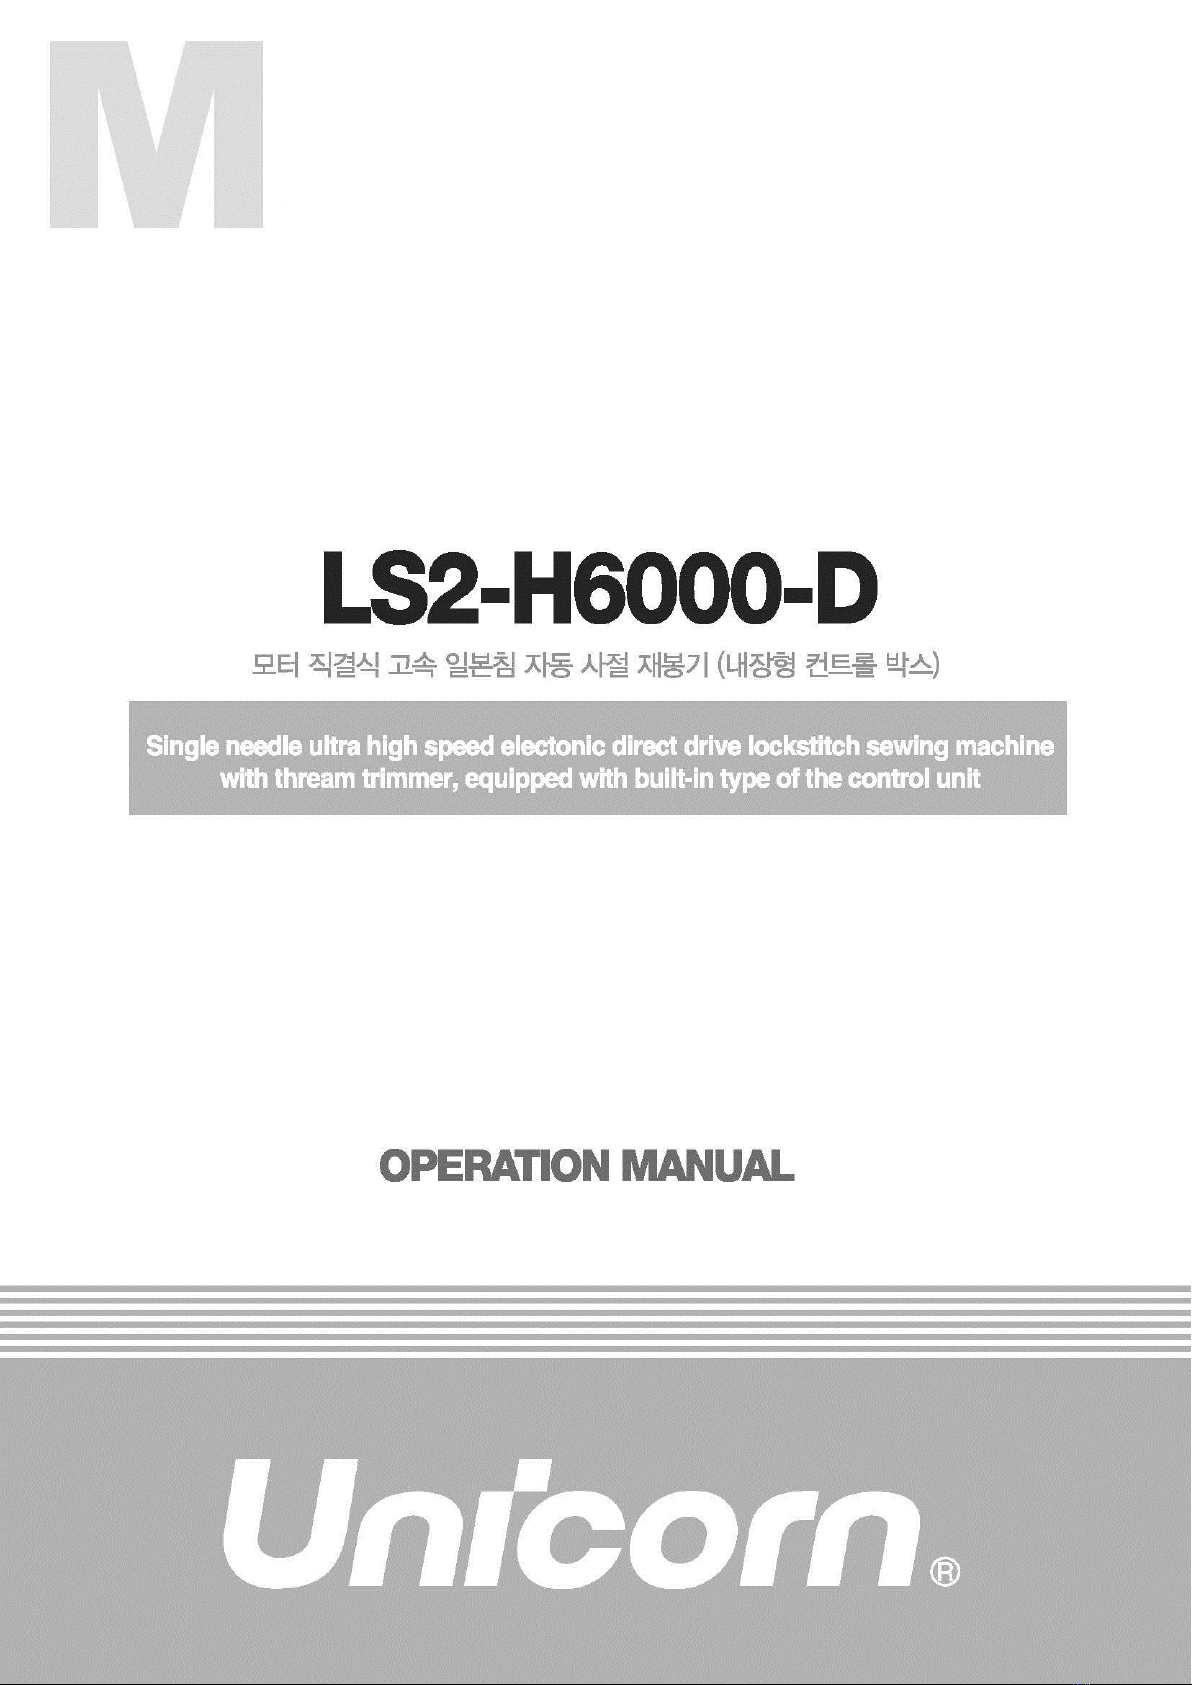
2. INSTALLATION 설치................................................................................................................................................................ 1
3. ADJUSTING THE HEIGHT OF THE KNEE LIFTER 무릎올림 높이 조절 ............................................................................. 2
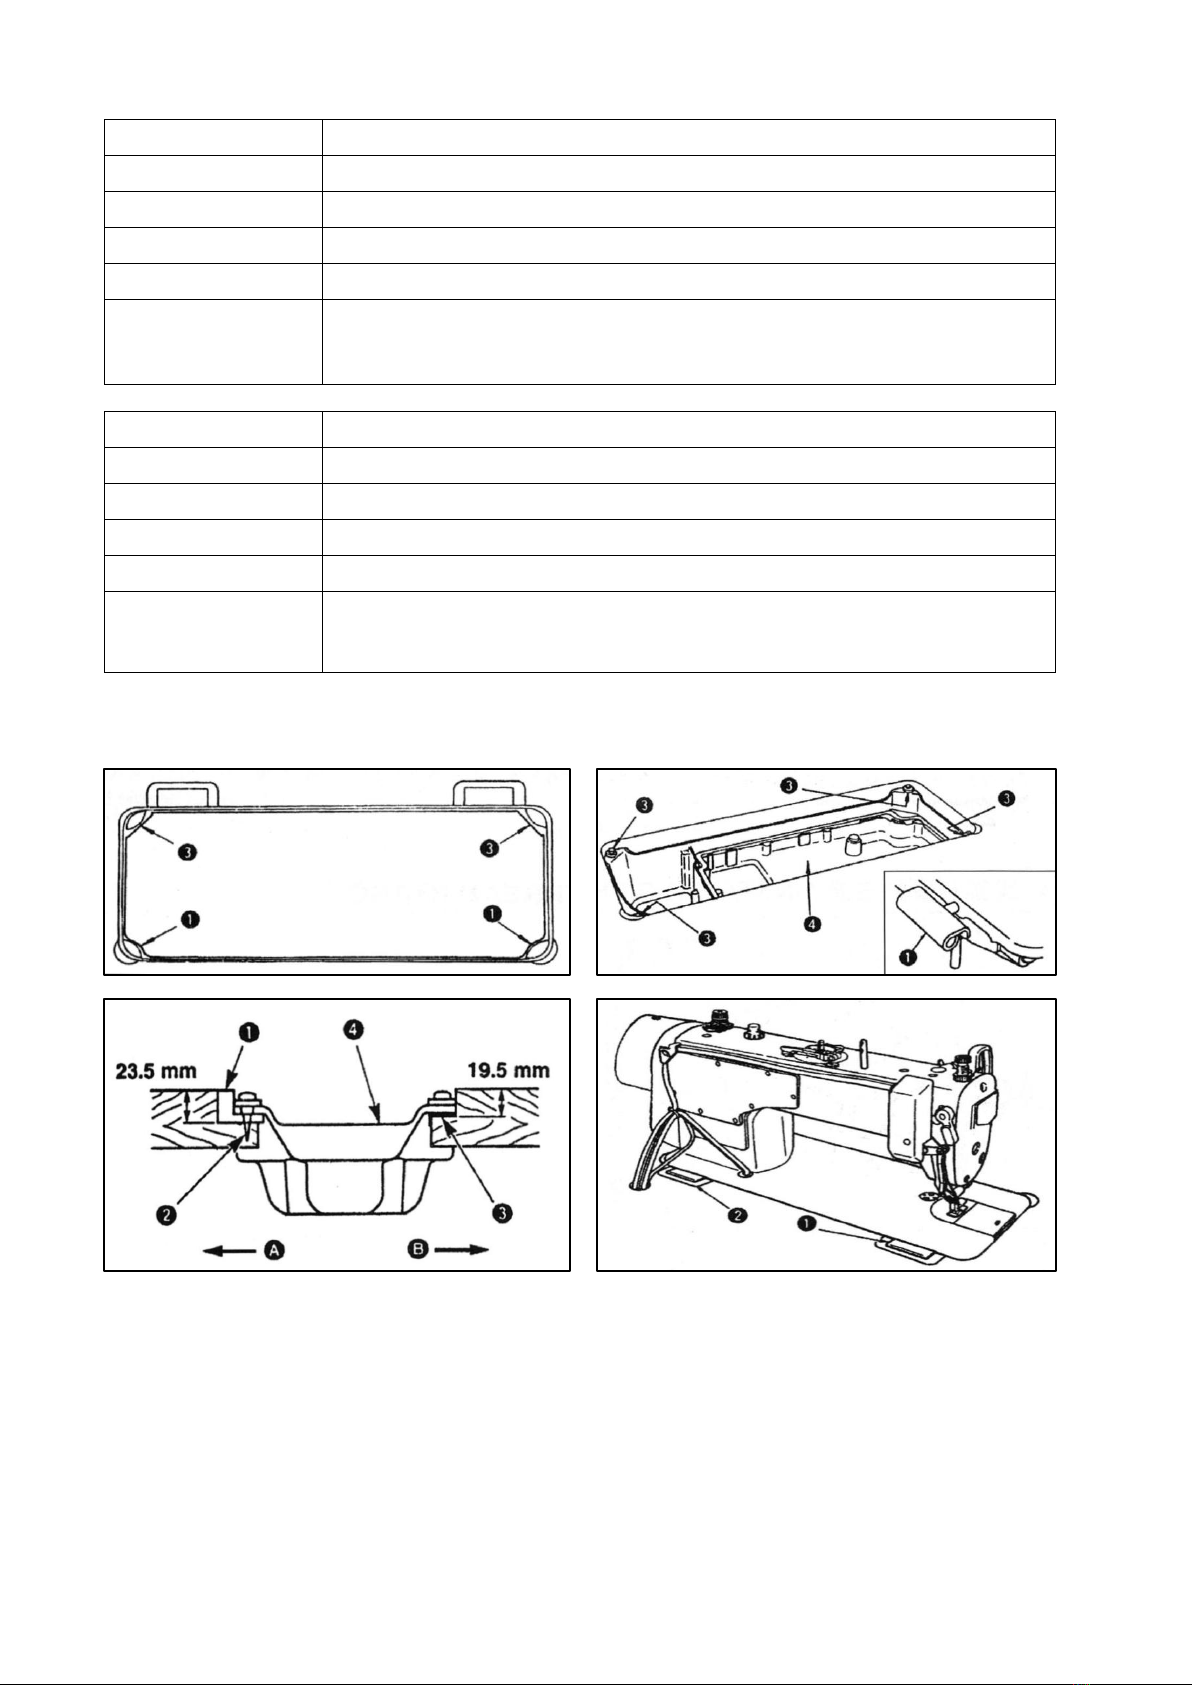
4. INSTALLING THE THREAD STAND 사립봉 설치 ................................................................................................................. 2
5. RUBRICATE 윤활..................................................................................................................................................................... 3
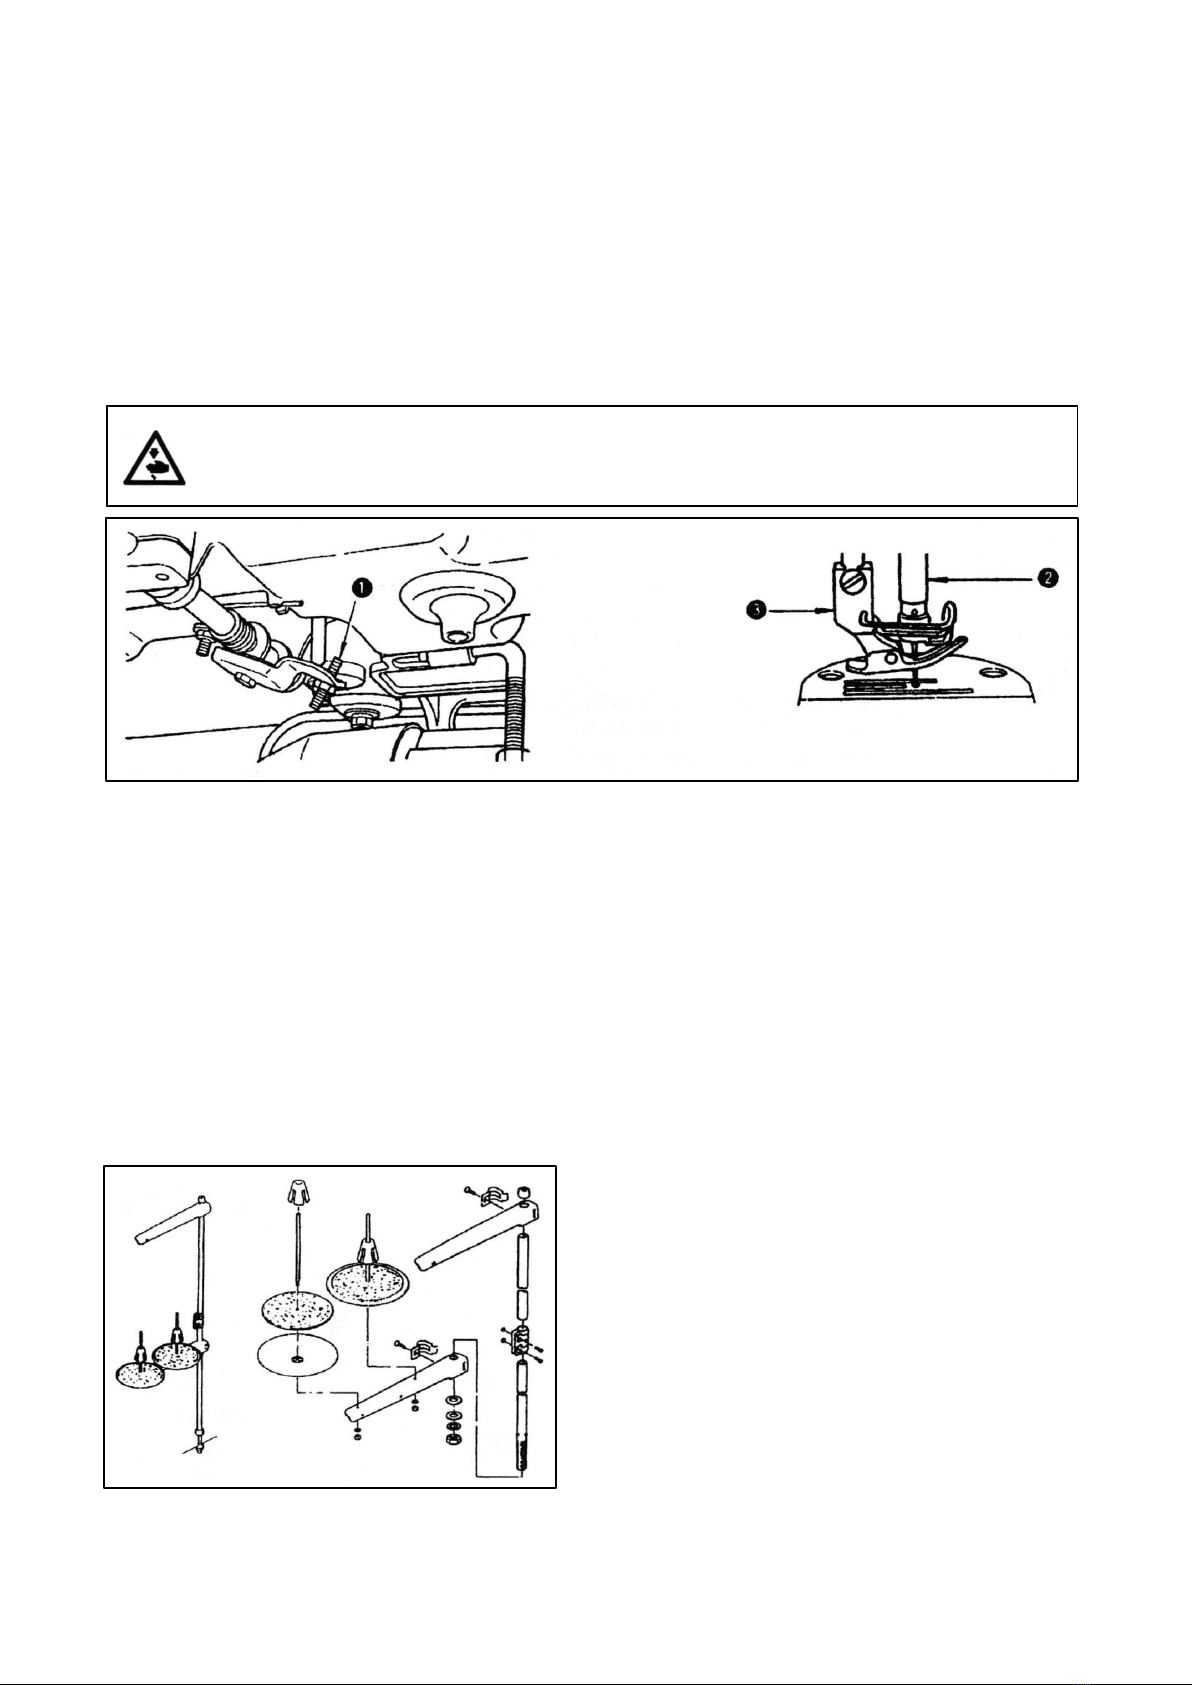
6. RUBRICATION 급유 ................................................................................................................................................................. 3
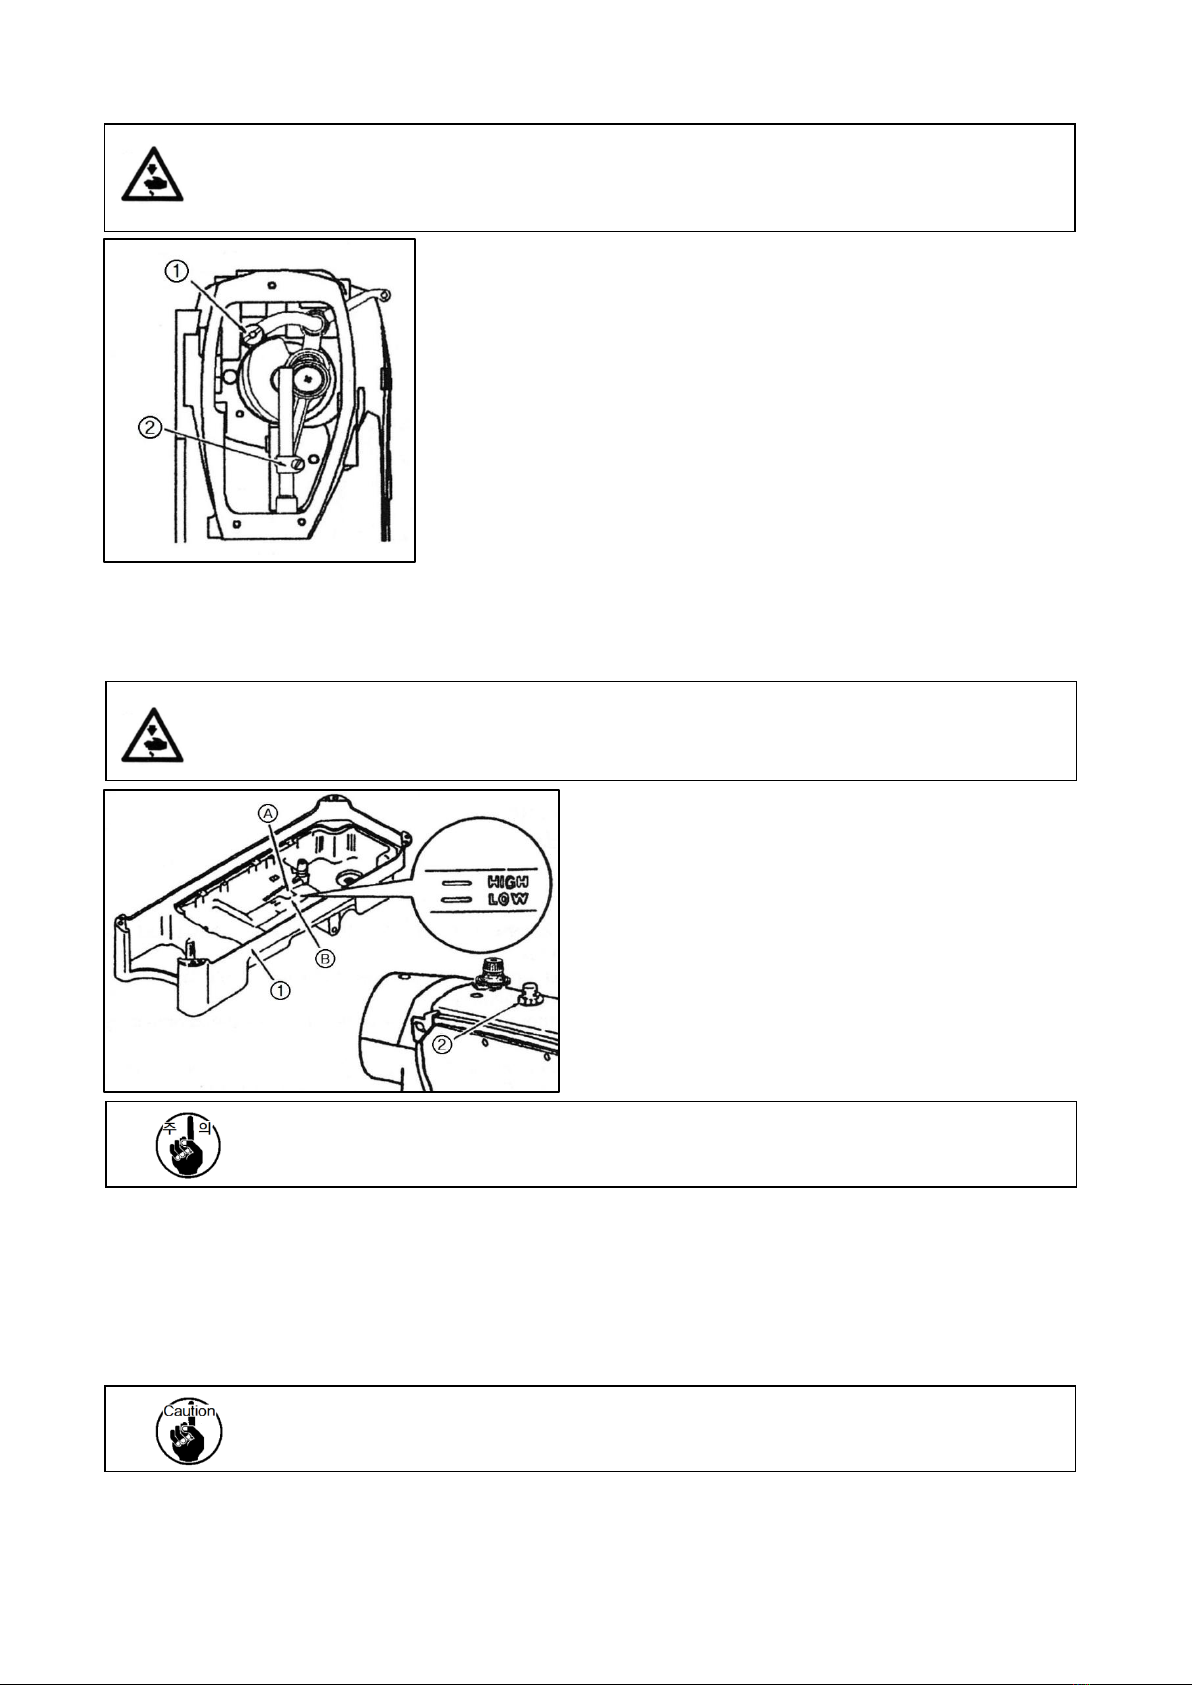
7. ADJUSTING THE AMOUNT OF OIL(OIL SPLASHES) IN THE HOOK 가마 기름양(기름 분사량) 조절 ............................ 4
8. ATTACHING NEEDLE 바늘 부착 ............................................................................................................................................. 5
9. SETTING THE BOBBIN INTO THE BOBBIN CASE 보빈 셋팅 ............................................................................................. 6
10. ADJUSTING THE STITCH LENGTH 땀길이 조절................................................................................................................ 6
11. PRESSER FOOT PRESSURE 노루발 압력............................................................................................................................ 6
12. HAND LIFER 손올림장치 ...................................................................................................................................................... 6
13. ADJUSTING THE HEIGHT OF THE PRESSER BAR 압봉 높이 조절.................................................................................. 7
14. THREADING THE MACHINE HEAD 실걸기 ........................................................................................................................ 7
15. THREAD TENSION 실장력.................................................................................................................................................... 8
16. THREAD TAKE-UP SPRING 실채기 스프링......................................................................................................................... 8
17. ADJUSTING THE THREAD TAKE-UP STROKE 천평 스트록 조절 .................................................................................... 9
18. NEEDLE-TO-HOOK RELATIONSHIP 바늘과 가마 관계..................................................................................................... 9
19. HEIGHT OF THE FEED DOG 톱니 높이 ............................................................................................................................. 10
20. TILT OF THE FEED DOG 톱니 기울기................................................................................................................................ 11
21. ADJUSTING THE FEED TIMING 톱니 타이밍 조절 ............................................................................................................11
22. PEDAL PRESSURE AND PEDAL STROKE 페달 압력과 페달 스트록 .............................................................................12
23. ADJUSTMENT OF THE PEDAL 페달 조절 .........................................................................................................................13
24. PEDAL OPERATION 페달 작동 ...........................................................................................................................................13
25. ONE-TOUCH TYPE REVERSE FEED STITCHING MECHANISM 원터치 타입 역전기구................................................14
26. WIPER 와이퍼........................................................................................................................................................................15
파트북 PARTS BOOK
1. MECHANIE FRAME & MISCELLANEOUS COVER COMPONENS 기계 구조 & 여러 커버..................................... 17-20
2. MAIN SHAFT & THREAD-UP LEVER COMPONENTS 주축 & 천평레버 ................................................................. 21-22
3. NEEDLE BAR, UPRIGHT SHAFT & HOOK DRIVING SHAFT 침봉, 상축 & 가마 구동축 ........................................ 23-24
4. HAND LIFTER COMPONENTS 손올림 기구 구성요소 ............................................................................................. 25-26
5. FEED MECHANISM COMPONENTS 톱니 기구 구성요소 ......................................................................................... 27-28
6. THREAD TRIMMER COMPONENTS 사절 기구 구성요소 ........................................................................................... 29-30
7. AUTOMATIC REVERSE FEED COMPONENTS 자동 역전 장치 구성요소 ................................................................ 31-32
8. WIPER COMPONENTS 와이퍼장치 구성요소 .............................................................................................................. 31-32
9. OIL LUBRICATION COMPONENTS 급유장치 구성요소............................................................................................... 33-34
10. OIL RESERVOIR COMPONENTS 기름 비축장치 구성요소 ........................................................................................ 33-34
11. THREAD STAND COMPONENTS 사립봉 구성요소 .................................................................................................... 35-36
12. ACCESSORIES 악세사리 ............................................................................................................................................... 35-36
전장반 사용설명서 INDUSTRIAL AC SERVO MOTOR & CONTROLLER.............................................................37

1
1. 사양 / SPECIFICATIONS
응용
박물, 중후물 이하의 소재
재봉 속도
최대 5,000 rpm
최대 땀길이
4mm
바늘
DB x 1 #9 to #18
노루발 올림
10mm (표준) 13mm (최대)
소음 .
재봉 속도에서의 작업공간 소음
n=4,500 min−1: LPA ≤83 dB(A)
DIN 45635-48-A-1에따른 소음 측정.
Application
General fabrics, light-weight and medium-weight materials
Sewing speed
Max. 5,000 rpm
Max. Stitch length
4mm
Needle
DB x 1 #9 to #18
Presser foot lift
10mm (standard) 13mm(Max.)
Noise
Workplace-related noise at sewing speed
n=4,500 min−1: LPA ≤83 dB(A)
Noise measurement according to DIN 45635-48-A-1.
2. 설치 / INSTALLATION
(1) 밑면 덮개 설치
1) 오일 팬은 테이블 홈의 네모서리에 놓여야 합니다.
2) 앞쪽Ⓐ의2개는 두부지지고무①를 못②으로 테이블의 튀어나온 부분에 고정하고, 힌지측Ⓑ의2개는 두부
쿠션③을 못으로 쳐서 고정하고, 오일팬④을 놓아주십시오.
3) 힌지①를 베드의 구멍에 끼우고 테이블 고무 힌지②에 끼운 다음 헤드를 네모서리의 쿠션③위에 놓습니
다.

2
(1) Installing the under cover
1) The oil pan should rest on the four corners of the machine table groove.
2) Fix two rubber seats①on sideⒶ(operator's side) using nails②as illustrated above. Fix two cushion
seats③on sideⒷ(hinged side) using a rubber-based adhesive. Then place oil pan④on the fixed
seats.
3) Fit hinge①into the opening in the machine bed, and fit the machine head to table rubber hinge②
before placing the machine head on cushions③on the four corners.
3. 무릎올림 높이 조절 / ADJUSTING THE HEIGHT OF THE KNEE LIFTER
1) 무릎올림대에 의한 노루발의 표준 높이는 10mm입니다.
2) 무릎올림장치 조절나사①를사용하여 노루발 높이를최대 13mm까지 조절할 수있습니다.
3) 노루발을 10mm가넘게 올릴 경우, 침봉②이최저 위치일 때하단 끝부분이 노루발③에닿지 않도록 조
절하십시오.
1) The standard height of the presser foot lifted using the knee lifter is 10mm.
2) You can adjust the presser foot lift up to 13mm using knee lifter adjust screw①.
3) When you have adjusted the presser foot lift to over 10mm, be sure that the bottom end of needle bar
②in its lowest position does not hit presser foot③.
4. 사립봉 설치 / INSTALLING THE THREAD STAND
주의 작업 시작 전에 기계의갑작스러운 작동으로 인한 사고를 방지하기 위해 전원을 꺼주 십시오.
WARNING Turn OFF the power before starting the work so as to prevent a accidents caused by
abrupt start of the sewing machine.

3
5. 조절핀 / PIN
6. 급유 / LUBRICATION
주의 작업 시작 전에 기계의갑작스러운 작동으로 인한 사고를 방지하기 위해 전원을 꺼주십시오.
WARNING Turn OFF the power before starting the work so as to prevent a accidents caused by
abrupt start of the sewing machine.
1) 실채기 크랭크 축①의 작은 나사를 분해하기 전에 조절핀으로
실채기 크랭크 축①의 구멍을 완전히 넓힙니다.
2) 침봉잡이(조)를분해하기 전에 작은 나사를 분해한 다음 조절핀
으로 침봉크랭크(조)②의 구멍을 완전히 넓힙니다.
1) Full pore of the thread take-up crank shaft①with pin before
disassembly small screw of the thread take-up crank shaft①.
2) Disassembly small screw before Disassembly the needle rod
holder ASM, then full pore of the needle bar connection ASM
②with pin.
주의 작업 시작 전에 기계의갑작스러운 작동으로 인한 사고를 방지하기 위해 전원을 꺼주십시오.
WARNING Turn OFF the power before starting the work so as to prevent a accidents caused
by abrupt start of the sewing machine.
1) 오일 팬①에 당사 지정 윤활유를 HIGH 표시부
Ⓐ까지 채웁니다.
2) 오일 높이가 LOW 표시부Ⓑ미만으로 낮아지면
오일 팬에 지정된 오일로 다시 채웁니다.
3) 기기를 윤활 후작동하는 경우 오일 표시창②을
통한 오일 튐으로 윤활이 충분한지 알수있습니
다.
4) 튀는 오일의 양은 윤활유의 양과 관련이 없습니
다.
기기를 설치 후또는 장기간 미사용 후에 처음 작동하는 경우 3,000rpm에서 10분간 작동시
켜주십시오.
1) Fill oil pan①with Machine Oil up to HIGH markⒶ.
2) When the oil level lowers below LOW markⒷ, refill the oil pan with the specified oil.
3) When you operate the machine after lubrication, you will see splashing oil through oil sight window②
if the lubrication is adequate.
4) Note that the amount of the splashing oil is unrelated to the amount of the lubricating oil.
When you first operate your machine after setup or after an extended period of disuse, run
your machine at 3,000 to 3,500 rpm. for about 10minutes for the purpose of break-in.

4
7. 가마급유 조정 방법 / ADJUSTING THE AMOUNT OF OIL (OIL SPLASHES) IN THE HOOK
* 아래의 2)의작업을 수행할 때미끄럼판을 제거하고 손가락이 가마에 닿지 않도록 주의하십시오.
1) 기기가 작동을 위해 충분히 예열되지 않은 경우, 기기를 약3분간 공회전 시킵니다(적절한 계속운전)
2) 미싱이 작동하는 동안 오일량(오일 튐) 확인용지를 가마 아래에 놓습니다.
3) 오일 저장기의 오일면 높이가 "고(HIGH)"와"저(LOW)" 사이의 범위 내에 있는지 확인합니다.
4) 오일량 확인은 5초간 실시해 주십시오.(시계로 시간 확인)
When carrying out the procedure described below in 2, remove the slide plate and take extreme caution not
to allow your fingers to come in contact with the hook.
1) If the machine has not been sufficiently warmed up for operation, make the machine run idle for
approximately three minutes. (Moderate intermittent operation)
2) Place the amount of oil (oil splashes) confirmation paper under the hook while the sewing machine is in
operation.
3) Confirm the height of the oil surface in the oil reservoir is within the range between "HIGH" and "LOW".
4) Confirmation of the amount of oil should be completed in five seconds. (Check the period of time with a
watch.)
주의 오일량은 가마를 고속으로 돌려 확인해야 하므로 기기를 작동할 때특히 주의해야 합니다.
WARNING Be extremely careful about the operation of the machine since the amount of oil has
to be checked by turning the hook at a high speed.
①오일량(오일 튐) 확인용지
Amount of oil (oil splashes) confirmation paper
②급유 확인 위치
Position to confirm the amount of oil (oil splashes)
오일 튐확인용지
Oil splashes
confirmation paper
종이를 베드의 벽면
에밀착시킬 것
Closely fit the paper
against the wall
surface of the bed.

5
•적절한 오일량 샘플 / Sample showing the appropriate amount of oil
•오일량 조절 / Adjusting the amount of oil
8. 바늘 부착하는 방법 / ATTACHING THE NEEDLE
가마에서의 오일 튐/ Splashes of oil from the hook
적절한 오일량(소)
Appropriate amount of oil (small)
가마에서의 오일 튐/ Splashes of oil from the hook
적절한 오일량(대)
Appropriate amount of oil (large)
1) 좌측 샘플에 표시된 오일량은 재봉 공정에 따라 증
감미세 조정이 필요하기 때문에 가마에서 오일량
이과도하게 늘어나지/줄어들지 않도록 주의하십시
오(오일량이 너무 적으면 가마 눌어 붙음(가마가
뜨거워짐). 오일량이 너무 많으면 봉재물에 오일이
묻을 수도 있음).
2) (세장의 종이로) 오일량을 세번확인하는 동안
오일량(오일 튐)이바뀌지 않도록 가마의 오일량을
조절하십시오.
1) The amount of oil shown in the samples on the
left should be finely adjusted in accordance with
sewing processes. Be careful not to excessively
increase/decrease the amount of oil in the hook.
(If the amount of oil is too small, the hook will be
seized (the hook will be hot). If the amount of oil
is too much, the sewing product may be stained
with oil.)
2) Adjust the amount of oil in the hook so that the
oil amount (oil splashes) should not change while
checking the oil amount three times (on the three
sheets of paper)
1) 하축 좌부싱에 부착된 오일량 조절나사를 "+" 방향
(방향 Ⓐ)으로 돌리면 가마의 오일량(오일 지점)이
증가하며, "-" 방향(방향 Ⓑ)으로 돌리면 감소하게
됩니다.
2) 가마의 오일량을 오일량 조절나사로 적절하게 조절
한후에는 미싱을 약30초간 공회전하여 가마의
오일량을 확인합니다.
1) Turning the oil amount adjustment screw attached on the hook driving shaft front bushing in the "+"
direction(in direction Ⓐ) will increase the amount of oil (oil spots) in the hook, or in the "-" direction (in
direction Ⓑ) will decrease it.
2) After the amount of oil in the hook has been property adjusted with the oil amount adjustment screw,
make the sewing machine run idle for approximately 30 seconds to check the amount of oil in the hook.
주의 작업 시작 전에 기계의갑작스러운 작동으로 인한 사고를 방지하기 위해 전원을 꺼주십시오.
WARNING Turn OFF the power before starting the work so as to prevent a accidents caused by
abrupt start of the sewing machine.

6
9. 보빈 넣는 방법 / SETTING THE BOBBIN INTO THE BOBBIN CASE
10. 봉목길이 조절 / ADJUSTING THE STITCH LENGTH
11. 노루발 압력 조절 / ADJUSTING PRESSURE OF PRESSER FOOT
12. 노루발 올림레버 / HAND LIFTER
1) 실을 실홈Ⓐ사이로 끼우고 실을 Ⓑ방향으로 당깁
니다. 그렇게 함으로써 실이 장력조절 스프링 밑을
통과하여 실구멍Ⓑ으로 나오게 됩니다.
2) 밑실Ⓒ을당겼을 때보빈이 화살표 방향으로 회전
하는지 확인합니다.
1) Pass the thread through thread slit Ⓐ, and pull
the thread in direction Ⓑ.
By so doing, the thread will pass under the
tension spring and come out from notchⒷ.
2) Check that the bobbin rotates in the direction of
the arrow when threadⒸis pulled.

7
13. 노루발 높이 조절 / ADJUSTING THE HEIGHT OF THE PRESSER BAR
14. 윗실 끼우는 방법 / THREADING THE MACHINE HEAD
주의 작업 시작 전에 기계의갑작스러운 작동으로 인한 사고를 방지하기 위해 전원을 꺼주십시오.
WARNING Turn OFF the power before starting the work so as to prevent a accidents caused by
abrupt start of the sewing machine.
1) 고정나사①를 풀고 노루발 높이 또는 노루발의 각도
를조절합니다.
2) 조절 후에는 고정나사①를 단단히 조입니다.
1) Loosen set screw①, and adjust the presser bar
height or the angle of the presser foot.
2) After adjustment, securely tighten the set screw①.
주의 작업 시작 전에 기계의갑작스러운 작동으로 인한 사고를 방지하기 위해 전원을 꺼주십시오.
WARNING Turn OFF the power before starting the work so as to prevent a accidents caused by
abrupt start of the sewing machine.

8
15. 실장력 조절 / THREAD TENSION
16. 실채기 스프링 / THREAD TAKE-UP SPRING
(1) 윗실 장력 조절
1) 실장력 1번너트①를 시계방향(방향 Ⓐ)으로 돌리
면사절 후바늘에 남은 실이 짧아집니다.
2) 너트①를 반시계방향(방향 Ⓑ)으로 돌리면 실길이
가길어집니다.
3) 실장력 2번너트②를 시계방향(방향 Ⓒ)으로 돌리
면바늘실 장력이 증가합니다.
4) 너트②를 반시계방향(방향 Ⓓ)으로 돌리면 바늘실
장력이 감소합니다.
(2) 밑실 장력 조절
1) 장력 조절 나사③를 시계방향(방향 Ⓔ)으로 돌리면
밑실 장력이 증가합니다.
2) 나사③를 반시계방향(방향 Ⓕ)으로 돌리면 밑실 장
력이 감소합니다
(1) Adjusting theh needle thread tension
1) As you turn thread tension No.1 nut①clockwise (in direction Ⓐ), the thread remaining on the needle
after thread trimming will be shorter.
2) As you turn nut①counterclockwise (in direction Ⓑ), the thread length will be longer.
3) As you turn thread tension No.2 nut②clockwise (in directionⒸ), the needle thread tension will be
increased.
4) As you turn nut②counterclockwise (in direction Ⓓ), the needle thread tension will be decreased.
(2) Adjusting the bobbin thread tension
1) As you turn tension adjust screw③counterclockwise (in directionⒺ), the bobbin thread tension will be
increased.
2) As you turn screw③counterclockwise (in direction Ⓕ), the bobbin thread tension will be decreased.
(1) 실채기 스프링①의스트로크 변경
1) 고정나사②를풉니다.
2) 사조자봉③을시계방향(방향 Ⓐ)으로 돌리면 실채기 스
프링의 스트로크가 증가합니다.
3) 반시계방향(방향 Ⓑ)으로 돌리면 스트로크가 감소합니다.
(2) 실채기 스프링①의압력 변경
1) 고정나사②를풀고 실장력조절기(조)를제거합니다.
2) 고정나사④를풉니다.
3) 사조자봉③을시계방향(방향 Ⓐ)으로 돌리면 압력이 증가하게 됩니다.
4) 반시계방향(방향 Ⓑ)으로 돌리면 압력이 감소합니다.
(1) Changing the stroke of thread take-up spring①
1) Loosen set screw②.
2) As you turn tension post③clockwise (in direction Ⓐ), the stroke of the thread take-up spring will
be increased.
3) As you turn the knob counterclockwise (in direction Ⓑ), the stroke will be decreased.
(2) Changing the pressure of thread take-up spring①
1) Loosen set screw②, and remove thread tension(asm)⑤.
2) Lossen set screw④.
3) As you turn tension post③clockwise (in direction Ⓐ), the pressure will be increased.
4) As you turn the post③counterclockwise (in direction Ⓑ), the pressure will be decreased.

9
17. 천평 실채기량 조절 / ADJUSTING THE THREAD TAKE-UP STROKE
18. 바늘과 가마의 관계 / NEEDLE-TO-HOOK RELATIONSHIP
주의 작업 시작 전에 기계의갑작스러운 작동으로 인한 사고를 방지하기 위해 전원을 꺼주십시오.
WARNING Turn OFF the power before starting the work so as to prevent a accidents caused
by abrupt start of the sewing machine.
1) 무거운 소재를 재봉할 때실안내①를 좌측(방향 Ⓐ)으로
옮겨 실채기로 당기는 실의 길이를 늘립니다.
2) 가벼운 소재를 재봉할 때실안내①를 우측(방향 Ⓑ)으로
옮겨 실채기로 당기는 실의 길이를 줄입니다.
3) 일반적으로 실안내①는 표시선Ⓒ이나사의 중앙과 일치하
는방식으로 배치됩니다.
1) When sewing heavy-weight materials, move thread guide①to the left (in direction Ⓐ) to increase the
length of thread pulled out by the thread take-up.
2) When sewing light-weight materials, move thread guide①to the right (in direction Ⓑ) to decrease the
length of thread pulled out by the thread take-up.
3) Normally, thread guide①is positioned in a way that marker lineⒸis aligned with the center of the
screw.
주의 기기의 갑작스러운 작동으로 인한 부상 가능성을 방지하기 위해 기기의 전원을 끄고 모터가
완전히 정지했는지 확인하십시오.
WARNING To avoid possible personal injury due to abrupt start of the machine, turn off the
power to the machine and check to be sure that the motor has totally stopped rotating in prior.
(1) 다음과 같이 바늘과 가마 간타이밍을 조절합니다.
1) 풀리를 돌려 침봉을 스트로크의 최저 지점으로 낮추고 고정
나사①를 풉니다.
(침봉 높이 조절)
2) [DB 바늘의 경우] 바늘대②의표시선Ⓐ을침봉 하부 부싱③
의하단 끝과 일치시킨 다음 고정나사①를조입니다.
[DA 바늘의 경우] 바늘대②의 표시선Ⓒ을침봉 하부 부싱③
의하단 끝과 일치시킨 다음 고정나사①를 조입니다.
(가마 ⓐ의 위치조절)
3) [DB 바늘의 경우] 3개의 가마 고정나사를 풀고 풀리를 돌려
올라가는 침봉의 표시선Ⓑ을침봉 하부 부싱③의 하단 끝과
일치시킵니다.
[DA 바늘의 경우] 3개의 가마 고정나사를 풀고 풀리를 돌려
올라가는 침봉의 표시선Ⓓ을침봉 하부 부싱③의 하단 끝과
일치시킵니다.
4) 이상태에서 가마 선단⑤을 바늘④중앙과 일치시킵니다. 바
늘과 가마 사이에 0.04mm~0.1mm의간격(기준 값)을둔다
음가마 고정나사를 단단히 조입니다
가마의 선단과 바늘간의 간격이 지정된 값보다 작으면 가마의 선단이 손상됩니다.
간격이 더크면 땀뜸현상이 나타납니다.

10
(1) Adjust the timing between the needle and the hook as follows:
1) Turn the handwheel to bright the needle bar down to the lowest point of its stroke, and loosen set
screw①.
(Adjusting the needle bar height)
2) [For a DB needle] Align marker lineⒶon needle bar②with the bottom end of needle bar lower
bushing③, then tighten set screw①.
[For a DA needle] align marker lineⒸon needle bar②with the bottom end of needle bar lower
bushing③, then tighten set screw①.
(Adjusting position of the hook ⓐ)
3) [For a DB needle] Loosen the three hook set screws, turn the handwheel and align marker lineⒷon
ascending needle bar with the bottom end of needle bar lower bushing③.
[For a DA needle] Loosen the three hook set screws, turn the handwheel and align marker lineⒹon
ascending needle bar with the bottom end of needle bar lower bushing③.
4) After making the adjustments mentioned in the above steps, align hook blade point⑤with the center of
needle④. Provide a clearance of 0.04mm to 0.1mm (reference value) between the needle and the hook,
then securely tighten set screws in the hook.
19. 톱니 높이 / HEIGHT OF THE FEED DOG
If the clearance between the blade point of hook and the needle is smaller than the
specified value, the blade point of hook will be damaged. If the clearance is larger, stitch
skipping will result.
주의 작업 시작 전에 기계의갑작스러운 작동으로 인한 사고를 방지하기 위해 전원을 꺼주십시오.
WARNING Turn OFF the power before starting the work so as to prevent a accidents caused
by abrupt start of the sewing machine.
톱니의 높이를 조절하려면:
1) 크랭크①의나사②를풉니다.
2) 이송대를 위/아래로 이동하여 조절합니다.
3) 나사②를단단히 조입니다.
체결압이 불충분하면 크랭크의 동작이
무겁게 됩니다.
If the clamping pressure is insufficient,
the motion of the forked portion
becomes heavy.
To adjust the height of the feed dog:
1) Loosen screw②of crank①.
2) Move the feed bar up/down to make adjustment.
3) Securely tighten screw②.

11
20. 톱니의 기울기 / TILT OF THE FEED DOG
1) The standard tilt(horizontal) of the feed dog is obtained when marker dotⒶon the feed bar shaft is
aligned with marker dotⒷon feed rocker①. (the marker dotⒷinclines forward the feed rocker shart
by 90°, as standard).
2) To tilt the feed dog with its front up in dorder to prevent puckering, loosen the set screw, and turn the
feed bar shaft 90°in the direction of the arrow, using a screw driver.
3) To tilt the feed dog with its front down in order to prevent uneven material feed, turn the feed bar shaft
90°in the opposite direction from the arrow. (The standard tilt for.)
21. 톱니 타이밍 조절 / ADJUSTING THE FEED TIMING
주의 작업 시작 전에 기계의갑작스러운 작동으로 인한 사고를 방지하기 위해 전원을 꺼주십시오.
WARNING Turn OFF the power before starting the work so as to prevent a accidents caused
by abrupt start of the sewing machine.
1) 톱니의 표준 기울기(수평)는이송대 축의 표시선
Ⓐ이이송대크랭크①의표시선Ⓑ과일치할 때확
보됩니다. (표시점Ⓑ은기준으로서 이송크랭크 축
쪽으로 90°로기울어져 있는것이 표준임).
2) 구김을 방지하기 위해 톱니의 전면을 위로 기울
이려면 고정나사를 풀고 드라이버를 이용하여 이
송대 축을 화살표 방향으로 90°돌립니다.
3) 불균일한 소재 이송을 방지하기 위해 톱니의 전
면을 아래로 기울이려면 이송대 축을 화살표에서
반대 방향으로 90°돌립니다(표준기울기).
톱니 기울기를 조절할 때마다 톱니 높이가 변경됩니다. 그러므로 기울기 조절 후에는 높이는
확인해야 합니다.
Whenever the feed dog tilt is adjusted, the feed dog height will be changed. So, it is
necessary to check the heigh after tilt adjustment..
주의 기기의 갑작스러운 작동으로 인한 부상 가능성을 방지하기 위해 기기의 전원을 끄고 모터가
완전히 정지했는지 확인하십시오.
WARNING To avoid possible personal injury due to abrupt start of the machine, turn off the
power to the machine and check to be sure that the motor has totally stopped rotating in prior.
1) 이송 편심캠①에서 나사②와③을풀고 이송 편심
캠을 화살표 또는 화살표 반대방향으로 움직이고
나사를 단단히 조입니다.
2) 표준 조절의 경우 톱니가 침판 아래로 내려갈 때
톱니 상부 표면과 바늘 구멍 단끝이 침판 상부 면
과같은 높이가 되도록 조절합니다.
3) 불규칙한 소재 이송을 방지하기 위해 이송 타이밍
을앞당기려면 이송 편심캠을 화살표 방향으로 이
동시킵니다.
4) 실조임을 높이기 위해 이송 타이밍을 늦추려면 이
송편심캠을 화살표 반대 방향으로 이동시킵니다.
바늘이 부러질 수있으므로 이송 편심캠을
너무 멀리 이동시키지 않도록 주의하십시오.
표준 이송 타이밍
Standard feed timing
이송 타이밍 앞당김
Advanced feed timing
이송 타이밍 지연
Delayed feed timing

12
1) Loosen screws②and ③in feed eccentric cam①, move the feed eccentric cam in the direction of the
arrow or opposite direction of the arrow, and firmly tighten the screws.
2) For the standard adjustment, adjust so that the top surface of feed dog and the top end of needle
eyelet are flush with the top surface of throat plate when the feed dog descends below the throat plate.
3) To advance the feed timing in order to prevent uneven material feed, move the feed eccentric cam in
the direction of the arrow.
4) To delay the feed timing in order to increase stitch tightness, move the feed eccentric cam in the
opposite, direction from the arrow.
22. 발판 압력 및발판 스트로크 / PEDAL PRESSURE AND PEDAL STROKE
(1) Adjusting the pressure required to depress the front part of the pedal
1) This pressure can be changed by changing the mounting position of pedaling pressure adjust spring①.
2) The pressure decreases when you hook the spring on the left side.
3) The pressure increases when you hook the spring on the right side.
(2) Adjusting the pressure required to depress the back part of the pedal
1) This pressure can be adjusted using regulator screw②.
2) The pressure increases as you turn the regulator screw in.
3) The pressure decreases as you turn the screw out.
(3) Adjusting the pedal stroke
1) The pedal stroke increases when you insert connecting rod③into the right hole.
Be careful not to move the feed eccentric cam too far, or else needle breakage may result.
주의 작업 시작 전에 기계의갑작스러운 작동으로 인한 사고를 방지하기 위해 전원을 꺼주십시오.
WARNING Turn OFF the power before starting the work so as to prevent a accidents caused
by abrupt start of the sewing machine.
(1) 발판의 앞부분을 누르는데 필요한 압력 조절하기
1) 발판 압력 조절 스프링②의장착 위치를 변경하여
이압력을 변경할 수있습니다.
2) 좌측에 스프링을 연결하면 압력이 감소합니다.
3) 우측에 스프링을 연결하면 압력이 증가합니다.
(2) 발판의 뒷부분을 누르는데 필요한 압력 조절하기
1) 조절기 나사①를사용하여 이압력을 조절할 수
있습니다.
2) 조절기 나사를 돌려 넣으면 압력이 증가합니다.
3) 조절기 나사를 돌려 빼내면 압력이 감소합니다.
(3) 페달 스트로크 조절하기
1) 연결 봉③을우측 구멍에 삽입하면 발판 스트로크
가증가합니다.

13
23. 발판의 조절 / ADJUSTMENT OF THE PEDAL
24. 발판 작동 / PEDAL OPERATION
(1) The pedal is operated in the following four steps:
1) The machine runs at low sewing speed when you lightly depress the front part of the pedal.Ⓑ
2) The machine runs at high sewing speed when you further depress the front part of the pedal.Ⓐ
(If the automatic reverse feed stitching has been preset, the machine runs at high speed after it
completes reverse feed stitching)
3) The machine stops(with its needle up or down) when you reset the pedal to its original position.Ⓒ
4) The machine trims threads when you fully depress the back part of the pedal.Ⓔ
* If your machine is provided with the Auto-lifter an addition step is given between the machine stop
and thread trimming step. The presser foot goes up when you lightly depress the back part of the
pedalⒹ, and if you further depress the back part, th thread trimmer is actuated.
주의 작업 시작 전에 기계의갑작스러운 작동으로 인한 사고를 방지하기 위해 전원을 꺼주십시오.
WARNING Turn OFF the power before starting the work so as to prevent a accidents caused
by abrupt start of the sewing machine.
(1) 연결 봉설치
1) 화살표와 같이 발판③을 좌/우로 이동시켜 모터 조절 레
버①와 연결 봉②이 직선을 이루도록 합니다.
(2) 발판 각도 조절
1) 연결 봉의 길이를 변경하여 발판 기울기를 자유롭게 조
절할 수있습니다.
2) 조절나사④를 풀고 연결봉⑤의 길이를 조절합니다.
(1) Installing the connecting rod
1) Move pedal③to the right or left as illustrated by the
arrow so that motor control lever①and connecting
rod②are straightened.
(2) Adjusting the pedal angle
1) The pedal tilt can be freely adjusted by changing the
length of the connecting rod.
2) Loosen adjust screw④, and adjust the length of
connecting rod⑤.
(1) 다음의 4가지 단계로 발판을 작동함:
1) 발판의 앞부분을 가볍게 누르면 미싱은 저속으로 작동합
니다.Ⓑ
2) 발판의 앞부분을 더세게 누르면 고속으로 작동합니다.Ⓐ
3) 발판을 원래 위치로 재설정하면 정지합니다(바늘은 아래
또는 위로 향함).Ⓒ
4) 발판의 뒷부분을 완전히 누르면 사절이 됩니다.Ⓔ
* 자동 올림대가 제공되는 경우 정지와 사절 단계 사이에
별도의 단계가 제공됩니다. 발판의 뒷부분을 가볍게 누르
면노루발이 올라가며Ⓓ뒷부분을 더세게 누르면 사절이
작동됩니다.

14
25.역전이송 기구 / ONE-TOUCH TYPE REVERSE FEED STITCHING MECHANISM
(1) 작동 방법
1) 스위치 레버①를 누르는 순간 역전이송이 실행됩니다.
2) 스위치 레버를 누르고 있는 동안 역전이송이 실행됩니다.
3) 스위치 레버가 해제되면 일반 이송을 다시 시작합니다.
(1) How to operate
1) The moment switch lever①is pressed, the machine
performs reverse feed stitching.
2) The machine performs reverse feed stitching as long as the
switch lever is held pressed.
3) The machine resumes normal feed stitching the moment the
switch lever is released.
주의 작업 시작 전에 기계의갑작스러운 작동으로 인한 사고를 방지하기 위해 전원을 꺼주십시오.
WARNING Turn OFF the power before starting the work so as to prevent a accidents caused
by abrupt start of the sewing machine.

15
26. 와이퍼 / WIPER
주의 작업 시작 전에 기계의갑작스러운 작동으로 인한 사고를 방지하기 위해 전원을 꺼주십시오.
WARNING Turn OFF the power before starting the work so as to prevent a accidents caused
by abrupt start of the sewing machine.
(1) 와이퍼 배치
봉제물의 두께에 따라 와이퍼의 위치를 조절합니다.
조절 절차는 다음과 같습니다.
1) 와이퍼의 평평한 부분과 바늘의 중앙 사이의 거리
를1mm로조절합니다.
와이퍼가 와이퍼 카라②에 의해 눌려 고정되도록
와이퍼 조절나사①를 조입니다.
2) 와이퍼가 불필요한 경우 와이퍼 스위치③를 꺼주십
시오.
(1) Positioning the wiper
Adjust the position of the wiper according to the
thickness of the material sewn.
The adjustment procedure is as follows:
1) Adjust the distance between the flat part of the
wiper and the center of the needle to 1mm.
Tighten wiper adjust screw①so that the wiper is
pressed and fixed by wiper collar②.
2) When the wiper is unnecessary, turn wiper
switch③OFF.

Other Unicorn Sewing Machine manuals

Unicorn
Unicorn LT2-H650 User manual

Unicorn
Unicorn LT5-H710-1 User manual

Unicorn
Unicorn LS2-H5300-D User manual

Unicorn
Unicorn LS2-H520 User manual

Unicorn
Unicorn LS2-H550 User manual

Unicorn
Unicorn LS2-H550 User manual

Unicorn
Unicorn LS2-H530 User manual

Unicorn
Unicorn DT6-H892?3 User manual

Unicorn
Unicorn DB2-H515 User manual

Unicorn
Unicorn DB2-H515 User manual