manuals.online logo
Brands
  1. Home
  2. •
  3. Brands
  4. •
  5. Unika
  6. •
  7. Recording Equipment
  8. •
  9. Unika EQ-815 User manual

Unika EQ-815 User manual

OPERATING MANUAL
This booklet contains important information concerning the proper and safe operation of your new equalizer.
PROFESSIONAL SOUND EQUIPMENT
Graphic Equalizer
Made in Taiwan EQ-815
INTRODUCTION
We congratulate you on choosing a Sound Product equalizer. You will find that it has been designed for easy use. The
latest advances in audio technology have been utilized in the design of making thisequalizer the ideal brain of any
audio system. We have incorporated many features to help you, 15x2 band of tone effects controls, in/out passing
switch, low-cut switch control and level control. Whether you're looking to custom tailor that mix or optimize the
acoustics of a really tough room. Please read all instructions carefully before operating.
WARNINGS
1. All operating instructions should be read before using this equipment.
2. To prevent the risk of electrical shock, do not remove cover or back, no user-serviceable parts inside,refer servicing
to a qualified service technician.
3. Do not expose to direct sunlight or heat source, such as radiators, stoves, or other appliances that produce heat.
4. This unit should be cleaned only with a damp cloth, audio solvents or other cleaning detergents.
5. When moving this equipment it should be placed in its original carton and packing. This will reduce the risk of
damage in transit.
INSTRUCTIONS FOR CONNECTIONS
1. Be sure that the power (1) is in the off position. All connections must be made with the equipment off.
2. Before plugging in the power cord (8) make sure the voltage selector switch (7) is set to the correct voltage.
(The unit is preset to 110 volts). Insert the power cord into the proper source.
3. For best sound use only high quality audio cables when hooking up this equalizer. Make sure that all cables are
pushed in securely.
4. Make sure you correctly attach the patch cables for the input source and output signal.
OPERATING INSTRUCTIONS
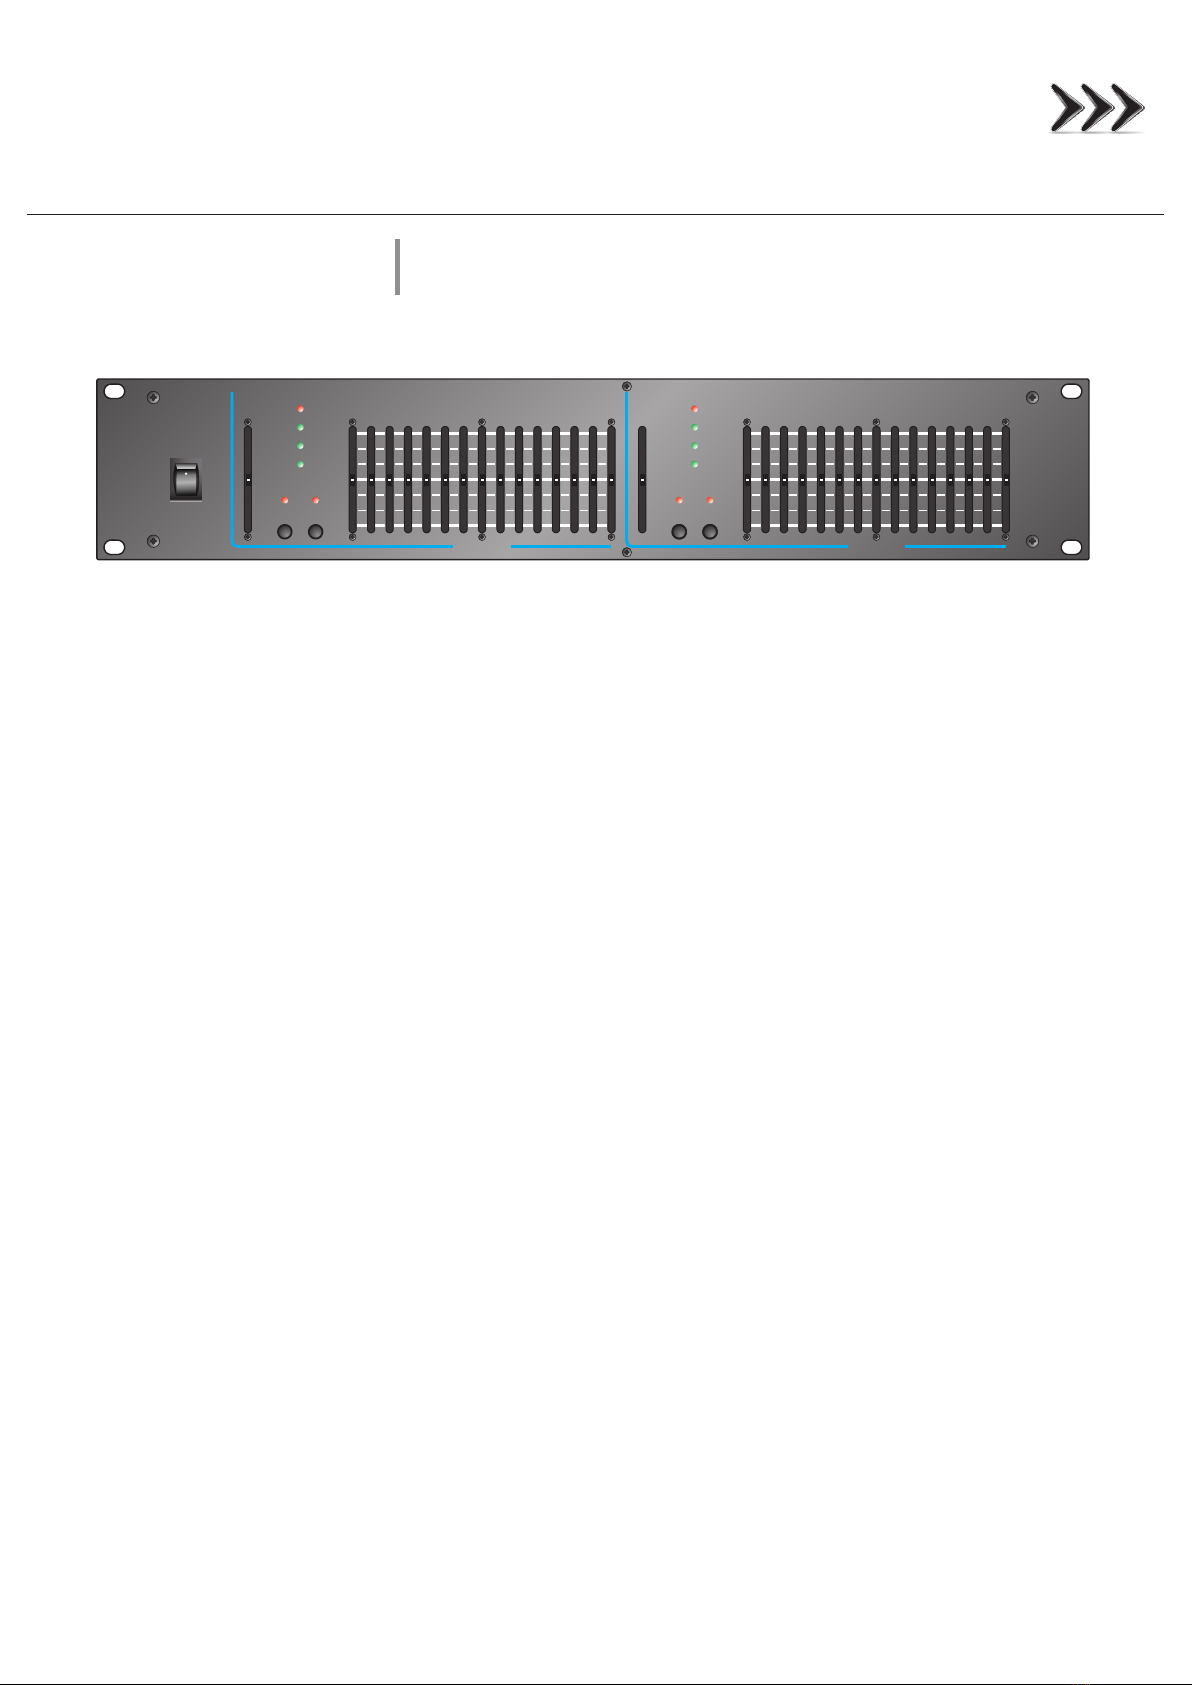
1. Power On: Once you have made all connections to your equalizer, Press the Power (1) button. The equalizer is on.
Press again to turn the power off.
2. IN/OUT Passing Switch (2): Press this switch in, the equalizer will be activated. Press it again to out, the signal will
be passed.
3. Graphic Equalizer (3): These sliders allow adjustment up to 12dB each octaves 25Hz to 16KHz (Dual 15 Band).
These equalizer controls are provided for improving frequency response of your system, compensating for room
environment effect.
4. Level adjustment control (6): You can obtain a proper output signal level using this level control.
The Level Display LEDS (4): will indicate you the exact output levels from -10dB to +18dB in 4 steps. When the
+18dB LED lights up, it tell you that there is too much outputpower calibrated to produced distortion, lower the level
control gradually until this LED goes off.
5. Low Cut Switch (5): The low-cut switch attenuates the muddy and unwanted sound created by your source
equipment, especially from record players.
25 2540 4063 63100 100160 160250 250400 400630 6301K 1K
1.6K 1.6K
2.5K 2.5K4K 4K6.3K 6.3K10K 10K16K 16K
dB dB
0 0
+3 +3
+6 +6
+12 +12
-3 -3
-6 -6
-12 -12
LOW
CUT
LOW
CUT
IN /
OUT
IN /
OUT
+18 +18
+10 +10
0 0
-10 -10
0 0
+3 +3
+6 +6
+12 +12
-3 -3
-6 -6
-12 -12
OUT LEVEL OUT LEVEL
CHANNEL 1CHANNEL 2
POWER
ON
OFF
EQ-815
UNiKA
PROFESSIONAL AUDIO
INPUT
GAIN
INPUT
GAIN
GRAPHIC EQUALIZER EQ-815
78
99 1010
1. Power Switch
2. In/Out Passing Switch
3. Fader Frequency setting
4. Level Display LED Indicator
5. Low Cut Switch
6. Input Gain Level Control
7. Voltage Selector Switch
8. Power Inlet
9. Input Jack
10. Output Jack
1 2 23 35 56 6
4 4
WWW: http://www.unika.com.tw
E-Mail: [email protected]
6F., No. 168, Xinhu 2nd Rd., Neihu Dist., Taipei City 114, Taiwan (R.O.C.)
P R O F E S S I O N A L A U D I O
UNiKA
EQ-815
Dual 15 band, 2/3 Octave from 20Hz ~ 20KHz
±12dB input gain range
EQ band control level range of ±12dB
45mm slide controls 20Hz ~20KHz frequency response, +/-1dB
Low cut filter 60Hz - 3dB
XLR, TRS balance input
XLR, TRS balance output
Signal level at -10dB, 0dB, +10dB, +18dB LEDs indicators
Low cut, & bypass function w/LEDs indicators
Operating voltage is switchtable: 110V-120V/60Hz; 220V-240V/50Hz
2U rack space
INPUT INPUT
OUTPUT OUTPUT
CHANNEL 2CHANNEL 1
FUSE :
0.5A /110V~1 20V
0.25 A/22 0V~2 40V
AC INP UT
15 WATTS
VOLTAGE:
110V~22 0V 50/ 60Hz
120V ~240 V 50/6 0Hz
WARNING:
TO PREVENT FIRE OR SHOCK
HAZARD. DO NOT EXPOSE THIS
APPLIANCE TO RAIN OR
MOISTURE.
CAUTION
RISK O F ELEC TRIC S HOCK
DO NOT OP EN
!
CAUTION -TO PREVENT ELECTRIC SHOCK, DO NOT REMOVE
COVER OR ANY SCREWS. NO USER-SERVICEABLE PARTS INSIDE.
REFER SERVICING TO QUALIFIED SERVICE PERSONNEL.
Serial No.:
USE ONLY WITH 250V FUSE
PUSH
PUSH
EQ-815
Front Panel and Rear Panel

Other Unika Recording Equipment manuals

Unika GEQ-215 User manual

Unika

Unika GEQ-215 User manual

Unika PRO IS2 User manual

Unika

Unika PRO IS2 User manual

Unika RACK POWER User manual

Unika

Unika RACK POWER User manual

Unika PRO Series User manual

Unika

Unika PRO Series User manual

Unika PRO Series User manual

Unika

Unika PRO Series User manual

Unika PRO Series User manual

Unika

Unika PRO Series User manual

Unika PRO Series User manual

Unika

Unika PRO Series User manual

Unika PRO Series User manual

Unika

Unika PRO Series User manual

Unika Stage Series User manual

Unika

Unika Stage Series User manual

Unika POWER 4800 User manual

Unika

Unika POWER 4800 User manual

Unika PRO MMD User manual

Unika

Unika PRO MMD User manual

Unika PRO Series User manual

Unika

Unika PRO Series User manual

Popular Recording Equipment manuals by other brands

Renishaw OMM-2 quick start guide

Renishaw

Renishaw OMM-2 quick start guide

Yamaha QX5 owner's manual

Yamaha

Yamaha QX5 owner's manual

Fairchild 670 instruction manual

Fairchild

Fairchild 670 instruction manual

Siemens 538-907 installation instructions

Siemens

Siemens 538-907 installation instructions

PRESONUS FIREPOD manual

PRESONUS

PRESONUS FIREPOD manual

Crestron TPS-TPI Operation guide

Crestron

Crestron TPS-TPI Operation guide

Xpression Maps Getting started

Xpression

Xpression Maps Getting started

Epson C82302/04 (Serial I/F) user manual

Epson

Epson C82302/04 (Serial I/F) user manual

Jura MDB user manual

Jura

Jura MDB user manual

Korg Toneworks AX10A owner's manual

Korg

Korg Toneworks AX10A owner's manual

Haunted Pliers Destino Build instructions

Haunted Pliers

Haunted Pliers Destino Build instructions

OHAUS SCOUT instruction manual

OHAUS

OHAUS SCOUT instruction manual

Epson C823461 (Ethernet) user guide

Epson

Epson C823461 (Ethernet) user guide

Sebatron Smac user manual

Sebatron

Sebatron Smac user manual

Koma Elektronik FT201 user manual

Koma Elektronik

Koma Elektronik FT201 user manual

MODEL SOUNDS ShockWave 3 Hardware reference manual

MODEL SOUNDS

MODEL SOUNDS ShockWave 3 Hardware reference manual

SoundForce SFC-60 V3 user manual

SoundForce

SoundForce SFC-60 V3 user manual

Trane X13790901030 installation instructions

Trane

Trane X13790901030 installation instructions

manuals.online logo
manuals.online logoBrands
  • About & Mission
  • Contact us
  • Privacy Policy
  • Terms and Conditions

Copyright 2025 Manuals.Online. All Rights Reserved.