manuals.online logo
Brands
  1. Home
  2. •
  3. Brands
  4. •
  5. Unilamp
  6. •
  7. Outdoor Light
  8. •
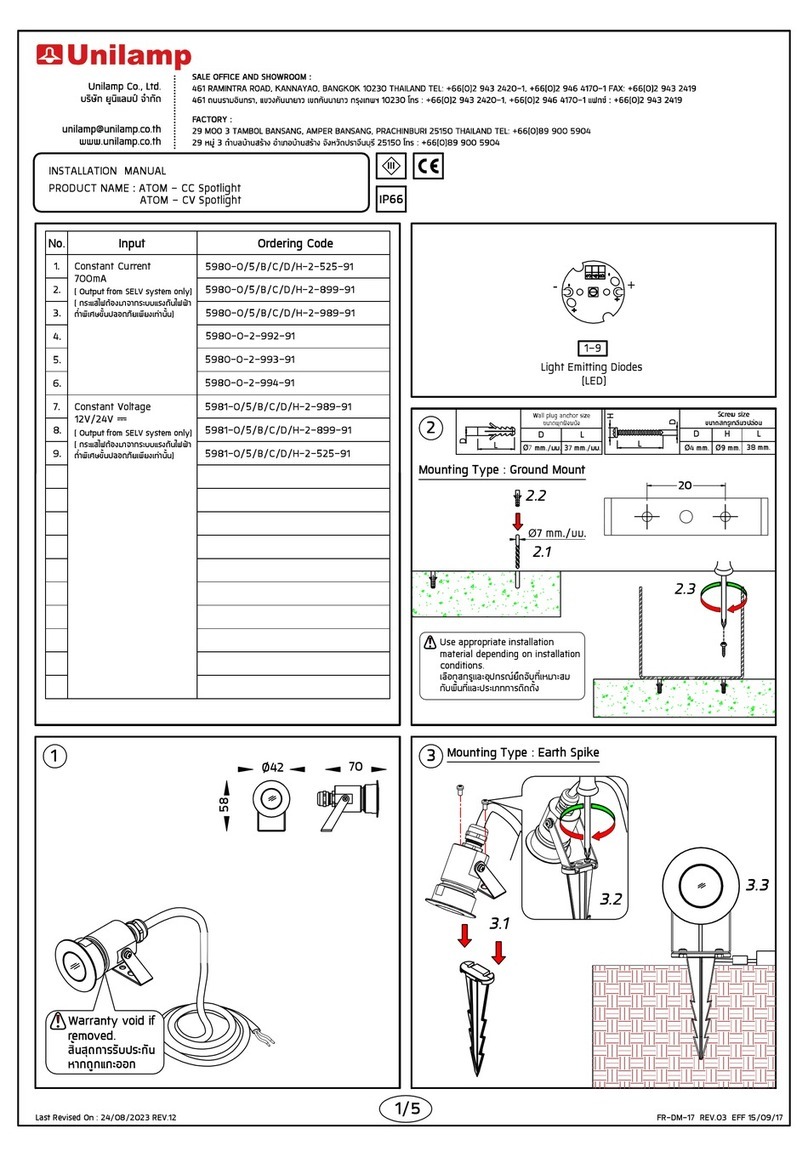
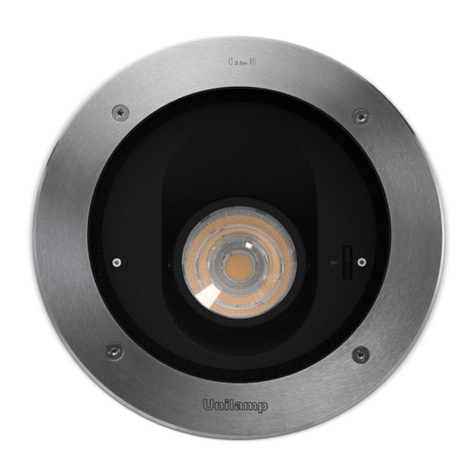
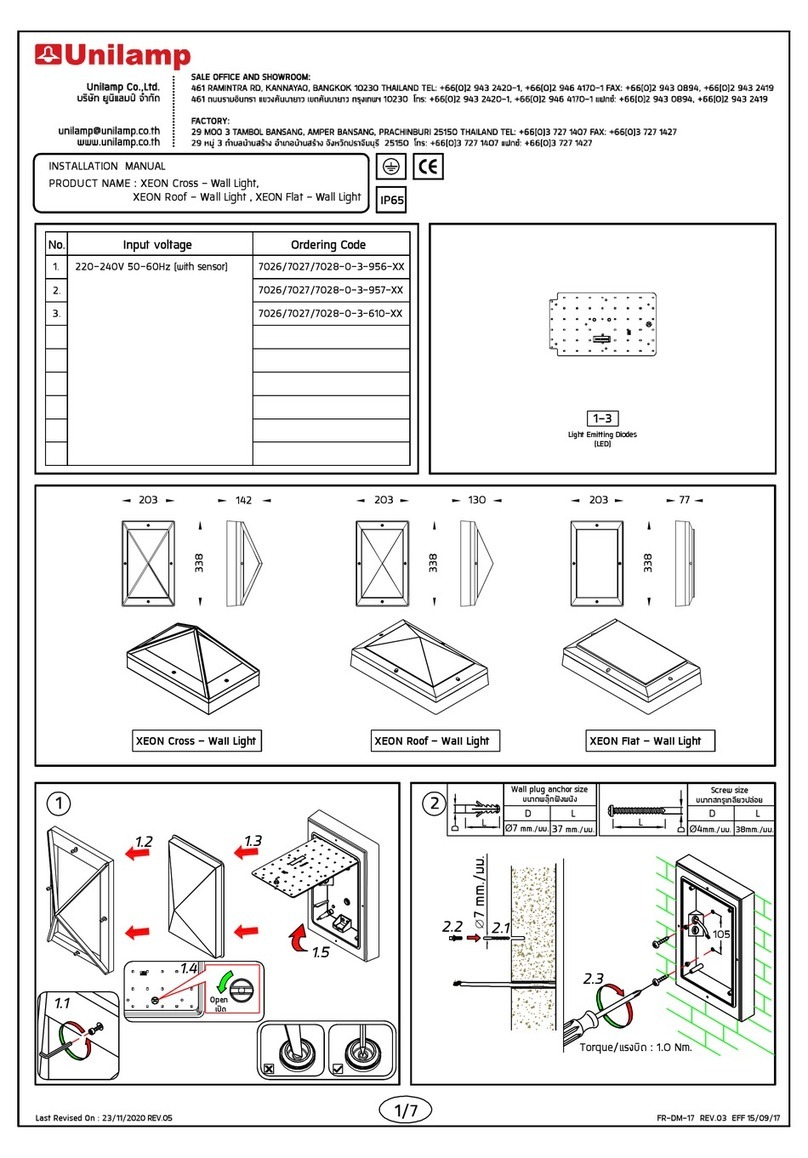
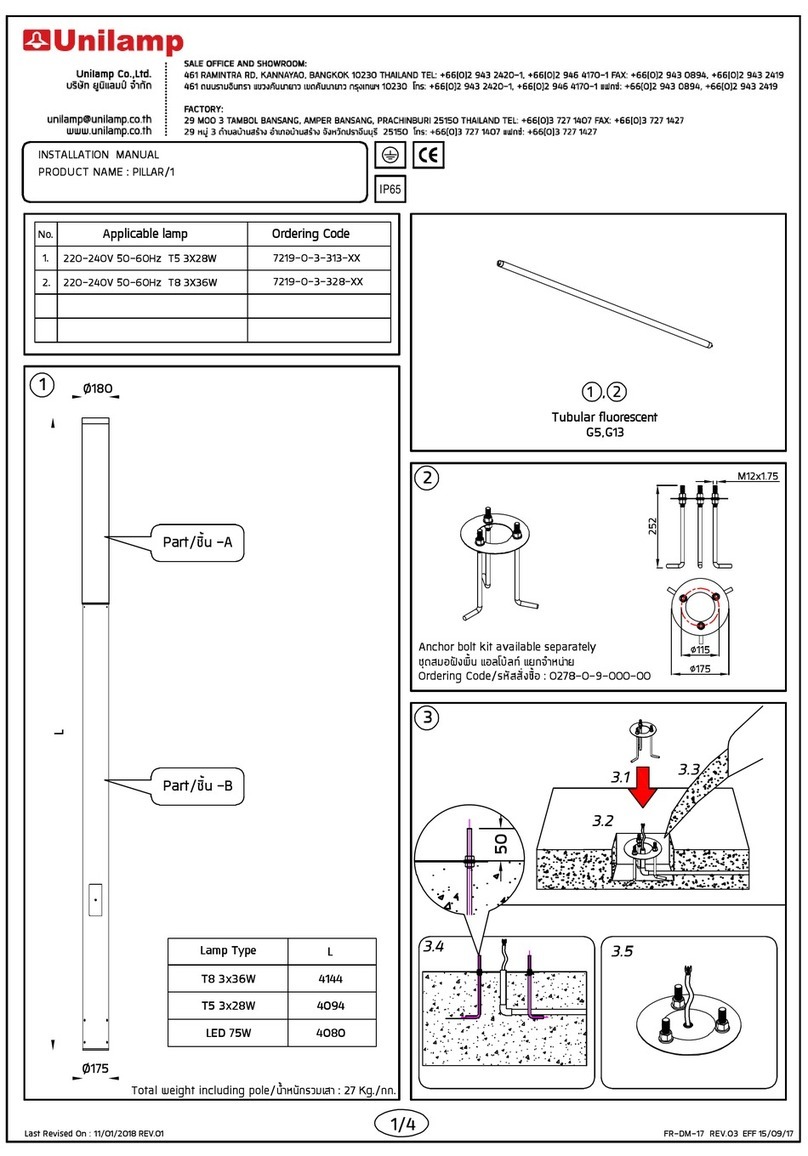
  9. Unilamp AGAR Prismatic User manual

Unilamp AGAR Prismatic User manual

1/5
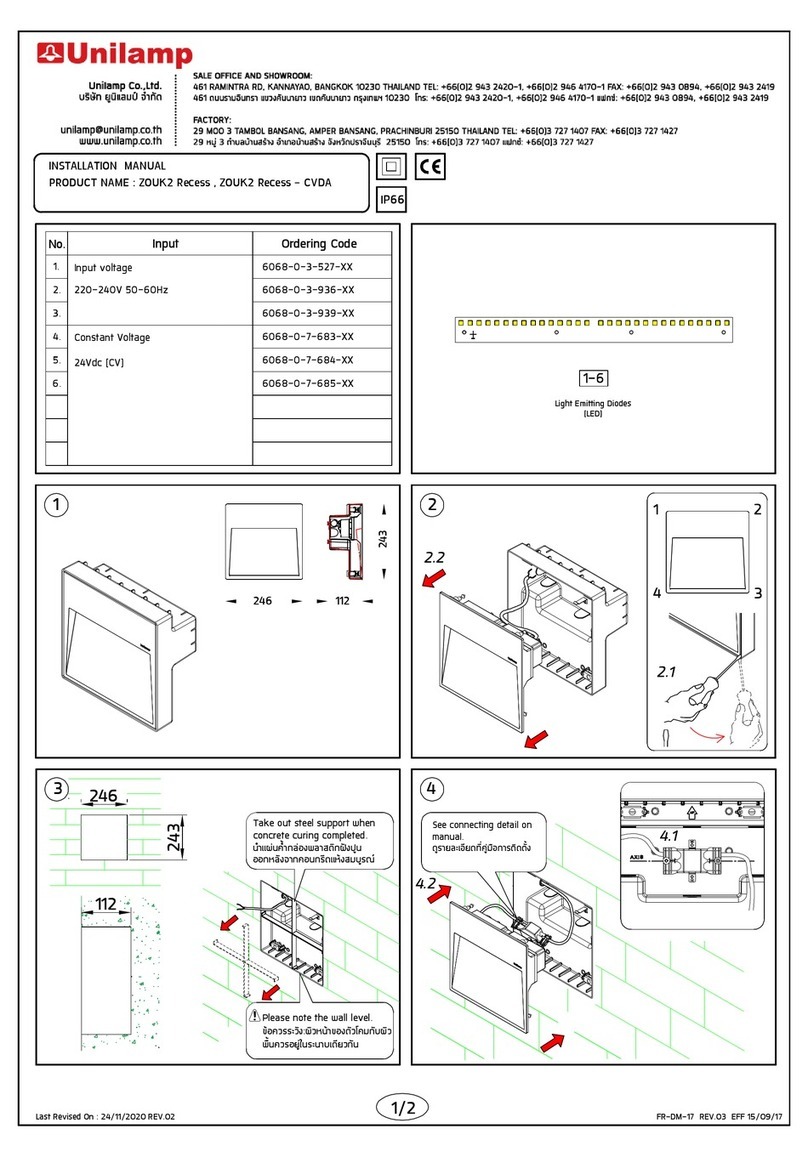
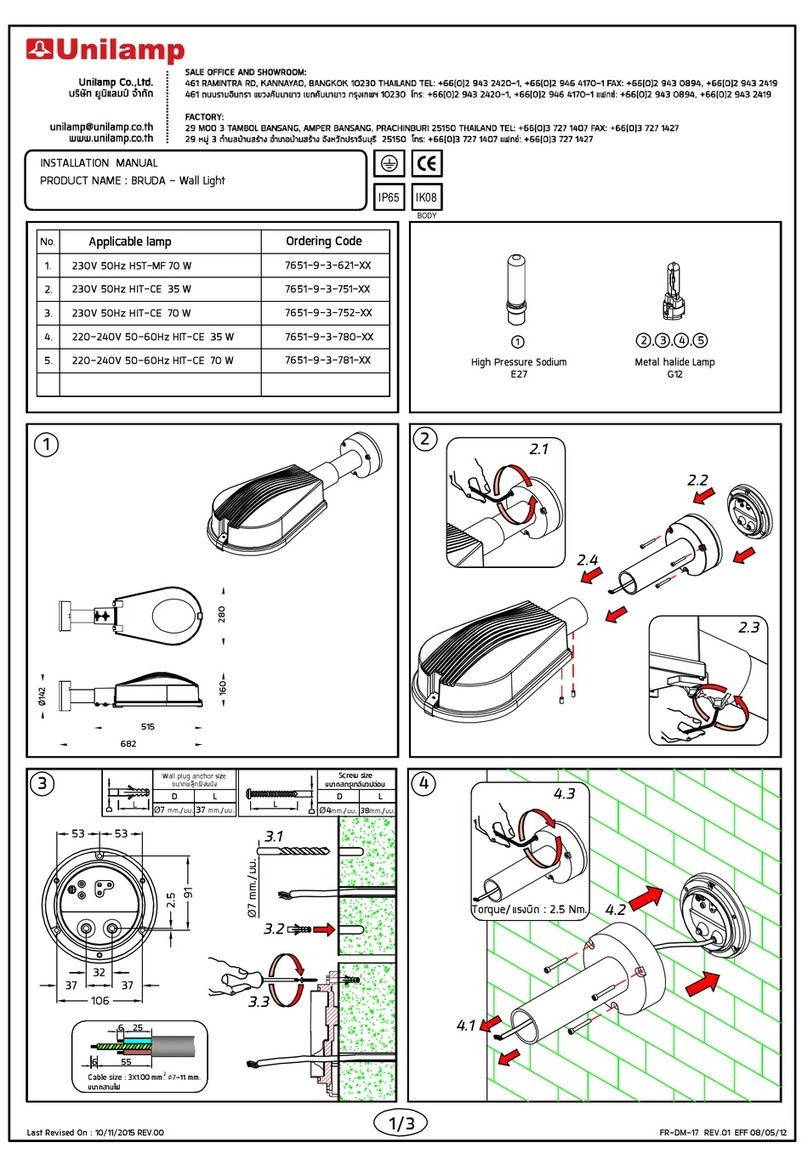
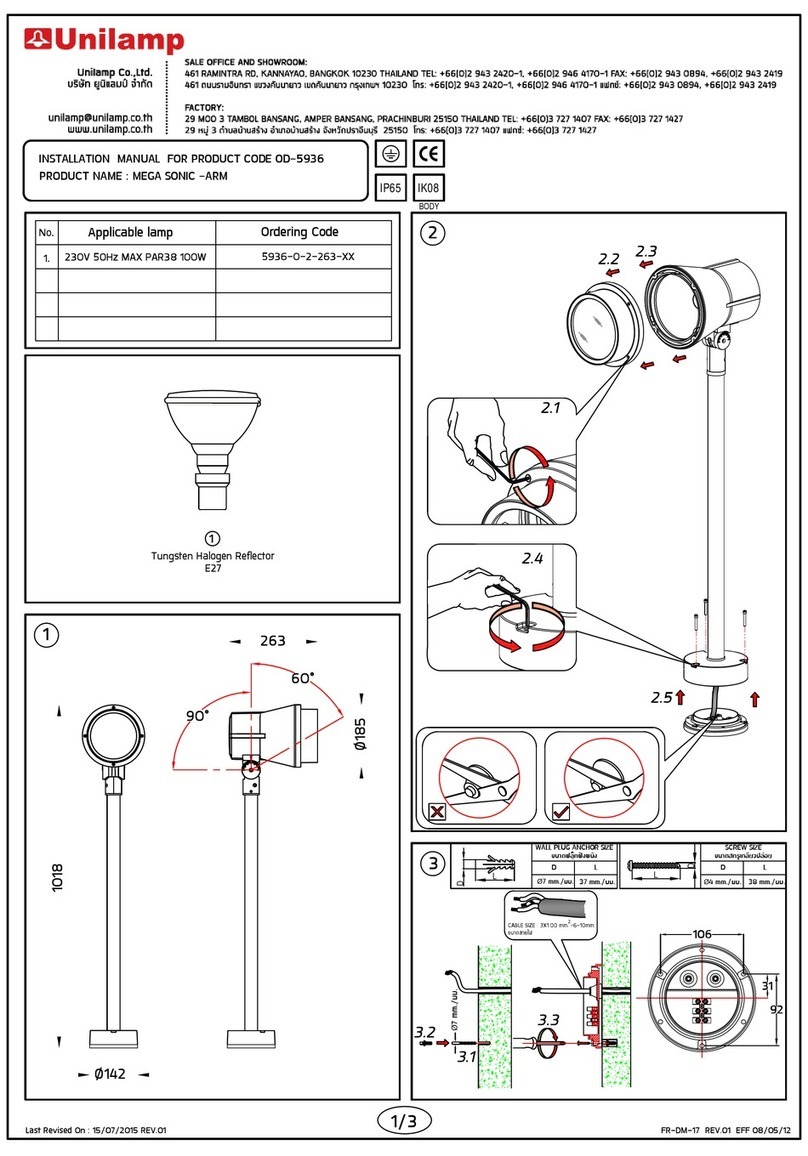
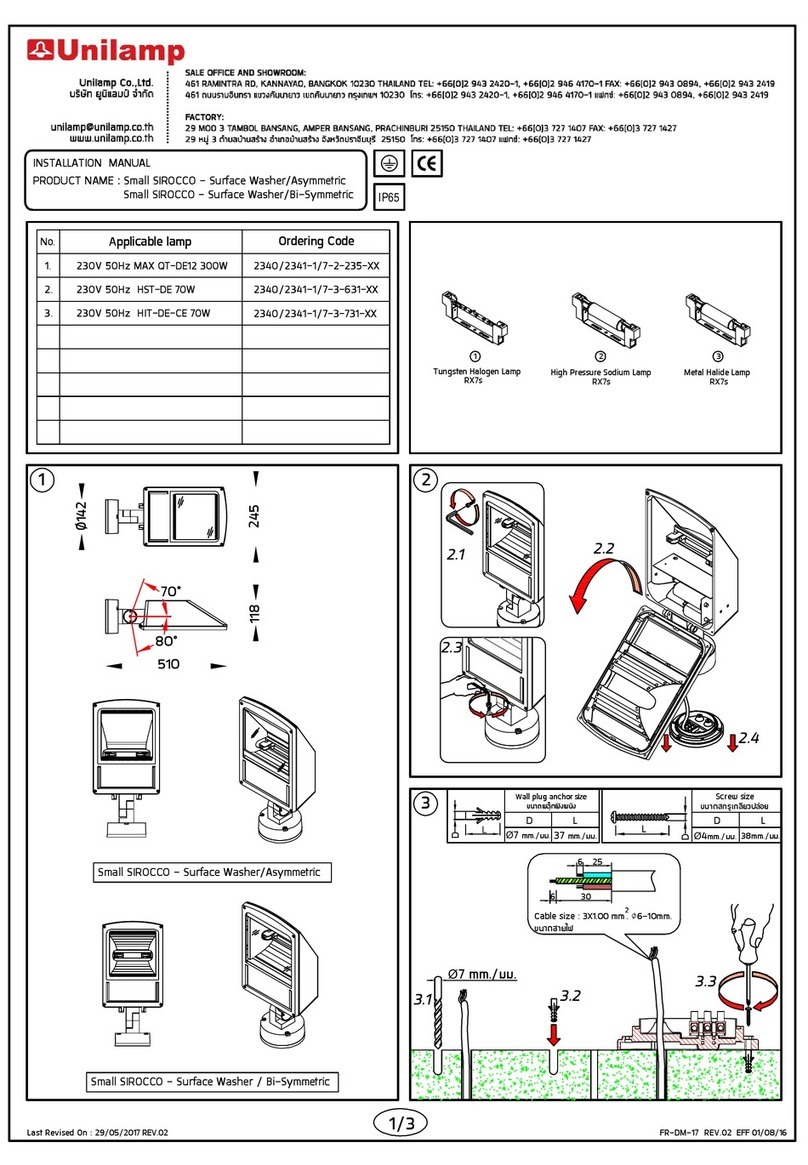
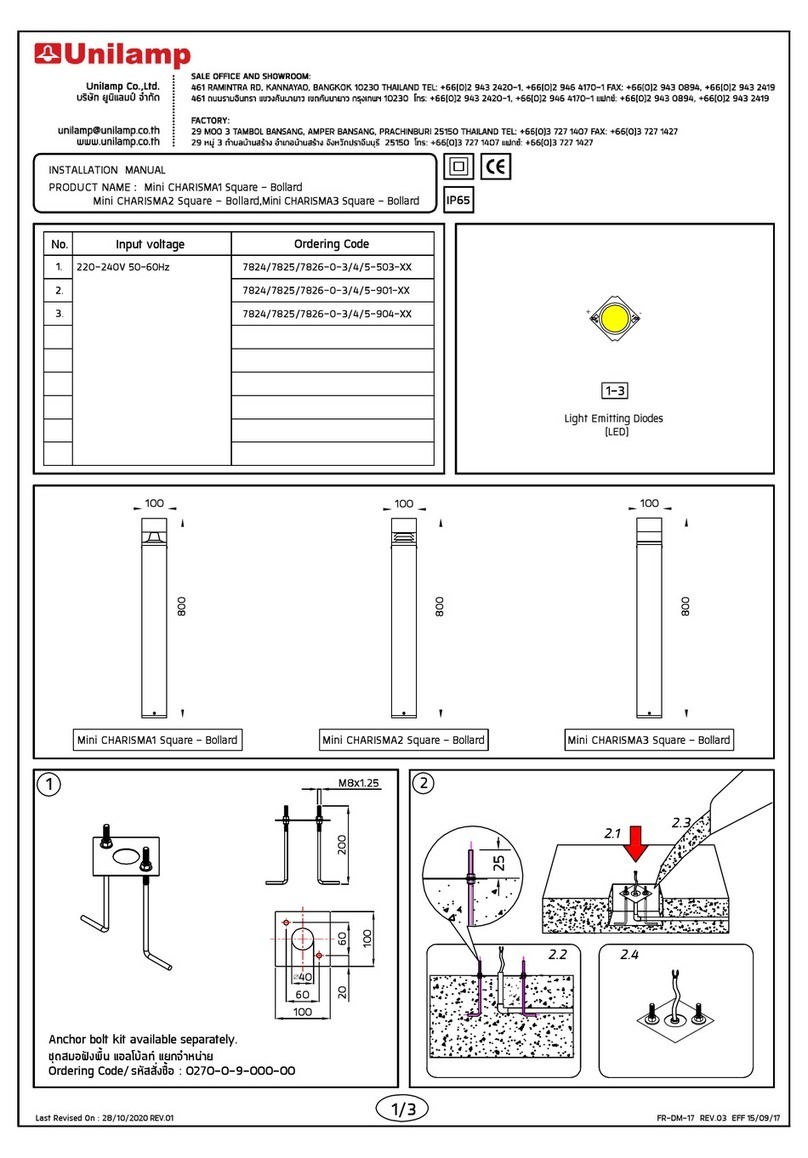
INSTALLATION MANUAL
IP65
No. Input voltage Ordering Code
1.
2.
3.
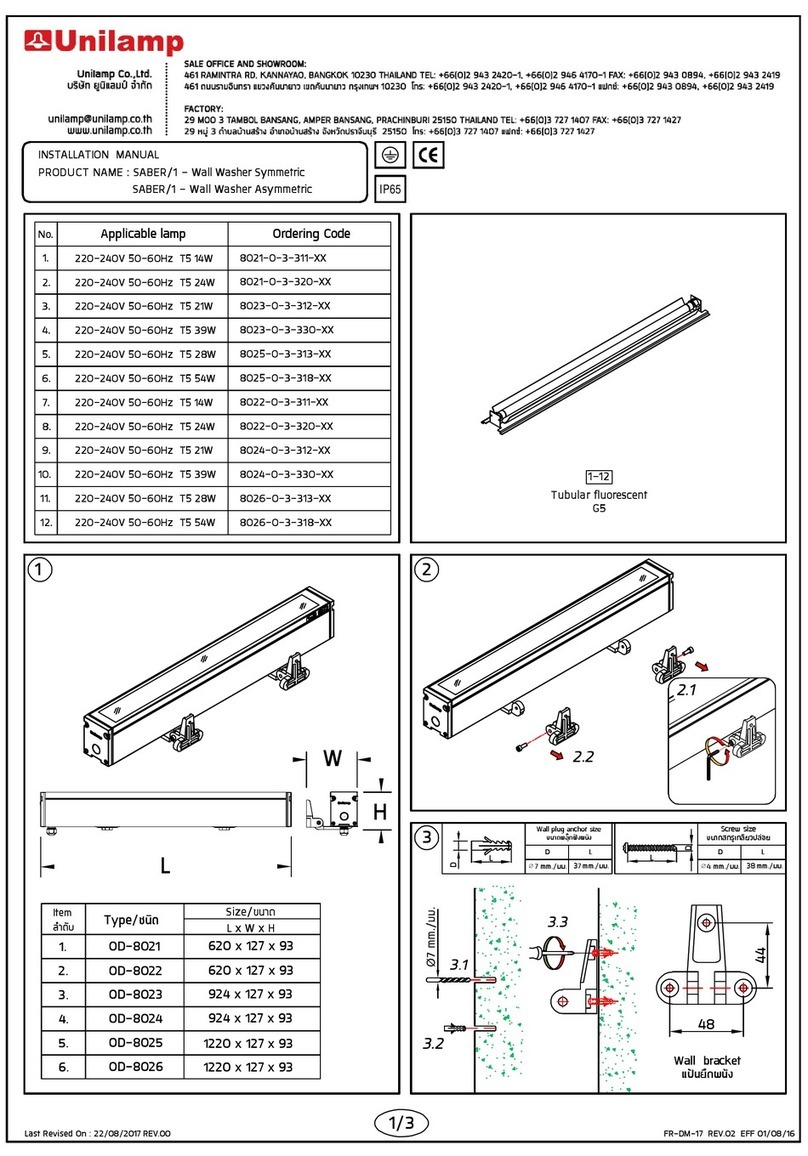
PRODUCT NAME : AGAR Prismatic - Indirect Light Bollard
AGAR Opal - Direct Light Bollard
4.
Last Revised On : 21/07/2022 REV.06
220-240V
~
50-60Hz ** 7123/7124-0-3/4/5-887-XX
7123/7124-0-3/4/5-891-XX
+
-
Light Emitting Diodes
(LED) Light Emitting Diodes
(LED)
5.
6.
895
û175
û324
û175
895
û324
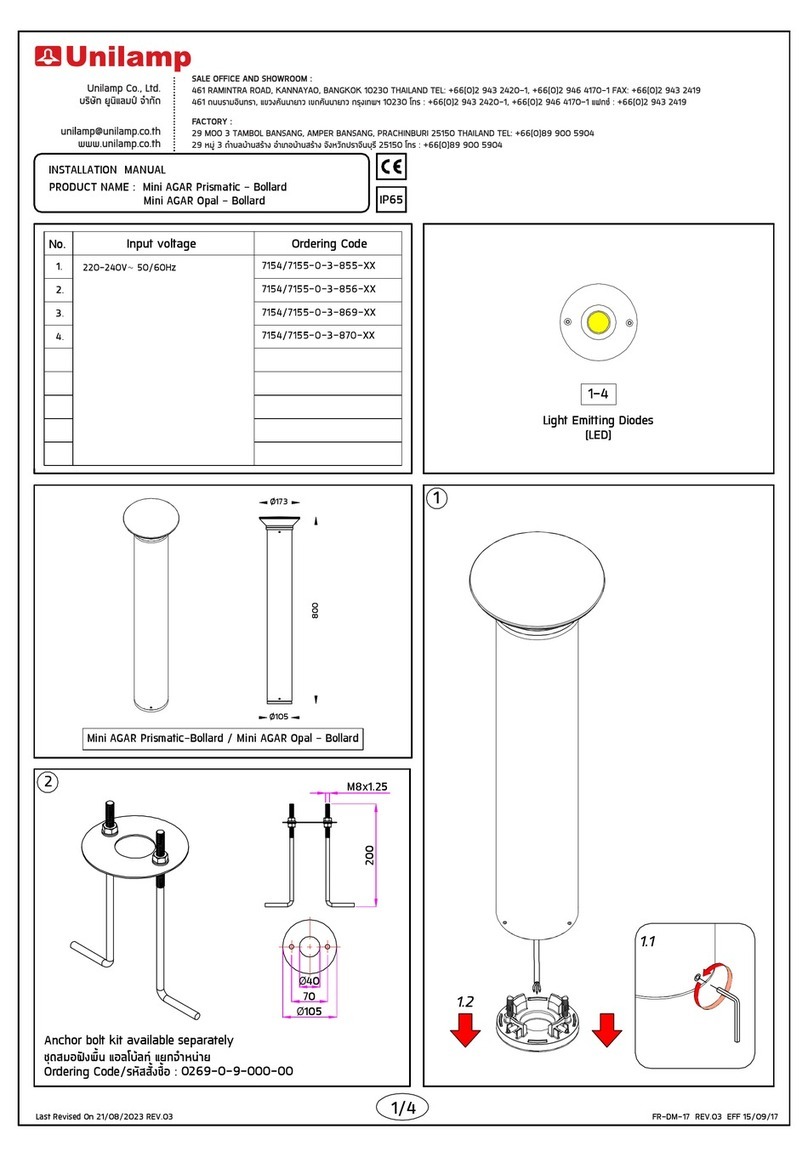
AGAR Prismatic - Indirect Light Bollard AGAR Opal - Direct Light Bollard
Part/ªÔé¹-A
Part/ªÔé¹-B
1
1.1
1.2
Part/ªÔé¹-B
FR-DM-17 REV.03 EFF 15/09/17
* **
7.
8.
220-240V
~
50-60Hz *
7123/7124-0-3/4/5-506-XX
7123/7124-0-3-873-XX
7123/7124-0-3-874-XX
1-6 7-8
7123/7124-0-3-902-XX
7123/7124-0-3-905-XX
7123/7124-0-3-505-XX
2
Anchor bolt kit available separately
ªØ´ÊÁͽ§¾×é¹ áÍÅâºÅ· ᡨíÒ˹ÒÂ
Ordering Code/ÃËÑÊÊÑè§«×éÍ : 0084-0-9-000-00
û175
û115
û90
200
M8x1.25
50
3
3.4
3.5
3.1
3.2
3.3
Cable length 200 mm.
ÊÒÂä¿ÂÒÇ 200 ÁÁ.
2/5
6
6.2
6.3
Torque/áçºÔ´ : 6 Nm.
Part/ªÔé¹-A
Do not cut or
disconnect the
cable between
this area.
ËÒÁµÑ´µÍÊÒÂä¿
ºÃÔàdz¹Õé
Warranty
void if removed.
ÊÔé¹ÊØ´¡ÒÃÃѺ»ÃСѹ
ËÒ¡¶Ù¡á¡ÐÍÍ¡
1
3
2
4
10
6.1
Make sure that cable
glands are fastened.
µͧ¢Ñ¹Ê¡ÃÙãËá¹¹·Ø¡µÑÇ
Make sure that the rubber seal is
correctly in place.
ÃÐÇѧÅÙ¡ÂÒ§ËÅØ´ÍÍ¡¨Ò¡ªØ´à¤àºÔÅá¡Åç¹´
5
7
6
8
9
Part/ªÔé¹-B
Use the rubber seal according to the size of the cable
àÅ×Í¡ãªÅÙ¡ÂÒ§à¤àºÔÅá¡Åç¹´ µÒÁ¢¹Ò´¢Í§ÊÒÂä¿
Cable size Dia
Ø
8-9 mm.
¢¹Ò´ÊÒÂä¿
12
Rubber seal size
ÅÙ¡ÂÒ§à¤àºÔÅá¡Åç¹´·Õèãª
Cable size Dia
Ø
10-11.5 mm.
¢¹Ò´ÊÒÂä¿
Cable size :
¢¹Ò´ÊÒÂä¿
9
IP68 water tight connecting device.
Available Separately
µÑǵÍÊÒÂä¿»ͧ¡Ñ¹¹éíÒ ¨íÒ˹ÒÂᡵÒ§ËÒ¡
Ordering Code/ÃËÑÊÊÑè§«×éÍ :
0248-0-9-000-00
Cable size : 2x1.00 mm.
Ø
8-11.5mm.
¢¹Ò´ÊÒÂä¿
256
2
4.1
4.2
4.3
4.1
4.2
4.3
Cable size : 3x1.00 mm.
Ø
8-11.5mm.
¢¹Ò´ÊÒÂä¿
306
256
2
4
For Class I
4
For Class II
5.2
5.1
Torque/áçºÔ´ : 6 Nm.
5
6
6.2
6.3
Torque/áçºÔ´ : 6 Nm.
Part/ªÔé¹-A
Do not cut or
disconnect the
cable between
this area.
ËÒÁµÑ´µÍÊÒÂä¿
ºÃÔàdz¹Õé
Warranty
void if removed.
ÊÔé¹ÊØ´¡ÒÃÃѺ»ÃСѹ
ËÒ¡¶Ù¡á¡ÐÍÍ¡
6.1
Part/ªÔé¹-B
Use the rubber seal according to the size of the cable
àÅ×Í¡ãªÅÙ¡ÂÒ§à¤àºÔÅá¡Åç¹´ µÒÁ¢¹Ò´¢Í§ÊÒÂä¿
Cable size Dia
Ø
8-9 mm.
¢¹Ò´ÊÒÂä¿
12
Rubber seal size
ÅÙ¡ÂÒ§à¤àºÔÅá¡Åç¹´·Õèãª
Cable size Dia
Ø
10-11.5 mm.
¢¹Ò´ÊÒÂä¿
Cable size :
¢¹Ò´ÊÒÂä¿
9
IP68 water tight connecting device.
Available Separately
µÑǵÍÊÒÂä¿»ͧ¡Ñ¹¹éíÒ ¨íÒ˹ÒÂᡵÒ§ËÒ¡
Ordering Code/ÃËÑÊÊÑè§«×éÍ :
0248-0-9-000-00
1
3
2
4
10
Make sure that
cable glands are
fastened.
µͧ¢Ñ¹Ê¡ÃÙãËá¹¹·Ø¡µÑÇ
Make sure that the rubber seal is
correctly in place.
ÃÐÇѧÅÙ¡ÂÒ§ËÅØ´ÍÍ¡¨Ò¡ªØ´à¤àºÔÅá¡Åç¹´
5
L =
Brown (ÊÕ¹éíÒµÒÅ)
=Green and yellow (ÊÕà¢ÕÂǡѺÊÕàËÅ×ͧ)
N = Blue (ÊÕ¿Ò)
7
6
8
9
For Class I For Class II
Last Revised On : 21/07/2022 REV.06 FR-DM-17 REV.03 EFF 15/09/17
L =
Brown (ÊÕ¹éíÒµÒÅ)
N = Blue (ÊÕ¿Ò)
3/5
1.
1.
2.
3.
4.
5.
2.
Remark :
ËÁÒÂà˵Ø
Installation should be carried out by a qualified
electrician in accordance with appropriate national
wiring regulation.
¡ÒõԴµÑé§â¤Áä¿¿ÒáÅÐÍØ»¡Ã³ ¤ÇôíÒà¹Ô¹¡ÒÃâ´ÂªÒ§ä¿¿Ò
·ÕèÁÕ¤ÇÒÁÃÙáÅФÇÒÁªíÒ¹Ò 㹡ÒõԴµÑé§ÍØ»¡Ã³ä¿¿Ò
â´Â੾ÒеÒÁÁÒµÃฐÒ¹¢Í§¡ÒÃä¿¿Ò
Disconnect the power before changing the lamp.
»´ÊÇÔ·ªä¿·Ø¡¤ÃÑé§·Õèà»ÅÕè¹ËÅÍ´ä¿
For class 1 luminaires,the installation must be
completed with earthing.
ÊíÒËÃѺâ¤ÁÃØ¹·Õè¶Ù¡Í͡ẺáÅШѴäÇã¹»ÃÐàÀ·¢Í§¡Òûͧ¡Ñ¹ä¿ÃÑèÇ
ÃдѺ1 ¡ÒõԴµÑé§µͧµÍÊÒ´ԹµÒÁÁÒµÃฐÒ¹¤ÇÒÁ»ÅÍ´ÀÑÂ
Do not exceed the maximum wattage.
ËÒÁãªËÅÍ´ä¿·ÕèÁÕ¢¹Ò´Çѵµà¡Ô¹¡ÇÒ·ÕèÃÐºØ ËÃ×ÍãªËÅÍ´¼Ô´»ÃÐàÀ·
Don't touch LED while maintaining or cleaning.
ËÒÁÊÑÁ¼ÑÊËÅÍ´ LED ¢³ÐºíÒÃØ§ÃÑ¡ÉÒ ËÃ×Í·íÒ¤ÇÒÁÊÐÍÒ´
Warning :
¢ͤÇÃÃÐÇѧ
The manufacturer will not be liable or held responsible for any incorrect installation, misuse or improper use and
unauthorised modification to the fittings. Failure to comply with mentioned warning may cause serious damage or
serious injury to persons, animals or objects. If any modification is required please consult your dealer for the details.
·Ò§¼Ù¼ÅÔµäÁÊÒÁÒöÃѺ¼Ô´ªÍºã¹¤ÇÒÁàÊÕÂËÒÂã´æ·Õèà¡Ô´¨Ò¡¡ÒõԴµÑé§äÁ¶Ù¡ÇÔ¸Õ, ãª§Ò¹¼Ô´»ÃÐàÀ·ËÃ×Í´ Ñ´á»Å§µÑÇâ¤Áã¹·Ø¡¡Ã³Õ «Öè§
ÊÔè§¼Ô´»¡µÔàËÅÒ¹Õé ÍÒ¨·íÒãËà¡Ô´ÍѹµÃÒ¡Ѻ ¤¹ ÊѵÇ ÊÔ觢ͧ ËÒ¡Á Õ¢ÍʧÊÑÂËÃ×ÍÁÕ¤ÇÒÁµͧ¡ÒûÃѺᵠ§µÑÇâ¤Á ãËàËÁÒÐÊÁ¡Ñº¡ÒÃãª§Ò¹
¡ÃسҵԴµ͵ÑÇá·¹¨íÒ˹ÒÂËÃ×ͼÙ¼ÅÔµ
Where damage has occured to the fittings, please make the replacement with standard parts before use.
㹡óշÕèÁÕªÔé¹Êǹ»ÃСͺã´à¡Ô´¤ÇÒÁàÊÕÂËÒÂ¡ÃØ³Òà»ÅÕ蹪Ôé¹ÊǹãËÁ¡͹¡ÒÃãª§Ò¹·Ø¡¤ÃÑé§ à¾×èͤÇÒÁ»ÅÍ´ÀÑÂ
Installation complete
¡ÒõԴµÑé§àÊÃç¨ÊÁºÙó
7
Last Revised On : 21/07/2022 REV.06 FR-DM-17 REV.03 EFF 15/09/17
For 1-10V dimming and DALI system.
Cable Size/¢¹Ò´ÊÒÂä¿ : 5x1.00 mm.
Ø
7.1-13 mm.
2
ÊíÒËÃѺÃкº´ÔÁ1-10V áÅÐÃкºDALI
A = 38-40 mm.
B = 8-10 mm.
C = 30-32 mm.
Green/Yellow (ÊÕà¢ÕÂÇ/ÊÕàËÅ×ͧ) :
Brown (ÊÕ¹éíÒµÒÅ) : L
Blue (ÊÕ¹éíÒà§Ô¹) : N
White (ÊÕ¢ÒÇ) : + (DA1)
Black (ÊÕ´íÒ) : - (DA2)
IP68 water tight connecting device 5 Pole.Cable Diameter 7.1-13 mm.
Available Separately/µÑǵÍÊÒÂä¿»ͧ¡Ñ¹¹éíÒ ¨íÒ˹ÒÂᡵÒ§ËÒ¡
Ordering Code : 0413-0-9-000-00
B
C
A
NO
Do not touch the LED because it may shorten the life time or the LED can be
breaking down.
ËÒÁÊÑÁ¼ÑÊËÅÍ´ LED â´Âà´ç´¢Ò´ à¾ÃÒШзíÒãËËÅÍ´àÊ×èÍÁÊÀÒ¾
4/5
Any damaged safety glass cover must be replaced only with the original
spare part.
àÁ×èÍ¡ÃШ¡à¡Ô´¤ÇÒÁàÊÕÂËÒ à¾×èͤÇÒÁ»ÅÍ´ÀѤÇÃÊÑè§ÍÐäËÅá·¨Ò¡¼Ù¼ÅÔµà·Ò¹Ñé¹
NO
Not using chemical compounds and aggressive agents such as , weed repellents
fertilizers , acid solvent and contaminated irrigation water near the Luminaires.
ËÒÁãªÊÒÃà¤ÁÕàª¹ »ØÂ, ÂÒ¡íҨѴÈѵÃپת, »Ù¹¢ÒÇ, ÊÒÃÅÐÅÒ·Õèà»¹¡Ã´ áÅйéíÒ»¹à»͹ÊÒÃà¤ÁÕ
ºÃÔàdz·ÕèµÔ´µÑé§â¤Áä¿
Last Revised On : 21/07/2022 REV.06 FR-DM-17 REV.03 EFF 15/09/17
Cable Size/¢¹Ò´ÊÒÂä¿ : 2x1.00 mm.
Ø
8-11.5 mm.
2
For Class I
For Class II
In case the supply cable is exposed to sunlight use UV resistant cable.
¡Ã³Õ·ÕèÁÕ¡ÒõԴµÑé§â¤Á俹͡ÍÒ¤Òà ËÃ×Íâ¤Áä¿·ÕèÁÕ¡ÒÃá¼ÃѧÊÕÂÙÇÕ ÊÒÂ俵ͧÊÒÁÒö»ͧ¡Ñ¹ ËÃ×Í ÁÕ¡Òûͧ¡Ñ¹äÁãË¶Ù¡ÃѧÊÕÂÙÇÕä´
LED
Clean the products regularly to maintain good light output and prolong surface
quality .
Only use solvent-free cleaning solutions on the products.
·íÒ¤ÇÒÁÊÐÍÒ´¼ÅÔµÀѳ±à»¹»ÃШíÒà¾×èÍÃÑ¡ÉÒ¤ÇÒÁÊͧÊÇÒ§·Õè´ÕáÅÐÂ×´ÍÒÂØ¤Ø³ÀÒ¾¾×é¹¼ÔÇ
ãª¹éíÒÂÒ·íÒ¤ÇÒÁÊÐÍÒ´·ÕèäÁÁÕáÍÅ¡ÍÎÍÅËÃ×͵ÑÇ·íÒÅÐÅÒ¡Ѻ¼ÅÔµÀѳ±à·Ò¹Ñé¹
Our products are installed with electronic components with the protection against
overvoltage according to IEC 61547. The customers have to install the additional
overvoltage protection devices (against surge, transients, etc) in their electrical
system to avoid the risk of damage. Failing to do so can cause the end
of products warranty.
¼ÅÔµÀѳ±¢Í§àÃÒä´ÃѺ¡ÒõԴµÑé§Ãкº»ͧ¡Ñ¹áç´Ñ¹ä¿¿Òà¡Ô¹µÒÁÁÒµÃฐÒ¹ IEC 61547
ÅÙ¡¤ÒµͧµÔ´µÑé§ÍØ»¡Ã³»ͧ¡Ñ¹áç´Ñ¹ä¿¿Òà¡Ô¹à¾ÔèÁàµÔÁ(àª¹ »ͧ¡Ñ¹ä¿¡ÃЪҡ ÏÅÏ )
ã¹Ãкºä¿¿Òà¾×èÍËÅÕ¡àÅÕ觤ÇÒÁàÊÕÂËÒ·ÕèÍÒ¨¨Ðà¡Ô´¢Öé¹ ËÒ¡ÅÙ¡¤ÒäÁ·íÒ¡ÒõԴµÑé§à¾ÔèÁ
àµÔÁÍÒ¨·íÒãË¡ÒÃÃѺ»ÃСѹÊÔ¹¤ÒÊÔé¹Êشŧ
Cable Size/¢¹Ò´ÊÒÂä¿ : 3x1.00 mm.
Ø
8-11.5 mm.
2
Do not use a high pressure washer to clean the products.
ËÒÁãªà¤Ã×èͧ©Õ´¹éíÒáç´Ñ¹Ê٧㹡Ò÷íÒ¤ÇÒÁÊÐÍÒ´¼ÅÔµÀѳ±
5/5
Last Revised On : 21/07/2022 REV.06 FR-DM-17 REV.03 EFF 15/09/17
1.
2.
3.
4.
5.
6.
Replacing the LED module
ÇÔ¸Õ¡ÒÃà»ÅÕè¹ LED module
Contact your sales representative for replacement LED modules. Make sure that the replacement module
match the initially supplied module. Note the part number printed on the LED module.
àµÃÕÂÁ LED module ãËµÃ§¡ÑºÃØ¹· Õèµͧ¡ÒÃà»ÅÕè¹â´ÂµÃǨÊͺ·ÕèËÁÒÂàÅ¢·Õè¾ÔÁ¾º¹LED modules áÅÐ µÔ´µ͵ÑÇá·¹¢ÒÂà¾×èÍÊÑè§«×éÍ
LED modules ·Õèµͧ¡ÒÃà»ÅÕè¹
The LED module can be replaced by qualified persons using standard tools.
¡ÒÃà»ÅÕè¹ LED module µͧ·íÒâ´ÂªÒ§¼ÙªíÒ¹ÒáÅÐãªà¤Ã×èͧÁ×Í·Õèä´ÁÒµÃฐÒ¹
Disconnect power before opening the luminaire housing.
µÑ´áËÅ§¨ÒÂä¿¡͹·Õè¨Ðà»´µÑÇâ¤Á
Replace the old LED module with the new LED module. Reapply thermal interface material as supplied with the
new LED module.
¶Í´ LED module ·ÕèªíÒÃØ´ÍÍ¡ ¨Ò¡¹Ñ ¹·íÒ¤ÇÒÁÊÐÍÒ´¨Ø´ÇÒ§ËÅÍ´ áÅǨ֧·íÒ¡ÒûÃСͺ LED module ãËÁ áÅе ͧà»ÅÕè¹
á¼¹Thermal Pad ËÃ×Í Thermal Grease ´Ç·ء¤ÃÑé§
Inspect gaskets and if required replace with new gaskets. Defective luminaire covers must be replaced. Inspect
correct wiring of replaced LED module.
µÃǨÊͺ»ÃÐà¡ç¹áÅЪÔé¹Êǹ¢Í§µÑÇâ¤Á ¶ÒªíÒÃØ´àÊÕÂËÒÂãË·íÒ¡ÒÃà»ÅÕè¹ãËÁ áÅеÃǨÊͺ¡ÒÃà¢ÒÊÒÂ俢ͧ LED module
·Õèà»ÅÕè¹ãËÁ¶Ù¡µͧËÃ×ÍäÁ
Close the luminaire housing before reconnecting power.
»´½Ò¤ÃͺÅçͤâ¤Áä¿ãËàÃÕºÃÍ¡͹à»´ä¿
Environmental protection: Waste electrical products should not be disposed of
with household waste. please recycle where facilities exist.check with your local
authority or retailer for recycling advice According to directive 2002/96/CE and
directive 2012/19/EU Waste Electrical and Electronic Equipment (WEEE).
ËÒÁ·Ôé§¼ÅÔµÀѳ±¹ÕéÃÇÁ¡Ñº¢ÂÐ㹤ÃÑÇàÃ×͹ª¹Ô´Í×è¹æàÁ×èÍÊÔé¹ÊØ´ÍÒÂØ¡ÒÃãª§Ò¹â»Ã´á¡¼ÅÔµÀѳ±ÍÍ¡
¨Ò¡¢Í§àÊÕ»ÃÐàÀ·Í×è¹æáÅÐÃÕä«à¤ÔÅÍÂÒ§àËÁÒÐÊÁà¾×èÍÊ§àÊÃÔÁ¡ÒùíÒ·ÃѾÂҡáÅѺÁÒãª«éíÒ«Ö觨ЪÇÂ
»ͧ¡Ñ¹ÍѹµÃÒµÍÊÔè§áÇ´ÅÍÁËÃ×ÍÊØ¢ÀÒ¾¢Í§Á¹ØÉÂ·Õèà¡Ô´¨Ò¡¡Ò÷Ôé§¢ÂÐâ´ÂäÁÁÕ¡ÒäǺ¤ØÁ
ÍÒ§ÍÔ§µÒÁÃÐàºÕº 2002/96/CE áÅÐÃÐàºÕº 2012/19/EU Waste Electrical and
Electronic Equipment (WEEE).
LED LED
To replace the LED module or the entrire luminaire.Please consult your
sales representative.
ËÒ¡µͧ¡ÒÃà»ÅÕè¹ LED module ËÃ×Íâ¤Áä¿â»Ã´µÔ´µ͵ÑÇá·¹¢Ò¢ͧ¤Ø³
230V
LED

This manual suits for next models

1

Other Unilamp Outdoor Light manuals

Unilamp POM Opal User manual

Unilamp

Unilamp POM Opal User manual

Unilamp SABER/1 User manual

Unilamp

Unilamp SABER/1 User manual

Unilamp TOWER3 User manual

Unilamp

Unilamp TOWER3 User manual

Unilamp Maxi CORE OD-4102 User manual

Unilamp

Unilamp Maxi CORE OD-4102 User manual

Unilamp CONE 3 User manual

Unilamp

Unilamp CONE 3 User manual

Unilamp CASA User manual

Unilamp

Unilamp CASA User manual

Unilamp XEON Cross User manual

Unilamp

Unilamp XEON Cross User manual

Unilamp BRUDA User manual

Unilamp

Unilamp BRUDA User manual

Unilamp 9007-4-2-361-91 User manual

Unilamp

Unilamp 9007-4-2-361-91 User manual

Unilamp ATOM - CC Spotlight User manual

Unilamp

Unilamp ATOM - CC Spotlight User manual

Unilamp VAREE User manual

Unilamp

Unilamp VAREE User manual

Unilamp SIROCCO User manual

Unilamp

Unilamp SIROCCO User manual

Unilamp MACRON Flat - Bollard User manual

Unilamp

Unilamp MACRON Flat - Bollard User manual

Unilamp Mini PETINA 1 User manual

Unilamp

Unilamp Mini PETINA 1 User manual

Unilamp Mini AGAR Prismatic - Bollard User manual

Unilamp

Unilamp Mini AGAR Prismatic - Bollard User manual

Unilamp ZOUK1 Recess User manual

Unilamp

Unilamp ZOUK1 Recess User manual

Unilamp KUBIK OD-5951 User manual

Unilamp

Unilamp KUBIK OD-5951 User manual

Unilamp Mini KUBIK - Ground Mount User manual

Unilamp

Unilamp Mini KUBIK - Ground Mount User manual

Unilamp ZOUK2 User manual

Unilamp

Unilamp ZOUK2 User manual

Unilamp MEGA SONIC-ARM User manual

Unilamp

Unilamp MEGA SONIC-ARM User manual

Unilamp BUZZ1 User manual

Unilamp

Unilamp BUZZ1 User manual

Unilamp QUARK Square - Asymmetric User manual

Unilamp

Unilamp QUARK Square - Asymmetric User manual

Unilamp Small SIROCCO User manual

Unilamp

Unilamp Small SIROCCO User manual

Unilamp PILLAR/1 User manual

Unilamp

Unilamp PILLAR/1 User manual
Popular Outdoor Light manuals by other brands

Kichler Lighting AMMA 37534 instructions

Kichler Lighting

Kichler Lighting AMMA 37534 instructions

SLV MECANICA PLUS instruction manual

SLV

SLV MECANICA PLUS instruction manual

LED Group ROBUS JUPITER manual

LED Group

LED Group ROBUS JUPITER manual

Classy Caps SSL810 Lighting instructions

Classy Caps

Classy Caps SSL810 Lighting instructions

Maxim Lighting Carriage House VX 40428WGOB installation instructions

Maxim Lighting

Maxim Lighting Carriage House VX 40428WGOB installation instructions

LIGMAN DE-20023 installation manual

LIGMAN

LIGMAN DE-20023 installation manual

Spectroline MAXIMA ML-3500 Series Operator's manual

Spectroline

Spectroline MAXIMA ML-3500 Series Operator's manual

JONATHAN Y JYL3011A quick start guide

JONATHAN Y

JONATHAN Y JYL3011A quick start guide

SImx Pukaki LHT1111 installation instructions

SImx

SImx Pukaki LHT1111 installation instructions

LIGMAN LIGHTSOFT 3 installation manual

LIGMAN

LIGMAN LIGHTSOFT 3 installation manual

Oase Luminis 3 operating instructions

Oase

Oase Luminis 3 operating instructions

VALLEY FORGE HECSFPL-12 quick start guide

VALLEY FORGE

VALLEY FORGE HECSFPL-12 quick start guide

J&J Electronics PureWhite LPL-P2-WHT-12-S Installation and operation guide

J&J Electronics

J&J Electronics PureWhite LPL-P2-WHT-12-S Installation and operation guide

Vaxcel T0241 Assembly and installation instructions

Vaxcel

Vaxcel T0241 Assembly and installation instructions

Kingfisher Viva-City Pro quick guide

Kingfisher

Kingfisher Viva-City Pro quick guide

HEPER LF8017.693-US Installation & maintenance instructions

HEPER

HEPER LF8017.693-US Installation & maintenance instructions

BEGA 33 592 Instructions for use

BEGA

BEGA 33 592 Instructions for use

LIGMAN ALDO 6 installation manual

LIGMAN

LIGMAN ALDO 6 installation manual

manuals.online logo
manuals.online logoBrands
  • About & Mission
  • Contact us
  • Privacy Policy
  • Terms and Conditions

Copyright 2025 Manuals.Online. All Rights Reserved.