manuals.online logo
Brands
  1. Home
  2. •
  3. Brands
  4. •
  5. Unilamp
  6. •
  7. Outdoor Light
  8. •
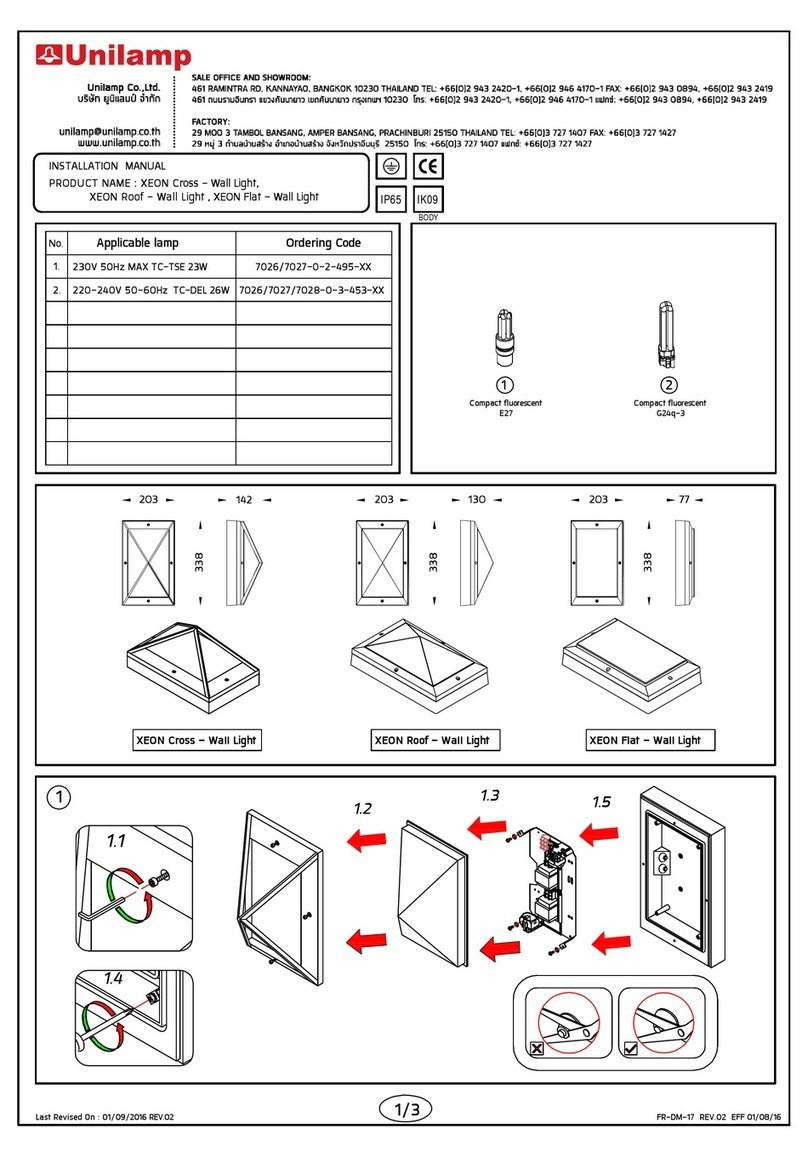
  9. Unilamp XEON Cross User manual

Unilamp XEON Cross User manual

1/7
IP65
No. Input voltage Ordering Code
1.
INSTALLATION MANUAL
PRODUCT NAME : XEON Cross - Wall Light,
XEON Roof - Wall Light , XEON Flat - Wall Light
Last Revised On : 23/11/2020 REV.05
220-240V 50-60Hz (with sensor) 7026/7027/7028-0-3-956-XX
7026/7027/7028-0-3-957-XX
Light Emitting Diodes
(LED)
1-3
1
1.1
1.2 1.3
1.5
Open
à»´
1.4
338
142
203
338
203 130
338
203 77
XEON Cross - Wall Light XEON Roof - Wall Light XEON Flat - Wall Light
2
∅7 mm./ÁÁ.
105
Torque/áçºÔ´ : 1.0 Nm.
2.1
2.2
2.3
Wall plug anchor size
¢¹Ò´¾ÅØ¡½§¼¹Ñ§
D L
Ø7 mm./ÁÁ. 37 mm./ÁÁ.
Screw size
¢¹Ò´Ê¡ÃÙà¡ÅÕÂÇ»ÅÍÂ
D L
Ø4mm./ÁÁ. 38mm./ÁÁ.
L
D
D
L
FR-DM-17 REV.03 EFF 15/09/17
7026/7027/7028-0-3-610-XX
2.
3.
4
5
5.3
6
Installation complete
¡ÒõԴµÑé§àÊÃç¨ÊÁºÙó
Close
»´
4.2
5.1
5.2
33
L
N
1. 1.
2.
3.
4.
5.
2.
Remark :
ËÁÒÂà˵Ø
Installation should be carried out by a qualified
electrician in accordance with appropriate national
wiring regulation.
¡ÒõԴµÑé§â¤Áä¿¿ÒáÅÐÍØ»¡Ã³ ¤ÇôíÒà¹Ô¹¡ÒÃâ´ÂªÒ§ä¿¿Ò ·ÕèÁÕ
¤ÇÒÁÃÙáÅФÇÒÁªíÒ¹Ò 㹡ÒõԴµÑé§ÍØ»¡Ã³ä¿¿Ò â´Â੾ÒеÒÁ
ÁÒµÃฐÒ¹¢Í§¡ÒÃä¿¿Ò
Disconnect the power before changing the lamp.
»´ÊÇÔ·ªä¿·Ø¡¤ÃÑé§·Õèà»ÅÕè¹ËÅÍ´ä¿
This is Class1 luminaire, the installation must be
completed with earthing.
â¤Áä¿ÃØ¹¹Õé¶Ù¡¨Ñ´äÇã¹»ÃÐàÀ·¢Í§¡Òûͧ¡Ñ¹ä¿¿ÒÃÑèÇ ÃдѺ 1 ·Õè¨Ð
µͧµÍÊÒ´ԹµÒÁÁÒµÃฐÒ¹¤ÇÒÁ»ÅÍ´ÀÑÂ
Do not exceed the maximum wattage.
ËÒÁãªËÅÍ´ä¿·ÕèÁÕ¢¹Ò´Çѵµà¡Ô¹¡ÇÒ·ÕèÃÐºØ ËÃ×ÍãªËÅÍ´¼Ô´»ÃÐàÀ·
Don't touch LED while maintaining or cleaning.
ËÒÁÊÑÁ¼ÑÊËÅÍ´ LED ¢³ÐºíÒÃØ§ÃÑ¡ÉÒ ËÃ×Í·íÒ¤ÇÒÁÊÐÍÒ´
Warning :
¢ͤÇÃÃÐÇѧ
The manufacturer will not be liable or held responsible
for any incorrect installation, misuse or improper use
and unauthorised modification to the fittings. Failure
to comply with mentioned warning may cause serious
damage or serious injury to persons, animals or
objects. If any modification is required please consult
your dealer for the details.
·Ò§¼Ù¼ÅÔµäÁÊÒÁÒöÃѺ¼Ô´ªÍºã¹¤ÇÒÁàÊÕÂËÒÂã´æ·Õèà¡Ô´¨Ò¡¡ÒÃ
µÔ´µÑé§äÁ¶Ù¡ÇÔ¸Õ, ãª§Ò¹¼Ô´»ÃÐàÀ·ËÃ×Í´Ñ´á»Å§µÑÇâ¤Áã¹·Ø¡¡Ã³Õ
«Öè§ ÊÔè§¼Ô´»¡µÔàËÅÒ¹Õé ÍÒ¨·íÒãËà¡Ô´ÍѹµÃÒ¡Ѻ ¤¹ ÊѵÇ ÊÔ觢ͧ
ËÒ¡ÁÕ¢ÍʧÊÑÂËÃ×ÍÁÕ¤ÇÒÁµͧ¡ÒûÃѺáµ§µÑÇâ¤Á ãËàËÁÒÐÊÁ¡Ñº
¡ÒÃãª§Ò¹ ¡ÃسҵԴµ͵ÑÇá·¹¨íÒ˹ÒÂËÃ×ͼÙ¼ÅÔµ
Where damage has occured to the fittings, please
make the replacement with standard parts before use.
㹡óշÕèÁÕªÔé¹Êǹ»ÃСͺã´à¡Ô´¤ÇÒÁàÊÕÂËÒÂ¡ÃØ³Òà»ÅÕ蹪Ôé¹
ÊǹãËÁ¡͹¡ÒÃãª§Ò¹·Ø¡¤ÃÑé§ à¾×èͤÇÒÁ»ÅÍ´ÀÑÂ
Torque : 1.0 Nm.
áçºÔ´
FR-DM-17 REV.03 EFF 15/09/17
Lock the screws
following this
sequence.
¤ÇâѹʡÃÙµÒÁ
ÅíҴѺ¢Í§ËÁÒÂàÅ¢
·ÕèÃкØäÇµÒÁÃÙ»ÀÒ¾
1
2
3
4
2/7
Last Revised On : 23/11/2020 REV.05
Cable size : 3x1.00 mm. ∅6-10 mm.
¢¹Ò´ÊÒÂä¿
256
306
2
4.1
Mounting height (m)
¤ÇÒÁÊ٧㹡ÒõԴµÑé§ (àÁµÃ)
Detection range (m)
ÃÐÂСÒõÃǨ¨Ñº (àÁµÃ)
0 1 2 3 4 5 6 7 8 9 1012345678910
1
2
3
4
5
6
7
8
9
11
12
13
14
15
Area of high sensitivity
¾×é¹·ÕèµÃǨ¨Ñº¤ÇÒÁäÇÊÙ§
DESCRIPTION OF MICROWAVE SENSOR
ÃÒÂÅÐàÍÕ´¢Í§Ãкºà«ç¹à«ÍÃ
Detection angle 30-150°
ÃÑÈÁÕ㹡ÒõÃǨ¨Ñº 30-150°
Detection range 12-18 M (diameter) adjustable
ÊÒÁÒöàÅ×Í¡»ÃѺÃÐÂеÃǨ¨Ñº¡ÒÃà¤Å×è͹äËÇ
µÑé§áµ 12-18 àÁµÃä´
Time setting 10sec-30 min adjustable
ÊÒÁÒö»ÃѺµÑé§àÇÅÒä´µÑé§áµ 10ÇÔ¹Ò·Õ - 30¹Ò·Õ
Light-control 5-50 Lux adjustable or disable
ÊÒÁÒö»ÃѺ¤Çº¤ØÁ¤ÇÒÁÊÇÒ§ä´µÑé§áµ 5-50 ÅÑ¡«
ËÃ×Í»´¡ÒÃãª§Ò¹
Mounting height Max 12 M
ÃÐÂСÒõԴµÑé§ä´ÊÙ§ÊØ´ 12 àÁµÃ Area of lower sensitivity
¾×é¹·ÕèµÃǨ¨Ñº¤ÇÒÁäǵèíÒ
10
Cable Size/¢¹Ò´ÊÒÂä¿ : 3x1.00 mm. Ø6-10 mm.
2
Any damaged safety glass cover must be replaced only with the original
spare part.
àÁ×èÍ¡ÃШ¡à¡Ô´¤ÇÒÁàÊÕÂËÒ à¾×èͤÇÒÁ»ÅÍ´ÀѤÇÃÊÑè§ÍÐäËÅá·¨Ò¡¼Ù¼ÅÔµà·Ò¹Ñé¹
FR-DM-17 REV.03 EFF 15/09/17
3/7
Last Revised On : 23/11/2020 REV.05
Environmental protection: Waste electrical products should not be disposed of
with household waste. please recycle where facilities exist.check with your local
authority or retailer for recycling advice.
ËÒÁ·Ôé§¼ÅÔµÀѳ±¹ÕéÃÇÁ¡Ñº¢ÂÐ㹤ÃÑÇàÃ×͹ª¹Ô´Í×è¹æ àÁ×èÍÊÔé¹ÊØ´ÍÒÂØ¡ÒÃãª§Ò¹ â»Ã´á¡¼ÅÔµÀѳ±
ÍÍ¡¨Ò¡¢Í§àÊÕ»ÃÐàÀ·Í×è¹æ áÅÐÃÕä«à¤ÔÅÍÂÒ§àËÁÒÐÊÁ à¾×èÍÊ§àÊÃÔÁ¡ÒùíÒ·ÃѾÂҡáÅѺÁÒãª«éíÒ «Öè§
¨ÐªÇ»ͧ¡Ñ¹ÍѹµÃÒµÍÊÔè§áÇ´ÅÍÁËÃ×ÍÊØ¢ÀÒ¾¢Í§Á¹ØÉÂ·Õèà¡Ô´¨Ò¡¡Ò÷Ôé§¢ÂÐâ´ÂäÁÁÕ¡ÒäǺ¤ØÁ
NO
Not using chemical compounds and aggressive agents such as , weed repellents
fertilizers , acid solvent and contaminated irrigation water near the Luminaires.
ËÒÁãªÊÒÃà¤ÁÕàª¹ »ØÂ, ÂÒ¡íҨѴÈѵÃپת, »Ù¹¢ÒÇ, ÊÒÃÅÐÅÒ·Õèà»¹¡Ã´ áÅйéíÒ»¹à»͹ÊÒÃà¤ÁÕ
ºÃÔàdz·ÕèµÔ´µÑé§â¤Áä¿
4/7
HI-LOW LIGHT FUNCTION SETTING FOR LUMINAIRE WITH SENSOR
¡ÒõÑ駤Ò¤ÇÒÁÊÇÒ§ÊíÒËÃѺâ¤Á·ÕèÁÕૹà«ÍÃ
I- Adjusting Brightness 0% light power is not lit,But when a motion occurs, light will lit to 100%
àÁ×èÍ»ÃѺ¤Ò¤ÇÒÁÊÇÒ§ä»·Õè 0% 俨ÐÂѧäÁµÔ´áµàÁ×èÍÁÕ¡ÒÃà¤Å×è͹äËÇà¡Ô´¢Öé¹ ä¿¡ç¨ÐÊÇÒ§à»¹ 100%
II- Adjusting Brightness 25% Brightness 25% But when a motion occurs, light will lit to 100%
àÁ×èÍ»ÃѺ¤Ò¤ÇÒÁÊÇÒ§ ä»·Õè 25% 俨ÐÊÇÒ§à¾Õ§ 25% áÅÐàÁ×èÍÁÕ¡ÒÃà¤Å×è͹äËÇà¡Ô´¢Öé¹ ¡ç¨ÐÊÇÒ§à»¹ 100%
III-Adjusting Brightness 50% Brightness 50% But when a motion occurs, light will lit to 100%
àÁ×èÍ»ÃѺ Brightness ä»·Õè 50% 俨ÐÊÇÒ§à¾Õ§ 50% áÅÐàÁ×èÍÁÕ¡ÒÃà¤Å×è͹äËÇà¡Ô´¢Öé¹ ¡ç¨ÐÊÇÒ§à»¹ 100%
Option/µÑÇàÅ×Í¡ I
Brightness
¤ÇÒÁÊÇÒ§
0%
Brightness
¤ÇÒÁÊÇÒ§
100%
Option/µÑÇàÅ×Í¡ II
Brightness
¤ÇÒÁÊÇÒ§
25%
Brightness
¤ÇÒÁÊÇÒ§
100%
Option/µÑÇàÅ×Í¡ III
Brightness
¤ÇÒÁÊÇÒ§
50%
Brightness
¤ÇÒÁÊÇÒ§
100%
Brightness
1 2
I
II
III
0%
25%
50% 2
1
ON
FR-DM-17 REV.03 EFF 15/09/17
Warning :
¢ͤÇÃÃÐÇѧ
12 3 4
1
I2 3 4
II
III
IV
V
VI
5Lux
10Lux
30Lux
50Lux
Disable
2Lux
on
off
Brightness
1 2
I
II
III
0%
25%
50% 21
ON
Daylight sensor and Dimming function cannot be used at the same time.
¿§¡ªÑ¹à´ÂäÅ·à«ç¹à«ÍÃ áÅп§¡ªÑ¹´ÔÁÁÔ§äÁÊÒÁÒö·íÒ§Ò¹¾ÃÍÁ¡Ñ¹ä´
When the Dimming function is required (either at 25% or 50%), the Daylight sensor have to be set at
Disable.
àÁ×èͨíÒà»¹µͧãª¿§¡ªÑ¹´ÔÁÁÔ§(·Õè 25% ËÃ×Í 50%) à´ÂäÅ·à«ç¹à«ÍÃ¨Ðµͧ¶Ù¡µÑ駤ÒäÇ·Õè Disable
Daylight sensor will be activated only when the Brightness setting is set at 0%
à´ÂäÅ·à«ç¹à«ÍÃ¨Ð·íÒ§Ò¹àÁ×è͵Ñ駤Ò¤ÇÒÁÊÇÒ§·Õè 0%
Last Revised On : 23/11/2020 REV.05
à´ÂäÅ·à«ç¹à«ÍÃ¨Ð·íÒ§Ò¹àÁ×è͵Ñ駤Ò¤ÇÒÁÊÇÒ§äÇ·Õè 0% à·Ò¹Ñé¹
Daylight sensor will be activated only when the
Brightness setting is set at 0%
PARAMETER SETTING OF MICROWAVE SENSOR
¡ÒõÑ駤Ңͧà«ç¹à«ÍÃ
Detection range setting (sensitivity) ¡ÒõÑ駤ÒÃÐÂеÃǨ¨Ñº¡ÒÃà¤Å×è͹äËÇ
This determines the effective range of the motion detector set by DIP switches at the sensor itself, refer to figure.
Note that reducing the sensitivity will also narrow the detection range.
â´ÂËÅÑ¡¡Ò÷íÒ§Ò¹¨Ðà»¹áºº¨Ñº¡ÒÃà¤Å×è͹äËÇ ¤×Í µÑÇsensor ¨ÐÊ§¤Å×è¹ Microwave ÍÍ¡ÁÒáÅÐàÁ×èÍÁÕ¡ÒÃà¤Å×è͹äËÇ ã¹ºÃÔàdzÃÑÈÁÕ·Õèä´·íÒ
¡ÒûÃѺµÑé§äÇ ¤Å×è¹ Microwave ¡ç¨ÐÊз͹¡Ñºä»·ÕèµÑÇÊ§à¾×èÍãË sensor ·íÒ§Ò¹(µͧÁÕ¡ÒÃà¤Å×è͹äËÇ sensor ¨Ö§¨Ð·íÒ§Ò¹·Ø¡¿§ªÑ蹡)
The following settings are available : µÑ駤Ò¡ÒÃãª§Ò¹
I-detection range 100%
»ÃѺ Detection Area ä»·Õè 100%
II-detection range 75%
»ÃѺ Detection Area ä»·Õè 75%
III-detection range 50%
»ÃѺ Detection Area ä»·Õè 50%
IV-detection range 25%
»ÃѺ Detection Area ä»·Õè 25%
V-detection range 10%
»ÃѺ Detection Area ä»·Õè 10%
Detection Area
100%
75%
50%
25%
10%
1
I2
3
II
III
IV
V21
This determines the time at 100% level on motion detection and set with DIP switches at the sensor , refer to figure.
The walk test is useful when installing the fittings to establish correct operation and range.
ËÅÑ¡¡Ò÷íÒ§Ò¹ ¤×ÍàÁ×èÍàÃÒµÑé§»ÃѺÊÇÔ·ªµÒÁ·ÕèàÅ×Í¡äÇ àª¹ 5s ,5, 15min Í×è¹æ àÁ×èÍäÁÁÕ¡ÒÃà¤Å×è͹äËÇ ÀÒÂã¹ÃÐÂÐÃÑÈÁÕ ã¹ÃÐÂÐàÇÅÒ·Õè·íÒ¡ÒõÑé§
äÇ àÁ×èͤú¡íÒ˹´àÇÅÒ¹Ñé¹áÅÇ Sensor ¡ç¨Ð»´¡Ò÷íÒ§Ò¹ Ãͨ¹¡ÇÒ¨ÐÁÕ¡ÒÃà¤Å×è͹äËÇãËÁÍÕ¡¤ÃÑ駨֧¨ÐàÃÔèÁµ¹·íÒ§Ò¹ãËÁ
The following settings are available.¡ÒõÑ駤Ò˹ǧàÇÅÒ
I -5S / 5 ÇÔ¹Ò·Õ (walk test/·´Êͺà´Ô¹¼Ò¹)
II-30S / 30 ÇÔ¹Ò·Õ
III-1 minutes / 1 ¹Ò·Õ
IV-5 minutes / 5 ¹Ò·Õ
V-15 minutes / 15 ¹Ò·Õ
VI-30 minutes / 30 ¹Ò·Õ
1
I2 3 4
II
III
IV
V
VI 30min
30s
1min
5s
12 3 12 3 4 1 2 3 4
12 3 4
1 2 3 4
This allows the sensor to switch the unit on when ambient light is either low daylight, twilight or after dark.
lt also allows the sensor to be disabled.
ËÅÑ¡¡Ò÷íÒ§Ò¹ ¤×ÍàÁ×èÍ·íÒ¡ÒûÃѺµÑé§ÊÇÔ·ªàÅ×Í¡¤Ò¤ÇÒÁÊÇÒ§µÒÁ·ÕèàÅ×Í¡äÇ àª¹ 5Lux , 10Lux Í×è¹æ àÁ×èÍÁÕ¤Ò¤ÇÒÁÊÇÒ§¹Í¡ÇÒ¤Ò·ÕèàÅ×Í¡äÇ
áÅÐÁÕ¡ÒÃà¤Å×è͹äËÇÀÒÂã¹ÃÐÂÐÃÑÈÁÕ·Õè»ÃѺµÑ駤Ò Sensor ¡ç¨Ð·íÒ§Ò¹ (¶ÒäÁÁÕ¡ÒÃà¤Å×è͹äËÇ sensor ¨ÐäÁ·íÒ§Ò¹) áµàÁ×èÍÁÕ¤Ò¤ÇÒÁÊÇÒ§ÁÒ¡¡ÇÒ
·Õèä´µÑé§äÇ àÁ×èÍÁÕ¡ÒÃà¤Å×è͹äËÇã¹ÃÐÂеÃǨ¨Ñº Sensor ¡ç¨ÐÂѧäÁ·íÒ§Ò¹ (¤Ò¤ÇÒÁÊÇÒ§ Lux 㹺ÃÔàdz¹Ñé¹ÁÕÁÒ¡¡ÇÒ·ÕèµÑé§äÇ)
The following settings are available./µÑ駤Ò¡ÒÃãª§Ò¹
I-2 lux darkness operation only
à«ç¹à«ÍÃ¨ÐàÃÔèÁ·íÒ§Ò¹·ÕèÁÕ¤ÇÒÁÊÇÒ§¹Í¡ÇÒ 2 ÅÑ¡«
II-5 lux twilight operation
à«ç¹à«ÍÃ¨ÐàÃÔèÁ·íÒ§Ò¹·ÕèÁÕ¤ÇÒÁÊÇÒ§¹Í¡ÇÒ 5 ÅÑ¡«
III-10 lux twilight operation
à«ç¹à«ÍÃ¨ÐàÃÔèÁ·íÒ§Ò¹·ÕèÁÕ¤ÇÒÁÊÇÒ§¹Í¡ÇÒ 10 ÅÑ¡«
IV-30 lux daylight operation
à«ç¹à«ÍÃ¨ÐàÃÔèÁ·íÒ§Ò¹·ÕèÁÕ¤ÇÒÁÊÇÒ§¹Í¡ÇÒ 30 ÅÑ¡«
V-50 lux daylight operation
à«ç¹à«ÍÃ¨ÐàÃÔèÁ·íÒ§Ò¹·ÕèÁÕ¤ÇÒÁÊÇÒ§¹Í¡ÇÒ 50 ÅÑ¡«
VI-photocell disabled /à«ç¹à«ÍÃäÁ·íÒ§Ò¹
5/7
Time setting ¡ÒõÑé§àÇÅÒ
Hold Time
Light-control setting/¡ÒõÑ駤Ò¡ÒèѺ¤ÇÒÁÊÇÒ§
Daylight Sensor
5min
15min
1
I2 3 4
II
III
IV
V
VI
5Lux
10Lux
30Lux
50Lux
Disable
2Lux
on
off
on
off
on
off
FR-DM-17 REV.03 EFF 15/09/17Last Revised On : 23/11/2020 REV.05
MASTER/SLAVE FUNCTION/Ãкº¤Çº¤ØÁ¡Ò÷íÒ§Ò¹â´Ââ¤Á·ÕèÁÕૹà«ÍÃ 1 µÑÇ
Option A/µÑÇàÅ×Í¡A
Cable connection/¡ÒõÍÊÒÂä¿
6/7
Controled by using 1 luminaire with sensor to control luminaire without sensor up to 26 fittings.
¡ÒÃãªâ¤Á·ÕèÁÕૹà«ÍÃ˹Öè§µÑÇ ¤Çº¤ØÁâ¤ÁẺäÁÁÕૹà«ÍÃ ÊÒÁÒöµ;ǧä´ÊÙ§ÊØ´ 26 â¤Á
short cable must be removed to enable the function.
µͧ¶Í´ÊÒ¾ǧÍÍ¡ àÁ×èÍ·íÒ¡ÒõÍàª×èÍÁ¡Ñºâ¤Á·ÕèÁÕૹà«ÍÃ
FR-DM-17 REV.03 EFF 15/09/17Last Revised On : 23/11/2020 REV.05
Option B/µÑÇàÅ×Í¡
Cable connection/¡ÒõÍÊÒÂä¿
7/7
MASTER/SLAVE FUNCTION/Ãкº¤Çº¤ØÁ¡Ò÷íÒ§Ò¹â´Ââ¤Á·ÕèÁÕૹà«ÍÃ 2 µÑÇ
Controled by using 2 luminaire with sensor to control luminaire without sensor up to 26 fittings.
¡ÒÃãªâ¤Á·ÕèÁÕૹà«ÍÃÊͧµÑÇ ¤Çº¤ØÁâ¤ÁẺäÁÁÕૹà«ÍÃ ÊÒÁÒöµ;ǧä´ÊÙ§ÊØ´ 26 â¤Á
short cable must be removed to enable the function.
µͧ¶Í´ÊÒ¾ǧÍÍ¡ àÁ×èÍ·íÒ¡ÒõÍàª×èÍÁ¡Ñºâ¤Á·ÕèÁÕૹà«ÍÃ
FR-DM-17 REV.03 EFF 15/09/17Last Revised On : 23/11/2020 REV.05

This manual suits for next models

2

Other Unilamp Outdoor Light manuals

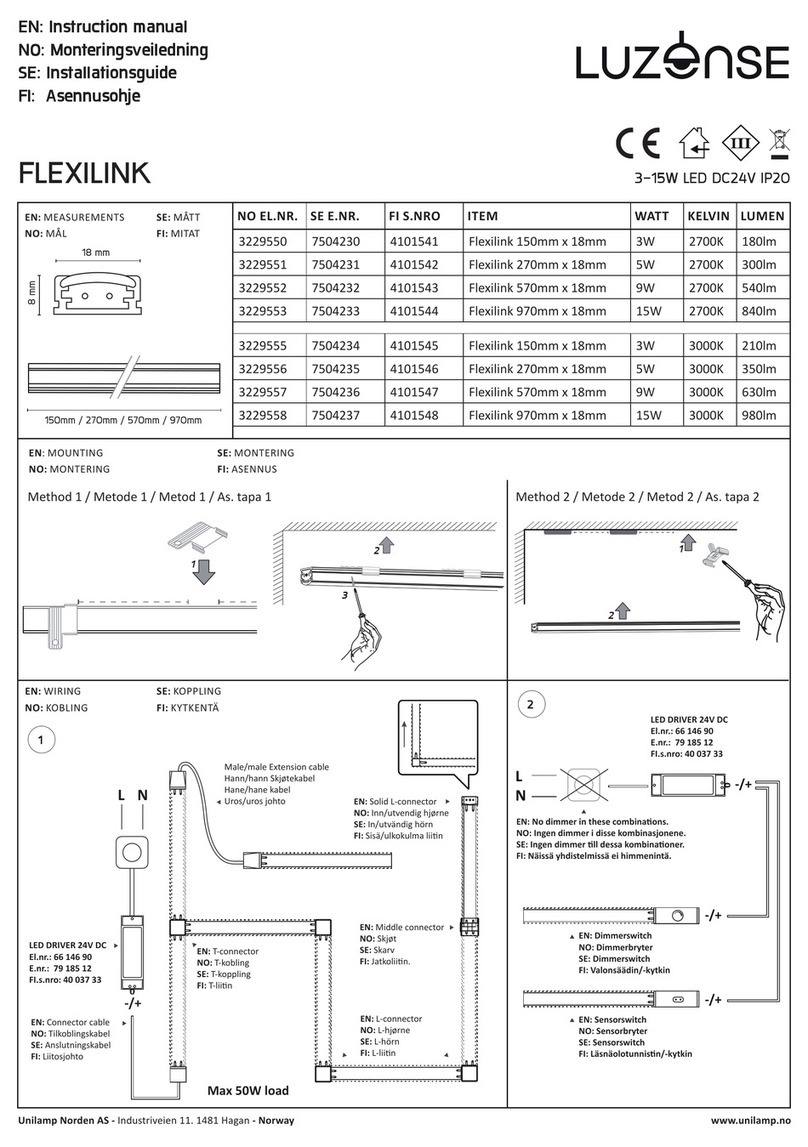
Unilamp FLEXILINK User manual

Unilamp

Unilamp FLEXILINK User manual

Unilamp Mini Quark Round User manual

Unilamp

Unilamp Mini Quark Round User manual

Unilamp 5505-0-3-873 Series User manual

Unilamp

Unilamp 5505-0-3-873 Series User manual

Unilamp Small SIROCCO User manual

Unilamp

Unilamp Small SIROCCO User manual

Unilamp BUZZ1 User manual

Unilamp

Unilamp BUZZ1 User manual

Unilamp QUARK Square - Asymmetric User manual

Unilamp

Unilamp QUARK Square - Asymmetric User manual

Unilamp AGAR Prismatic User manual

Unilamp

Unilamp AGAR Prismatic User manual

Unilamp Maxi CORE OD-4102 User manual

Unilamp

Unilamp Maxi CORE OD-4102 User manual

Unilamp ZOUK1 Recess User manual

Unilamp

Unilamp ZOUK1 Recess User manual
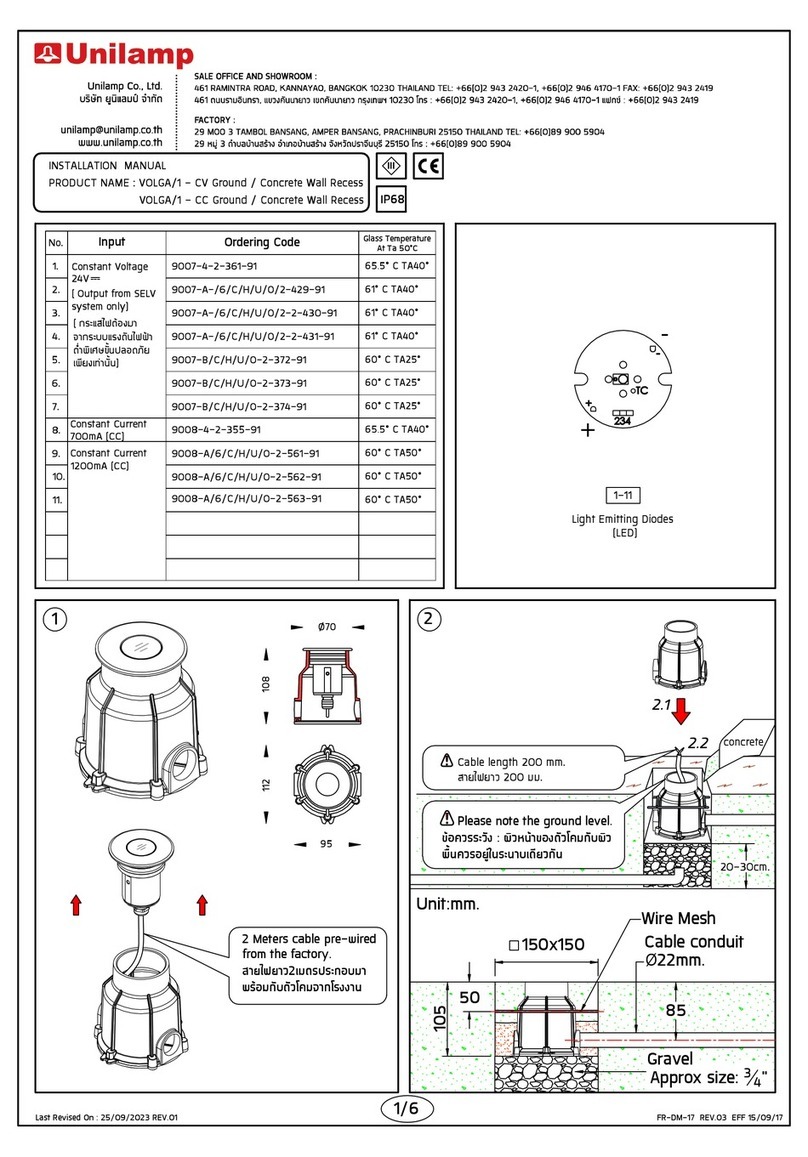
Unilamp CONE 3 User manual

Unilamp

Unilamp CONE 3 User manual

Unilamp ZOUK2 User manual

Unilamp

Unilamp ZOUK2 User manual

Unilamp MACRON Flat - Bollard User manual

Unilamp

Unilamp MACRON Flat - Bollard User manual

Unilamp Mini AGAR Prismatic - Bollard User manual

Unilamp

Unilamp Mini AGAR Prismatic - Bollard User manual

Unilamp Mini PETINA 1 User manual

Unilamp

Unilamp Mini PETINA 1 User manual

Unilamp KUBIK OD-5951 User manual

Unilamp

Unilamp KUBIK OD-5951 User manual

Unilamp SIROCCO User manual

Unilamp

Unilamp SIROCCO User manual

Unilamp ARC User manual

Unilamp

Unilamp ARC User manual

Unilamp CASA User manual

Unilamp

Unilamp CASA User manual

Unilamp SIRIUS 300 User manual

Unilamp

Unilamp SIRIUS 300 User manual

Unilamp POM Opal User manual

Unilamp

Unilamp POM Opal User manual

Unilamp ZET1 User manual

Unilamp

Unilamp ZET1 User manual
Unilamp Mini KUBIK - Ground Mount User manual

Unilamp

Unilamp Mini KUBIK - Ground Mount User manual

Unilamp Mini CHARISMA1 Square-Bollard User manual

Unilamp

Unilamp Mini CHARISMA1 Square-Bollard User manual

Unilamp MEGA SONIC-ARM User manual

Unilamp

Unilamp MEGA SONIC-ARM User manual

Popular Outdoor Light manuals by other brands

eLEDing EE800W-SH Series Installation guidelines

eLEDing

eLEDing EE800W-SH Series Installation guidelines

LightPro Juno Tube 213S user manual

LightPro

LightPro Juno Tube 213S user manual

BTC Victor FT407 instruction manual

BTC

BTC Victor FT407 instruction manual

Sea gull lighting Brentwood Outdoor Post installation instructions

Sea gull lighting

Sea gull lighting Brentwood Outdoor Post installation instructions

LIGMAN SA-31481 installation manual

LIGMAN

LIGMAN SA-31481 installation manual

AEC ILLUMINAZIONE Kaos 1 Mounting and Maintenance Instructions

AEC ILLUMINAZIONE

AEC ILLUMINAZIONE Kaos 1 Mounting and Maintenance Instructions

LIGMAN LIGHT LINEAR DENVER 3 installation manual

LIGMAN

LIGMAN LIGHT LINEAR DENVER 3 installation manual

Qazqa Pallon FL Brass Pink instruction manual

Qazqa

Qazqa Pallon FL Brass Pink instruction manual

Technogym Easy Lamp Service manual

Technogym

Technogym Easy Lamp Service manual

STEINEL PROFESSIONAL L 665 LED Information

STEINEL PROFESSIONAL

STEINEL PROFESSIONAL L 665 LED Information

FLOS F1584018 installation instructions

FLOS

FLOS F1584018 installation instructions

Vista 7216 Landscape Series installation instructions

Vista

Vista 7216 Landscape Series installation instructions

LIGMAN PIB-50005 installation manual

LIGMAN

LIGMAN PIB-50005 installation manual

DS Produkte Z 05880 instructions

DS Produkte

DS Produkte Z 05880 instructions

Vaxcel T0503 Assembly and installation instructions

Vaxcel

Vaxcel T0503 Assembly and installation instructions

FLOS SUPERLOON Instruction for correct Installation and Use

FLOS

FLOS SUPERLOON Instruction for correct Installation and Use

BGS technic 70051 instruction manual

BGS technic

BGS technic 70051 instruction manual

Health Zenith HZconnect 9302 owner's manual

Health Zenith

Health Zenith HZconnect 9302 owner's manual

manuals.online logo
manuals.online logoBrands
  • About & Mission
  • Contact us
  • Privacy Policy
  • Terms and Conditions

Copyright 2025 Manuals.Online. All Rights Reserved.