UNITEC Climate E0106 User manual

Bedienungsanleitung
Owner’s Manual
Manuel de l’utilisateur
Manuale d’istruzioni
Funkwetterstation
Wireless weather
station
Station météorologique,
sans fil
Stazione meteo
wireless
313533_Funk-Wetterstation-E0106_Manual_190308.indd 1 22.03.19 17:49

Deutsch
2 3
Deutsch
Funkwetterstation E0106
Vielen Dank für den Kauf dieser Wetterstation der neuesten Generation. Dieses Gerät wurde mit aktueller
Technologie konstruiert und modernsten Bauteilen hergestellt; es liefert Ihnen eine zuverlässige Wettervor-
hersage. Lesen Sie dieses Handbuch sorgfältig durch, um die Eigenschaften und Funktionen dieses
Produktes vollständig kennenzulernen.
INHALT
Bedienungsanleitung deutsch ............................................................................................................................. 3
Sicherheitshinweise ............................................................................................................................................ 3
Funktionsbeschreibungen ................................................................................................................................... 4
Einrichtung der Station und Aussensensoren ..................................................................................................... 6
Grundeinstellungen ............................................................................................................................................. 6
Technische Daten ................................................................................................................................................ 8
CONTENT
Owner‘s manual english...................................................................................................................................... 9
Safety instructions............................................................................................................................................... 9
Function descriptions ........................................................................................................................................ 10
Station setup and outdoor sensors.................................................................................................................... 12
Basic settings .................................................................................................................................................... 12
Specifications .................................................................................................................................................... 14
CONTENU
Manuel de l’utilisateur français.......................................................................................................................... 15
Consignes de sécurité....................................................................................................................................... 15
Description des fonctions.................................................................................................................................. 16
Configuration de la station et capteurs extérieurs............................................................................................. 18
Réglages de base .............................................................................................................................................. 18
Caractéristiques techniques .............................................................................................................................. 20
CONTENUTO
Manuale d‘istruzioni italiano .............................................................................................................................. 21
Avvertenze di sicurezza ..................................................................................................................................... 21
Descrizioni di funzionamento............................................................................................................................. 22
Configurazione della stazione e sensori esterni................................................................................................. 24
Impostazioni di base.......................................................................................................................................... 24
Dati tecnici......................................................................................................................................................... 26
• Das Produkt ist für den nichtgewerblichen Privat-
gebrauch vorgesehen.
• Schützen Sie das Anzeigegerät vor Feuchtigkeit.
• Der Aussensensor sollte an einem geschützten Ort
aufgestellt werden, wo er von direkten Wetterein-
flüssen wie Regen geschützt ist.
• Das Anzeigegerät darf nicht in unmittelbarer Nähe
von Heizungen, anderen Hitzequellen oder an
direkter Sonneneinstrahlung betrieben werden.
• Vermeiden Sie den Betrieb des Geräts in der Nähe
elektromagnetischer Felder.
• Service-, Wartungs- und Reparaturarbeiten dürfen
nur von einem Fachmann ausgeführt werden.
• Es dürfen keine Veränderungen am Produkt vor-
genommen werden. Bei einem Eingriff erlischt die
Garantie.
• Dieses Gerät und dessen Batterien sind kein Spiel-
zeug und sollten ausserhalb der Reichweite von
Kindern aufbewahrt werden!
SICHERHEITSHINWEISE
• Leere Batterien sofort entnehmen, um ein Aus-
laufen und dadurch verursachte Folgeschäden
zu verhindern. Im Umgang mit ausgelaufenen
Batterien chemikalienbeständige Schutzbrille und
Schutzhandschuhe tragen!
• Zum Austausch nur Batterien bzw. Akkus des emp-
fohlenen Typs verwenden.
• Bei Fragen, die durch diese Bedienhinweise nicht
beantwortet werden, kontaktieren Sie unsere tech-
• Der Hersteller übernimmt keine Verantwortung für
inkorrekte Anzeigen, Messwerte oder Wettervor-
hersagen und die Folgen, die sich daraus ergeben
können.
• Elektronische Geräte mit Funk von Nachbarn
können Interferenzen/Funktionsstörungen verursa-
chen. Ein anderer Aufstellungsort der Geräte kann
Abhilfe schaffen.
313533_Funk-Wetterstation-E0106_Manual_190308.indd 2-3 22.03.19 17:49

Deutsch
4 5
Deutsch
Bezeichnungen und Funktionen von Tasten am Anzeigegerät:
Taste Funktion Zusatzfunktion
1 [LIGHT] Schaltet die blaue Hintergrundbeleuch-
tung für 5 Sekunden ein
Bei aktiviertem Alarm mit Schlummerfunkti-
on/Snooze
2 [UP]
Im Zeit- und Alarmprogrammiermodus
für aufsteigende Werteinstellung (ge-
drückt halten für schnellen Vorlauf)
Im Normalmodus zur Aktivierung und
Deaktivierung der Weckzeiten
3 [DOWN] Im Zeit- und Alarmprogrammiermodus
für absteigende Werteinstellung (ge-
drückt halten für schnellen Rücklauf)
Im Standartmodus 3 Sekunden gedrückt
halten um die Funkuhrsignalsuche manu-
ell zu aktivieren
4
[CH]
Abrufen der Aussensensoren, Aktivie-
rung des Anzeigeintervall Im Standartmodus 3 Sekunden gedrückt
halten um die Sensorsuche zu aktivieren
5 [SET] Systemeinstellungen, 3 Sekunden
gedrückt halten
Abrufen der Alarmzeiten
6 [MAX/MIN] Aufrufen der Maximal- und Minimal-
werte 3 Sekunden gedrückt halten um zwischen
ºC oder ºF umzuschalten
7 Aufhängevorrichtung
8
Batteriefachabdeckung
9 Standfuss
Bezeichnungen und Funktionen von Tasten am Aussensensor:
Batteriefachabdeckung
Standfuss
Aufhängevorrichtung
[CH] Kanalwahltaste Wahl des Sendekanals
[C/F] Umschaltung zwischen °C und °F
Bezeichnung der Display-Funktionen im Hauptgerät
A Symbole Wettervorhersage
B
Aussentemperatur
C Innentemperatur
D
Alarmaktivierung 1 und 2, Schlummerfunktion (Snooze)
E
Uhrzeit
F
Zeitzone
G Datum
H Wochentag
I Funkuhr (Empfang)
J
Innenluftfeuchtigkeit
K
Batteriestandanzeige Wetterstation
L Aussenluftfeuchtigkeit
M
Tendenz-/Trendanzeige
N Batteriestandanzeige Aussensensoren
O
Kanalanzeige Aussensensoren
P
Automatischer Anzeigeintervall
Q
Empfang Aussensensoren
R
Frostalarm oder Schneefall
S
Luftdruck
Bezeichnung der Display-Funktionen im Sensor
T
Temperatur
U
Sendeanzeige
V
Kanalnummer
W
Luftfeuchtigkeit
X
Batteriestandsanzeige
T
U
V
W X
A
B
C
D
E
F
R
S
Q
P
O
N
M
L
K
J
I
H
G
E0106 (313533.00)
Station: 2 x AAA
Sender:
2 x AAA (E0002HA-A3-YX)
Serial-No.:
TegroAG · Ringstr. 3
CH-8603 Schwerzenbach
1
2
3
4
9
8
7
5
6E0106 (313533.00)
Station: 2 x AAA
Sender:
2 x AAA (E0002HA-A3-YX)
Serial-No.:
Tegro AG
Ringstrasse 3
CH-8603 Schwerzenbach
313533_Funk-Wetterstation-E0106_Manual_190308.indd 4-5 22.03.19 17:49

6 7
Deutsch
7Deutsch
EINSETZEN DER BATTERIEN
Hauptgerät:
Öffnen Sie das Batteriefach 8, legen Sie 2 AAA/
LR03-Batterien mit der angegebenen Polarität ein
und schließen Sie das Batteriefach 8wieder.
Aussensensor:
Öffnen Sie die Batterieabdeckung
in Pfeilrichtung und
legen Sie 2 AAA/LR03-Batterien ein; achten Sie dabei auf
die richtige Polarität. Schliessen Sie die Batteriefachab-
deckung
in entgegengesetzter Richtung wieder.
Warnung: Es dürfen nur Batterien desselben Typs
und mit gleicher Ladekapazität verwendet werden.
EINRICHTUNG DES AUSSENSENSORS
1.
Schalten Sie bei der Erstinbetriebnahme immer erst das
Hauptgerät und nach 20 Sekunden die Fernsensoren ein.
2. Nach Einsetzen der Batterien wird beim ersten Sen-
sor automatisch Kanal 1 (V) aktiviert.
3.
Beim 2. Sensor setzen Sie die Batterien ein und es wird
wiederum automatisch Kanal 1 (V) aktiviert. Drücken
Sie nun die Taste „CH“
um Kanal 2 zu aktivieren.
4. Ist ein Sensor registriert, erscheint im Display der
Station die Kanalnummer (O), Aussentemperatur (B)
und Aussenluftfeuchtigkeit (L).
5. Mit der Taste „CH“
können die Sensoren der
Reihe nach CH1CH2CH310-Sekunden-Intervall
(P) abgerufen werden.
Hinweis: Nach dem Einsetzen der Batterien im
Hauptgerät blinkt die Luftdruckanzeige (S) während
20 Sekunden und Sie können den lokalen Luftdruck,
wenn nötig, mit den Tasten
„“
2und
„“
3
anpassen. Danach wechselt die Wetterstation für 3
Minuten in den Registrierungsmodus der Fernsenso-
ren. Während dieser Zeit blinkt die Empfangsanzeige
(Q). Wird innerhalb dieser Zeit kein Aussensensor
registriert, schaltet sich der Registriermodus ab.
Hinweis: Platzieren Sie Hauptgerät und Sensoren
entfernt von Metallen und Störquellen, wie z. B. Mo-
biltelefonen, Fernseh- und anderen Elektrogeräten.
Hinweis: Um genauere Temperaturwerte zu erhalten
muss der Sensor an einer schattigen Aussenstelle
platziert werden.
AUTOMATISCHE ZEITEINSTELLUNG
Wenn nach dem Einsetzten der Batterien die Wetterstati-
on die Suche nach den Sensoren und das Einmessen des
örtlichen Luftdrucks abgeschlossen hat, startet die Suche
nach dem Funkuhrsignal. Diese Einstellungsmodus dau-
ert ca. 5 Minuten und das Funkuhrsymbo
l (I) blinkt.
Wird das Signal nicht empfangen, kann die Suche manu-
ell gestartet werden.
1. Drücken Sie die Taste „“
3
für länger als 3 Sekun-
den bis ein Piepton erklingt und im Display blinkt das
Funkuhrsymbol (I) für die Dauer (ca. 5 Minuten)
der Suchfunktion.
2. Drücken Sie die Taste „“
3
während der fünfmi-
nütigen Suche erneut, wird die Funkuhrsignalsuche
abgebrochen.
Hinweis: Taste „“
3
nur kurz drücken um die im
Abschnitt EINSTELLUNG DER UHR, DATUM UND
WETTER gewählte Zeitzone zu aktivieren. Im Display
erscheint das Icon (F).
MANUELLE EINRICHTUNG DES
AUSSENSENSORS
Der Batteriestand (R) des aktuellen Aussensensors
wird im Display angezeigt. Bei niedrigem Batteriestand
oder Verbindungsverlust muss der Sensor manuell
registriert werden.
1. Drücken Sie die Taste „CH“ 4für mehr als 3 Sekun-
den bis ein Piepton erklingt und das Symbol
(Q)
zu blinken beginnt.
2. Setzten Sie die Batterien im Fernsensor nach
angegebener Polarität ein. Wählen Sie umgehend die
Kanalnummer mittels Taste „CH“
.
3. Bei erfolgreicher Registrierung erscheinen Tempera-
tur (B) und Luftfeuchtigkeit (L) im Outdoor Bereich
des Displays.
4. Die Suchfunktion schaltet nach 3 Minuten automa-
tisch ab und die Station geht in den Standartmodus
zurück
.
Hinweis: LL.L--,-ºC oder HH.H--,-ºC wird im Outdoor-
Display angezeigt, wenn die Verbindung zu den
Aussensensoren abbricht oder diese ausserhalb des
Empfangsbereichs sind.
EINSTELLUNG DER UHR, DATUM UND ANZEIGE
1. Drücken Sie die Taste „SET” 5für länger als 3
Sekunden bis ein Piepton erklingt und in der Zeitan-
zeige (E) die Jahreszahl blinkt.
2. Stellen Sie mittels „“2und „“3die Jahres-
zahl ein.
3. Drücken Sie die Taste „SET” 5.
4. Stellen Sie mittels „“2und „“3den Monat
ein.
5. Drücken Sie die Taste SET” 5.
6. Stellen Sie mittels „“2und „“3den Tag ein.
7. Drücken Sie die Taste SET” 5.
8. Stellen Sie mittels „“2und „“3die Stunde
ein.
9. Drücken Sie die Taste „SET” 5.
10. Stellen Sie mittels „“2und „“3die Minute
ein.
11. Drücken Sie die Taste „SET” 5.
12. Wählen Sie mittels „“2und „“3zw. 12h
oder 24h Zeitanzeige.
13. Drücken Sie die Taste „SET” 5.
14. Stellen Sie mittels „“2und „“3die örtliche
Zeitzone (Schweiz 0) ein.
15. Drücken Sie die Taste „SET” 5.
16. Wählen Sie mittels „“2und „“3z. B. „GER“
für Deutsch.
17. Drücken Sie die Taste „SET” 5.
18. Wählen Sie mittels „“2und „“3das aktuelle
Wettersymbol.
19. Drücken Sie die Taste „SET” 5.
20. Passen Sie mittels „“2und „“3den aktuel-
len Luftdruck an, falls notwendig.
21. Drücken Sie die Taste „SET” 5um den Program-
miervorgang zu beenden.
EINSTELLUNG EINER ALARMZEIT
1. Drücken Sie die Taste „SET” 5um Weckzeit 1/A1
und nochmals um Weckzeit 2/A2 (F) ) zu wählen.
2. Drücken Sie innerhalb von 20 Sekunden die Taste
„SET” 5erneut für länger als 3 Sekunden bis ein
Piepton erklingt und in der Zeitanzeige (E) die Stun-
denanzeige blinkt.
3.
Stellen Sie mittels „“2und „“3die Stunde ein.
4. Drücken Sie die Taste „SET” 5.
5.
Stellen Sie mittels „“2und „“3die Minute ein.
6. Drücken Sie die Taste „SET” 5um die Alarmpro-
grammierung zu beenden.
AKTIVIERUNG DES ALARMS
1. Im Normalmodus drücken Sie die Taste
„“2
.
Das Glockensymbol 1 (D) erscheint im Display.
2. Drücken Sie die Taste
„“2
erneut. Das Glocken-
symbol erlischt und Nummer 2erscheint rechts.
3. Drücken Sie die Taste
„“2
erneut. Beide
Weckzeiten sind nun aktiviert.
4. Drücken Sie die Taste
„“2
erneut. Beide
Weckzeiten sind nun deaktiviert.
SNOOZE
Wenn der Alarmton erklingt, drücken Sie die Taste
„LIGHT“
1
, nun wird der Alarm für 5 Minuten
unterbrochen. Die Symbole ZZund blinken für
diese Zeit. Durch Drücken irgendeiner Taste, ausser
„LIGHT“
1
, wird die Schlummerfunktion beendet.
WETTERVORHERSAGE
Das Gerät sagt, basierend auf Änderungen des atmo-
sphärischen Drucks, Wetterbedingungen der nächsten
12 - 24 Stunden voraus. Das Einzugsgebiet umfasst
dabei ca. 30 – 50 km. Die Wettervorhersage weist zu
70 – 75 % korrekte Vorhersagen auf. Da Wetterbedin-
gungen nicht mit 100 prozentiger Korrektheit voraus-
gesagt werden können, können wir nicht für Verluste
verantwortlich gemacht werden, die durch inkorrekte
Wettervoraussagen verursacht wurden.
Sonnig
Teilweise bewölkt
Bewölkt
Regen
Gewitter/Sturm
Hinweis: Für Schneefall blinkt zusätzlich (R)
mit dem Regen-Wettersymbol. Dies geschieht im
Temperaturbereich zwischen -3 ºC bis +1 ºC. Fällt die
Temperatur unter -3 ºC, wird permanent angezeigt.
Achtung: Das Gerät muss mindestens 12 Stunden in
Betrieb sein, um einen Druckverlauf aufzuzeichnen.
Basierend auf diesem Verlauf werden die Wettersym-
bole (A) angezeigt.
Hinweis: Orte mit unterschiedlicher Geografie, wie
z. B. inländische Bereiche, föhnige Täler oder Küsten-
gebiete, haben unterschiedliche Wettervorhersagen.
Ihre Wettervorhersage (A) kann in solchen Gebieten
abweichen. Die Vorhersage kann im Abschnitt „EIN-
STELLUNG DER UHR, DATUM UND WETTER“,
wenn nötig, justiert werden.
ANZEIGEN FÜR TEMPERATUR- UND
LUFTFEUCHTIGKEITSTRENDS
Wenn sich der Wert für die Temperatur und Luft-
feuchtigkeit geändert hat, zeigen 4 kleine Pfeile
die Tendenz (M) an: Steigend, gleichbleibend oder
fallend.
WARTUNG UND PFLEGE
Reinigen Sie das Gerät nur mit einem weichen Tuch.
Bei starken Verschmutzungen kann dieses leicht
angefeuchtet sein. Verwenden Sie keine lösungs-
mittelhaltigen Reinigungsmittel!
Achten Sie darauf, dass keine Feuchtigkeit ins
Geräteinnere gelangt. Beim Aussensensor muss der
Sitz der Batteriefachabdeckung geprüft werden, v.a.
bei einem Batteriewechsel.
Falls sich in der Öffnung der Sensorabdeckung
Staub festsetzt, kann dieser mit einem Staubsauger
ausgesaugt werden.
ALTGERÄTEENTSORGUNG
Dieses Produkt am Ende der Lebensdauer nicht in
den normalen Haushaltsabfall geben, sondern an
einem Recycling-Sammelpunkt für elektrische und
elektronische Geräte abgeben.
Das Symbol auf dem Produkt, der Bedienungsanlei-
tung oder der Verpackung weist darauf hin.
KONFORMITÄTSERKLÄRUNG
Wir, Tegro AG (Ringstrasse 3, CH-8603 Schwerzen-
bach), erklären in alleiniger Verantwortung, dass
dieses Produkt in Übereinstimmung mit den grundle-
genden und anderen relevanten Anforderungen der
Richtlinien 2014/53/EU, 2014/30/EU und 2011/65/EU
ist. Konformitätserklärung anfragen unter:
313533_Funk-Wetterstation-E0106_Manual_190308.indd 6-7 22.03.19 17:49

Deutsch
8 9 English
TECHNISCHE DATEN WETTERSTATION
Spannungsversorgung Hauptgerät: 2 x 1.5 V
Batterietyp Hauptgerät: 2 x AAA / LR03 (exkl.)
Temperaturbereich Hauptgerät: 0 ºC bis +50 ºC
Genauigkeit Temperaturbereich Hauptgerät: ± 1.5 ºC
Auflösung Temperaturanzeige: 0.1 ºC
Luftfeuchtigkeitsbereich Hauptgerät: 20% bis 99% RH
Genauigkeit Luftfeuchtigkeitsbereich Hauptgerät: ± 5%
Auflösung Luftfeuchtigkeit: 1%
Luftdruckbereich: 800 – 1100 hPa / 23.62 – 32.49 inHg
Genauigkeit Luftdruckbereich: ± 3 hPa
Auflösung Luftdruck: 1 hPa
Zeitzonen: -12 bis 12
Betriebstemperatur: 0 ºC bis +50 ºC
Funkuhr: DFC 77
Abmessungen (HxLxT): 150 x 80 x 30 mm
TECHNISCHE DATEN AUSSENSENSOR
Spannungsversorgung Fernsensor: 2 x 1.5 V
Batterietyp Fernsensor: 2 x AAA / LR03 / AM4 (exkl.)
Temperaturbereich: –40 ºC bis +70 ºC
Genauigkeit Temperaturbereich: ± 1.5 ºC
Auflösung Temperaturanzeige: 0.1 ºC
Luftfeuchtigkeitsbereich: 20% bis 99% RH
Genauigkeit Luftfeuchtigkeitsbereich: ± 5%
Sendefrequenz: 433 MHz
Max. Reichweite (unter opt. Bedingungen): 100m
Anzahl Kanäle: 3
Abmessungen (HxLxT): 95 x 60 x 27 mm
Wireless weather station E0106
Thank you very much for purchasing this latest-generation weather station. This device was designed with
the latest technology and manufactured with state-of-the-art components; it will provide you with a reliable
weather forecast. Read this manual through carefully in order to fully familiarise yourself with the features and
functions of the product.
• The product is intended for non-commercial private
use.
• Protect the display unit against moisture.
• The outdoor sensor should be set up in a safe
place where it is protected against direct weather
influences such as rain.
• The display unit must not be operated in the direct
vicinity of heating systems, other sources of heat,
or direct sunlight.
• Avoid using the device in the vicinity of electroma-
gnetic fields.
• Servicing, maintenance and repair work may only
be performed by a qualified expert.
• The product must not be subjected to modifica-
tions. Any tampering will void the warranty.
• This device and its batteries do not constitute a toy
and should be stored out of children‘s reach!
SAFETY INSTRUCTIONS
• Remove empty batteries immediately in order to
prevent leaks and any consequential damage they
may cause. When handling batteries that leak,
always wear chemical-resistant safety goggles and
protective gloves!
• When changing the alkaline or rechargeable batte-
ries, only use ones of the recommended type.
• If you have any questions that are not answered
by these operating instructions, please contact our
• The manufacturer does not accept any responsi-
bility for incorrect displays, readings or weather
forecasts, or for any consequences that may arise
therefrom.
• Neighbours‘ electronic devices with radio trans-
mission may cause interference/malfunctions.
Choosing a different setup location for the devices
may be the solution.
313533_Funk-Wetterstation-E0106_Manual_190308.indd 8-9 22.03.19 17:49

10 11 EnglishEnglish
Designation and functions of buttons on the display unit:
Button Function Extra function
1 [LIGHT] Switches on blue background light for
5 seconds
If alarm with snooze function is activated
2 [UP]
In down time and alarm programming
mode for upwards values (keep holding
down for fast forward)
At normal mode for activating and
deactivating of wake-up times
3 [DOWN]
In down time and alarm programming
mode for downwards values (keep
holding down for fast backward)
In standard mode, hold down for 3 se-
conds to manually activate the signal
search of the radio-controlled clock
4
[CH]
Access to outside sensors, activating
display intervall In standard mode, hold down for 3
seconds to activate sensor search
5 [SET]
System settings, hold down for 3 seconds
To access alarm times
6 [MAX/MIN] Activate maximum and minimum
values Hold down for 3 seconds to switch
between ºC and ºF
7 Hanger
8
Battery compartment cover
9 Base
Designation and functions of buttons on the outdoor sensor:
Battery compartment cover
Base
Hanger
[CH] Channel selection
button Selection of channel on outdoor
sensor
[C/F] Switch between °C and °F
Designation of display functions in the main device
A
Weather forecast icons
B Outdoor temperature
C
Indoor temperature
D
Activating alarm 1 and 2, snooze function
E
Time of day
F
Time zone
G Date
H Day of the week
I Radio-controlled clock (reception)
J
Indoor humidity
K Battery level indicator for weather station
L Outdoor humidity
M
Tendency/trend display
N
Battery level indicator for outdoor sensors
O
Channel indicator for outdoor sensors
P
Automatic display intervall
Q
Reception indicator for outdoor sensors
R
Frost forecast or snowfall
S
Atmospheric pressure indicator
Designation of display functions in the sensor
T
Temperature
U
Transmit indicator
V
Channel number
W
Humidity
X
Battery level indicator
T
U
V
W X
A
B
C
D
E
F
R
S
Q
P
O
N
M
L
K
J
I
H
G
E0106 (313533.00)
Station: 2 x AAA
Sender:
2 x AAA (E0002HA-A3-YX)
Serial-No.:
TegroAG · Ringstr. 3
CH-8603 Schwerzenbach
1
2
3
4
9
8
7
5
6E0106 (313533.00)
Station: 2 x AAA
Sender:
2 x AAA (E0002HA-A3-YX)
Serial-No.:
Tegro AG
Ringstrasse 3
CH-8603 Schwerzenbach
313533_Funk-Wetterstation-E0106_Manual_190308.indd 10-11 22.03.19 17:49

12 13 English13English
INSERTING THE BATTERIES
Main device:
Open the battery compartment 8, insert 2 AAA/
LR03 batteries the right way round as indicated and
close the battery compartment 8again.
Outdoor sensor:
Open the battery compartment cover by sliding it
in the direction of the arrow and insert 2 AAA/LR03
batteries, making sure they are the right way round.
Close the battery compartment cover again by
sliding it in the opposite direction.
Warning: Only use batteries of the same type and
with the same charge capacity.
SETTING UP THE OUTDOOR SENSOR
1. When putting into operation for the first time, always
switch on the main device first and after 20 seconds
switch on the remote sensors.
2. After the batteries have been inserted, the first
sensor automatically activates Channel 1 (V).
3. For the second sensor insert the batteries and
Channel 1 (V) will again be automatically activated.
Press button
„CH“
in order to activate Channel 2.
4. When a sensor has been detected, the display of the
station will show the channel number (O), outdoor
temperature (B) and outdoor humidity (L).
5. With the „CH“
button you can call up the
sensors one after the other in the sequence
CH1CH2CH310-second interval (P).
Note: When batteries have been inserted in the
main device, the atmospheric pressure indicator
(S) will flash for 20 seconds, during which you will
be able to adjust the local atmospheric pressure (if
required) with buttons „“2und „“3. After
that the weather station will change to the register
mode of the remote sensors. During this period the
reception indicator (Q). flashes. If no outdoor
sensor is detected within that period, the detection
mode switches off.
Note: Place the main device and sensors at a distance
from metals and sources of interference, e.g. mobile
phones, television sets and other electrical appliances.
Note: To obtain relatively accurate temperature values
the sensor must be placed in a shady location outdoors.
AUTOMATIC TIME SETTING
Once the batteries have been inserted and the
weather station has concluded the search for the
sensors and the measuring of the local atmospheric
pressure, search for the radio-controlled clock signal
starts. The radio symbol (I) flashes after
ca. 5 minutes.
If the signal is not received, the search can be started
manually.
1.
Press the „“3button for more than 3 seconds, until
you hear a beep and the radio-controlled clock symbol
(I) in the display flashes for approx. 5 minutes.
2. Press the
„“3
again during the five minute
search and the search for the radio-controlled clock
signal will be discontinued.
Note: Press the „“3button briefly in order to activate
the time zone selected in the section SETTING THE
TIME, DATE AND WEATHER. Display shows (F).
SETTING UP THE OUTDOOR SENSOR
MANUALLY
The battery level (R) of the current outdoor
sensor is indicated on the display. If the battery level
is low or the link fails, the sensor has to be detected
manually.
1. Press the „CH“ button 4for more than 3 se-
conds until you hear a beep and the icon (Q)
starts flashing.
2. Insert the batteries into the remote sensor the
right way round. Immediately select the Channel
number with button „CH“ .
3. If the signal is detected successfully, temperature
(B) and humidity (L) appear in the outdoor panel
of the display.
4. The search function switches off automatically
after 3 minutes and the station returns to
standard mode.
Note: LL.L--,- ºC or HH.H--,- ºC is shown on the out-
door display if the link to the outdoor sensors fails or
if the sensors are outside the range of reception.
SETTING THE TIME OF DAY, DATE AND
INDICATOR
1. Press the „SET“ button 5for more than 3
seconds until you hear a beep and the hour indi-
cator starts flashing on the time display (E).
2. Use „“2and „“3to set the year.
3. Press the „SET“ button 5.
4. Use „“2and „“3to set the month.
5. Press the „SET“ button 5.
6. Use „“2and „“3to set the day.
7. Press the „SET“ button 5.
8. Use „“2and „“3to set the hour.
9. Press the „SET“ button 5.
10. Use „“2and „“3to set the minute.
11. Press the „SET“ button 5.
12. Use „“2and „“3(3) to select either 12h
or 24h time display.
13. Press the „SET“ button 5.
14. Use „“2and „“3to set the time zone
(Switzerland 1).
15. Press the „SET“ button 5.
16. Use „“2and „“3e.g. „GER“ for German.
17. Press the „SET“ button 5.
18. Use „“2and „“3for the current weather
symbol.
19. Press the „SET“ button 5.
20. Use „“2and „“3to adjust the current
atmospheric pressure (if required).
21. Press the „SET“ button 5to complete the
programming procedure.
SETTING AN ALARM TIME
1. Press the
„SET“ button 5
in order to select alarm
time 1/A1 and again to select alarm time 2/A2 (F).
2. According to the selection of the alarm, press the
„SET“ button 5
within a time span of 20 seconds
again for more than 3 seconds until you hear a beep
and the hour flashes in the time indicator (E).
3. Use „“2and „“3to set the hour
.
4. Press the „SET” button 5.
5. Use „“2and „“3to set the minute.
6. Press the „SET” button 5to complete the alarm
programming procedure.
ACTIVATING THE ALARM
1. In normal mode press the „“2button. The bell
symbol 1 (D) appears in the display.
2. Press the „“2button again. The bell symbol
goes off and the number 2 appears on the right.
3. Press the „“2button again.
Both wake-up times have been activated.
4. Press the „“2button.
Both wake-up times have been deactivated.
SNOOZE
When the alarm rings, press the „LIGHT“ 1button
and the alarm will be interrupted for 5 minutes. The
symbols ZZand will flash throughout this time. By
pressing any button, except the „LIGHT“ 1button,
the snooze function alarm will be ended.
WEATHER FORECAST
The device forecasts weather conditions for the next
12 - 24 hours based on changes in atmospheric pres-
sure. The catchment area covers approx. 30 – 50
km. The weather forecasts have an accuracy of 70%
– 75%. Since weather conditions cannot be forecast
with 100% accuracy, we cannot be held responsible
for any losses that are caused by incorrect weather
forecasts.
Sunny
Partially cloudy
Cloudy
Rain
Thunderstorm/storm
Note: In case of snowfall the symbol (R) with the
rain weather symbol will flash in addition. This will
occur at a temperature range between -3 ºC to
+1 ºC. If the temperature falls below ºC the
symbol will appear permanently.
Important: The device must be in operation for at
least 12 hours to record a pressure trend. The wea-
ther icons (A) are displayed on the basis of that trend.
Note: Places with various geographical situations,
e.g. inland areas, windy valleys or coastal regions,
have different weather forecasts. Your particular
weather forecast (A) may be different in such areas.
If required, the forecast can be adjusted in the section
SETTING THE TIME OF DAY, DATE AND
WEATHER.
INDICATORS FOR TEMPERATURE AND
HUMIDITY TRENDS
If the values for temperature and humidity have
changed, 4 small arrows indicate the tendency (M):
Rising, constant or falling.
MAINTENANCE AND CARE
Only clean the device with a soft cloth. If there is
heavy soiling, the cloth can be moistened slightly.
Never use detergents that contain solvent.
Make sure no moisture gets inside the device. As
regards the outdoor sensor, check to make sure the
battery compartment cover is fitted properly, espe-
cially when you have changed the batteries.
If dust has accumulated in the opening of the sensor
cover, it can be removed with a vacuum cleaner.
DISPOSING OF OLD EQUIPMENT
At the end of its life, do not dispose of this product
in the normal household waste. Take it to a recycling
collectionpoint for electrical and electronic equip-
ment.
This is indicated by the symbol on the product, the
operating instructions or the packaging.
DECLARATION OF CONFORMITY
We, Tegro AG (Ringstrasse 3, 8603 Schwerzenbach,
Switzerland), declare with sole responsibility that this
product conforms to the basic and other relevant
requirements of Radio Equipment Directive
2014/53/EU, 2014/30/EU and 2011/65/EU.
To request the Declaration of Conformity please
contact: [email protected]
313533_Funk-Wetterstation-E0106_Manual_190308.indd 12-13 22.03.19 17:49

14 15English Français
WEATHER STATION SPECIFICATIONS
Main device power supply: 2 x 1.5 V
Battery type for main device: 2 x AAA / LR03 (not incl.)
Temperature range of main device: 0°C to +50°C
Temperature range accuracy of main device: ± 1.5°C
Resolution of temperature display: 0.1°C
Humidity range of main device: 20% to 99% RH
Humidity range accuracy of main device: ± 5%
Resolution of humidity: 1%
Atmospheric pressure range: 800 – 1100 hPa / 23.62 – 32.49 inHg
Accuracy of atmospheric pressure range: ± 3 hPa
Resolution of atmospheric pressure: 1 hPa
Time zones: -12 to 12
Operating temperature: 0°C to +50°C
Radio-controlled clock DFC77
Dimensions (HxLxD): 130 x 80 x 30 mm
OUTDOOR SENSOR SPECIFICATIONS
Remote sensor power supply: 2 x 1.5 V
Battery type for remote sensor: 2 x AAA / LR03 / AM4 (not incl.)
Temperature range: –40°C to +70°C
Temperature range accuracy: ± 1.5°C
Resolution of temperature display: 0.1°C
Humidity range: 20% to 99% RH
Humidity range accuracy: ± 5%
Transmit frequency: 433 MHz
Max. range (under ideal conditions): 100 m
Number of channels: 3
Dimensions (HxLxD): 95 x 60 x 27 mm
Station météorologique, sans fil E0106
Nous vous remercions d‘avoir fait l‘acquisition de cette station météorologique de dernière génération. Cet
appareil a été conçu avec la technologie la plus pointue du moment et avec des composants ultramodernes.
Il vous fournit des prévisions météorologiques fiables. Veuillez lire soigneusement ce mode d’emploi pour
vous familiariser totalement avec les propriétés et les fonctions de ce produit.
• Ce produit est conçu pour une utilisation privée
non commerciale.
• Protégez l’unité d’affichage de l’humidité.
• Le capteur extérieur doit être placé à un endroit
protégé des intempéries (notamment de la pluie).
• L’unité d’affichage ne doit pas fonctionner à proxi-
mité immédiate des chauffages et autres sources
de chaleur, ni exposé au rayonnement solaire
direct.
• Évitez d’utiliser l’appareil à proximité des champs
électromagnétiques.
• Les travaux d’entretien, de maintenance et de
réparation doivent impérativement être réalisés par
un professionnel qualifié.
• Aucune modification ne doit être effectuée sur
le produit. Toute garantie est annulée en cas
d‘intervention sur l‘appareil.
• Cet appareil et ses piles ne sont pas des jouets et
doivent être tenus hors de portée des enfants!
CONSIGNES DE SÉCURITÉ
• Retirer immédiatement les piles vides afin d’éviter
toute fuite ainsi que les dommages consécutifs.
Il convient de porter des lunettes et des gants de
protection résistants aux produits chimiques lors
de la manipulation des piles qui ont fui!
• Remplacez uniquement les piles/accus avec des
modèles de même type.
• Pour toutes questions qui ne trouvent pas de répon-
se dans cette notice d’utilisation, veuillez contacter
• Le fabricant décline toute responsabilité en cas
d’affichages, de mesures ou de prévisions météo
incorrects ainsi que pour les conséquences pou-
vant en résulter.
• Les appareils électroniques radiocommandés des
voisins peuvent causer des interférences/dysfonc-
tionnements. Placer l’appareil à un autre emplace-
ment peut résoudre le problème.
313533_Funk-Wetterstation-E0106_Manual_190308.indd 14-15 22.03.19 17:49

16 17 FrançaisFrançais
Désignation et fonction des touches sur l’unité d’affichage
Touche Fonction Fonction complémentaire
1 [LIGHT] Allume le rétroéclairage bleu pendant 5
secondes
Alarme activée, avec fonction de répéti-
tion / snooze
2 [UP]
En mode de programmation de l’heure et de
l’alarme, réglage ascendant des valeurs (main-
tenir actionné pour une avance rapide)
En mode standard, pour activer et
désactiver les heures de réveil
3 [DOWN]
En mode de programmation de l’heure et
de l’alarme, réglage descendant des valeurs
(maintenir actionné pour un retour rapide)
En mode standard, actionner pendant
3 secondes pour activer manuelle-
ment la recherche d’horloge radio
4
[CH]
Interrogation des capteurs extérieurs, acti-
vation de l’intervalle d’affichage En mode standard, actionner pendant
3 secondes pour activer la recherche
des capteurs
5 [SET] Réglages système, actionner pendant 3
secondes
Consultation des horaires d’alarme
6 [MAX/MIN] Consultation des valeurs maximale et
minimale Actionner pendant 3 secondes pour
commuter entre ºC et ºF
7
Dispositif d’accrochage
8 Couvercle du com-
partiment des piles
9 Pied
Désignation et fonction des touches sur le capteur extérieur
Couvercle du com-
partiment des piles
Pied
Dispositif d’accrochage
[CH] touche de
sélection du canal Sélection du canal du capteur extérieur
[C/F] Commutation entre ºC et ºF
Désignation des fonctions de l’écran sur l’appareil principal
A
Symbole de prévision météo
B Température extérieure
C
Température intérieure
D
Activation de l’alarme 1 et 2, fonction de répétition de l’alarme (Snooze)
E
Heure
F
Fuseau horaire
G Date
H Jour de la semaine
I Horloge radio (réception)
J
Hygrométrie intérieure
K Indicateur de charge des piles de la station météorologique
L Hygrométrie extérieure
M
Affichage de tendance
N
Indicateur de charge des piles des capteurs extérieurs
O
Affichage du canal des capteurs extérieurs
P
Intervalle d’affichage automatique
Q
Affichage de réception des capteurs extérieurs
R
Alarme gel ou chute de neige
S
Affichage de pression atmosphérique
Désignation des fonctions de l’écran sur le capteur
T
Température
U
Affichage d’émission
V
Numéro de canal
W
Hygrométrie
X
Indicateur de charge des piles
T
U
V
W X
A
B
C
D
E
F
R
S
Q
P
O
N
M
L
K
J
I
H
G
E0106 (313533.00)
Station: 2 x AAA
Sender:
2 x AAA (E0002HA-A3-YX)
Serial-No.:
TegroAG · Ringstr. 3
CH-8603 Schwerzenbach
1
2
3
4
9
8
7
5
6E0106 (313533.00)
Station: 2 x AAA
Sender:
2 x AAA (E0002HA-A3-YX)
Serial-No.:
Tegro AG
Ringstrasse 3
CH-8603 Schwerzenbach
313533_Funk-Wetterstation-E0106_Manual_190308.indd 16-17 22.03.19 17:49

1918 Français19Français
MISE EN PLACE DES PILES
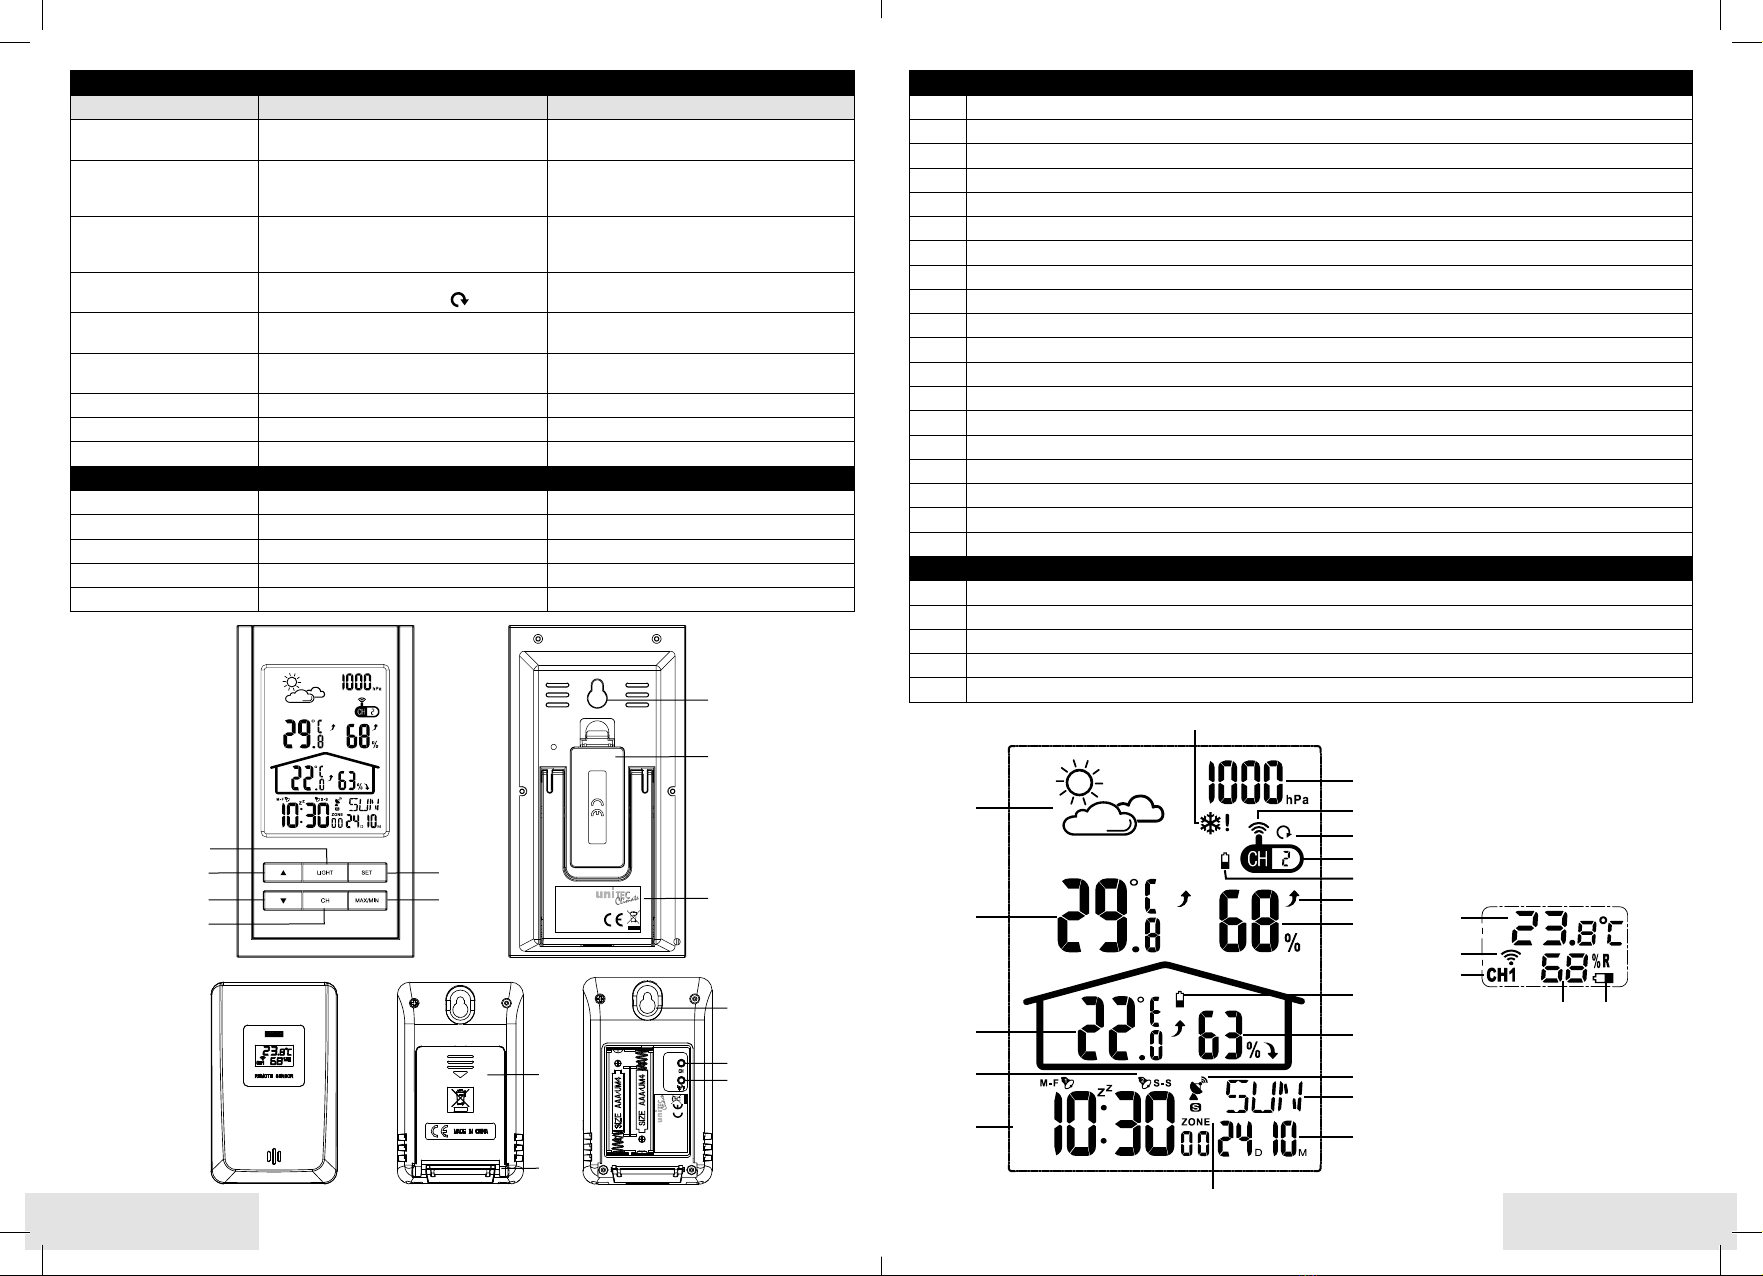
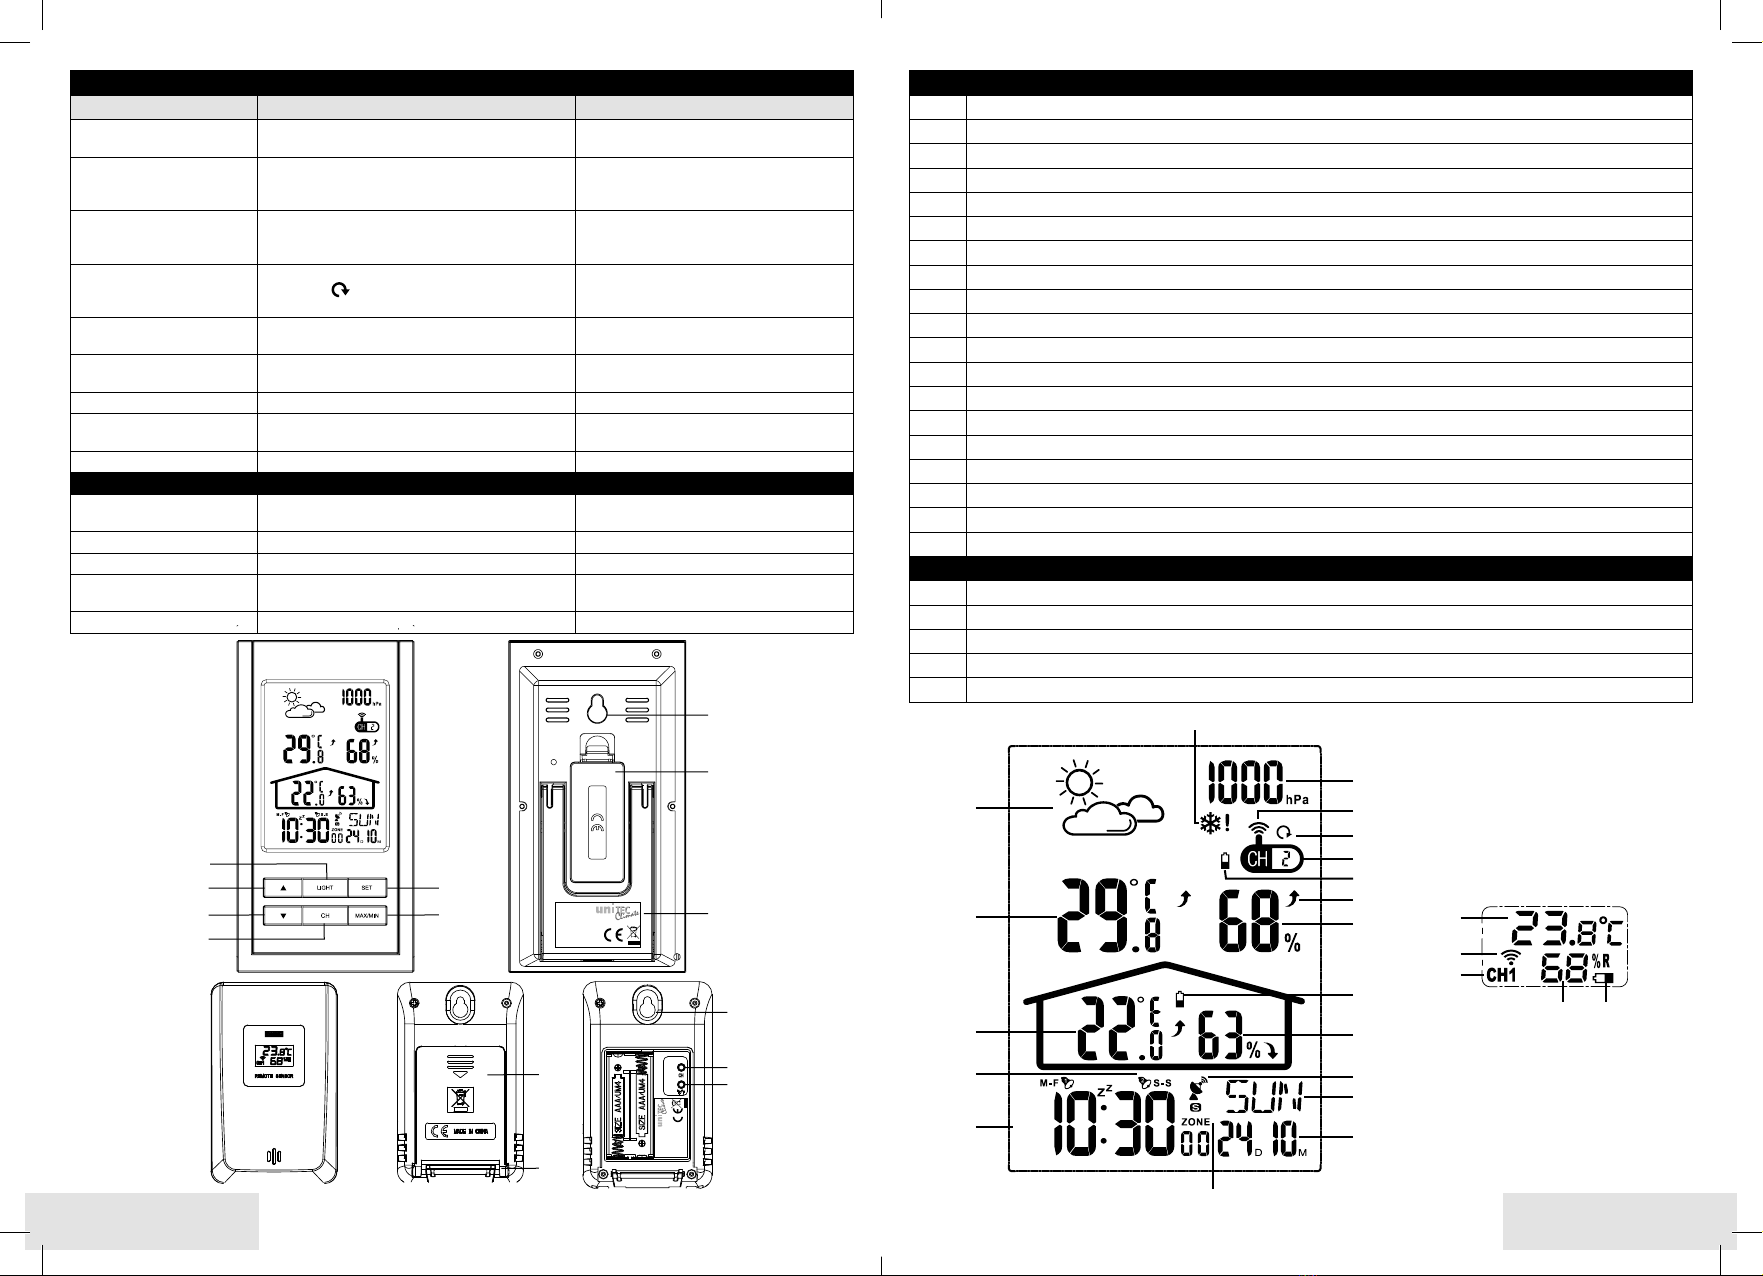
Appareil principal:
Alimentation électrique supplémentaire: ouvrez le
compartiment des piles 8, insérez les 3 piles
2 AAA/LR03 selon la polarité indiquée et refermez le
compartiment des piles 8.
Capteur extérieur:
Ouvrez le couvercle du compartiment des piles
dans le sens de la flèche et insérez les 2 piles AAA/LR03,
en respectant la polarité. Refermez le couvercle du
compartiment des piles dans le sens inverse.
Attention: Il est impératif d’utiliser des piles de
même type et de même capacité.
PARAMÉTRAGE DU CAPTEUR EXTÉRIEUR
1. Lors de la première mise en service, mettez d’abord
en marche l’appareil principal, puis, après 20 secon-
des, les capteurs à distance.
2. Après la mise en place des piles, le canal 1 (V) est
automatiquement activé pour le premier capteur.
3. Pour le 2nd capteur, insérez les piles ; le canal 1 (V)
est là encore automatiquement activé. Actionnez la
touche « CH »
pour activer le canal 2.
4. Lorsqu’un capteur est enregistré, le numéro de canal
(O), la température extérieure (B) et l’hygrométrie
extérieure (L) apparaissent sur l’écran de la station.
5. La touche «CH»
permet de consulter les capteurs
l’un après l’autre CH1CH2CH3Intervalle de
10 secondes (P).
Remarque: après la mise en place des piles sur l’appareil
principal, l’affichage de pression atmosphérique (S)
clignote pendant 20 secondes et vous pouvez si
nécessaire modifier la pression atmosphérique locale à
l’aide des touches
«»2et «»3
. Ensuite, la station
météorologique passe en mode enregistrement des
capteurs extérieurs pendant 3 minutes. Pendant ce
temps, l’affichage de réception (Q) clignote. Si
aucun capteur extérieur n’est enregistré pendant cette
période, le mode enregistrement s’interrompt.
Remarque: placez l’appareil principal et les capteurs
loin des métaux et des sources de perturbation, p. ex.
des téléphones mobiles, des téléviseurs et autres
appareils électriques
.
Remarque: pour obtenir des températures plus
précises, il faut placer le capteur à un emplacement
extérieur ombragé.
PARAMÉTRAGE AUTOMATIQUE DE L’HEURE
Après avoir inséré les piles, une fois que la station
météorologique a terminé la recherche des capteurs et la
mesure de la pression atmosphérique locale, la recherche
d‘horloge radio débute. Ce mode de paramétrage dure
env. 5 minutes et le symbole horloge radio
(I) clignote.
Si ne signal n’est pas reçu, la recherche peut être lancée
manuellement.
1. Actionnez la touche «»3pendant plus de 3 secon-
des jusqu‘à entendre un « bip » et à voir le symbole
horloge radio (I) clignoter pendant la durée
(env. 5 minutes) de la fonction de recherche.
2. Si vous actionnez une nouvelle fois la touche «»3
pendant les 5 minutes de recherche, la recherche de
signal d’horloge radio interrompt.
Remarque: actionnez brièvement la touche «»3
pour activer le fuseau horaire sélectionné dans la sec-
tion RÉGLAGE DE L’HEURE, DE LA DATE ET DE LA
MÉTÉO. L’icon (F) apparaît sur l’écran.
PARAMÉTRAGE MANUEL DU CAPTEUR EXTÉRIEUR
La charge des piles (R) du capteur extérieur s’affiche
à l’écran. Si la charge est faible ou en cas de perte de
connexion, le capteur doit être enregistré manuellement.
1. Actionnez la touche «CH» 4pendant plus de
3 secondes, jusqu‘à entendre un « bip » et voir le
symbole
(Q)
se mettre à clignoter.
2. Insérez les piles dans le capteur extérieur selon la
polarité indiquée. Sélectionnez immédiatement le
numéro de canal à l’aide de la touche « CH
»
.
3. Une fois l’enregistrement réussi, la température (B)
et l’hygrométrie (L) apparaissent sur l’affichage, dans
la zone Outdoor.
4.
La fonction de recherche s’interrompt automatiquement
après 3 minutes et la station revient en mode standard.
Remarque: LL.L--,- ºC ou HH.H --,- ºC apparaît sur
l’affichage, dans la zone Outdoor, si la liaison avec les
capteurs extérieurs s’interrompt ou que les capteurs
ne sont pas dans la zone de réception.
SETTING THE TIME OF DAY, DATE AND
INDICATOR
1.
Actionnez la touche «SET» 5pendant plus de
3 secondes, jusqu‘à entendre un « bip » et voir
l’affichage de l’année clignoter sur l’affichage (E).
2.
Réglez l’année au moyen des touches «»2et
«»3.
3.
Actionnez la touche «SET» 5.
4.
Réglez le mois au moyen des touches «»2et
«»3.
5.
Actionnez la touche «SET» 5.
6.
Réglez le jour au moyen des touches «»2et «»
3.
7.
Actionnez la touche «SET» 5.
8.
Réglez l’heure au moyen des touches «»2et
«»3.
9.
Actionnez la touche «SET» 5.
10.
Réglez les minutes au moyen des touches «»2
et «»3.
11.
Actionnez la touche «SET» 5.
12. Sélectionnez l’affichage de l’heure sur 12h ou
24h, au moyen des touches
«»2et «»3
.
13.
Actionnez la touche «SET» 5.
14.
Sélectionnez le fuseau horaire au moyen des
touches «»2et «»3(Suisse : 1).
15.
Actionnez la touche «SET» 5.
16. Sélectionnez la langue au moyen des touches
«»2et «»3
, p.ex. « GER » pour l’allemand.
17.
Actionnez la touche «SET» 5.
18. Sélectionnez le symbole météo actuel au moyen
des touches
«»2et «»3
.
19.
Actionnez la touche «SET» 5.
20. Si nécessaire, corrigez la pression atmosphérique
actuelle au moyen des touches
«»2et «»3
.
21.
Actionnez la touche «SET» 5pour terminer le
processus de programmation.
PROGRAMMER UNE ALARME
1. Actionnez la touche «SET» 5pour sélectionner
l’heure d’alarme 1/A1 et encore une fois pour sélecti-
onner l’heure d’alarme 2/A2 (F).
2. Selon le choix de l’alarme, actionnez une nouvelle
fois la touche «SET» 5dans les 20 secondes, pen-
dant plus de 3 secondes, jusqu‘à entendre un « bip »
et voir l’heure clignoter sur l’affichage de l’heure (E).
3. Réglez l’heure au moyen des touches
«»2et
«»3
.
4. Actionnez la touche „SET” 5.
5. Réglez les minutes au moyen des touches
«»2et
«»3
.
6. Actionnez la touche „SET” 5pour terminer le pro-
cessus de programmation de l’alarme.
ACTIVATION DE L’ALARME
1. En mode normal, actionnez la touche «
»
2
.
Le symbole de cloche 1 (D) apparaît sur l’écran.
2. Actionnez la touche «
»
2
une nouvelle fois.
Le symbole de cloche 1disparaît et le numéro
2apparaît à droite.
3. Actionnez la touche «
»
2
une nouvelle fois.
Les deux heures de réveil sont à présent activées.
4. Actionnez la touche «
»
2
une nouvelle fois.
Les deux heures de réveil sont alors désactivées.
SNOOZE
Lorsque l’alarme sonore retentit, actionnez la touche
«LIGHT»
1
pour interrompre l’alarme pendant
5 minutes. Les symbole ZZet clignotent pendant
cette période. La fonction de répétition de l’alarme
est désactivée en pressant n’importe quelle touche,
sauf «LIGHT»
1
.
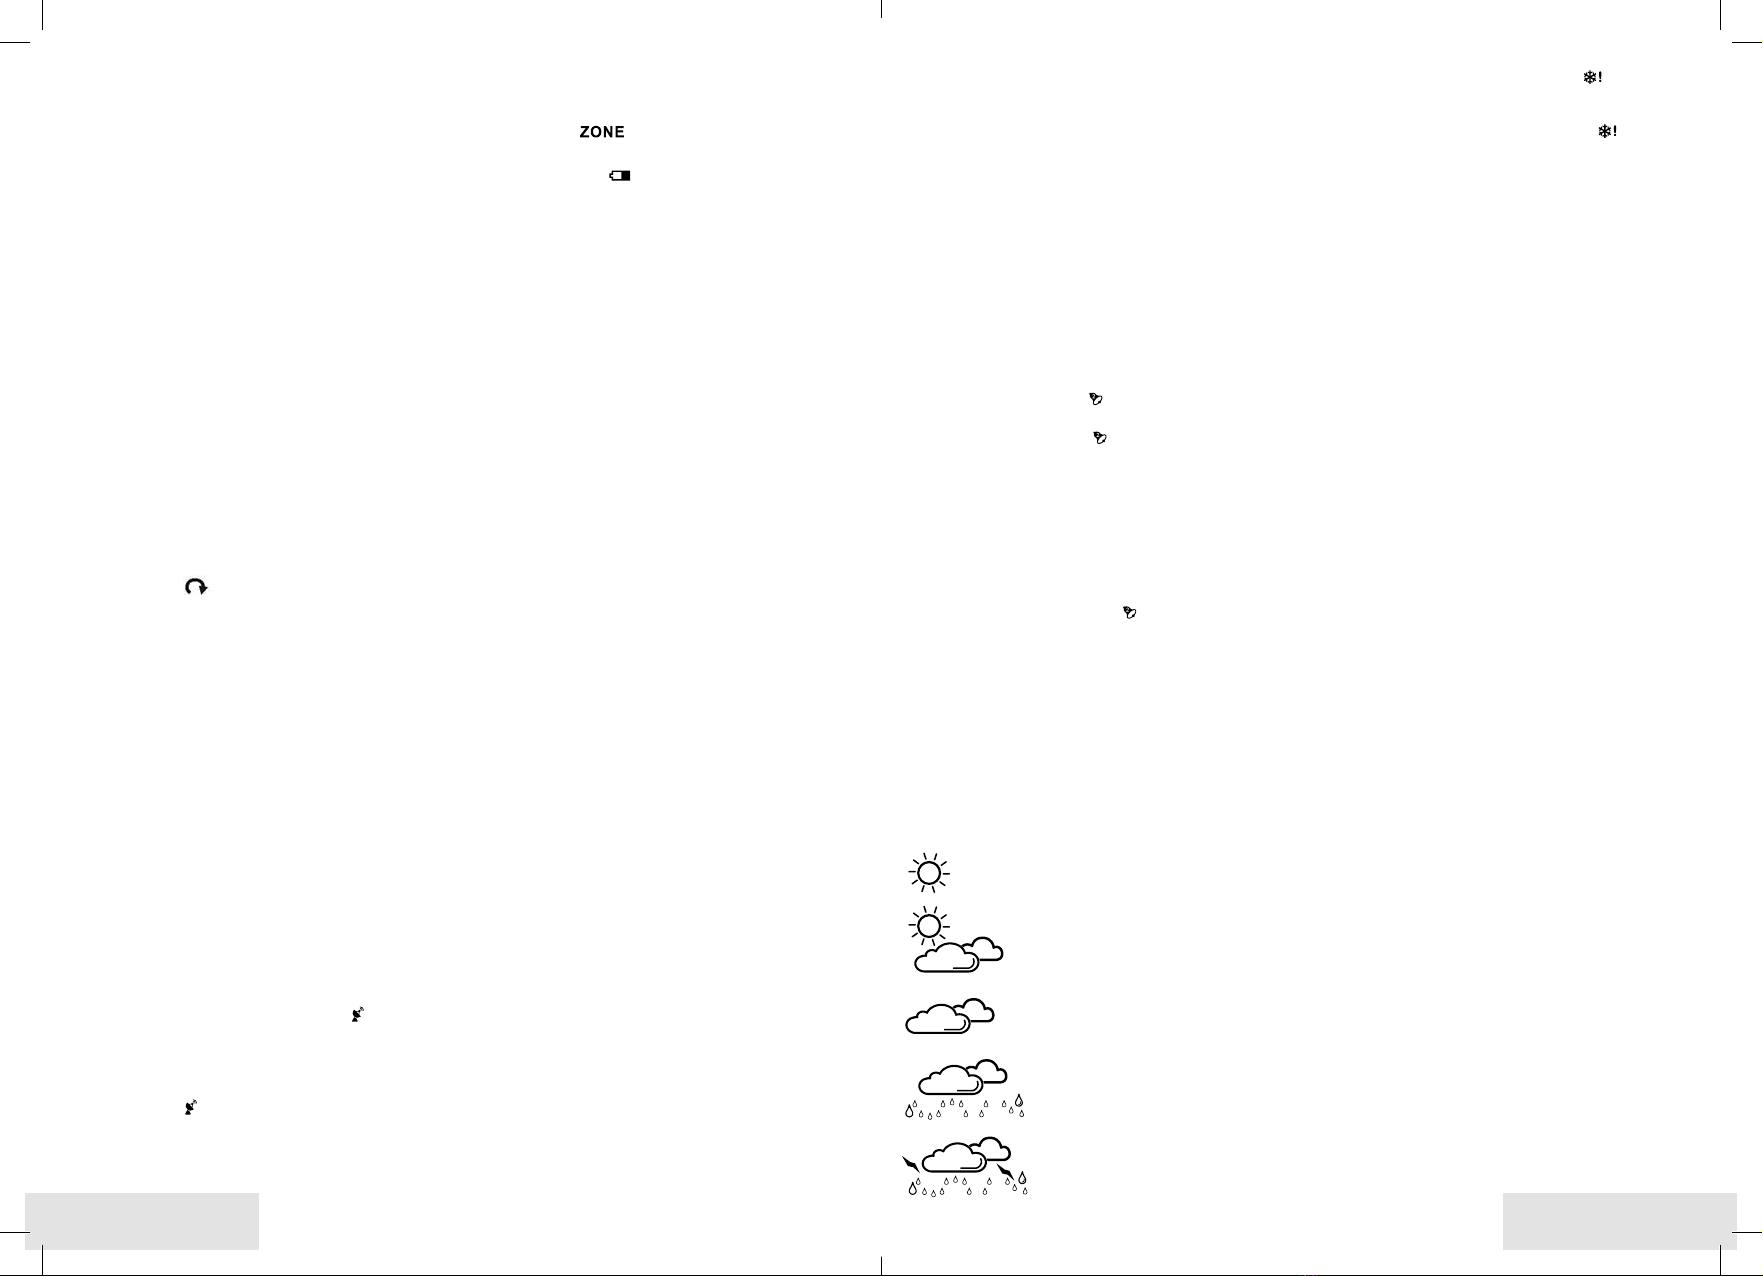
PRÉVISIONS MÉTÉOROLOGIQUES
Sur la base des variations de la pression atmosphérique,
l’appareil prévoit les conditions météo des prochaines
12 à 24 heures. La zone concernée est d’env. 30 à 50
km. Les prévisions météorologiques sont correctes à
70 - 75 %. Comme les conditions météo ne peuvent
pas être prévues avec une exactitude de 100%, nous
ne pouvons pas être tenus responsables des pertes
résultant de prévisions météorologiques incorrectes.
Ensoleillé
Partiellement nuageux
Nuageux
Pluie
Orage/Tempête
Remarque: en cas de chute de neige, (R) ) cligno-
te en plus du symbole de pluie. C’est le cas lorsque
la température est comprise entre -3 ºC et +1 ºC. Si la
température tombe en-dessous de -3 ºC s’affiche
en permanence.
Attention: l’appareil doit être en fonctionnement
pendant au moins 12 heures pour enregistrer une
courbe de pression. Les symboles de prévisions (A)
s’affichent en fonction de cette courbe
.
Remarque: les prévisions varient selon la géographie,
p. ex. l’intérieur des terres, les vallées soumises au
foehn et les zones côtières. Vos prévisions météo
(A) peuvent varier dans ces régions. Si nécessaire,
les prévisions peuvent être corrigées dans la section
« RÉGLAGE DE L’HEURE, DE LA DATE ET DE LA
MÉTÉO ».
AFFICHAGES DE TENDANCE POUR LA
TEMPÉRATURE ET L’HYGROMÉTRIE
Lorsque les valeurs de température et d’hygrométrie
ont changé, 4 petites flèches indiquent la tendance
(M): stable, en hausse ou en baisse.
MAINTENANCE ET ENTRETIEN
Nettoyez uniquement l’appareil avec un chiffon
doux. En cas de fort encrassement, vous pouvez
humidifier légèrement le chiffon. N’utilisez pas de
produits de nettoyage contenant des solvants!
Veuillez à ce qu‘aucune humidité ne puisse pénétrer
à l’intérieur de l’appareil. Sur le capteur extérieur,
vérifiez le bon positionnement du capot du compar-
timent des piles, notamment lors du remplacement
des piles.
Si de la poussière s’incruste dans l’ouverture du
couvercle du capteur, utilisez un aspirateur pour
l’éliminer.
ÉLIMINATION DES APPAREILS USAGÉS
À la fin de sa durée de vie, ne jetez pas ce produit
avec les déchets ménagers, mais déposez-le à un
point de collecte pour le recyclage des appareils
électriques et électroniques.
Le symbole figurant sur le produit lui-même, la noti-
ce d’utilisation ou l’emballage le signale.
DÉCLARATION DE CONFORMITÉ
Par la présente, nous, Tegro SA (Ringstrasse 3,
CH-8603 Schwerzenbach), déclarons sous notre
seule responsabilité que ce produit respecte les
exigences fondamentales et autres prescriptions
pertinentes de la directive 2014/53/EU, 2014/30/EU
et 2011/65/EU sur les équipements radioélectriques.
Demandez la déclaration de conformité à:
313533_Funk-Wetterstation-E0106_Manual_190308.indd 18-19 22.03.19 17:49

20 21Français Italiano
CARACTÉRISTIQUES TECHNIQUES DE LA STATION MÉTÉO
Tension d’alimentation de l’appareil principal: 2 x 1.5 V
Type de pile de l’appareil principal: 2 x AAA / LR03 (non fournies)
Plage de température de l’appareil principal: 0 ºC à +50 ºC
Précision de la température de l’appareil principal: ± 1.5 ºC
Résolution de l’affichage de température: 0.1 ºC
Plage d’hygrométrie de l’appareil principal: 20% à 99% RH
Précision de l’hygrométrie de l’appareil principal: ± 5%
Résolution de l’hygrométrie: 1%
Plage de pression atmosphérique: 800 – 1100 hPa / 23.62 – 32.49 inHg
Précision de la pression atmosphérique: ± 3 hPa
Résolution de la pression atmosphérique: 1 hPa
Fuseaux horaires: -12 à 12
Température d’utilisation: 0 ºC à +50 ºC
Horloge radio: DFC 77
Dimensions (HxLxP): 150 x 80 x 30 mm
CARACTÉRISTIQUES TECHNIQUES DU CAPTEUR EXTÉRIEUR
Tension d’alimentation du capteur à distance: 2 x 1.5 V
Type de pile capteur à distance: 2 x AAA / LR03 / AM4 (non fournies)
Plage de température: –40 ºC à +70 ºC
Précision de la température: ± 1.5 ºC
Résolution de l’affichage de température: 0.1 ºC
Plage d’hygrométrie: 20% à 99% RH
Précision de l’hygrométrie: ± 5%
Fréquence d’émission: 433 MHz
Portée max. (en conditions optimales): 100 m
Nombre de canaux: 3
Dimensions (HxLxP): 95 x 60 x 27 mm
Stazione meteo wireless E0106
Grazie per l’acquisto di questa stazione meteo di ultima generazione. Questo apparecchio è stato costruito
utilizzando la tecnologia più avanzata e fabbricato utilizzando componenti all‘avanguardia; vi fornisce previsi-
oni meteo affidabili. Leggere attentamente il manuale per scoprire appieno le caratteristiche e le funzioni di
questo prodotto.
• il prodotto è destinato all‘uso non commerciale di
privati.
• Proteggere il display dall’umidità.
• Il sensore esterno deve essere collocato in un luo-
go riparato, protetto dagli agenti atmosferici diretti
come la pioggia.
• Il display non può essere utilizzato nelle immediate
vicinanze di riscaldamenti, altre fonti di calore o con
irraggiamento solare diretto.
• Evitare di utilizzare l’apparecchio nelle vicinanze di
campi elettromagnetici.
• I lavori di servizio, manutenzione e riparazione pos-
sono essere eseguiti solo da uno specialista.
• Non possono essere effettuate modifiche sul pro-
dotto. In caso di un intervento decade la garanzia.
• Questo apparecchio e le sue batterie non sono
un giocattolo e devono essere tenuti lontano dalla
portata dei bambini!
AVVERTENZE DI SICUREZZA
• Togliere immediatamente le batterie scariche, per
prevenire perdite e danni conseguenti. • Indossare
occhiali e guanti di protezione resistenti agli agenti
chimici quando si maneggiano batterie esaurite!
• Per la sostituzione utilizzare solo batterie o batterie
ricaricabili del tipo consigliato.
• In caso di domande, che non vengono chiarite dalle
istruzioni per l’uso, contattare il nostro reparto di
• Il produttore non si assume alcuna responsabilità
per indicazioni, valori misurati o previsioni me-
teorologiche non corrette e per le conseguenze
risultanti.
• Le apparecchiature elettriche radio dei vicini pos-
sono causare interferenze/malfunzionamenti. Può
essere d’aiuto trovare un altro luogo di installazione
per le apparecchiature.
313533_Funk-Wetterstation-E0106_Manual_190308.indd 20-21 22.03.19 17:49

22 23 ItalianoItaliano
Nome e funzione dei pulsanti sul display
Pulsante Funzione Funzione supplementare
1 [LIGHT] Accende la retroilluminazione blu per 5
secondi
Quando l'allarme con funzione snooze
è attivato
2 [UP]
In modalità di programmazione dell‘ora e degli
allarmi per impostazione del valore crescente
(tenere premuto per l‘avanzamento rapido)
In modalità normale per
l‘attivazione e la disattivazione dei
tempi di allarme
3 [DOWN] In modalità di programmazione dell‘ora e
degli allarmi per impostazione del valore
decrescente (tenere premuto per tornare
indietro rapidamente)
Nella modalità standard tene-
re premuto per 3 secondi per
attivare manualmente la ricerca
dell’orologio radiocontrollato
4
[CH]
Richiamo dei sensori esterni, attivazione
dell‘intervallo di visualizzazione Nella modalità standard tenere
premuto per 3 secondi per attivare
la ricerca del sensore
5 [SET] Impostazioni di sistema, tenere premuto
per 3 secondi
Recupero dei tempi di allarme
6 [MAX/MIN] Richiamo dei valori massimo e minimo Premere e tenere premuto per 3
secondi per passare da ºC a ºF
7 Dispositivo di sospensione
8
Coperchio del vano batterie
9 Piede di sostegno
Nome e funzione dei pulsanti sul sensore esterno
Coperchio del vano batterie
Piede di sostegno
Dispositivo di sospensione
[CH] Tasto di selezione
del canale Selezione del canale di trasmissione
[C/F] Commutazione tra °C e °F
Denominazione delle funzioni del display nell‘apparecchio principale
A Simboli previsioni meteo
B
Temperatura esterna
C Temperatura interna
D
Attivazione allarme 1 e 2, funzione snooze
E
Ora
F
Fuso orario
G Data
H Giorno della settimana
I Orologio radiocontrollato (ricezione)
J
Umidità dell’aria interna
K
Indicazione livello batteria stazione meteo
L Umidità esterna
M
Visualizzazione della tendenza/trend
N Indicazione livello batteria sensori esterni
O
Visualizzazione canale sensori esterni
P
Intervallo di visualizzazione automatico
Q
Ricezione sensori esterni
R
Allarme gelo o nevicate
S
Pressione dell'aria
Denominazione delle funzioni del display nel sensore
T
Temperatura
U
Indicazione di trasmissione
V
Numero di canale
W
Umidità dell’aria
X
Indicazione livello batteria
T
U
V
W X
A
B
C
D
E
F
R
S
Q
P
O
N
M
L
K
J
I
H
G
E0106 (313533.00)
Station: 2 x AAA
Sender:
2 x AAA (E0002HA-A3-YX)
Serial-No.:
TegroAG · Ringstr. 3
CH-8603 Schwerzenbach
1
2
3
4
9
8
7
5
6E0106 (313533.00)
Station: 2 x AAA
Sender:
2 x AAA (E0002HA-A3-YX)
Serial-No.:
Tegro AG
Ringstrasse 3
CH-8603 Schwerzenbach
313533_Funk-Wetterstation-E0106_Manual_190308.indd 22-23 22.03.19 17:50

24 25 Italiano25Italiano
INSERIMENTO DELLE BATTERIE
Apparecchio principale:
Alimentazione elettrica supplementare: aprire il vano
batterie 8, inserire 3 batterie AA/LR6 con la polarità
indicata e richiudere il vano batterie 8.
Sensore esterno:
Aprire il coperchio del vano batterie in direzione
della freccia ed inserire 2 batterie AAA/LR03; nel
fare ciò prestare attenzione alla corretta polarità.
Chiudere il coperchio del vano batterie in
direzione opposta.
Avvertenza: si possono utilizzare solo batterie dello
stesso tipo e con ugual capacità di carica.
CONFIGURAZIONE DEL SENSORE ESTERNO
1. Alla prima messa in servizio accendere sempre prima
l’apparecchio principale e dopo 20 secondi i sensori
remoti.
2. Dopo l’inserimento delle batterie, il canale 1 (V) si
attiva automaticamente al primo sensore.
3. Con il secondo sensore, inserire le batterie e il canale
1 (V) si riattiva automaticamente. Premere ora il tasto
„CH“
(13) per attivare il canale 2.
4. Se è registrato un sensore, sul display della stazione
vengono visualizzati il numero di canale (O), la tem-
peratura esterna (B) e l’umidità dell’aria esterna (L).
5. Con il tasto “CH”
i sensori della serie possono
essere richiamati dopo un intervallo di 10 secondi
CH1CH2CH3(P).
Nota: dopo aver inserito le batterie nell‘unità princi-
pale, il display della pressione dell‘aria (S) lampeggia
per 20 secondi ed è possibile regolare la pressione
dell‘aria locale utilizzando i pulsanti
“”2e “”3
se necessario. Poi la stazione meteo cambia per 3
minuti nella modalità di registrazione dei sensori re-
moti. Durante questo tempo, l‘indicazione di ricezione
lampeggia (Q). Se durante questo tempo non
viene registrato alcun sensore esterno, la modalità di
registrazione si spegne.
Nota: posizionare l’apparecchio principale e i sensori
lontano da metalli e fonti di disturbo, come telefoni
cellulari, televisori e altri dispositivi elettronici
.
Nota: per ottenere valori di temperatura più precisi, il
sensore deve essere posizionato in un luogo ombreg-
giato all‘aperto.
IMPOSTAZIONE AUTOMATICA DELL‘ORA
Quando la stazione meteo ha terminato la ricerca dei senso-
ri e la misurazione della pressione dell‘aria locale dopo aver
inserito le batterie, inizia la ricerca del segnale dell‘orologio
radio. Questa modalità di impostazione dura circa 5 minuti e
il simbolo dell’orologio radiocontrollato (I) lampeggia.
Se il segnale non viene ricevuto, la ricerca può essere
avviata manualmente.
1.
Premere il pulsante “”3per più di 3 secondi
finché non si sente un segnale acustico e il simbolo
dell’orologio radiocontrollato (I) lampeggia sul display
per la durata (circa 5 minuti) della funzione di ricerca.
2. Se si preme nuovamente il tasto “”3durante la
ricerca di cinque minuti, la ricerca dell’orologio radio-
controllato viene annullata.
Nota: premere solo brevemente il tasto
“”3
per at-
tivare il fuso orario selezionato nella sezione IMPOSTA-
ZIONE DI ORA, DATA E METEO. Sul display compare
l’icona (F).
CONFIGURAZIONE MANUALE DEL SENSORE
ESTERNO
Il livello della batteria (R) del sensore esterno attuale
viene visualizzato sul display. Con livello della batteria
basso o perdita della connessione, il sensore deve
essere registrato manualmente.
1. Premere il tasto “CH” 4per più di 3 secondi finché
non viene emesso un segnale acustico ed il simbolo
(Q) non inizia a lampeggiare.
2. Inserire le batterie nel sensore remoto secondo la
polarità indicata. Selezionare immediatamente il
numero di canale con il tasto ”CH“ .
3. A registrazione avvenuta vengono visualizzate la tem-
peratura (B) e l’umidità dell’aria (L) nell’area Outdoor
del display.
4. La funzione di ricerca si spegne automaticamente
dopo 3 minuti e la stazione torna alla modalità Stan-
dard.
Nota: LL.L--,- ºC o HH.H--,- ºC viene visualizzato nel
display Outdoor, se la connessione con i sensori es-
terni si interrompe o se questi si trovano fuori portata.
IMPOSTAZIONE DI ORA, DATA E VISUALIZZAZIONE
1. Premere il tasto
“SET”5
per più di 3 secondi
finché non viene emesso un segnale acustico e
nella visualizzazione dell’ora (E) non lampeggia la
visualizzazione dell’anno.
2.
Impostare l’anno tramite “”2e “”3.
3.
Premere il tasto “SET”5.
4.
Impostare il mese tramite “”2e “”3.
5.
Premere il tasto “SET”5.
6.
Impostare il giorno tramite “”2e “”3.
7.
Premere il tasto “SET”5.
8.
Impostare l’ora tramite “”2e “”3.
9.
Premere il tasto “SET”5.
10.
Impostare i minuti tramite
“”2e “”3
.
11.
Premere il tasto “SET”5.
12. Selezionare con
“”2e “”3
tra la
visualizzazione dell‘ora 12h o 24h.
13.
Premere il tasto “SET”5.
14.
Selezionare tramite “”2e “”3il fuso orario
(Svizzera 1).
15.
Premere il tasto “SET”5.
16. Selezionare tramite
“”2e “”3
, ad es.
“GER” per il Tedesco.
17.
Premere il tasto “SET”5.
18. Impostare il simbolo meteorologico corrente
tramite
“”2e “”3
.
19.
Premere il tasto “SET”5.
20. Se necessario, regolare l‘attuale pressione
dell‘aria tramite
“”2e “”3
.
21.
Premere il tasto “SET”5per concludere la
procedura di programmazione.
IMPOSTAZIONE DI UN ORARIO DI ALLARME
1. Premere il pulsante ”SET” 5per selezionare l‘ora
della sveglia 1/A1 e di nuovo per selezionare l‘ora
della sveglia 2/A2 (F).
2. Dopo aver selezionato l‘allarme, premere nuovamen-
te il pulsante ”SET” 5per più di 3 secondi entro 20
secondi, finché non si sente un segnale acustico e il
display dell‘ora lampeggia nel display dell‘ora (E).
3. Impostare l’ora tramite “”2e “”3.
4. Premere il tasto „SET” 5.
5. Impostare i minuti tramite “”2e “”3.
6. Premere il tasto „SET” 5per concludere la pro-
grammazione dell’allarme.
ATTIVAZIONE DELL‘ALLARME
1. In modalità normale, premere il pulsante ”“2.
Sul display appare il simbolo della campana 1 (D).
2. Premere nuovamente il tasto
”“2
. Il simbolo
della campana 1si spegne e il numero 2appare
sulla destra.
3. Premere nuovamente il tasto
”“2
.
Entrambi gli orari di allarme sono ora attivati.
4. Premere nuovamente il tasto
”“2
.
Entrambi gli orari di allarme sono ora disattivati.
SNOOZE
Quando suona il tono di allarme premere il pulsante
”LIGHT“
1
e l‘allarme viene interrotto per 5 minuti.
I simboli ZZe lampeggiano durante questo tempo.
Premendo un tasto qualsiasi diverso da ”LIGHT“
1
si annulla l‘allarme snooze.
PREVISIONI METEO
Sulla base delle variazioni della pressione atmosfe-
rica, l’apparecchio indica le condizioni meteo per le
successive 12-24 ore. L‘area di pertinenza è di ca.
30-50 km. Le previsioni meteo presentano previ-
sioni corrette al 70 – 75 %. Poiché non è possibile
prevedere le condizioni meteo con una precisione
al 100%, non possiamo essere ritenuti responsabili
per eventuali perdite riconducibili a previsioni meteo
incorrette.
Soleggiato
Parzialmente nuvoloso
Nuvoloso
Pioggia
Temporale/tempesta
Nota: In caso di nevicate, lampeggia anche (R)
con il simbolo della pioggia. Ciò avviene nel campo di
temperatura compreso tra -3 ºC e +1 ºC. Se la tem-
peratura scende al di sotto di -3 ºC, il display visualizza
in modo permanente.
Attenzione: l’apparecchio deve essere in funzione
da almeno 12 ore per registrare un andamento della
pressione. Sulla base di questo andamento vengono
visualizzati i simboli meteorologici (A).
Nota: per le località con una geografia diversificata,
come ad es. le zone interne, le valli ventose o le coste
le previsioni meteo sono differenti. Le previsioni me-
teo (A) possono variare in queste zone. La previsione
può essere regolata, se necessario, nella sezione
“IMPOSTAZIONE DI ORA, DATA E METEO“.
VISUALIZZAZIONE PER TREND DI TEMPERATURA
E UMIDITÀ DELL’ARIA
Se è variato il valore per la temperatura e l‘umidità
dell’aria, 4 piccole frecce indicano la tendenza (M):
in aumento, costante o in calo.
MANUTENZIONE E CURA
Pulire l’apparecchio solo utilizzando un panno
morbido. Con sporco ostinato, questo può essere
leggermente inumidito. Non utilizzare detergenti che
contengono solventi!
Fare attenzione che l‘umidità non penetri all’interno
dell’apparecchio. Nel sensore esterno occorre cont-
rollare che il coperchio del vano batterie sia in sede,
soprattutto in caso di sostituzione delle batterie.
Se si deposita la polvere nell’apertura del coperchio
del sensore, questa può essere rimossa con un
aspirapolvere.
SMALTIMENTO DI APPARECCHI DISMESSI
Al termine della sua durata utile, non smaltire questo
prodotto nei normali rifiuti domestici, ma presso
un punto di raccolta per il riciclaggio di apparec-
chiature elettriche ed elettroniche. Il simbolo sul
prodotto, sulle istruzioni per l’uso o sull’imballaggio è
un‘indicazione in merito.
DICHIARAZIONE DI CONFORMITÀ
Noi, Tegro AG (Ringstrasse 3, CH-8603 Schwerzen-
bach), dichiariamo sotto la nostra responsabilità che
questo prodotto è conforme ai requisiti essenziali e
pertinenti della direttiva delle apparecchiature radio
2014/53/EU, 2014/30/EU e 2011/65/EU.
Per domande sulla dichiarazione di conformità
313533_Funk-Wetterstation-E0106_Manual_190308.indd 24-25 22.03.19 17:50

26 27Italiano Italiano
DATI TECNICI STAZIONE METEOROLOGICA
Alimentazione tensione apparecchio principale: 2 x 1.5 V
Tipo di batteria apparecchio principale: 2 x AAA / LR03 (escl.)
Gamma di temperatura apparecchio principale: da 0 ºC a +50 ºC
Precisione gamma di temperatura apparecchio principale: ± 1,5 ºC
Risoluzione visualizzazione temperatura: 0,1 ºC
Range umidità dell‘aria apparecchio principale: da 20% a 99% RH
Precisione range umidità dell‘aria apparecchio principale: ± 5%
Risoluzione umidità dell’aria: 1%
Range pressione dell’aria: 800 – 1100 hPa / 23.62 – 32.49 inHg
Precisione range pressione dell’aria: ± 3 hPa
Risoluzione pressione dell’aria: 1 hPa
Fusi orari: Da -12 a 12
Temperatura di esercizio: da 0 ºC a +50 ºC
Orologio radiocontrollato: DFC 77
Dimensioni (AxLxP): 150 x 80 x 30 mm
DATI TECNICI SENSORE ESTERNO
Alimentazione tensione sensore remoto: 2 x 1,5 V
Tipo di batteria sensore remoto: 2 x AAA / LR03 / AM4 (escl.)
Range di temperatura: da -40 ºC a +70 ºC
Precisione range di temperatura: ± 1,5 ºC
Risoluzione visualizzazione temperatura: 0,1 ºC
Range umidità dell‘aria: da 20% a 99% RH
Precisione range umidità dell’aria: ± 5%
Frequenza di trasmissione: 433 MHz
Portata max. (in condizioni ottimali): 100m
Numero canali: 3
Dimensioni (AxLxP): 95 x 60 x 27 mm
313533_Funk-Wetterstation-E0106_Manual_190308.indd 26-27 22.03.19 17:50

Deutsch
28
E0106 - 313533.00
Tegro AG
CH-8603 Schwerzenbach
www.tegro.ch
Fernsensoren
Remote sensors
Capteurs distants
Sensori remoti
Aussentemperatur
Outdoor temperature
Température extérieur
Temperatura esterno
Symbole Wettervorhersage
Wheather forecast symbols
Symboles prévisions météo
Simboli previsioni meteo
Innentemperatur
Indoor temperature
Température intérieur
Temperatura interno
Uhranzeige
Clock display
Affichage horloge
Visualizzazione orologio
Aussenluftfeuchtigkeit
Outdoor humidity
Humidité atmosphérique extérieur
Umiditá atmosferica esterno
Luftdruckanzeige
Pressure reading
Affichage pression
Valore della pressione
Innen-Luftfeuchtigkeit
Indoor humidity
humidité atmosphérique intérieure
Umiditá atmosferica interna
Datumsanzeige
Day / month display
Affichage jour / mois
Visualizzazione giorno / mese
313533_Funk-Wetterstation-E0106_Manual_190308.indd 28 22.03.19 17:50
This manual suits for next models
1
Table of contents
Languages:
Other UNITEC Climate Weather Station manuals

UNITEC Climate
UNITEC Climate W010 User manual

UNITEC Climate
UNITEC Climate W0785 User manual

UNITEC Climate
UNITEC Climate W194-1 User manual

UNITEC Climate
UNITEC Climate WT3081 User manual

UNITEC Climate
UNITEC Climate E0316 User manual

UNITEC Climate
UNITEC Climate W177 User manual

UNITEC Climate
UNITEC Climate W185-0 User manual

UNITEC Climate
UNITEC Climate W263 User manual

UNITEC Climate
UNITEC Climate W129-1 User manual

UNITEC Climate
UNITEC Climate W164 User manual