UNITEC Climate E0316 User manual

Bedienungsanleitung
Owner’s Manual
Manuel de l’utilisateur
Manuale d’istruzioni
Funkwetterstation
Wireless weather station
Station météorologique, sans fil
Stazione meteo wireless
313532__Funk-Wetterstation_Manual_180410.indd 1 24.04.18 09:25

Deutsch
2
INHALT
Bedienungsanleitung deutsch ............................................................................................................................. 3
Sicherheitshinweise ............................................................................................................................................ 3
Funktionsbeschreibungen ................................................................................................................................... 4
Einrichtung der Station und Aussensensoren ..................................................................................................... 6
Grundeinstellungen ............................................................................................................................................. 6
Technische Daten ................................................................................................................................................ 8
CONTENT
Owner‘s manual english...................................................................................................................................... 9
Safety instructions............................................................................................................................................... 9
Function descriptions ........................................................................................................................................ 10
Station setup and outdoor sensors.................................................................................................................... 12
Basic settings .................................................................................................................................................... 12
Specifications .................................................................................................................................................... 14
CONTENU
Manuel de l’utilisateur français.......................................................................................................................... 15
Consignes de sécurité....................................................................................................................................... 15
Description des fonctions.................................................................................................................................. 16
Configuration de la station et capteurs extérieurs............................................................................................. 18
Réglages de base .............................................................................................................................................. 18
Caractéristiques techniques .............................................................................................................................. 20
CONTENUTO
Manuale d‘istruzioni italiano .............................................................................................................................. 21
Avvertenze di sicurezza ..................................................................................................................................... 21
Descrizioni di funzionamento............................................................................................................................. 22
Configurazione della stazione e sensori esterni................................................................................................. 24
Impostazioni di base.......................................................................................................................................... 24
Dati tecnici......................................................................................................................................................... 26
313532__Funk-Wetterstation_Manual_180410.indd 2 24.04.18 09:25

3
Deutsch
Funkwetterstation E0316
Vielen Dank für den Kauf dieser Wetterstation der neuesten Generation. Dieses Gerät wurde mit aktueller
Technologie konstruiert und modernsten Bauteilen hergestellt; es liefert Ihnen eine zuverlässige Wettervor-
hersage. Lesen Sie dieses Handbuch sorgfältig durch, um die Eigenschaften und Funktionen dieses
Produktes vollständig kennenzulernen.
• Das Produkt ist für den nichtgewerblichen Privat-
gebrauch vorgesehen.
• Schützen Sie das Anzeigegerät vor Feuchtigkeit.
• Der Aussensensor sollte an einem geschützten Ort
aufgestellt werden, wo er von direkten Wetterein-
flüssen wie Regen geschützt ist.
• Das Anzeigegerät darf nicht in unmittelbarer Nähe
von Heizungen, anderen Hitzequellen oder an
direkter Sonneneinstrahlung betrieben werden.
• Vermeiden Sie den Betrieb des Geräts in der Nähe
elektromagnetischer Felder.
• Service-, Wartungs- und Reparaturarbeiten dürfen
nur von einem Fachmann ausgeführt werden.
• Es dürfen keine Veränderungen am Produkt vor-
genommen werden. Bei einem Eingriff erlischt die
Garantie.
• Dieses Gerät und dessen Batterien sind kein Spiel-
zeug und sollten ausserhalb der Reichweite von
Kindern aufbewahrt werden!
SICHERHEITSHINWEISE
• Leere Batterien sofort entnehmen, um ein Aus-
laufen und dadurch verursachte Folgeschäden
zu verhindern. Im Umgang mit ausgelaufenen
Batterien chemikalienbeständige Schutzbrille und
Schutzhandschuhe tragen!
• Zum Austausch nur Batterien bzw. Akkus des emp-
fohlenen Typs verwenden.
• Bei Fragen, die durch diese Bedienhinweise nicht
beantwortet werden, kontaktieren Sie unsere tech-
• Der Hersteller übernimmt keine Verantwortung für
inkorrekte Anzeigen, Messwerte oder Wettervor-
hersagen und die Folgen, die sich daraus ergeben
können.
• Elektronische Geräte mit Funk von Nachbarn
können Interferenzen/Funktionsstörungen verursa-
chen. Ein anderer Aufstellungsort der Geräte kann
Abhilfe schaffen.
313532__Funk-Wetterstation_Manual_180410.indd 3 24.04.18 09:25

Deutsch
4
1 2 3 4 5 6
7
9
8
Bezeichnungen und Funktionen von Tasten am Anzeigegerät:
Taste Funktion Zusatzfunktion
1 [MODE] Umschaltung zw. 12h und 24h I
m Standartmodus 3 Sekunden gedrückt halten,
um die Zeit- und Datumseinstellung vorzunehmen
2 []
Zeit- und Alarmprogrammiermodus
aufsteigend (gedrückt halten für
schnellen Vorlauf)
Im Standartmodus 3 Sekunden gedrückt
halten, um die Minimum- und Maximumwerte
zu löschen
3 [] Zeit- und Alarmprogrammiermodus
+absteigend (gedrückt halten für
schnellen Rücklauf)
Im Standartmodus 3 Sekunden gedrückt
halten, um Luftdruckeinheit umzustellen (hPa/
mb oder inHg)
4[] Ein- und Ausschalten des Alarms;
Alarmzeit anzeigen lassen Im Standartmodus 3 Sekunden gedrückt
halten, um eine Alarmzeit einzustellen
5
[CH]
Umschaltung Aussensensoren Im Standartmodus 3 Sekunden gedrückt
halten um Sensorsuche zu aktivieren
6 [C/F] Anzeigeumschaltung für ºC oder ºF
Im Standartmodus 3 Sekunden gedrückt halten,
um die Minimum- und Maximumwerte zu löschen
7 [SNOOZE/LIGHT] Schlummerfunktion für Alarm Im Batteriebetrieb (ohne 230 V Netzteil) wird
die Hintergrundbeleuchtung für 5 Sekunden
eigeschaltet
8 Netzanschluss
9 Standfuss
Aufhängevorrichtung
Batteriefach
Netzteil
Bezeichnungen und Funktionen von Tasten am Aussensensor:
Display
Aufhängevorrichtung
[TEST] Manuelle Übertragung zur Wetter-
station
[Kanalwahltaste] Wahl des Kanals vom Aussensenor
[C/F] Umschaltung zwischen °C und °F
Batteriefachabdeckung
Standfuss
313532__Funk-Wetterstation_Manual_180410.indd 4 24.04.18 09:25

5
Deutsch
Bezeichnung der Display-Funktionen im Hauptgerät
A Aussentemperatur
B
Minimum-/Maximum-Wert Aussentemperatur
C Aussenluftfeuchtigkeit
D
Minimum-/Maximum-Wert Aussenluftfeuchtigkeit
E
Uhrzeit
F
Alarmanzeige und Schlummerfunktion (Snooze)
G Wochentag
H Datum
I Minimum-/Maximum-Wert Innenluftfeuchtigkeit
J
Innenluftfeuchtigkeit
K
Tendenz-/Trendanzeige
L Minimum-/Maximum-Wert Innentemperatur
M
Innentemperatur
N Batteriestandanzeige Wetterstation
O
Mondphase
P
Symbole Wettervorhersage
Q
Luftdruckanzeige
R
Batteriestandanzeige Aussensensoren
S
Kanalanzeige Aussensensoren
T
Empfangsanzeige Aussensensoren
Bezeichnung der Display-Funktionen im Sensor
U
Temperatur
V
Sendeanzeige
W
Kanalnummer
X
Luftfeuchtigkeit
Y
Batteriestandsanzeige
U
V
W
X Y
A
B
C
D
PQRST O N
E F G H
M
L
K
J
I
313532__Funk-Wetterstation_Manual_180410.indd 5 24.04.18 09:25

6Deutsch
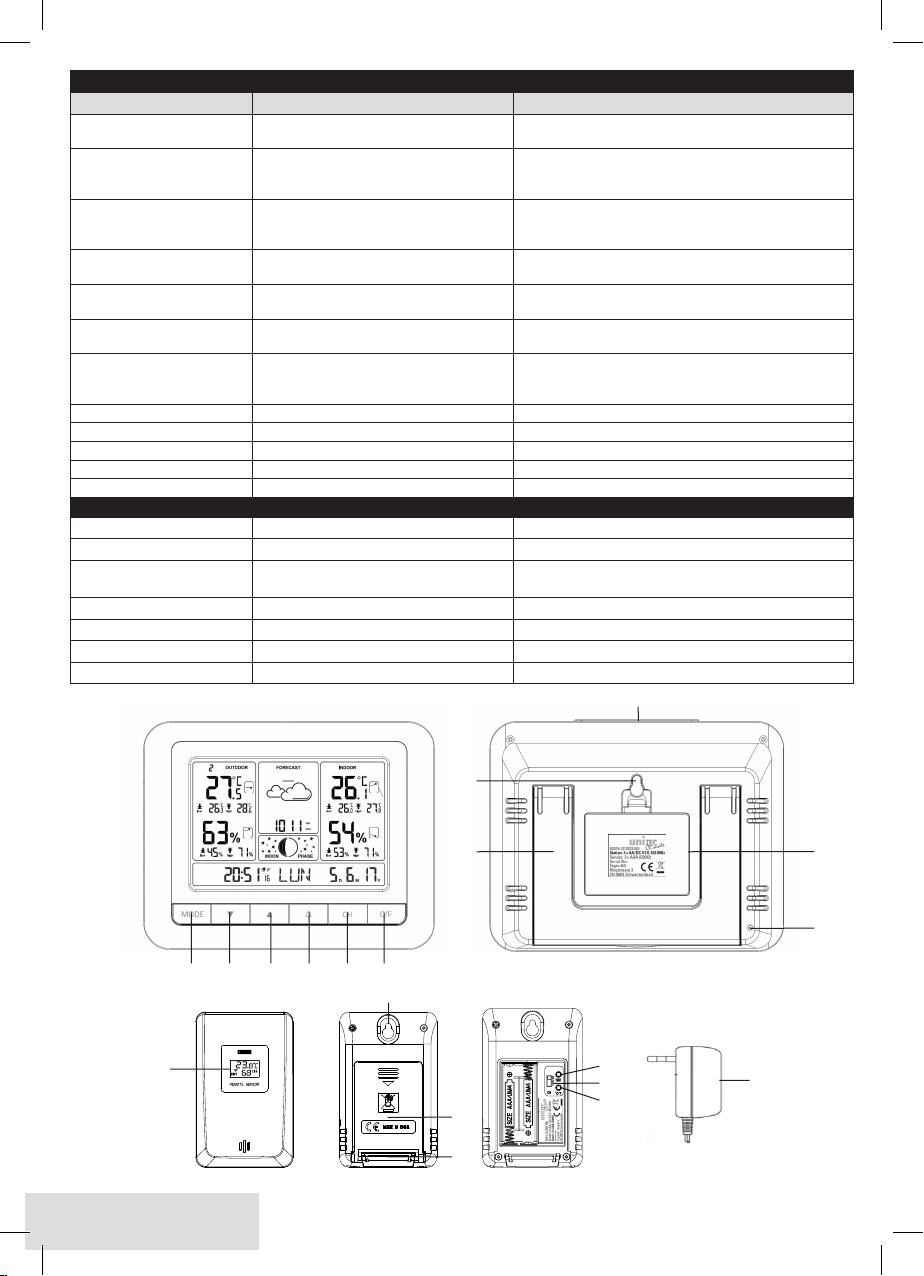
EINSETZEN DER BATTERIEN
Hauptgerät:
Hauptstromquelle: Für Basisbetrieb und für den
Betrieb der kontinuierlichen Hintergrundbeleuch-
tung kann ein 4.5 V-Adapter in die Buchse 8an
der Geräteseite eingesteckt werden. Zusätzliche
Stromversorgung: Öffnen Sie das Batteriefach ,
legen Sie 3 AA/LR6-Batterien mit der angegebenen
Polarität ein und schließen Sie das Batteriefach
wieder.
Aussensensor:
Öffnen Sie die Batterieabdeckung in Pfeilrichtung
und legen Sie 2 AAA/LR03-Batterien ein; achten
Sie dabei auf die richtige Polarität. Schliessen Sie
die Batteriefachabdeckung in entgegengesetzter
Richtung wieder.
Warnung: Es dürfen nur Batterien desselben Typs
und mit gleicher Ladekapazität verwendet werden.
EINRICHTUNG DES AUSSENSENSORS
1. Schalten Sie bei der Erstinbetriebnahme immer erst
das Hauptgerät und dann den Fernsensor ein.
2. Wählen Sie mittels Schiebeschalter
für den ersten
Fernsensor Kanal 1.
3. Wählen Sie mittels Schiebeschalter
für den zwei-
ten Fernsensor Kanal 2.
4. Ist ein Sensor registriert, erscheint im Display der
Station die Kanalnummer (S), Aussentemperatur (A)
und Aussenluftfeuchtigkeit (C).
5. Mit der Taste „CH“ können die Sensoren der Reihe
nach CH1CH2CH310-Sekunden-Intervall
abgerufen werden.
Hinweis: Platzieren Sie Hauptgerät und Sensoren
entfernt von Metallen und Störquellen, wie z. B. Mo-
biltelefonen, Fernseh- und anderen Elektrogeräten
.
Hinweis: Nach dem Einsetzen der Batterien sind
Wetterstation und Aussensensoren für 3 Minuten
im Registrierungsmodus. Während dieser Zeit blinkt
die Empfangsanzeige (T). Wird innerhalb dieser
Zeit kein Aussensensor registriert, schaltet sich der
Registriermodus nach 3 Minuten ab.
Hinweis: Um genauere Temperaturwerte zu erhalten
muss der Sensor an einer schattigen Aussenstelle
platziert werden.
MANUELLE EINRICHTUNG DES
AUSSENSENSORS
Der Batteriestand (R) des aktuellen Aussensensors
wird im Display angezeigt. Bei niedrigem Batteriestand
oder Verbindungsverlust muss der Sensor manuell
registriert werden.
1. Drücken Sie die Taste „CH“ 5für mehr als 3 Sekun-
den bis ein Piepton erklingt und das Symbol
(T)
zu blinken beginnt.
2. Drücken Sie die Taste „TEST“ am Aussensensor,
um die Signalübertragung zu forcieren.
3. Bei erfolgreicher Registrierung erscheinen Tempera-
tur (A) und Luftfeuchtigkeit (C) im Outdoor Bereich
des Displays.
4. Die Suchfunktion schaltet nach 3 Minuten automa-
tisch ab und die Station geht in den Standartmodus
zurück
.
Hinweis: LL.L ºC oder HH.H ºC wird im Outdoor-
Display angezeigt, wenn die Verbindung zu den
Aussensensoren abbricht oder diese ausserhalb des
Empfangsbereichs sind.
EINSTELLUNG DER UHR, DATUM UND ANZEIGE
1. Drücken Sie die Taste „MODE” 1für länger als 3
Sekunden bis ein Piepton erklingt und in der Zeitan-
zeige (E) die Stundenanzeige blinkt.
2. Stellen Sie mittels „“2und „“3die Stunde
ein.
3. Drücken Sie die Taste „MODE” 1.
4. Stellen Sie mittels „“2und „“3die Minute
ein.
5. Drücken Sie die Taste „MODE” 1.
6. Stellen Sie mittels „“2und „“3das Jahr ein.
7. Drücken Sie die Taste „MODE” 1.
8. Stellen Sie mittels „“2und „“3den Monat
ein.
9. Drücken Sie die Taste „MODE” 1.
10. Stellen Sie mittels „“2und „“3den Tag ein.
11. Drücken Sie die Taste „MODE” 1.
12. Wählen Sie mittels „“2und „“3die Sprache
für die Wochentaganzeige .
13. Drücken Sie die Taste „MODE” 1.
14. Wählen Sie mittels „“2und „“3die Zeitzone
(Schweiz 1).
15. Drücken Sie die Taste „MODE” 1um den Program-
miervorgang zu beenden.
Hinweis: Die Wochentage können auf Französisch
(FRE), Italienisch (ITA), Spanisch (SPA), Deutsch (GER)
und Englisch (ENG) angezeigt werden
.
EINSTELLUNG EINER ALARMZEIT
1. Drücken Sie die Taste „“4für länger als
3 Sekunden bis ein Piepton erklingt und in der Zeitan-
zeige (E) die Stundenanzeige blinkt.
2. Stellen Sie mittels „“2und „“3die Stunde
ein.
3. Drücken Sie die Taste „“4.
4. Stellen Sie mittels „“2und „“3die Minute
ein.
5. Drücken Sie die Taste „“4um die Alarmprogram-
mierung zu beenden.
Hinweis: Mit der Programmierung einer Alarmzeit
wird der Alarm automatisch aktiviert
.
Hinweis: Mit einmaligem Drücken der Taste
„“4
im Standartmodus wird die programmierte Alarmzeit
in der Zeitanzeige (E) für 20 Sekunden angezeigt. Mit
zweimaligem Drücken der Taste
„“4
im Standart-
modus wird der Alarm je nach dem aktiviert oder
deaktiviert.
313532__Funk-Wetterstation_Manual_180410.indd 6 24.04.18 09:25

7
Deutsch
7
MONDPHASE
Die Mondphasen (O) werden analog des Kalenders
angezeigt.
Neumond
Erstes Viertel
Zunehmender Halbmond
Zweites Viertel
Vollmond
Drittes Viertel
Abnehmender Halbmond
Letztes Viertel
SNOOZE
Mit der Taste „SNOOZE“ 7wird der Alarm für
5 Minuten unterbrochen. Die Symbole ZZund
blinken für diese Zeit. Durch Drücken irgendeiner
Taste, ausser „SNOOZE“, wird die Schlummerfunk-
tion beendet.
WETTERVORHERSAGE
Das Gerät sagt, basierend auf Änderungen des
atmosphärischen Drucks, Wetterbedingungen der
nächsten 12 - 24 Stunden voraus. Das Einzugsgebiet
umfasst dabei ca. 30 – 50 km. Die Wettervorhersage
weist zu 70 – 75 % korrekte Vorhersagen auf. Da
Wetterbedingungen nicht mit 100 prozentiger Kor-
rektheit vorausgesagt werden können, können wir
nicht für Verluste verantwortlich gemacht werden,
die durch inkorrekte Wettervoraussagen verursacht
wurden.
Sonnig
Teilweise bewölkt
Bewölkt
Regen (Schnee)
Wolkenbruch/Schneesturm
Achtung: Das Gerät muss mindestens 12 Stunden in
Betrieb sein, um einen Druckverlauf aufzuzeichnen.
Basierend auf diesem Verlauf werden die Wetter-
symbole (P) angezeigt
.
Hinweis: Orte mit unterschiedlicher Geografie, wie
z. B. inländische Bereiche, föhnige Täler oder Küsten-
gebiete, haben unterschiedliche Wettervorhersagen.
Ihre Wettervorhersage (P) kann in solchen Gebieten
abweichen.
ANZEIGEN FÜR TEMPERATUR- UND
LUFTFEUCHTIGKEITSTRENDS
Wenn sich der Wert für die Temperatur und Luft-
feuchtigkeit geändert hat, zeigen 4 kleine Pfeile
die Tendenz (K) an: Steigend, gleichbleibend oder
fallend.
WARTUNG UND PFLEGE
Reinigen Sie das Gerät nur mit einem weichen Tuch.
Bei starken Verschmutzungen kann dieses leicht
angefeuchtet sein. Verwenden Sie keine lösungs-
mittelhaltigen Reinigungsmittel!
Achten Sie darauf, dass keine Feuchtigkeit ins
Geräteinnere gelangt. Beim Aussensensor muss der
Sitz der Batteriefachabdeckung geprüft werden, v.a.
bei einem Batteriewechsel.
Falls sich in der Öffnung der Sensorabdeckung
Staub festsetzt, kann dieser mit einem Staubsauger
ausgesaugt werden.
ALTGERÄTEENTSORGUNG
Dieses Produkt am Ende der Lebensdauer nicht in
den normalen Haushaltsabfall geben, sondern an
einem Recycling-Sammelpunkt für elektrische und
elektronische Geräte abgeben.
Das Symbol auf dem Produkt, der Bedienungsanlei-
tung oder der Verpackung weist darauf hin.
KONFORMITÄTSERKLÄRUNG
Wir, Tegro AG (Ringstrasse 3, CH-8603 Schwerzen-
bach), erklären in alleiniger Verantwortung , dass
dieses Produkt in Übereinstimmung mit den grundle-
genden und anderen relevanten Anforderungen der
Funkgeräte-Richtlinie 2014/53/EU ist. Konformitäts-
313532__Funk-Wetterstation_Manual_180410.indd 7 24.04.18 09:25

Deutsch
8
TECHNISCHE DATEN WETTERSTATION
Spannungsversorgung Hauptgerät: 3 x 1.5 V oder mit 4.5 V Netzteil (inkl.)
Batterietyp Hauptgerät: 3 x AA / LR6 (exkl.)
Temperaturbereich Hauptgerät: 0 ºC bis +50 ºC
Genauigkeit Temperaturbereich Hauptgerät: ± 1.5 ºC
Auflösung Temperaturanzeige: 0.1 ºC
Luftfeuchtigkeitsbereich Hauptgerät: 20% bis 99% RH
Genauigkeit Luftfeuchtigkeitsbereich Hauptgerät: ± 5%
Auflösung Luftfeuchtigkeit: 1%
Luftdruckbereich: 800 – 1100 hPa / 23.62 – 32.49 inHg
Genauigkeit Luftdruckbereich: ± 3 hPa
Auflösung Luftdruck: 1 hPa
Zeitzonen: -12 bis 12
Betriebstemperatur: 0 ºC bis +50 ºC
Abmessungen (HxLxT): 130 x 165 x 30 mm
TECHNISCHE DATEN AUSSENSENSOR
Spannungsversorgung Fernsensor: 2 x 1.5 V
Batterietyp Fernsensor: 2 x AAA / LR03 / AM4 (exkl.)
Temperaturbereich: –40 ºC bis +70 ºC
Genauigkeit Temperaturbereich: ± 1.5 ºC
Auflösung Temperaturanzeige: 0.1 ºC
Luftfeuchtigkeitsbereich: 20% bis 99% RH
Genauigkeit Luftfeuchtigkeitsbereich: ± 5%
Sendefrequenz: 433 MHz
Max. Reichweite (unter opt. Bedingungen): 100m
Anzahl Kanäle: 3
Abmessungen (HxLxT): 95 x 60 x 27 mm
313532__Funk-Wetterstation_Manual_180410.indd 8 24.04.18 09:25

9 English
Wireless weather station E0316
Thank you very much for purchasing this latest-generation weather station. This device was designed with
the latest technology and manufactured with state-of-the-art components; it will provide you with a reliable
weather forecast. Read this manual through carefully in order to fully familiarise yourself with the features and
functions of the product.
• The product is intended for non-commercial private
use.
• Protect the display unit against moisture.
• The outdoor sensor should be set up in a safe
place where it is protected against direct weather
influences such as rain.
• The display unit must not be operated in the direct
vicinity of heating systems, other sources of heat,
or direct sunlight.
• Avoid using the device in the vicinity of electroma-
gnetic fields.
• Servicing, maintenance and repair work may only
be performed by a qualified expert.
• The product must not be subjected to modifica-
tions. Any tampering will void the warranty.
• This device and its batteries do not constitute a toy
and should be stored out of children‘s reach!
• Remove empty batteries immediately in order to
prevent leaks and any consequential damage they
SAFETY INSTRUCTIONS
may cause. When handling batteries that leak,
always wear chemical-resistant safety goggles and
protective gloves!
• When changing the alkaline or rechargeable batte-
ries, only use ones of the recommended type.
• If you have any questions that are not answered
by these operating instructions, please contact our
• The manufacturer does not accept any responsi-
bility for incorrect displays, readings or weather
forecasts, or for any consequences that may arise
therefrom.
• Neighbours‘ electronic devices with radio trans-
mission may cause interference/malfunctions.
Choosing a different setup location for the devices
may be the solution.
313532__Funk-Wetterstation_Manual_180410.indd 9 24.04.18 09:25

10English
Designation and functions of buttons on the display unit:
Button Function Extra function
1 [MODE] Switch between 12h and 24h
In standard mode, hold down for 3 seconds to
make the time and date settings
2 []
Time and alarm programming mode
upwards (hold down for fast forward)
In standard mode, hold down for 3 seconds
to delete the minimum and maximum values
3 [] Time and alarm programming mode
downwards (hold down for fast
backward)
In standard mode, hold down for 3 seconds
to switch over atmospheric pressure units
(hPa/mb or inHg)
4[] Switch the alarm on and off; display
the alarm time In standard mode, hold down for 3 seconds
to set an alarm time
5
[CH]
Switch over outdoor sensors In standard mode, hold down for 3 seconds
to activate sensor search
6 [C/F] Display switchover for °C or °F
In standard mode, hold down for 3 seconds to
delete the minimum and maximum values
7 [SNOOZE/LIGHT] Snooze function for alarm In battery mode (without 230 V power
supply unit) the background lighting is
switched on for 5 seconds
8 Mains cable socket
9 Base
Hanger
Battery compartment
compartment
Power supply unit
Designation and functions of buttons on the outdoor sensor:
Display
Hanger
[TEST] Manual signal transmission to the
weather station
[Channel selection
button] Selection of channel on outdoor
sensor
[C/F] Switch between °C and °F
Battery compartment
cover
Base
1 2 3 4 5 6
7
9
8
313532__Funk-Wetterstation_Manual_180410.indd 10 24.04.18 09:25

11 English
Designation of display functions in the main device
A Outdoor temperature
B
Minimum/maximum value of outdoor temperature
C Outdoor humidity
D
Minimum/maximum value of outdoor humidity
E
Time of day
F
Alarm display and snooze function
G Day of the week
H Date
I Minimum/maximum value of indoor humidity
J
Indoor humidity
K
Tendency/trend display
L Minimum/maximum value of indoor temperature
M
Indoor temperature
N Battery level indicator for weather station
O
Moon phase
P
Weather forecast icons
Q
Atmospheric pressure indicator
R
Battery level indicator for outdoor sensors
S
Channel indicator for outdoor sensors
T
Reception indicator for outdoor sensors
Designation of display functions in the sensor
U
Temperature
V
Transmit indicator
W
Channel number
X
Humidity
Y
Battery level indicator
U
V
W
X Y
A
B
C
D
PQRST O N
E F G H
M
L
K
J
I
313532__Funk-Wetterstation_Manual_180410.indd 11 24.04.18 09:25

12English
INSERTING THE BATTERIES
Main device:
Main power source: For basic duty and for operation
of continuous background lighting a 4.5 V adaptor
can be plugged into the socket 8on the back of the
device. Additional power supply: Open the battery
compartment , insert 3 AA/LR6 batteries the right
way round as indicated and close the battery com-
partment again.
Outdoor sensor:
Open the battery compartment cover by sliding it
in the direction of the arrow and insert 2 AAA/LR03
batteries, making sure they are the right way round.
Close the battery compartment cover again by
sliding it in the opposite direction.
Warning: Only use batteries of the same type and
with the same charge capacity.
SETTING UP THE OUTDOOR SENSOR
1. When putting into operation for the first time, always
switch on the main device first and then the remote
sensor.
2. Use slide switch to select channel 1 for the first
remote sensor.
3. Use slide switch to select channel 2 for the
second remote sensor.
4. When a sensor has been detected, the display of the
station will show the channel number (S), outdoor
temperature (A) and outdoor humidity (C).
5. With the „CH“ button you can call up the
sensors one after the other in the sequence
CH1CH2CH310-second interval .
Note: Place the main device and sensors at a dis-
tance from metals and sources of interference, e.g.
mobile phones, television sets and other electrical
appliances
.
Note: When batteries have been inserted, the
weather station and outdoor sensors are in detection
mode for 3 minutes. During that period the recep-
tion indicator (T) flashes. If no outdoor sensor is
detected within that period, detection mode switches
off after 3 minutes.
Note: To obtain relatively accurate temperature
values the sensor must be placed in a shady location
outdoors.
SETTING UP THE OUTDOOR SENSOR MANUALLY
The battery level (R) of the current outdoor sensor
is indicated on the display. If the battery level is low or
the link fails, the sensor has to be detected manually.
1. Press the „CH“ button 5for more than 3 seconds
until you hear a beep and the icon (T) starts flas-
hing.
2. Press the „TEST“ button on the outdoor sensor
to force signal transmission.
3. If the signal is detected successfully, temperature (A)
and humidity (C) appear in the outdoor panel of the
display.
4. The search function switches off automatically after
3 minutes and the station returns to standard mode
.
Note: LL.L ºC or HH.H ºC is shown on the outdoor
display if the link to the outdoor sensors fails or if the
sensors are outside the range of reception.
SETTING THE TIME OF DAY, DATE AND
INDICATOR
1. Press the „MODE“ button 1for more than 3
seconds until you hear a beep and the hour indicator
starts flashing on the time display (E).
2. Use „“2and „“3to set the hour.
3. Press the „MODE“ button 1.
4. Use „“2and „“3to set the minute.
5. Press the „MODE“ button 1.
6. Use „“2and „“3to set the year.
7. Press the „MODE“ button 1.
8. Use „“2and „“3to set the month.
9. Press the „MODE“ button 1.
10. Use „“2and „“3to set the day.
11. Press the „MODE“ button 1.
12. Use „“2and „“3to set the language for the
day-of-the-week indicator.
13. Press the „MODE“ button 1.
14. Use „“2and „“3to set the time zone (Swit-
zerland 1).
15. Press the „MODE“ button 1) to complete the
programming procedure.
Note: The days of the week can be displayed in
French (FRE), Italian (ITA), Spanish (SPA), German
(GER) and English (ENG).
SETTING AN ALARM TIME
1. Press the „“button 4for more than 3 seconds
until you hear a beep and the hour indicator starts
flashing on the time display (E).
2. Use „“2and „“3to set the hour.
3. Press the „“button 4.
4. Use „“2and „“3to set the minute.
5. Press the „“button 4to complete the alarm
programming procedure.
Note: If an alarm time is programmed, the alarm is
activated automatically
.
Note: Pressing the
„“button 4
once in standard
mode displays the programmed alarm time on the
time indicator (E) for 20 seconds. Pressing the
„“
button 4
twice in standard mode activates or deacti-
vates the alarm, as applicable.
313532__Funk-Wetterstation_Manual_180410.indd 12 24.04.18 09:25

13 English13
MOON PHASE
The moon phases (O) are displayed according to the
calendar.
New moon
First quarter
Waxing half moon
Second quarter
Full moon
Third quarter
Waning half moon
Last quarter
SNOOZE
Press the „SNOOZE“ button 7to interrupt the
alarm for 5 minutes. Icons ZZand flash during that
period. Press any button apart from „SNOOZE“ to
complete the snooze function.
WEATHER FORECAST
The device forecasts weather conditions for the next
12 - 24 hours based on changes in atmospheric pres-
sure. The catchment area covers approx. 30 – 50
km. The weather forecasts have an accuracy of 70%
– 75%. Since weather conditions cannot be forecast
with 100% accuracy, we cannot be held responsible
for any losses that are caused by incorrect weather
forecasts.
Sunny
Partially cloudy
Cloudy
Rain (Snow)
Cloudburst/Snowstorm
Important: The device must be in operation for at
least 12 hours to record a pressure trend. The wea-
ther icons (P) are displayed on the basis of that trend.
Note: Places with various geographical situations,
e.g. inland areas, windy valleys or coastal regions,
have different weather forecasts. Your particular
weather forecast (P) may be different in such areas.
INDICATORS FOR TEMPERATURE AND
HUMIDITY TRENDS
If the values for temperature and humidity have
changed, 4 small arrows indicate the tendency (K):
Rising, constant or falling.
MAINTENANCE AND CARE
Only clean the device with a soft cloth. If there is
heavy soiling, the cloth can be moistened slightly.
Never use detergents that contain solvent.
Make sure no moisture gets inside the device. As
regards the outdoor sensor, check to make sure the
battery compartment cover is fitted properly, espe-
cially when you have changed the batteries.
If dust has accumulated in the opening of the sensor
cover, it can be removed with a vacuum cleaner.
DISPOSING OF OLD EQUIPMENT
At the end of its life, do not dispose of this product
in the normal household waste. Take it to a recycling
collectionpoint for electrical and electronic equip-
ment.
This is indicated by the symbol on the product, the
operating instructions or the packaging.
DECLARATION OF CONFORMITY
We, Tegro AG (Ringstrasse 3, 8603 Schwerzenbach,
Switzerland), declare with sole responsibility that this
product conforms to the basic and other relevant
requirements of Radio Equipment Directive 2014/53/
EU. To request the Declaration of Conformity please
contact: [email protected]
313532__Funk-Wetterstation_Manual_180410.indd 13 24.04.18 09:25

14English
WEATHER STATION SPECIFICATIONS
Main device power supply: 3 x 1.5 V or with 4.5 V power supply unit (incl.)
Battery type for main device: 3 x AA / LR6 (not incl.)
Temperature range of main device: 0°C to +50°C
Temperature range accuracy of main device: ± 1.5°C
Resolution of temperature display: 0.1°C
Humidity range of main device: 20% to 99% RH
Humidity range accuracy of main device: ± 5%
Resolution of humidity: 1%
Atmospheric pressure range: 800 – 1100 hPa / 23.62 – 32.49 inHg
Accuracy of atmospheric pressure range: ± 3 hPa
Resolution of atmospheric pressure: 1 hPa
Time zones: -12 to 12
Operating temperature: 0°C to +50°C
Dimensions (HxLxD): 130 x 165 x 30 mm
OUTDOOR SENSOR SPECIFICATIONS
Remote sensor power supply: 2 x 1.5 V
Battery type for remote sensor: 2 x AAA / LR03 / AM4 (not incl.)
Temperature range: –40°C to +70°C
Temperature range accuracy: ± 1.5°C
Resolution of temperature display: 0.1°C
Humidity range: 20% to 99% RH
Humidity range accuracy: ± 5%
Transmit frequency: 433 MHz
Max. range (under ideal conditions): 100 m
Number of channels: 3
Dimensions (HxLxD): 95 x 60 x 27 mm
313532__Funk-Wetterstation_Manual_180410.indd 14 24.04.18 09:25

15 Français
Station météorologique, sans fil E0316
Nous vous remercions d‘avoir fait l‘acquisition de cette station météorologique de dernière génération. Cet
appareil a été conçu avec la technologie la plus pointue du moment et avec des composants ultramodernes.
Il vous fournit des prévisions météorologiques fiables. Veuillez lire soigneusement ce mode d’emploi pour
vous familiariser totalement avec les propriétés et les fonctions de ce produit.
• Ce produit est conçu pour une utilisation privée
non commerciale.
• Protégez l’unité d’affichage de l’humidité.
• Le capteur extérieur doit être placé à un endroit
protégé des intempéries (notamment de la pluie).
• L’unité d’affichage ne doit pas fonctionner à proxi-
mité immédiate des chauffages et autres sources
de chaleur, ni exposé au rayonnement solaire
direct.
• Évitez d’utiliser l’appareil à proximité des champs
électromagnétiques.
• Les travaux d’entretien, de maintenance et de
réparation doivent impérativement être réalisés par
un professionnel qualifié.
• Aucune modification ne doit être effectuée sur
le produit. Toute garantie est annulée en cas
d‘intervention sur l‘appareil.
• Cet appareil et ses piles ne sont pas des jouets et
doivent être tenus hors de portée des enfants!
CONSIGNES DE SÉCURITÉ
• Retirer immédiatement les piles vides afin d’éviter
toute fuite ainsi que les dommages consécutifs.
Il convient de porter des lunettes et des gants de
protection résistants aux produits chimiques lors
de la manipulation des piles qui ont fui!
• Remplacez uniquement les piles/accus avec des
modèles de même type.
• Pour toutes questions qui ne trouvent pas de répon-
se dans cette notice d’utilisation, veuillez contacter
• Le fabricant décline toute responsabilité en cas
d’affichages, de mesures ou de prévisions météo
incorrects ainsi que pour les conséquences pou-
vant en résulter.
• Les appareils électroniques radiocommandés des
voisins peuvent causer des interférences/dysfonc-
tionnements. Placer l’appareil à un autre emplace-
ment peut résoudre le problème.
313532__Funk-Wetterstation_Manual_180410.indd 15 24.04.18 09:25

16Français
Désignation et fonction des touches sur l’unité d’affichage
Touche Fonction Fonction complémentaire
1 [MODE] Commutation 12h / 24h
En mode standard, actionner pendant 3 secon-
des pour régler la date et l’heure
2 []
Mode de programmation de l’heure
et de l’alarme montant (maintenir
actionné pour une avance rapide)
En mode standard, actionner pendant 3 secon-
des pour supprimer les valeurs mini. et maxi.
3 []Mode de programmation de l’heure
et de l’alarme descendant (mainte-
nir actionné pour un retour rapide)
En mode standard, actionner pendant 3
secondes pour changer l’unité de pression
atmosphérique (hPa/mb ou inHg)
4[]
Mise en marche et à l’arrêt de l’alarme;
affichage de l’heure d’alarme
En mode standard, actionner pendant 3 secon-
des pour régler une heure d’alarme
5
[CH]
Commutation des capteurs exté-
rieurs En mode standard, actionner pendant 3 secon-
des pour activer la recherche des capteurs
6 [C/F] Commutation de l’affichage entre
ºC et ºF
En mode standard, actionner pendant 3 secon-
des pour supprimer les valeurs mini. et maxi.
7 [SNOOZE/LIGHT] Fonction de répétition de l’alarme
En mode piles (sans bloc d’alimentation 230 V), le
rétroéclairage reste allumé pendant 5 secondes
8 Raccordement secteur
9 Pied
Dispositif d’accrochage
Couvercle du com-
partiment des piles
Bloc d’alimentation
Désignation et fonction des touches sur le capteur extérieur
Écran
Dispositif d’accrochage
[TEST] Transmission manuelle du signal à
la station météorologique
[touche de sélection
du canal] Sélection du canal du capteur
extérieur
[C/F] Commutation entre ºC et ºF
Couvercle du com-
partiment des piles
Pied
1 2 3 4 5 6
7
9
8
313532__Funk-Wetterstation_Manual_180410.indd 16 24.04.18 09:25

17 Français
Désignation des fonctions de l’écran sur l’appareil principal
A Température extérieure
B
Valeur minimum/maximum pour la température extérieure
C Hygrométrie extérieure
D
Valeur minimum/maximum pour l’hygrométrie extérieure
E
Heure
F
Affichage de l’alarme et fonction de répétition de l’alarme (Snooze)
G Jour de la semaine
H Date
I Valeur minimum/maximum pour l’hygrométrie intérieure
J
Hygrométrie intérieure
K
Affichage de tendance
L Valeur minimum/maximum pour la température intérieure
M
Température intérieure
N Indicateur de charge des piles de la station météorologique
O
Phase de la lune
P
Symbole de prévision météo
Q
Affichage de pression atmosphérique
R
Indicateur de charge des piles des capteurs extérieurs
S
Affichage du canal des capteurs extérieurs
T
Affichage de réception des capteurs extérieurs
Désignation des fonctions de l’écran sur le capteur
U
Température
V
Affichage d’émission
W
Numéro de canal
X
Hygrométrie
Y
Indicateur de charge des piles
U
V
W
X Y
A
B
C
D
PQRST O N
E F G H
M
L
K
J
I
313532__Funk-Wetterstation_Manual_180410.indd 17 24.04.18 09:25

18Français
MISE EN PLACE DES PILES
Appareil principal:
Source d’alimentation principale: pour le fonction-
nement de base et le fonctionnement continu du
rétroéclairage, un adaptateur 4,5 V peut être
branché sur la prise 8, sur le côté de l’appareil.
Alimentation électrique supplémentaire: ouvrez le
compartiment des piles , insérez les 3 piles
AA/LR6 selon la polarité indiquée et refermez le
compartiment des piles .
Capteur extérieur:
Ouvrez le couvercle du compartiment des piles
dans le sens de la flèche et insérez les 2 piles
AAA/LR03, en respectant la polarité. Refermez le
couvercle du compartiment des piles dans le sens
inverse.
Attention: Il est impératif d’utiliser des piles de
même type et de même capacité.
PARAMÉTRAGE DU CAPTEUR EXTÉRIEUR
1. Lors de la première mise en service, mettez d’abord
en marche l’appareil principal, puis le capteur à
distance.
2. Au moyen du commutateur coulissant , sélection-
nez le canal 1 pour le premier capteur à distance.
3. Au moyen du commutateur coulissant , sélection-
nez le canal 2 pour le deuxième capteur à distance.
4. Lorsqu’un capteur est enregistré, le numéro de canal
, la température extérieure (A) et l’hygrométrie exté-
rieure (C) apparaissent sur l’écran de la station (S).
5. La touche «CH» permet de consulter les capteurs
l’un après l’autre CH1CH2CH3Intervalle de
10 secondes .
Remarque: placez l’appareil principal et les capteurs
loin des métaux et des sources de perturbation, p. ex.
des téléphones mobiles, des téléviseurs et autres
appareils électriques
.
Remarque: après la mise en place des piles, la station
météorologique et les capteurs extérieurs sont en mode
enregistrement pendant 3 minutes. Pendant ce temps,
l’affichage de réception (T) clignote. Si aucun cap-
teur extérieur n’est enregistré pendant cette période, le
mode enregistrement s’interrompt après 3 minutes.
Remarque: pour obtenir des températures plus
précises, il faut placer le capteur à un emplacement
extérieur ombragé.
PARAMÉTRAGE MANUEL DU CAPTEUR EXTÉRIEUR
La charge des piles (R) du capteur extérieur s’affiche
à l’écran. Si la charge est faible ou en cas de perte de
connexion, le capteur doit être enregistré manuellement.
1. Actionnez la touche «CH» pendant plus de
3 secondes, jusqu‘à entendre un « bip » et voir le
symbole
(T)
se mettre à clignoter.
2. Actionnez la touche « TEST » sur le capteur exté-
rieur pour forcer la transmission du signal.
3. Une fois l’enregistrement réussi, la température (A)
et l’hygrométrie (C) apparaissent sur l’affichage, dans
la zone Outdoor.
4. La fonction de recherche s’interrompt automatique-
ment après 3 minutes et la station revient en mode
standard
.
Remarque: LL.L ºC ou HH.H ºC apparaît sur
l’affichage, dans la zone Outdoor, si la liaison avec les
capteurs extérieurs s’interrompt ou que les capteurs
ne sont pas dans la zone de réception.
RÉGLAGE DE L’HEURE, DE LA DATE ET DE
L’AFFICHAGE
1. Actionnez la touche «MODE» 1pendant plus de
3 secondes, jusqu‘à entendre un « bip » et voir
l’affichage de l’heure clignoter sur l’affichage de
l’heure (E).
2. Réglez l’heure au moyen des touches «»2et
«»3.
3. Actionnez la touche «MODE» 1.
4. Réglez les minutes au moyen des touches «»2
et «»3.
5. Actionnez la touche «MODE» 1.
6. Réglez l’année au moyen des touches «»2et
«»3.
7. Actionnez la touche «MODE» 1.
8. Réglez le mois au moyen des touches «»2et
«»3.
9. Actionnez la touche «MODE» 1.
10.
Réglez le jour au moyen des touches «»2et «»
3.
11. Actionnez la touche «MODE» 1.
12. Sélectionnez la langue pour l’affichage du jour de la
semaine, au moyen des touches «»2et «»3.
13. Actionnez la touche «MODE» 1.
14. Sélectionnez le fuseau horaire au moyen des tou-
ches «»2et «»3(Suisse : 1).
15. Actionnez la touche «MODE» 1pour terminer le
processus de programmation.
Remarque: les jours de la semaine peuvent être af-
fichés en français (FRE), italien (ITA), espagnol (SPA),
allemand (GER) et anglais (ENG).
PROGRAMMER UNE ALARME
1. Actionnez la touche «»4pendant plus de 3 secon-
des, jusqu‘à entendre un « bip » et voir l’affichage de
l’heure clignoter sur l’affichage de l’heure (E).
2. Réglez l’heure au moyen des touches
«»2et «»
3
.
3. Actionnez la touche «»4.
4. Réglez les minutes au moyen des touches
«»2et
«»3
.
5. Actionnez la touche «»4pour terminer le proces-
sus de programmation de l’alarme.
Remarque: la programmation d’une heure d’alarme
active automatiquement l’alarme
.
Remarque: en pressant une fois la touche
«»4
en mode standard, l’heure d’alarme programmée
s’affiche (E) pendant 20 secondes. En pressant deux
fois la touche
«»4
en mode standard, l’alarme est
activée ou désactivée, selon le cas.
313532__Funk-Wetterstation_Manual_180410.indd 18 24.04.18 09:25

19 Français19
PHASE DE LA LUNE
Les phases de la lune (O) s’affichent de manière
similaire à un calendrier.
Nouvelle lune
Premier quartier
Lune montante
Deuxième quartier
Pleine lune
Troisième quartier
Lune descendante
Dernier quartier
SNOOZE
La touche «SNOOZE» permet s’interrompre
l’alarme pendant 5 minutes. Les symboles ZZet
clignotent pendant cette période. La fonction de
répétition de l’alarme est désactivée en pressant
n’importe quelle touche, sauf «SNOOZE».
PRÉVISIONS MÉTÉOROLOGIQUES
Sur la base des variations de la pression atmos-
phérique, l’appareil prévoit les conditions météo des
prochaines 12 à 24 heures. La zone concernée est
d’env. 30 à 50 km. Les prévisions météorologiques
sont correctes à 70 - 75 %. Comme les conditions
météo ne peuvent pas être prévues avec une ex-
actitude de 100%, nous ne pouvons pas être tenus
responsables des pertes résultant de prévisions
météorologiques incorrectes.
Ensoleillé
Partiellement nuageux
Nuageux
Pluie (neige)
Averses/Tempête de neige
Attention: l’appareil doit être en fonctionnement
pendant au moins 12 heures pour enregistrer une
courbe de pression. Les symboles de prévisions (P)
s’affichent en fonction de cette courbe
.
Remarque: les prévisions varient selon la géographie,
p. ex. l’intérieur des terres, les vallées soumises au
foehn et les zones côtières. Vos prévisions météo (P)
peuvent varier dans ces régions.
AFFICHAGES DE TENDANCE POUR LA
TEMPÉRATURE ET L’HYGROMÉTRIE
Lorsque les valeurs de température et d’hygrométrie
ont changé, 4 petites flèches indiquent la tendance
(K): stable, en hausse ou en baisse.
MAINTENANCE ET ENTRETIEN
Nettoyez uniquement l’appareil avec un chiffon
doux. En cas de fort encrassement, vous pouvez
humidifier légèrement le chiffon. N’utilisez pas de
produits de nettoyage contenant des solvants!
Veuillez à ce qu‘aucune humidité ne puisse pénétrer
à l’intérieur de l’appareil. Sur le capteur extérieur,
vérifiez le bon positionnement du capot du compar-
timent des piles, notamment lors du remplacement
des piles.
Si de la poussière s’incruste dans l’ouverture du
couvercle du capteur, utilisez un aspirateur pour
l’éliminer.
ÉLIMINATION DES APPAREILS USAGÉS
À la fin de sa durée de vie, ne jetez pas ce produit
avec les déchets ménagers, mais déposez-le à un
point de collecte pour le recyclage des appareils
électriques et électroniques. Le symbole figurant
sur le produit lui-même, la notice d’utilisation ou
l’emballage le signale.
DÉCLARATION DE CONFORMITÉ
Par la présente, nous, Tegro SA (Ringstrasse 3,
CH-8603 Schwerzenbach), déclarons sous notre
seule responsabilité que ce produit respecte les
exigences fondamentales et autres prescriptions
pertinentes de la directive 2014/53/UE sur les équi-
pements radioélectriques. Demandez la déclaration
313532__Funk-Wetterstation_Manual_180410.indd 19 24.04.18 09:25

20Français
CARACTÉRISTIQUES TECHNIQUES DE LA STATION MÉTÉO
Tension d’alimentation de l’appareil principal: 3 x 1.5 V ou bloc d’alimentation 4.5 V (fourni)
Type de pile de l’appareil principal: 3 x AA / LR6 (non fournies)
Plage de température de l’appareil principal: 0 ºC à +50 ºC
Précision de la température de l’appareil principal: ± 1.5 ºC
Résolution de l’affichage de température: 0.1 ºC
Plage d’hygrométrie de l’appareil principal: 20% à 99% RH
Précision de l’hygrométrie de l’appareil principal: ± 5%
Résolution de l’hygrométrie: 1%
Plage de pression atmosphérique: 800 – 1100 hPa / 23.62 – 32.49 inHg
Précision de la pression atmosphérique: ± 3 hPa
Résolution de la pression atmosphérique: 1 hPa
Fuseaux horaires: -12 à 12
Température d’utilisation: 0 ºC à +50 ºC
Dimensions (HxLxP): 130 x 165 x 30 mm
CARACTÉRISTIQUES TECHNIQUES DU CAPTEUR EXTÉRIEUR
Tension d’alimentation du capteur à distance: 2 x 1.5 V
Type de pile capteur à distance: 2 x AAA / LR03 / AM4 (non fournies)
Plage de température: –40 ºC à +70 ºC
Précision de la température: ± 1.5 ºC
Résolution de l’affichage de température: 0.1 ºC
Plage d’hygrométrie: 20% à 99% RH
Précision de l’hygrométrie: ± 5%
Fréquence d’émission: 433 MHz
Portée max. (en conditions optimales): 100 m
Nombre de canaux: 3
Dimensions (HxLxP): 95 x 60 x 27 mm
313532__Funk-Wetterstation_Manual_180410.indd 20 24.04.18 09:25
This manual suits for next models
1
Table of contents
Languages:
Other UNITEC Climate Weather Station manuals

UNITEC Climate
UNITEC Climate WT3081 User manual

UNITEC Climate
UNITEC Climate W129-1 User manual

UNITEC Climate
UNITEC Climate W263 User manual

UNITEC Climate
UNITEC Climate W185-0 User manual

UNITEC Climate
UNITEC Climate W010 User manual

UNITEC Climate
UNITEC Climate W194-1 User manual

UNITEC Climate
UNITEC Climate W0785 User manual

UNITEC Climate
UNITEC Climate E0106 User manual

UNITEC Climate
UNITEC Climate W177 User manual

UNITEC Climate
UNITEC Climate W164 User manual