manuals.online logo
Brands
  1. Home
  2. •
  3. Brands
  4. •
  5. Urban
  6. •
  7. Outdoor Fountain
  8. •
  9. Urban BF200WM Manual

Urban BF200WM Manual

Drinking Fountains
Models: BF200WM
INSTALLATION, OPERATION AND MAINTENANCE INSTRUCTIONS
SPECIFICATIONS
CUSTOMER SERVICE
Model: BF200WM (Also available in 3 TAP and 2 TAP variations)
2year
warranty
Quality Certified
ISO 9001:2015
AU1228-QC
CARE AND MAINTENANCE
WARRANTY
www.urbanff.com.au
[email protected]
07 3382 7372
07 3287 5598
1. Regular washing down of the exterior surface will help prolong the lustre of the painted finish.
2. Painted fountains that become dull due to prolonged exposure to direct sunlight can be
restored with an appropriate surface polish.
3. To maintain the exterior of the fountain carefully remove any loose surface deposits with a wet sponge.
Use a soft (non abrasive) brush and dilute a solution of mild detergent (eg. PH-neurtral liquid hand
washing detergent in warm water (DO NOT use solvents) to remove dust, salt and other deposits.
Rinse thoroughly with clean fresh water to remove residues. To remove any Tea Staining on
Stainless Steel surfaces we recommend Drifter Hull cleaner and stain remover.
4. Do not use any solvents on the surface as this will adversely affect the longevity of the painted
finish.
5. Surface scratches and inconsistencies can be touched up using Dulux touch up paint.
Most colours can be matched.
6. We recommend the use of anti-seize paste on all external fixing bolts to maintain ease of
access over long periods of time.
7. Check the fountain internal connections, water flow and all external access screws and fixing
bolts regularly (every 3mths) to ensure they are tight.
8. In high debris areas (parks, children’s playgrounds etc) where there may be sand or bark or
a lot of leaf letter that may be placed in to the basin, check regularly and remove debris to
prevent blocking of the basin or the waste outlet pipe.
9. After any interruption to the water supply, always flush the lines prior to reconnection to the
fountain to prevent debris entering the valve.
All Urban Fountains and Furniture outdoor drinking fountains are covered by a 2 year manufacturers
guarantee against faulty materials and workmanship under normal wear and tear conditions.
All fountains are date stamped at the time of despatch.
This warranty will only apply under the following conditions:
• The fountain was installed in accordance with our installation instructions that are supplied
with every fountain.
• The fountain was installed by a licensed plumber
• The water lines have been thoroughly flushed prior to connection to the fountain
• The fountain has not been tampered with or repaired in any way without obtaining prior
approval from our factory specialists first.
• The fountain has been serviced and maintained as per our supplied instructions.
These quick release fittings allow instant
connection and disconnection
without the use of spanners. Push outer ring in to
release tube from fitting
ATTENTION PLUMBERS
This fountain uses “Push In Fittings”.
Failure to release these fittings correctly
will result in leakage.
1/2” bsb water inlet (15mm)
Maximum Temperature: 40 c
Maximum Water Pressure: 800 kpa
Complies with WMTS-105 Technical
Specification: Appliances - Beverage
dispensers and icemakers
Complies with AS/NZS 4020 Testing of
products in contact with drinking water
O
WM-080042
WMTS-105
INSTALLATION TROUBLESHOOTING
1. All UrbanFF Fountains must be installed by a qualified plumber in accordance with National plumbing and drainage
code AS/NZS 3500.1 and AS/NZS 3500.2 and any local authority codes.
2. Before Installation FLUSH ALL EXTERNAL LINES before connecting to fountain.
3. When mounting the fountain off a wall, check first with a Structural Engineer to ensure it has the capacity to
support this cantilevered fountain. Provide adequate surface for mounting fountain.
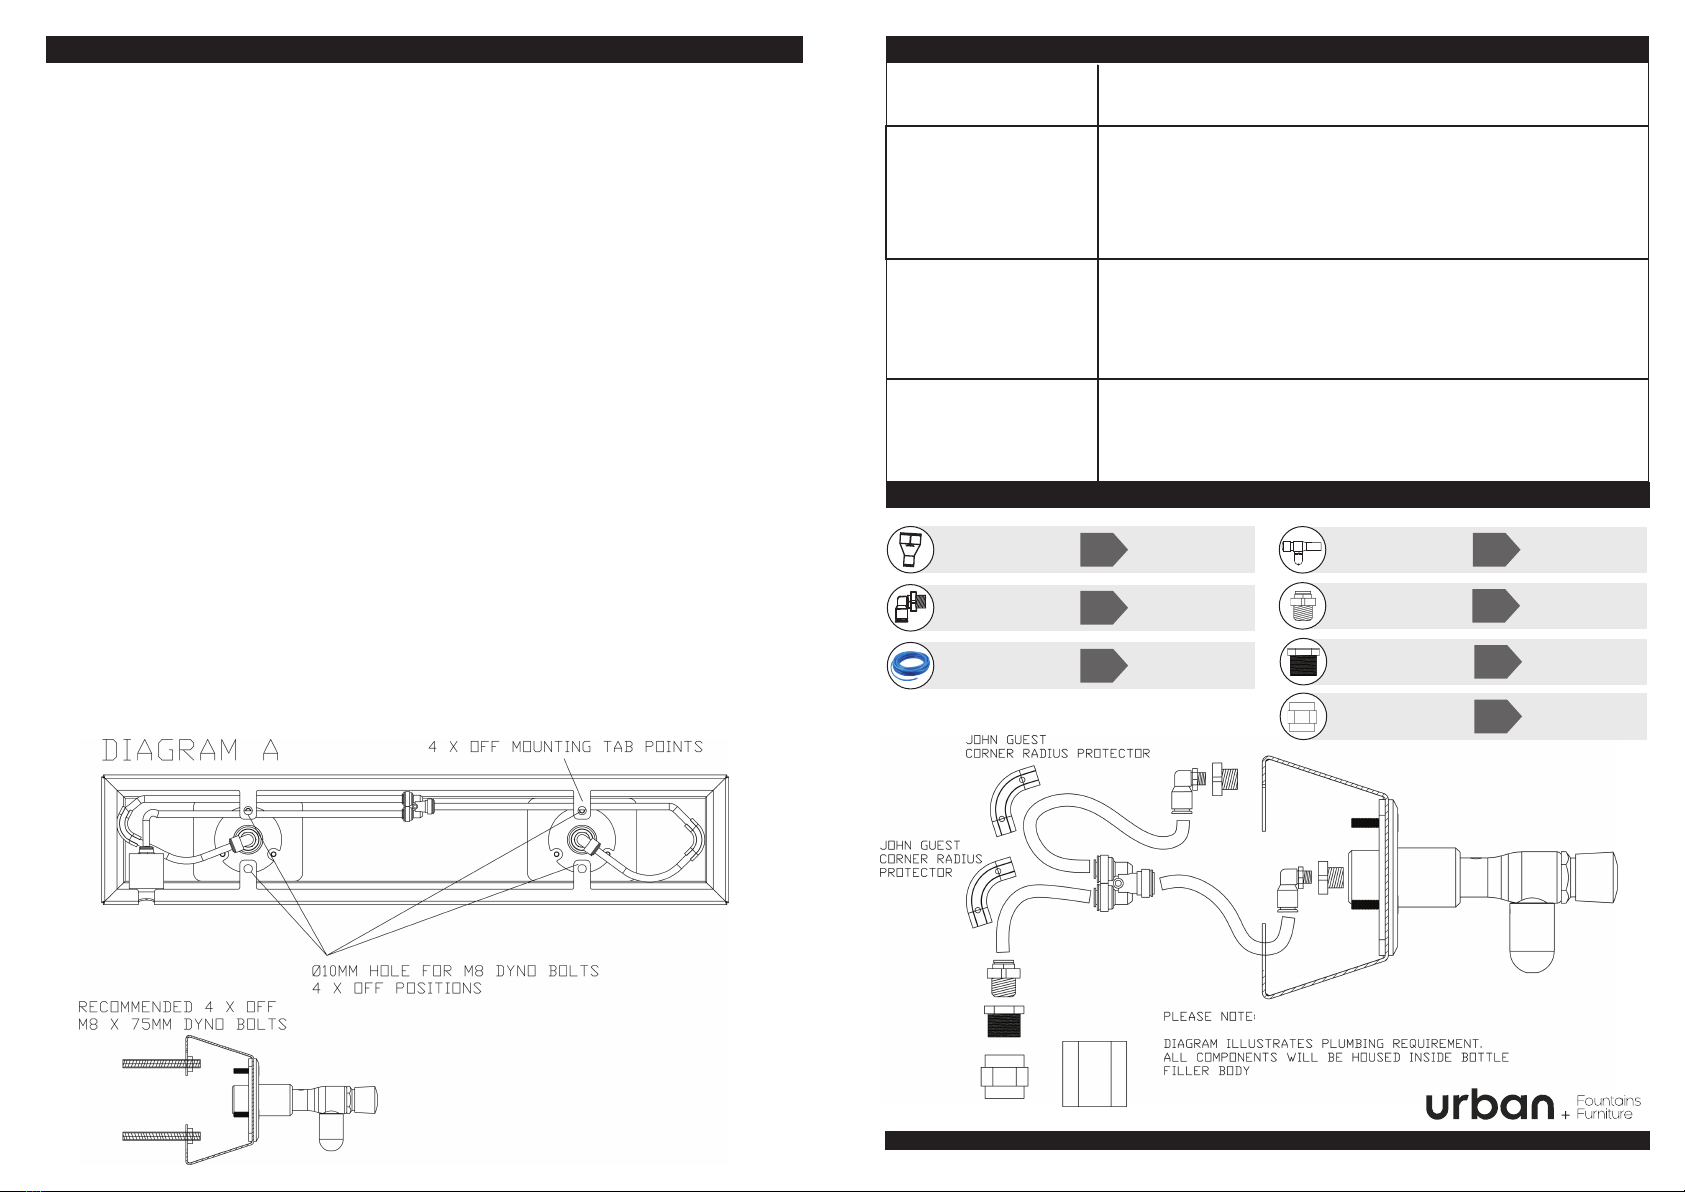
4. Remove the fountain from the packaging preventing scratching and damage.
5. Use a standard Metric Allen Key (size 6) for an M6 CSK head screw. Unscrew 3 x off M6 CSK screws from the front
face of the Tap Flange/s. Do this to all instances where there is a tap and flange present, either a 2 tap, 3 tap or 4 tap.
6. Pull the sub assembly of the bottle filler tap and flange forward, in order to gain access into the aperture behind
the flange plate.
7. Present the entire BF200WM bottle filler product, complete with the loose tap and flanges to the wall,
or desired location.Using a permanent marking pen, whilst holding the Bottle Filler Product in the desired installation
location, mark all mounting holes located on the mounting tabs on the back of the bottle filler, to the wall.
8. Remove entire bottle filler product from mounting location and using an 8mm masonry drill, drill holes into wall to
desired depth. * Please note, this is a recommendation, mechanical fasteners may differ by installation
specialist decision.
9. Insert M8 x 75 (or similar) dyna bolts into drilled hole location in the wall.
10. Present complete BF200WM bottle filler product, complete with loose taps and flanges, to the wall and fix to
inserted dynabolt positions.
11. Whilst Bottle filler product is in position on the wall, using a socket wrench with an extension and desired socket size,
present M8 nuts to the M8 dyna bolts and screw up tight. This must be done through the front facing aperture behind
the tap and mount flange, from the front of the bottle filler product.
12. Feed the filler tap and flange back into the aperture on the front of the fountain and use the size 6 Allen key to screw
the flanges back into their original position on the front of the fountain.
13. A certified Plumber must connect the main water supply to the fountain by screwing a standard ½ inch
connection to the provided inlet location on the bottom right-hand side of the bottle filler product.
14. Please see below the associated diagrams.
There is restricted or
no water flow?
The water continues
to drip / run after
shutting off?
Leaking from the
internal connections?
The water flow is
shooting over the top of
the basin or is not high
enough and trickling
over the nozzle?
Check the inlet lines for kinks in the tubing. Ensure the water
supply valve is fully open. Check the water pressure regulator is open.
The water pressure is too high / low and needs to be adjusted via the
water flow regulator so it flows in to the catchment area of the basin.
Check that they have been installed correctly. (all fountains are leak
tested prior to leaving the factory). Have the push in fittings been pulled?
(see instructions on how to connect and disconnect push in fittings).
Is the water inlet connection tight?
The most common cause of water not shutting off is a leaking valve and
is due to the lines not being flushed adequately and debris getting in to
the valve through the inlet and sitting on the rubber seals.
To check the valve it will need to be removed. Please contact this office
for details instructions to ensure this is done correctly.
1/4 x 90 Fitting 15-JG8-ELB-1-4X90
15-JG8-YPIECE
reorder
code:
reorder
code:
reorder
code:
reorder
code:
reorder
code:
15-JG8-STR-1-4
Blue Hose 15-HOS-BL8
Y fitting
1/4 Straight
o
SPARE PARTS
reorder
code:
Bottle Filler 15-BUB-TD90P
reorder
code: 15-HOB-1-2-121/2 Reducer
reorder
code: 15-JG8-STR-1-21/2 S/Connector

Other Urban Outdoor Fountain manuals

Urban BF200 Manual

Urban

Urban BF200 Manual

Urban BF200WC Manual

Urban

Urban BF200WC Manual

Urban THE O INITIATIVE OFOUNT Product manual

Urban

Urban THE O INITIATIVE OFOUNT Product manual

Urban A280W Manual

Urban

Urban A280W Manual

Urban A300 Manual

Urban

Urban A300 Manual

Urban SU600 Manual

Urban

Urban SU600 Manual

Urban A280D Manual

Urban

Urban A280D Manual

Urban A880 User manual

Urban

Urban A880 User manual

Urban CF200 Manual

Urban

Urban CF200 Manual

Urban Apollo 300 Manual

Urban

Urban Apollo 300 Manual

Urban BF200W Manual

Urban

Urban BF200W Manual

Urban CF400 Manual

Urban

Urban CF400 Manual

Urban BF200W Manual

Urban

Urban BF200W Manual

Urban A400 Manual

Urban

Urban A400 Manual

Urban A300D Manual

Urban

Urban A300D Manual

Urban A300 Manual

Urban

Urban A300 Manual

Urban A450 Manual

Urban

Urban A450 Manual

Urban PF450BF Manual

Urban

Urban PF450BF Manual

Urban PF450 Manual

Urban

Urban PF450 Manual

Urban BF400T Manual

Urban

Urban BF400T Manual

Urban PF400 Manual

Urban

Urban PF400 Manual

Popular Outdoor Fountain manuals by other brands

HoMedics Mirra CASCADE WFL-510 manual

HoMedics

HoMedics Mirra CASCADE WFL-510 manual

Campania International FT-30 Palazzo quick start guide

Campania International

Campania International FT-30 Palazzo quick start guide

Bradley SN2003 Parts and service manual

Bradley

Bradley SN2003 Parts and service manual

Global 761223 instruction manual

Global

Global 761223 instruction manual

Smart Solar SOLAR COPPER BIRDBATH FOUNTAIN manual

Smart Solar

Smart Solar SOLAR COPPER BIRDBATH FOUNTAIN manual

SEI OD964100TX Assembly instructions

SEI

SEI OD964100TX Assembly instructions

PEAKTOP 201601PT Use & care guide

PEAKTOP

PEAKTOP 201601PT Use & care guide

Halsey Taylor 4410 owner's manual

Halsey Taylor

Halsey Taylor 4410 owner's manual

Campania International 144527-XX01 Assembly instructions

Campania International

Campania International 144527-XX01 Assembly instructions

Haws 3377FR Installation, operation & maintenance instructions

Haws

Haws 3377FR Installation, operation & maintenance instructions

MELINERA Z30094B Assembly, operating and safety instructions

MELINERA

MELINERA Z30094B Assembly, operating and safety instructions

Elkay Swirlflo EDFPB114FPC Installation, care & use manual

Elkay

Elkay Swirlflo EDFPB114FPC Installation, care & use manual

Sunnydaze Decor TOUR DE VASE manual

Sunnydaze Decor

Sunnydaze Decor TOUR DE VASE manual

Blue Thumb Spouted Square Urn Fountain Kits installation manual

Blue Thumb

Blue Thumb Spouted Square Urn Fountain Kits installation manual

A&B Home HYDRIAN Assemble Instruction

A&B Home

A&B Home HYDRIAN Assemble Instruction

Petoneer FSW020 user manual

Petoneer

Petoneer FSW020 user manual

Airmar EcoSeries ES05 Gen 3 owner's manual

Airmar

Airmar EcoSeries ES05 Gen 3 owner's manual

Massarelli's 79" THREE TIER BOCA HEXAGON Setup instructions

Massarelli's

Massarelli's 79" THREE TIER BOCA HEXAGON Setup instructions

manuals.online logo
manuals.online logoBrands
  • About & Mission
  • Contact us
  • Privacy Policy
  • Terms and Conditions

Copyright 2025 Manuals.Online. All Rights Reserved.