manuals.online logo
Brands
  1. Home
  2. •
  3. Brands
  4. •
  5. Urban
  6. •
  7. Outdoor Fountain
  8. •
  9. Urban CF200 Manual

Urban CF200 Manual

Drinking Fountains
Models: CF200
INSTALLATION, OPERATION AND MAINTENANCE INSTRUCTIONS
SPECIFICATIONS
CUSTOMER SERVICE
2year
warranty
Quality Certified
ISO 9001:2015
AU1228-QC
CARE AND MAINTENANCE
WARRANTY
www.urbanff.com.au
[email protected]
07 3382 7372
07 3287 5598
1. Regular washing down of the exterior surface will help prolong the lustre of the painted finish.
2. Painted fountains that become dull due to prolonged exposure to direct sunlight can be
restored with an appropriate surface polish.
3. Regular polishing with a non-abrasive polish will help maintain the exterior of the fountain ie,
Septone Fibreglass restorer and wax. To remove any Tea Staining on Stainless Steel surfaces
we recommend Drifter Hull cleaner and stain remover.
4. Do not use any solvents on the surface as this will adversely affect the longevity of the painted
finish.
5. Surface scratches and inconsistencies can be touched up using Dulux touch up paint.
Most colours can be matched.
6. We recommend the use of anti-seize paste on all external fixing bolts to maintain ease of
access over long periods of time.
7. Check the fountain internal connections, water flow and all external access screws and fixing
bolts regularly (every 3mths) to ensure they are tight.
8. In high debris areas (parks, children’s playgrounds etc) where there may be sand or bark or
a lot of leaf litter that may be placed in to the basin, check regularly and remove debris to
prevent blocking of the basin or the waste outlet pipe.
9. After any interruption to the water supply, always flush the lines prior to reconnection to the
fountain to prevent debris entering the valve.
All Urban Fountains and Furniture outdoor drinking fountains are covered by a 2 year manufacturers
guarantee against faulty materials and workmanship under normal wear and tear conditions.
All fountains are date stamped at the time of despatch.
This warranty will only apply under the following conditions:
• The fountain was installed in accordance with our installation instructions that are supplied
with every fountain.
• The fountain was installed by a licensed plumber and electrician.
• The water lines have been thoroughly flushed prior to connection to the fountain
• The fountain has not been tampered with or repaired in any way without obtaining prior
approval from our factory specialists first.
• The fountain has been serviced and maintained as per our supplied instructions.
These quick release fittings allow instant
connection and disconnection
without the use of spanners. Push outer ring in to
release tube from fitting
ATTENTION PLUMBERS
This fountain uses “Push In Fittings”.
Failure to release these fittings correctly
will result in leakage.
1/2” bsb water inlet (15mm)
40mm waste outlet
Chilling capacity 30 litres per hour
600kpa Water Pressure Reducer installed
Access to electrical power required
Earthing points provided
240 Volts, 50Hz Full load current is 4.8amps
Install to AS300 Regulations
INSTALLATION - ***********PLEASE READ BEFORE INSTALLATION CHILLER FOUNTAIN DETAIL
1. The CF200 Fountain must be installed by a qualified plumber in accordance with National plumbing
& drainage code AS/NZS 3500.1 and AS/NZS 3500.2 and qualified electrician in accordance with
AS3000 regulations as well as local authority codes.
2. Before Installation FLUSH ALL EXTERNAL LINES before connecting to fountain to help prevent
blockage caused by debris.
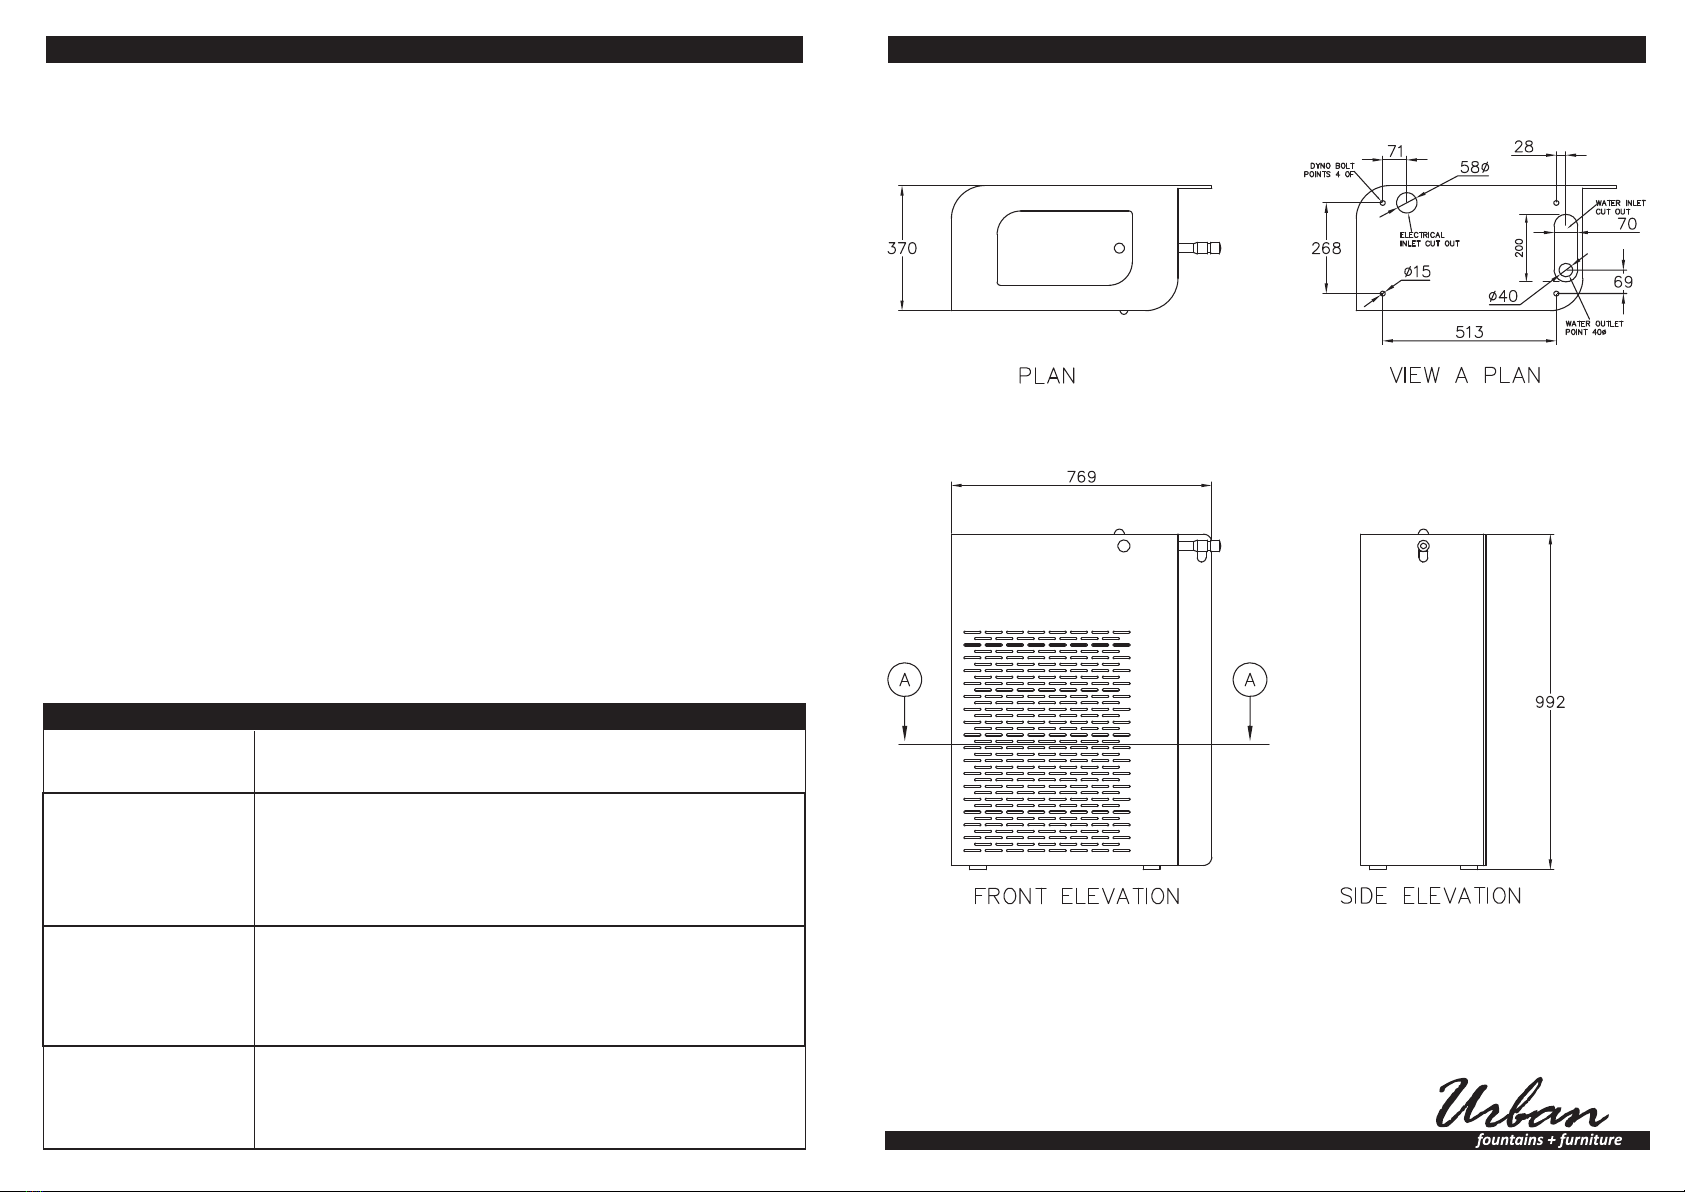
3. Provide adequate level surface for mounting fountain as specified in local area codes. Installation
under shade would be prefereable. M12 Dynabolts required for installing on to concrete surface.
Incorrect installation will affect the fountain performance. Urban Fountains and Furniture will not be
responsible for defects that arise from incorrect installation. All fountains have been checked for
leaks as part of our quality assurance program and some droplets of water may be evident inside
the packaging and/or unit. This is perfectly normal.
5. This fountain uses waterpush fittings - see back for quick release instructions. A sample fitting has
been supplied to familiarise the plumber with method of connecting and disconnecting the fittings.
Stretching and pulling will result in damage of the fitting and possible leaking at connectors.
6. Ensure that the water lines are replaced correctly when re attaching the chiller unit.
7. Water flow ball cock regulator is mounted directly below the water nozzle. Access is via removal of
side panel. Adjusting may be required depending on site water pressure.
8. Depending on the water pressure available, the bubbler flow can be altered by adjusting the stop
cock directly below the bubbler. Access via the access door. *****Allen Key Supplied.
9. The water cooler has an adjustable thermostat access via access door
10. Recommended minimum and maximum ambient temperatures for correct operations of water
cooler are from 5 C to 50 C respectively.
11. Main line water supplies must be separated by a shut off valve.
12. The water cooler must be earthed. Never wire directly to power supply. Earthing points provided.
13. Always ensure the correct security screwdriver is used when undoing external bolts.
14. All maintenance tools and replacement parts can be purchased individually from the manufacturer.
The water filter should be replaced approximately every 6-8 months.
TROUBLESHOOTING
There is restricted or
no water flow?
The water continues
to drip / run after
shutting off?
Leaking from the
internal connections?
The water flow is
shooting over the top of
the basin or is not high
enough and trickling
over the nozzle?
Check the inlet lines for kinks in the tubing. Ensure the water
supply valve is fully open. Check the water pressure regulator is open.
The water pressure is too high / low and needs to be adjusted via the
water flow regulator so it flows in to the catchment area of the basin.
Check that they have been installed correctly. (all fountains are leak
tested prior to leaving the factory). Have the push in fittings been pulled?
(see instructions on how to connect and disconnect push in fittings).
Is the water inlet connection tight?
The most common cause of water not shutting off is a leaking valve and
is due to the lines not being flushed adequately and debris getting in to
the valve through the inlet and sitting on the rubber seals.
To check the valve it will need to be removed. Please contact this office
for details instructions to ensure this is done correctly.
o o

Other Urban Outdoor Fountain manuals

Urban BF200W Manual

Urban

Urban BF200W Manual

Urban BF200WM Manual

Urban

Urban BF200WM Manual

Urban A300 Manual

Urban

Urban A300 Manual

Urban Apollo 300 Manual

Urban

Urban Apollo 300 Manual

Urban A880 User manual

Urban

Urban A880 User manual

Urban CF400 Manual

Urban

Urban CF400 Manual

Urban BF200 Manual

Urban

Urban BF200 Manual

Urban A300D Manual

Urban

Urban A300D Manual

Urban BF200WC Manual

Urban

Urban BF200WC Manual

Urban A400 Manual

Urban

Urban A400 Manual

Urban PF450BF Manual

Urban

Urban PF450BF Manual

Urban SU600 Manual

Urban

Urban SU600 Manual

Urban PF400 Manual

Urban

Urban PF400 Manual

Urban THE O INITIATIVE OFOUNT Product manual

Urban

Urban THE O INITIATIVE OFOUNT Product manual

Urban A300 Manual

Urban

Urban A300 Manual

Urban PF450 Manual

Urban

Urban PF450 Manual

Urban A450 Manual

Urban

Urban A450 Manual

Urban BF200W Manual

Urban

Urban BF200W Manual

Urban BF400T Manual

Urban

Urban BF400T Manual

Urban A280D Manual

Urban

Urban A280D Manual

Urban A280W Manual

Urban

Urban A280W Manual

Popular Outdoor Fountain manuals by other brands

Profi-pumpe FELS-ZAUBER operating instructions

Profi-pumpe

Profi-pumpe FELS-ZAUBER operating instructions

Hasley Taylor 2501A owner's manual

Hasley Taylor

Hasley Taylor 2501A owner's manual

Sunnydaze Decor XSS-578 Assembly instructions

Sunnydaze Decor

Sunnydaze Decor XSS-578 Assembly instructions

Campania International Bibendum FT-400 Assembly instructions

Campania International

Campania International Bibendum FT-400 Assembly instructions

Elkay FLEXI-GUARD EFHA8 1M Series Installation, care & use manual

Elkay

Elkay FLEXI-GUARD EFHA8 1M Series Installation, care & use manual

S.R.Smith Color Light Stream 2CLSLBK instructions

S.R.Smith

S.R.Smith Color Light Stream 2CLSLBK instructions

Hozelock Cyprio Cascade 1500 Installation and operating instructions

Hozelock Cyprio

Hozelock Cyprio Cascade 1500 Installation and operating instructions

Campania International Juliet Fountain quick start guide

Campania International

Campania International Juliet Fountain quick start guide

Alpine WIN732 quick start guide

Alpine

Alpine WIN732 quick start guide

Campania International FT-320 Assembly instructions

Campania International

Campania International FT-320 Assembly instructions

Kelkay Easy Fountain Rustic Windmill instructions

Kelkay

Kelkay Easy Fountain Rustic Windmill instructions

Alpine WIN258 manual

Alpine

Alpine WIN258 manual

GardenWize SWGSL230 quick start guide

GardenWize

GardenWize SWGSL230 quick start guide

EasyPro Tranquil Décor HBB39 installation instructions

EasyPro

EasyPro Tranquil Décor HBB39 installation instructions

Campania International Girona FT-102A Assembly instructions

Campania International

Campania International Girona FT-102A Assembly instructions

Campania International FT-271 quick start guide

Campania International

Campania International FT-271 quick start guide

Campania International Bilbao GFRCFT-1111 Assembly instructions

Campania International

Campania International Bilbao GFRCFT-1111 Assembly instructions

Campania International Westover manual

Campania International

Campania International Westover manual

manuals.online logo
manuals.online logoBrands
  • About & Mission
  • Contact us
  • Privacy Policy
  • Terms and Conditions

Copyright 2025 Manuals.Online. All Rights Reserved.