Questions Réponses
La zonedetraitementdevient
rouge.Est-cenormal? Une rougeur cutanée temporaire sous les électrodes est bénigne et normale. Elle
s'expliquepar l'augmentation localisée dufluxsanguin.
Il est possible que vous ayez retiré le patch trop rapidement de la peau, ce qui cause la
rougeur. Essayez de retirer le patch plus doucement la prochaine fois.
Si l'irritation cutanée persiste et que vous ressentez une démangeaison ou une
irritation, une allergie peut en être la cause. Dans ce cas, consultez votre médecin
avant de reprendrel'utilisation.
Peut-on appliquer le patch par-dessus
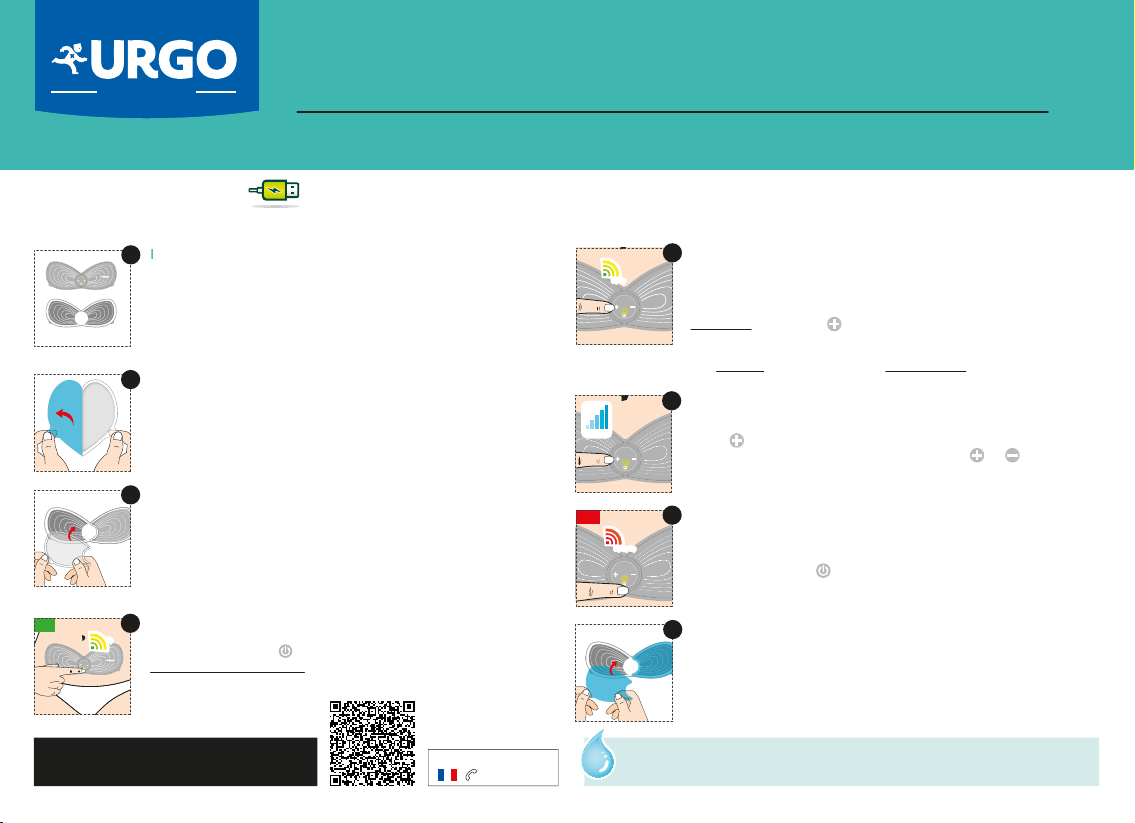
des vêtements? Non, le démarrage du programme est bloqué, car le circuit électrique n'est pas fermé :
les vêtements jouent un rôle de couche isolante et empêchent le circuit de se fermer.
Le patch doit être en contact direct avec la peau.
Puis-je retirer le patch sans l’arrêter ? Non, il faut tout d’abord arrêter le patch (appuyer sur le bouton “ marche / arrêt ”) puis,
après avoir entendules3bips sonores,retirerlepatch.
Puis-je utiliser le patch en prévention
des douleurs? Non. Le patch ne permet pas de prévenir la douleur.
Utilisez-ledès lespremiers symptômes.
Puis-je faire du sport avec le patch ? Vous pouvez marcher et vaquer à vos occupations quotidiennes en portant le PATCH
URGO ÉLECTROTHÉRAPIE RÈGLES DOULOUREUSES RECHARGEABLE. Pour ce qui estde
fairedu sport, tantquelepatch restebien collécelane doitpasposer deproblèmemais
si vous transpirez ou bougez beaucoup, il est probable que l’adhérence du patch
diminueetentraineunediminutionou annule sonefficacité.
Puis-je appliquer le patch sur une
cicatricede césarienne ? Vous pouvez appliquer le patch sur une cicatrice de plus de 6 mois, si la cicatrice a
moins de 6 mois nous vous conseillons de ne pas appliquer le patch.
Est-ce que je ressentirai les effets du
patch de manièrehomogènesi
j’applique lepatch surune cicatrice ?
Pas obligatoirement, de petites fibres nerveuses superficielles peuvent avoir été
endommagées et gêner les sensations relatives aux effets du patch. Quoi qu’il en soit,
ne disposez pas le patch sur des cicatrices datant de moins de 6 mois.
Apartirdecombien de temps après
l’accouchement puis-je utiliser le patch ? Vous pourrez appliquer le patch après 8 semaines. Mais dans le cas d’une cicatrice de
césarienne inférieure à 6 mois, nous vous conseillons de ne pas appliquer le patch.
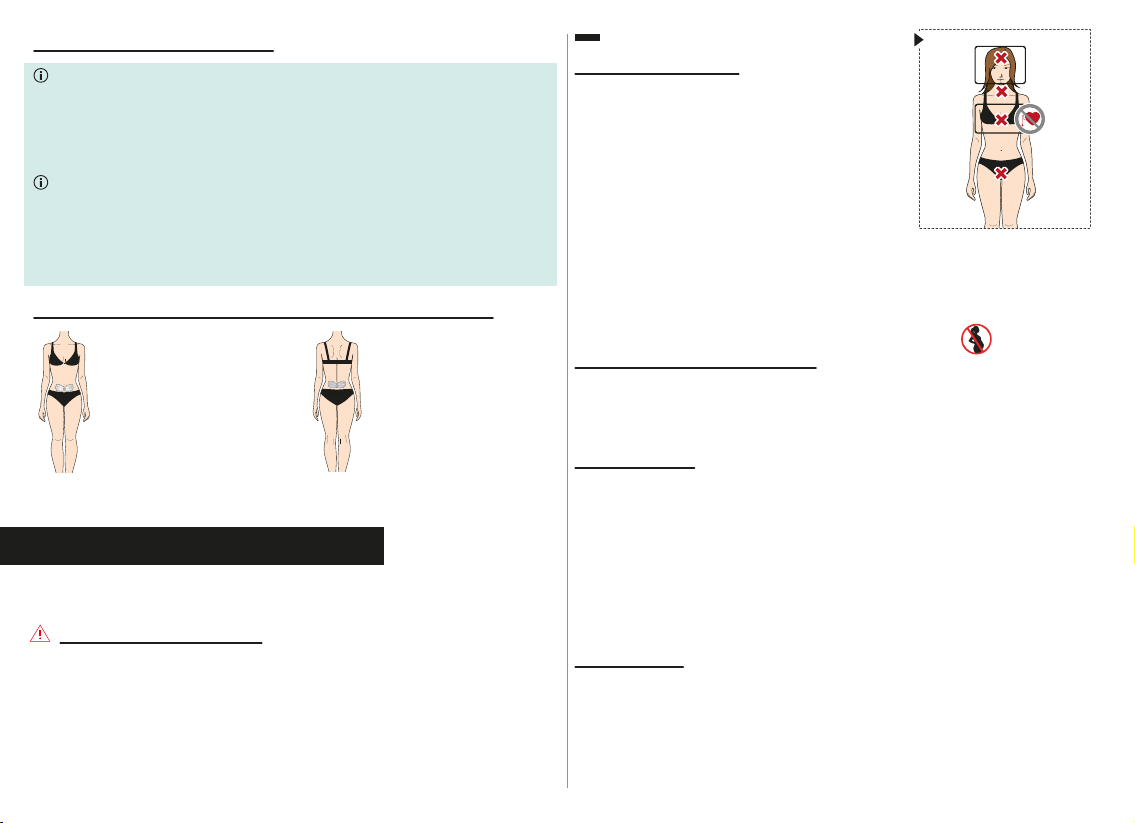
Pendant mes règles, j’ai souvent plus
mald’un côté que del’autre, comment
dois-je appliquer le patch dans ce cas ?
Dans ce cas, il faut appliquer le patch au plus près de la douleur. Cependant, même
disposé au centre du ventre, le patch continuera d’être efficace contre les règles
douloureuses.
Après avoir collé les gels sur les circuits
électriques, je constate laprésencede
petites bulles d’air. Est-ce grave ?
Non, la présence de petites bulles d’air sur le circuit électrique n’entrave pas le bon
fonctionnement dupatch. Veillez à ceque legelsoit bien collédans sa globalité.
Les gelsadhésifsontété légèrement
abîmésen périphérie(par exemple,lors
du retrait du film transparent) : est-ce
quele patchfonctionneramoinsbien ?
Même si les gels sont légèrement abîmés en périphérie, le patch fonctionnera
correctementà conditionqueles circuits électriques soient bien recouverts.
Puis-je utiliser le chargeur secteur de
montéléphone portable? Oui, s’il est certifié et délivre le courant avec les paramètres de sortie (output)
suivants : 5V et 0.3-2A (imprimés sur le chargeur).
Puis-je utiliser le chargeur rapide ? Non, car le chargeur rapide n’est pas compatible avec le patch et peut l’endommager.
Puis-je utiliser le câble de mon
téléphone portable ? Non, utilisez le câble fourni dans l’emballage.
Puis-je utiliser le patch en présence
d’une personnequiporteundispositif
implanté électroniqueou cardiaque? Oui.
8. ÉLIMINATION
Dans l’intérêt de la protection de l’environnement, le PATCH URGO ÉLECTROTHÉRAPIE RÈGLES DOULOUREUSES
RECHARGEABLE ne doit pas être jeté avec les ordures ménagères à la fin de sa durée de vie.
L’élimination doit se faire par le biais des points de collecte des déchets d'équipements électriques et
électroniques envigueur.
Veuillez éliminer l’appareil conformément à la directive européenne relative aux Déchets d'Équipements
Électriques et Électroniques (DEEE). Pour toute question, adressez-vous aux collectivités locales responsables
del’éliminationetdu recyclage de cesproduits.
9. CARACTÉRISTIQUES TECHNIQUES
Modèle/type
Source de courant
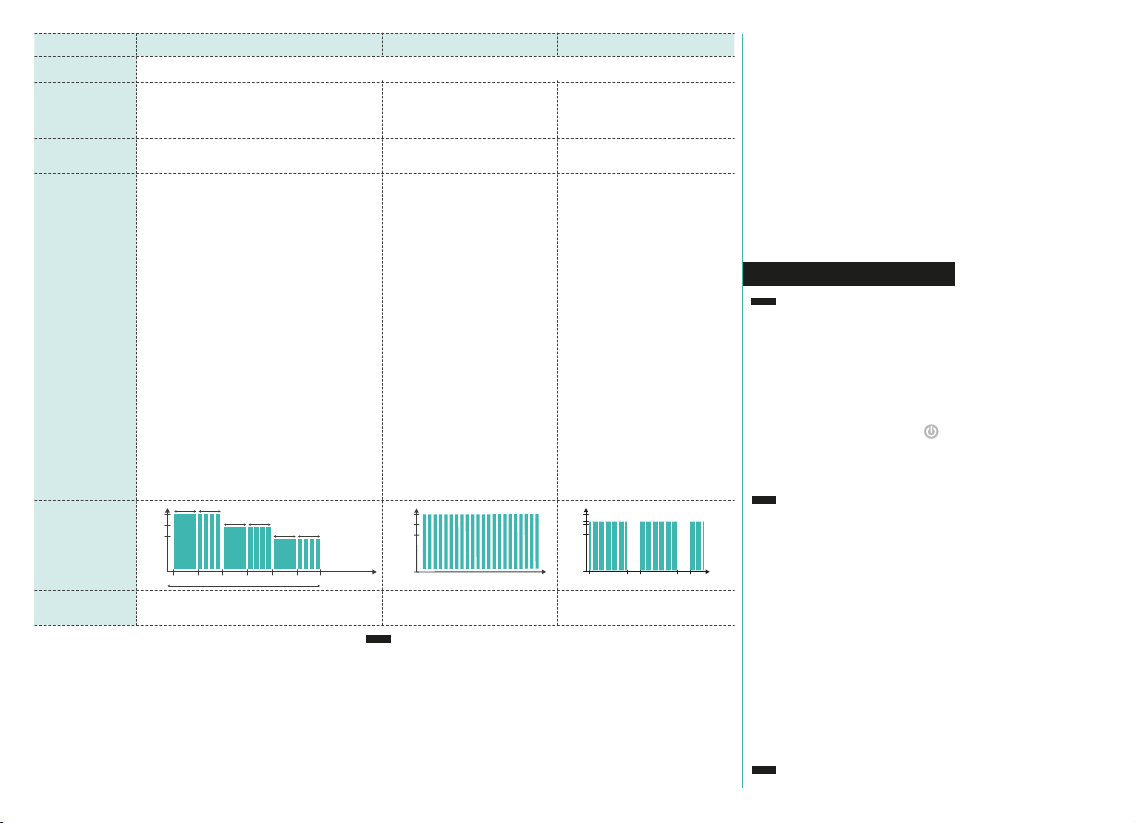
Forme d’onde
Durée de l’impulsion
Fréquence de l’impulsion
Poids
Arrêt automatique
Degré de protection contre les chocs électriques
Typede protection contreles chocs électriques
Code IP
Maximumvoltage
Tempsde traitement
Intensitédesortie
Programmes
Durée de fonctionnementnormale de la batterie
Comportementdel’équipementpendant que
la batterie interne rechargeable est en charge
Durée de vie normale de la batterie
Températureambiante normalede fonctionnement
Températureambiante de stockageet de transport
Pression atmosphériquepourl’utilisationet le stockage
Nombre d’utilisationsdesgelsadhésifs
Date d’expiration des gelsadhésifs
Modede fonctionnement
Version du logiciel
Tempsrequis pour que l’équipement réchauffe entrele moment où latempératurede
stockage est minimale et le moment où il est prêt à l’utilisation
Tempsrequis pour que l’équipement refroidisse entreles utilisations
de la température maximale jusqu’à ce qu’il soit prêt pour utilisation
Câble USB de recharge
Humiditéambiante normaledefonctionnement
Humidité ambiante de stockage et de transport
Surface des électrodes
PATCH URGO ÉLECTROTHÉRAPIE RÈGLES DOULOUREUSES RECHARGEABLE
Alimenté par une batterie interne Li-ion de 3,7 V
Impulsion onde rectangulairebiphasique
0-200µs (Micro secondes)
1 - 100 Hz ± 15%
30 grammes
30 minutes
Appareil de type BF
Équipementàalimentationinterne
IP22 : L’appareil est protégé contre les corps étrangers ≥ 12.5 mm et
contre les gouttes d’eau tombant à une inclinaison de 15°
Max. 16V+/- 20% (at 500 ohm load)
30 minutes
0 - 15 niveaux, ajustable
3programmes
Autour de 240 minutes après une charge complète
La lumièreclignotependantlacharge et
reste fixe lorsqu’elle est chargée au maximum
Rechargeable 300 fois
5°C à 40°C
-25°C à +70°C
70 kPa - 106 kPa
30 fois
Indiquéesurlesgelsadhésifs
Continu / discontinu
A0
30 minutes
15 minutes jusqu’à ce qu’il soit prêt
Utiliser un câble de sortie DC5V et un courant de sortie de 0,3 - 2,0 A pour le chargement
15% RH - 90% RH
0% RH - 90% RH
48 cm2
Ne pas utiliser dans un ENVIRONNEMENT RICHE en OXYGÈNE : par exemple, il est interdit d'utiliser
le patch dansune chambreà oxygènehyperbare ou dans un environnementde traitementàl'oxygène.
NOTE : NE DOIT PAS ÊTRE STÉRILISÉ.
9