Urrea C0MP9100 Dimensions and installation guide

COMP9100
Manual de Usuario y Garantía.
User’s Manual and Warranty.
ATENCIÓN: Lea, entienda y siga las instrucciones de seguridad contenidas en este
manual, antes de operar esta herramienta.
WARNING: Read, understand and follow the safety rules in this manual, before operating this tool.
Compresor Industrial de Aire a Gasolina
Gasoline Industrial Air Compressor
COMP9100 manual.indd 1 28/05/15 14:35

2
ENGLISHESPAÑOL
General safety rules
Personal safety
Air compressor use and care
Specific safety rules for air
compressors
Features
Assembly & adjustments
Operation instructions
Maintenance
Troubleshooting
Technical data
Warranty policy
Normas generales de seguridad
Seguridad personal
Utilización y cuidados de los
compresores
Advertencias de seguridad para
compresores
Características
Ensamble y ajustes
Instrucciones de operación
Mantenimiento
Solucionador de problemas
Especificaciones técnicas
Garantía
10
10
10
11
12
13
13
14
15
15
16
3
3
3
5
6
6
7
8
9
9
16
CONTENIDO CONTENT
SÍMBOLOS SYMBOLS
PELIGRO, ADVERTENCIA, PRECAUCIÓN:
Indica un riesgo personal o la posibilidad
de un daño.
DANGER, CAUTION, WARNING: Indicates risk of
personal injury and/or the possibility of damage.
COMP9100 manual.indd 2 28/05/15 14:35

NORMAS GENERALES DE SEGURIDAD
Este COMPRESOR tienen características que ha-
rán su trabajo más rápido y fácil. Seguridad, co-
modidad y confiabilidad fueron previstos como
prioridad para el diseño del mismo, haciendo
más fácil su operación.
ADVERTENCIA: Lea todas las advertencias
de seguridad y todas las instrucciones. La omi-
sión de alguna de las advertencias e instruccio-
nes que se enlistan a continuación puede dar
como resultado un choque eléctrico, fuego y/o
un daños serios.
CONSERVE TODAS LAS ADVERTENCIAS Y
TODAS LAS INSTRUCCIONES.
SEGURIDAD EN EL ÁREA DE TRABAJO
Mantenga el área de trabajo limpia y bien ilu-
minada. Las áreas desordenadas y oscuras pro-
vocan accidentes.
No maneje herramientas eléctricas en atmós-
feras explosivas, tales como en presencia de
líquidos inflamables, gases o polvo. Las herra-
mientas eléctricas crean chispas que pueden
encender el polvo o los humos.
Mantenga alejados a los niños y curiosos
mientras maneja una herramienta de poder.
Las distracciones pueden causarle la pérdida
del control.
SEGURIDAD PERSONAL
Esté alerta, vigile lo que está haciendo y use el
sentido común cuando maneje una herramien-
ta de poder. No use una herramienta de poder
cuando esté cansado o bajo la influencia de
drogas, alcohol o medicamentos. Un momento
de distracción mientras maneja herramientas
eléctricas puede causar un daño personal serio.
Use equipo de seguridad. Lleve siempre pro-
tección para los ojos. La utilización para las
condiciones apropiadas de un equipo de segu-
ridad tal como mascarilla antipolvo, zapatos no
resbaladizos, gorro duro, o protección para los
oídos reducirá los daños personales.
Retire llaves o herramienta antes de arrancar
la herramienta de poder. Una llave o herra-
mienta dejada unida a una pieza rotativa de
una herramienta de poder puede causar un
daño personal.
No se sobrepase. Mantenga los pies bien asen-
tados sobre el suelo y conserve el equilibrio en
todo momento. Esto permite un mejor control
de la herramienta de poder en situaciones in-
esperadas.
Vista adecuadamente. No vista ropa suelta o
joyas. Mantenga su pelo, su ropa y guantes
alejados de las piezas en movimiento. La ropa
suelta, las joyas o el pelo largo pueden ser co-
gidos en las piezas en movimiento.
Si hay dispositivos para la conexión de medios
de extracción y recolección de polvo, asegúre-
se de que éstos estén conectados y se usen co-
rrectamente. El uso de estos dispositivos puede
reducir los peligros relacionados con el polvo.
UTILIZACIÓN Y CUIDADOS DE LOS
COMPRESORES
• Para usarse sólo en el exterior.
• No sobrepase la presión nominal de ningún
componente del sistema.
• Antes de usar la unidad revise las mangueras
para verificar que no presentan daños o des-
gaste. Asegúrese de que estén seguras todas
las conexiones. No utilice la unidad si encuen-
tra algún defecto. Adquiera una manguera
nueva o lleve la unidad a un centro de servicio
autorizado para que la examinen y reparen.
• Purgue lentamente todas las presiones inter-
nas del sistema. El polvo y la basura pueden ser
dañinos.
• Mantenga el compresor, cuando no este en
uso, fuera del alcance de los niños y de toda
persona no capacitada en el uso de las mismas.
• Mantenga el exterior del compresor de aire
seco, limpio y libre de aceite o grasa. Siempre
utilice un paño limpio para la limpieza de la
unidad. Nunca utilice líquido para frenos, ga-
solina, productos a base de petróleo ni solven-
tes fuertes para limpiar esta unidad. Con el
cumplimiento de esta regla se reduce el riesgo
de deterioro del alojamiento de plástico de la
unidad.
• Mantenga las protecciones en su lugar y en
buenas condiciones de trabajo. Nunca utilice la
herramienta con ninguna de las protecciones
o cubiertas quitadas. Asegúrese de que todas
las protecciones estén funcionando de forma
correcta antes de utilizar la unidad.
• No haga funcionar el motor en un espacio
3
ESPAÑOL•Manual de Usuario
COMP9100 manual.indd 3 28/05/15 14:35

cerrado donde se puedan recolectar las emana-
ciones de monóxido de carbono. El monóxido
de carbono, un gas incoloro, inodoro y suma-
mente peligroso, puede causar la pérdida de la
conciencia o la muerte.
• Mantenga el tubo de escape libre de objetos
extraños.
• No utilice la unidad cerca de vegetación o ra-
mas secas, paños de textiles ni otros materiales
inflamables.
• Nunca alce ni transporte una máquina mien-
tras se encuentre en marcha.
• Nunca ponga en marcha la máquina si se ha
formado hielo en cualquier parte del equipo.
• Siempre ponga en marcha la máquina en
superficies niveladas. Si el motor se encuentra
inclinado, podría agarrotarse debido a la lu-
bricación insuficiente (incluso con el nivel de
aceite al máximo).
• Nunca intente efectuar ajuste alguno mien-
tras el motor está en marcha (excepto cuando
así lo recomiende el fabricante).
• Mantenga la entrada de aire de enfriamiento
(el área del arrancador retráctil) y el lado del
silenciador alejados un mínimo de 1 metro de
cualquier edificación, obstrucciones y otros ob-
jetos combustibles.
• Mantenga alejado el motor de materiales in-
flamables y de otros materiales peligrosos.
• Evite el contacto con las partes calientes de la
unidad. El silenciador y otras partes del motor
se calientan mucho; tenga precaución.
• No toque la bujía ni el cable de ignición du-
rante el arranque ni durante el funcionamien-
to del motor.
• Antes de usar la unidad, inspeccione las man-
gueras de combustible y los acoplamientos
pertinentes para verificar que no estén flojos
ni haya derrames de combustible.
• Antes de cada uso, inspeccione los pernos y
las tuercas para verificar que están apretados.
Una tuerca o perno sueltos pueden causar pro-
blemas graves en el motor.
• Siempre reabastezca el combustible al aire
libre. Nunca reabastezca el combustible en
espacios interiores ni en áreas con ventilación
insuficiente.
• Nunca guarde la máquina con combustible
en el tanque dentro de un edificio donde haya
presentes fuentes de ignición, como el agua
caliente y calentadores locales, secadoras de
ropa, etc.
• Si fuera necesario vaciar el tanque de com-
bustible, hágalo al aire libre.
• Para reducir el riesgo de incendio o de lesio-
nes por quemadura, maneje con cuidado el
combustible. Es sumamente inflamable.
• No fume mientras esté mezclando el combus-
tible o reabasteciendo el tanque.
• Reabastezca de combustible la unidad antes
de arrancar el motor. Nunca retire la tapa del
tanque de combustible ni lo reabastezca mien-
tras la unidad esté encendida o caliente.
• Aoje la tapa del tanque de combustible len-
tamente para aliviar la presión y evitar que se
escape combustible por la tapa.
• Vuelva a colocar rmemente la tapa del tan-
que de combustible y la del recipiente.
• Limpie todo el combustible que se haya de-
rramado de la unidad. Aléjese por lo menos 1
metro del sitio de reabastecimiento de com-
bustible antes de encender el motor.
• Si se derrama combustible, no intente arran-
car el motor; aleje la máquina del área del
derramamiento y evite causar una fuente de
ignición hasta que se disipen los vapores del
combustible.
• Nunca intente en ninguna circunstancia eli-
minar el combustible derramado quemándolo.
• Antes de guardar la unidad deje que se enfríe
el motor.
• Guarde la unidad en un lugar frío y bien ven-
tilado, a una distancia segura de todo equipo
generador de chispas o llamas.
• Guarde el combustible en recipientes diseña-
dos específicamente para tal fin.
• Antes de transportar la unidad en un vehí-
culo, vacíe el tanque de combustible e inmo-
vilícela.
• Asegúrese de que haya una distancia mínima
de 1 metro de todo material combustible.
SERVICIO
• Al dar servicio a una herramienta, sólo utilice
piezas de repuesto idénticas. Siga las instruc-
ciones señaladas en la sección Mantenimiento
de este manual. El empleo de piezas no autori-
zadas o el incumplimiento de las instrucciones
de mantenimiento puede significar un riesgo
de lesiones.
• El servicio de la herramienta sólo debe ser
efectuado por personal de reparación califica-
4
COMP9100 manual.indd 4 28/05/15 14:35

do. Todo servicio o mantenimiento efectuado
por personal no calificado puede significar un
riesgo de lesiones.
• Desconecte el cable de la bujía, abra la válvu-
la de drenaje para purgar la presión del tanque
y permitir que se drene el agua, y por último
permita que se enfríe el compresor antes de
darle servicio. Gire la completamente a la iz-
quierda la perilla de regulación de la presión
antes de apagar el compresor.
ADVERTENCIAS DE SEGURIDAD
PARA COMPRESORES
¡ IMPORTANTE !
Solamente utilice el compresor de aire para el
propósito especificado. No altere ni modifique
la unidad con respecto a su diseño y funciona-
miento originales.
AIRE DE ADMISIÓN. Puede contener monóxi-
do de carbono u otros contaminantes. Causará
lesiones graves o la muerte. Los compresores
de aire URREA no están diseñados, destinados
o aprobados para respirar aire. No se debe usar
el aire comprimido para aplicaciones de aire
respirable, a menos que se trate de acuerdo
con todas las normas y reglamentos aplicables.
ADVERTENCIA: Apague el motor y purgue
la presión del tanque antes de hacer mante-
nimiento. Bloquee/etiquete la máquina. No
opere el compresor en condiciones húmedas.
Almacene en interiores.
PARTES MÓVILES. Pueden causar lesiones gra-
ves. No opere la máquina si se ha retirado el
protector. La máquina puede empezar a fun-
cionar automáticamente.
AIRE DE ALTA PRESIÓN. La derivación, modi-
ficación o retiro de las válvulas de seguridad/
alivio puede causar lesiones graves o la muer-
te. No derive, modifique o retire las válvulas
de seguridad/desahogo. No apunte el flujo de
aire a las personas. Los tanques oxidados pue-
den causar una explosión y lesiones graves o la
muerte. Vacíe el tanque diariamente o después
cada uso. Válvula de drenaje ubicada al fondo
del tanque.
• Siempre tenga presente que el uso y manejo
indebidos de esta herramienta puede causarle
lesiones a usted y a otras personas.
• Nunca deje desatendida ninguna herramien-
ta con la manguera de aire conectada.
• Nunca apunte ninguna herramienta hacia sí
u otras personas.
• No utilice esta herramienta si no tiene una
etiqueta de advertencia.
• No continúe usando ninguna herramienta o
manguera que tenga fugas de aire o que no
funcione correctamente.
• Siempre desconecte el suministro de aire y
desconecte el cable de la bujía antes de efec-
tuar ajustes, dar servicio a la herramienta o
cuando no la esté usando.
• No intente tirar de la manguera ni acarrear el
compresor tomándolo por la misma.
• Una herramienta determinada puede nece-
sitar más aire del que este compresor es capaz
de suministrar.
• Siempre siga todas las reglas de seguridad
recomendadas por el fabricante de la herra-
mienta de aire, además de todas las reglas de
seguridad del compresor de aire. Con el cum-
plimiento de esta regla se reduce el riesgo de
lesiones serias.
• Nunca dirija un chorro de aire comprimido
hacia personas o animales. Tenga cuidado de
no soplar polvo o tierra hacia sí u otras perso-
nas. Con el cumplimiento de esta regla se redu-
ce el riesgo de posibles lesiones serias.
• No utilice este compresor de aire para rociar
productos químicos. Pueden resultar afectados
los pulmones debido a la inhalación de ema-
naciones tóxicas. Puede ser necesario utilizar
un respirador en entornos polvorientos o al
rociar pintura. No acarree la unidad mientras
esté pintando.
• Inspeccione periódicamente las mangueras
de las herramientas, y si están dañados, per-
mita que los reparen en el centro de servicio
autorizado más cercano de la localidad.
• Revise para ver si hay piezas dañadas. Antes
de seguir utilizando el compresor o la herra-
mienta de aire, es necesario inspeccionar cui-
dadosamente toda protección o pieza dañada
para determinar si funcionará correctamente
y desempeñará la función a la que está desti-
nada. Verique la alineación de las partes mó-
viles, que no haya atoramiento de las mismas,
que no haya piezas rotas, el montaje de las
piezas y cualquier otra condición que pudiera
afectar su funcionamiento. Toda protección o
pieza que esté dañada debe repararse apro-
piadamente o reemplazarse en un centro de
5
ESPAÑOL•Manual de Usuario
COMP9100 manual.indd 5 28/05/15 14:35

servicio autorizado. Con el cumplimiento de
esta regla se reduce el riesgo de una descarga
eléctrica, incendio o lesión grave.
• Guarde estas instrucciones. Consúltelas con
frecuencia y empléelas para instruir a otras
personas que puedan utilizar esta herramien-
ta. Si presta a alguien esta herramienta, facilí-
tele también las instrucciones.
CARACTERÍSTICAS
CONOZCA SU HERRAMIENTA
Antes de intentar usar la herramienta lea cui-
dadosamente este manual y comprenda todas
sus capacidades y limitantes antes de comenzar
a utilizar esta máquina.
1. TANQUE DE 100 L.
2. MOTOR A GASOLINA.
3. BANDA DE TRANSMISIÓN.
4. MANGO.
5. VÁLVULA DE DRENADO DE HUMEDAD.
6. LLANTAS NEUMÁTICAS.
ENSAMBLE Y AJUSTES
MANGO
El mango debe ser instalado como se indica a
continuación:
1. Afloje los tornillos de cada lado de los tubos
usando una llave hexagonal (no se incluye).
2. Inserte las dos terminacio-
nes del mango alineados con
los orificios de ensamble.
3. Apriete los tornillos para
asegurar que el mango se
quede en su lugar.
LLANTAS
Ajuste las llantas de la siguiente manera:
1. Coloque la parte de atrás de la llanta en el
soporte de metal ubicado en el tanque.
2. A continuación, inserte el perno de la rueda
a través de la rueda y luego a través del aguje-
ro en el soporte en el tanque.
3. Coloque y apriete la tuerca con la arandela,
en el interior de la abrazadera apriete con dos
llaves. Repita el procedimiento para la segunda
rueda.
NOTA: Los neumáticos deben ser inflados con
una presión que no exceda los 30 PSI.
PIE DE GOMA
1. Para ajustar las dos patas
de goma ajuste una arande-
la en la cabeza del tornillo y
pasar el tornillo y la arande-
la a través del pie de goma
(Fig.2).
2. Coloque el perno por el
agujero en el soporte frontal
y asegúrelo con la tuerca y
arandela. Apriete la tuerca
con una llave, mientras que
sostiene la cabeza del tor-
nillo con el dedo pulgar. No
apriete en exceso.
Repita para el otro pie de goma (Fig.3).
ACEITE
ATENCIÓN: Se le debe de colocar aceite al
compresor antes de su uso. Para prevenir posi-
bles derrames durante su transporte, el aceite
viene en un contenedor aparte.
Debe de ser añadido al compresor antes de en-
cenderlo.
1. Remueva la tapa plástica
del cárter de aceite (Fig.4)
que se encuentra colocado
en la parte superior del tan-
que.
2. Use el aceite provisto para
llenar el cárter hasta el nivel
indicado con un punto en la
mirilla del cárter (Fig.5).
3. Vuelva a ajustar la tapa,
y asegúrese de que está co-
rrectamente posicionado en
su lugar.
Fig.1
5
6
3
1
24
6
Fig.2
Fig.3
Fig.4
Fig.5
COMP9100 manual.indd 6 28/05/15 14:35

INSTRUCCIONES DE OPERACIÓN
RUTINA DE ENCENDIDO
1. Asegúrese de que el área donde va a ser ubi-
cado el compresor, se encuentra limpia, seca y
bien ventilada.
2. Asegúrese que el cárter
esté lleno de aceite y con
un nivel correcto, también
asegúrese que el ltro esté
colocado en su lugar.
3. Abra la válvula, girando
la perilla (esta debe quedar
en línea recta con la salida,
como se muestra en la g.6).
Para cerrar la válvula, dirija
la válvula hacia la derecha o
hacia la izquierda (vea la fi-
gura 7 “CERRADO“).
4. Encienda el compresor siguiendo los pasos
que más adelante se muestran en la sección de
“Encendiendo y apagando el compresor.“
Para la primera operación, deje el motor en-
cendido por 10 minutos con carga y con la vál-
vula abierta para asegurar que todas las partes
se encuentren bien lubricadas.
ADVERTENCIA: Este consciente que esta ac-
ción hará que el aire comprimido sea expulsa-
do por la salida del aire, tenga cuidado que el
puerto de salida no se encuentre en dirección
de usted el operador o hacia cualquier otra
persona en la cercanía.
ENCENDIENDO LA UNIDAD
ADVERTENCIA: La gasolina es muy peligro-
sa. Si la gasolina hace contacto con superficies
calientes puede ocasionar lesiones serias o la
muerte.
1. No reabastezca el tanque de combustible
con el motor en marcha.
2. Apague el motor y espere 2 minutos antes
de reabastecerlo de combustible.
3. Trate de no derramar combustible al reabas-
tecer el tanque. Si hubo algún derrame, limpie-
lo inmediatamente.
4. No mezcle gasolina y aceite.
5. Siga las instrucciones y advertencias conteni-
das en el manual de usuario.
PREPARACIONES PREVIAS AL ENCENDIDO
Antes de arrancar el compresor, verifique si hay
piezas sueltas o faltantes y si hay cualquier tipo
de daño que pudiera haber ocurrido durante
el envió.
ENCENDIENDO EL MOTOR
1. Abra la válvula del combustible.
2. Encienda la unidad.
3. Cierre el ahogador.
4. Jale la piola un poco hasta sentir un poco
de resistencia y prosiga a jalar con fuerza hasta
que el motor se encienda.
5. Abra el ahogador.
6. Mueva la palanca del acelerador a “RUN-
NING“.
IMPORTANTE: No permita que la piola se re-
grese bruscamente contra el motor. Regrésela
suavemente a su posición original, evite daños
innecesarios al motor.
PRECAUCIÓN: Antes del primer uso, haga
funcionar durante 30 minutos el compresor
de aire en presión cero del tanque con las
válvulas de drenaje totalmente abiertas.
NOTA: Una vez que el compresor de aire se
haya puesto en funcionamiento, la presión
dentro del tanque de aire comenzará a acumu-
larse. Después de alcanzar la máxima presión
del tanque, el motor funcionará en ralentí para
permitir que la presión dentro del tanque de
aire disminuya hasta alcanzar un nivel preesta-
Fig.6
open
Fig.7
closed
7
ESPAÑOL•Manual de Usuario
2
COLOQUE EL
INTERRUPTOR
DE ENCENDIDO
EN “ON“
6
COLOQUE EL
ACELERADOR
A LA POSICIÓN
“RUN“
5
ABRA EL
AHOGADOR
1
ABRA LA
VÁLVULA DE
GASOLINA
3
4
CIERRE EL
AHOGADOR
TIRE
DE LA PIOLA
COMP9100 manual.indd 7 28/05/15 14:35

blecido. Cuando la presión cae por debajo del
nivel preestablecido, el motor se acelera para
proporcionar una mayor presión del aire.
PELIGRO: Debe suministrar una ventilación
adecuada para los gases tóxicos de escape y el
flujo de aire que enfría al motor ( el motor es
enfriado por aire que es inyectado por su pro-
pio ventilador).
• No encienda o arranque el compresor en un
área cerrada, incluso si las puertas o ventanas
están abiertas.
• El motor despide monóxido de carbono, un
gas venenoso, inodoro e invisible.
• Aspirar monóxido de carbono puede ocasio-
nar nausea, desfallecimiento o la muerte.
PARA APAGAR EL MOTOR:
• Lleve el interruptor del apagado/marcha en
la posición de OFF (APAGADO).
MANTENIMIENTO
1. Después de las primeras 10 horas de funcio-
namiento, vacíe el cárter de aceite y sustitúyalo
con aceite limpio quitando la tapa de desalojo
de aceite (parte inferior del tanque).
NOTA: Utilice un aceite lubricante de calidad
para compresor o similar.
2. Cambie el aceite después de las primeras 50
horas de funcionamiento. Revise el aceite cada
150 horas de operación y reemplace cada 300
horas de funcionamiento.
3. Después de cada día de funcionamiento,
utilice la válvula de drenaje en el tanque para
drenar el condensado.
4. Verique diariamente el funcionamiento
de la válvula. Esta verificación se debe realizar
cuando el compresor se encuentre cerca del
presurizado máximo. Para vericar la válvula,
el presurizado del tanque y jale el anillo de la
válvula de seguridad. El aire debe ser expulsa-
do por esta válvula (Fig.10).
Suelte el anillo de la válvula
de seguridad. Cuando se li-
bera el anillo de la válvula,
la expulsión de aire se deten-
drá. Si la válvula de seguri-
dad no opera correctamente
en ninguna de las indicaciones previas, apague
el compresor inmediatamente y lleve el com-
presor con la válvula de seguridad a un centro
de servicio para su revisión.
NO CONTINÚE UTILIZANDO EL COMPRESOR
POR NINGÚN MOTIVO SI LA VÁLVULA DE SE-
GURIDAD NO FUNCIONA COMO DEBERÍA.
FILTRO DE AIRE
ATENCIÓN: Compruebe regularmente la es-
ponja/ filtro de aire dentro de la caja del filtro
de aire. Limpie o reemplace la esponja cuando
sea necesario.
1. Utilice una llave hexago-
nal para retirar los dos tor-
nillos que sujetan la tapa del
filtro.
2. Retire este ensamble del
filtro de aire y quite la tapa,
en seguida quite la esponja
de ltro (Fig.11).
3. Lave el ltro con un solvente limpio, expri-
ma el solvente restante y deje que se seque por
completo.
4. Añada unas gotas de aceite de motor a la
esponja del filtro y apriete para distribuirlo.
5. Coloque la cubierta exte-
rior del filtro de aire, y colo-
que la segunda mitad de la
cubierta que encierra el fil-
tro de espuma (Fig.12).
LIMPIEZA
1. Mantenga las ventilas de las herramientas
despejadas y limpias en todo momento.
2. Elimine el polvo o suciedad regularmente.
Esta limpieza se lograría mejor con un cepillo
suave o un trapo.
3. Lubrique regularmente y en intervalos todas
las partes móviles.
4. Si el cuerpo del compresor necesita limpieza,
limpielo con una tela suave y húmeda. Un de-
tergente suave puede ser usado pero nada con
alcohol, gasolina u otro agente de limpieza.
5. Nunca utilice agentes cáusticos para limpiar
partes plásticas.
PRECAUCIÓN: El agua nunca debe entrar
en contacto con el compresor.
AJUSTE DE LA CORREA
COMPROBACIÓN DE LA TENSIÓN DE LA CO-
RREA. Compruebe ocasionalmente la tensión
de la correa, especialmente si sospecha afloja-
miento. Las correas nuevas también se deben
tensar adecuadamente en el momento de su
instalación.
8
Fig.11
Fig.12
Fig.10
COMP9100 manual.indd 8 28/05/15 14:35

TENSADO DE CORREAS
Se puede lograr el tensado de la correa aflojan-
do los tornillos de anclaje del motor, alejando
el motor de la bomba y volviendo a apretar los
tornillos de anclaje del motor. Siga los proce-
dimientos descritos más abajo para ajustar y
medir correctamente la tensión:
1. Mida la longitud del tramo de la transmisión.
2. Determine la cantidad de exión (en pulga-
das) que se requiere para medir la fuerza de
exión (en libras) multiplicando la longitud del
tramo por 1/64. Por ejemplo, una longitud de
tramo de 32” multiplicada por 1/64 equivale a
1/2” de exión necesaria para medir la fuerza
de la exión.
3. Apoye un borde recto en la supercie ex-
terior superior de la transmisión de la correa,
desde la polea a la rondana.
4. Al centro del tramo, en forma perpendicular
a la correa, aplique presión a la supercie ex-
terior de la correa con un medidor de tensión.
Fuerce la correa a la exión predeterminada
que se calculó en el paso 2.
Antes de volver a poner en marcha el compre-
sor, compruebe que las poleas y la banda estén
adecuadamente alineadas y que los tornillos
de anclaje del motor se vuelvan a apretar ade-
cuadamente.
PRECAUCIÓN: Una alineación de las poleas
y bandas, y una tensión inadecuada de las ban-
das pueden generar una sobrecarga del motor,
un exceso de vibración y la falla prematura de
la correa y/o el rodamiento. Para evitar estos
problemas, compruebe que las poleas y bandas
estén alineadas y que la tensión de la banda
sea satisfactoria después de instalar bandas
nuevas o de tensar bandas existentes.
SOLUCIONADOR DE PROBLEMAS
EL MOTOR NO ARRANCA
El interruptor del motor está en apagado
(OFF). Ponga el interruptor del motor en en-
cendido (ON).
No hay combustible en el tanque. Llénelo.
Está cerrada la válvula de combustible (OFF).
Abra la válvula (ON).
Bujía defectuosa, sucia o con separación inco-
rrecta. Reemplace la bujía.
Tanque lleno de aire. El compresor se encien-
de cuando la presión del tanque desciende a la
presión de activación.
LE FALTA POTENCIA AL MOTOR
Elemento de combustible obstruidos. Com-
pruebe el elemento de filtro de aire. Limpie o
reemplace según sea necesario.
Dispositivo de descarga de presión defectuo-
so. Lleve el compresor a un centro de servicio.
LA PRESIÓN DEL APARATO RECEPTOR DEL AIRE
DESCIENDE CUANDO SE APAGA EL COMPRESOR
Conexiones flojas (adaptadores, mangueras,
etc.). Revise todas las conexiones con solución
de agua y jabón, y apriételas.
Revise para ver si hay fugas en dispositivo de
descarga de presión. Lleve el compresor a un
centro de servicio.
HUMEDAD EXCESIVA EN EL AIRE DE DESCARGA
Cantidad excesiva de agua en el tanque de
aire. Drene el tanque.
Alta humedad. Lleve la unidad a un lugar de
menor humedad; use un filtro de aire en línea.
EL COMPRESOR FUNCIONA CONTINUAMENTE
Dispositivo de descarga de presión defectuo-
so. Lleve el compresor a un centro de servicio.
Uso excesivo de aire. Disminuya el consumo de
aire; el compresor no es de la suficiente capa-
cidad para las necesidades de la herramienta.
Los aros de pistón son llevados. Reemplace
aros de pistón; el servicio de atención al cliente
de la Llamada para la ayuda.
PRODUCCIÓN DE AIRE MÁS BAJA DE LO NORMAL
Válvulas de entrada descompuestas. Lleve el
compresor a un centro de servicio.
Hay conexiones con fugas. Apriete las cone-
xiones.
9
ESPAÑOL•Manual de Usuario
ESPECIFICACIONES TÉCNICAS
CAPACIDAD DEL TANQUE
CAUDAL A 90 PSI
PRESIÓN MÁXIMA
POTENCIA
VELOCIDAD DEL CABEZAL
PESO
100 L
10,6 CFM
8 bar (116 PSI)
7 HP
3 400 r/min
70 kg (154,3 lb)
COMP9100 manual.indd 9 28/05/15 14:35

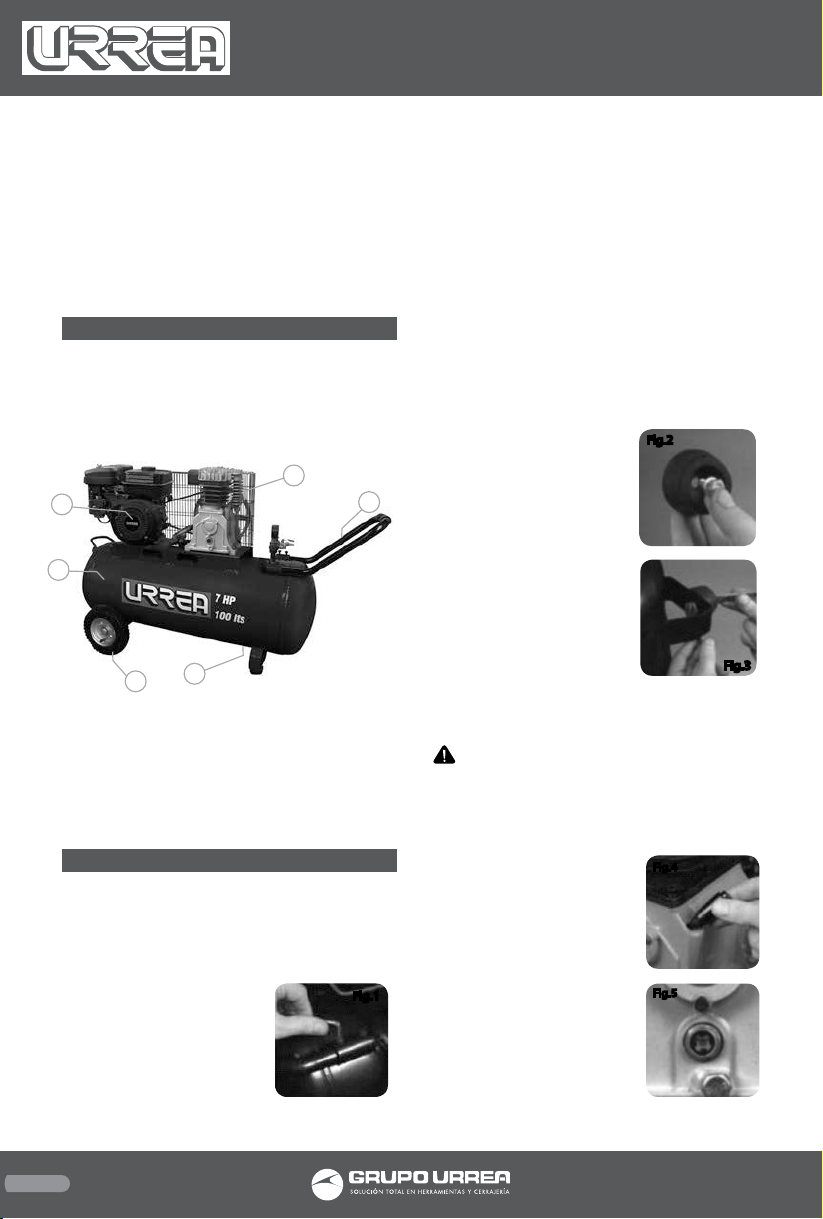
GENERAL SAFETY RULES
Your AIR COMPRESSOR has many features that
will make your job faster and easier. Safety,
performance and reliability have been given
top priority in the design of this tool, qualities
to make easy to maintain and to operate.
WARNING: Read and understand all in-
structions. Failure to follow all indications list-
ed below, may result in electric shock, fire and/
or serious personal injury.
SAVE THESE INSTRUCTIONS.
SAFETY IN WORKING AREA
Keep your work area clean and well lit. Clut-
tered benches and dark areas may cause acci-
dents.
Do not operate power tools in explosive atmo-
spheres, such as in the presence of flammable
liquids, gases or dust. Some power tools create
sparks which may provoke fire.
Keep away observers, children and visitors
while operating a power tool. Distractions can
cause you to lose control.
PERSONAL SAFETY
Stay alert, watch what you are doing and use
common sense when operating a power tool.
Don’t use the tool if you are tired or under the
influence of drugs, alcohol or medication. A
moment of inattention while operating power
tools may cause a serious personal injury.
Dress properly. Do not wear loose clothing
or jewelry. Contain long hair. Keep your hair,
clothing and gloves away of moving parts.
Loose clothes, jewelry or long hair can be
caught in moving parts.
Remove the adjusting keys or wrenches be-
fore turning the tool on. A wrench or a key
that is left close to a rotating part of the tool
may provoke a personal injury.
Do not overreach. Keep proper footing and
balance at all times. Proper footing and bal-
ance enables better control of the tools on un-
expected situations.
Use safety equipment. Always wear eye pro-
tection. Dust mask, nonskid safety shoes, hard
hat, or hearing protection must be used for ap-
propriate conditions.
AIR COMPRESSOR USE AND CARE
• For outdoor use only.
• Do not exceed the pressure rating of any
component in the system.
• Protect material lines and air lines from dam-
age or puncture. Keep hose away from sharp
objects, chemical spills, oil, solvents, and wet
floors.
• Check hoses for weak or worn condition be-
fore each use, making certain all connections
are secure. Do not use if defect is found. Pur-
chase a new hose or notify an authorized ser-
vice center for examination or repair.
• Release all pressures within the system slowly.
Dust and debris may be harmful.
• Store idle air compressors out of the reach
of children and other untrained persons. Air
compressors are dangerous in the hands of un-
trained users.
• Maintain air compressors with care. Follow
maintenance instructions. Properly maintained
products are easier to control.
• Check for misalignment or binding of moving
parts, breakage of parts, and any other condi-
tion that may affect the product’s operation.
If damaged, have the air compressor serviced
before using. Many accidents are caused by
poorly maintained products.
• Keep the exterior of the air compressor dry,
clean, and free from oil and grease. Always use
a clean cloth when cleaning. Never use brake
fluids, gasoline, petroleum-based products, or
any strong solvents to clean the unit. Following
this rule will reduce the risk of deterioration of
the enclosure plastic.
• Keep the engine free of grass, leaves, or
grease to reduce the chance of a fire hazard.
• Keep guards in place and in working order.
Never operate the tool with any guard or cover
removed. Make sure all guards are operating
properly before each use.
• Do not operate the engine in a conned
space where dangerous carbon monoxide
fumes can collect. Carbon monoxide, a color-
less, odorless, and extremely dangerous gas,
can cause unconsciousness or death.
• Keep the exhaust pipe free of foreign objects.
• Do not operate around dry brush, twigs,
cloth rags, or other flammable materials.
• Never pick up or carry a machine while the
engine is running.
10
COMP9100 manual.indd 10 28/05/15 14:35

• Never start the machine if ice has formed in
any part of the equipment.
• Always operate the machine on a level sur-
face. If the engine is on an incline, it could
seize due to improper lubrication (even at the
maximum oil level).
• Never attempt to make any adjustments
while the engine (motor) is running (except
where specifically recommended by the manu-
facturer).
• Protective covers must always cover rotating
parts when the engine is running.
• Keep cooling air intake (recoil starter area)
and muffler side of the engine at least 3 feet
away from buildings, obstructions, and other
combustible objects.
• Keep the engine away from ammables and
other hazardous materials.
• Keep away from hot parts. The mufer and
other engine parts become very hot; use cau-
tion.
• Do not touch the spark plug and ignition
cable when starting and operating the engine.
• Check fuel hoses and joints for looseness and
fuel leakage before each use.
• Check bolts and nuts for looseness before
each use. A loose bolt or nut may cause serious
engine problems.
• Always refuel outdoors. Never refuel indoors
or in a poorly ventilated area.
• Never store the machine with fuel in the fuel
tank inside a building where ignition sources
are present, such as hot water and space heat-
ers, clothes dryers, and the like.
• If the fuel tank has to be drained, do this out-
doors.
• To reduce the risk of re and burn injury,
handle fuel with care. It is highly flammable.
• Do not smoke while handling fuel.
• Add fuel before starting the engine. Never
remove the cap of the fuel tank or add fuel
while the engine is running or when the en-
gine is hot.
• Loosen fuel cap slowly to release pressure
and to keep fuel from escaping around the
cap.
• Replace all fuel tank and container caps se-
curely.
• Wipe spilled fuel from the unit. Move 30
feet away from refueling site before starting
engine.
• If fuel is spilled, do not attempt to start the
engine but move the machine away from the
area of spillage and avoid creating any source
of ignition until fuel vapors have dissipated.
• Never attempt to burn off spilled fuel under
any circumstances.
• Before storing, allow the engine to cool.
• Store fuel in a cool, well-ventilated area,
safely away from spark and/or flame-produc-
ing equipment.
• Store fuel in containers specically designed
for this purpose.
• Empty fuel tank and restrain the unit from
moving before transporting in a vehicle.
• Make sure minimum clearance of 3 feet is
maintained from combustible materials.
SERVICE
• When servicing a product, use only identical
replacement parts. Follow instructions in the
Maintenance section of this manual. Use of
unauthorized parts or failure to follow Main-
tenance instructions may create a risk of injury.
• Service must be performed only by qualied
repair personnel. Service or maintenance per-
formed by unqualified personnel may result in
a risk of injury.
• Disconnect the spark plug wire, open drain
valve to decompress tanks and allow water to
drain, and allow air compressor to become cool
to the touch before servicing. Turn pressure
regulator knob fully clockwise after shutting
off air compressor.
SPECIFIC SAFETY RULES FOR
AIR COMPRESSOR
IMPORTANT !
Only use the air compressor for the specified
purpose. Do not alter or modify the unit with
respect to its original design and operation.
INTAKE AIR. Can contain carbon monoxide or
other contaminants. Will cause serious injury
or death. URREA air compressors are not de-
signed, intended or approved for breathing air.
Compressed air should not be used for breath-
ing air applications unless treated in accor-
dance with all applicable codes and regula-
tions.
MOVING PARTS. Can cause serious injury. Do
not operate with guards removed. Machine
11
ENGLISH•User’s manual
COMP9100 manual.indd 11 28/05/15 14:35

may start automatically. Disconnect power be-
fore servicing. Lockout/Tagout machine.
HIGH PRESSURE AIR. Bypassing, modifying or
removing safety/relief valves can cause seri-
ous injury or death. Do not bypass, modify or
remove safety/relief valves. Do not direct air
stream at body. Rusted tanks can cause explo-
sion and severe injury or death. Drain tank
daily or after each use. Drain valve located at
bottom of tank.
• Always be aware that misuse and improper
handling of this product can cause injury to
yourself and others.
• Never leave a tool unattended with the air
hose attached.
• Never point any air tool toward yourself or
others.
• Do not operate this air compressor if it does
not contain a legible warning label.
• Do not continue to use a tool or hose that
leaks air or does not function properly.
• Always disconnect the air supply and remove
spark plug wire before making adjustments,
servicing a product, or when a product is not
in use.
• Do not attempt to pull or carry the air com-
pressor by the hose.
• Your tool may require more air consumption
than this air compressor is capable of provid-
ing.
• Always follow all safety rules recommended
by the manufacturer of your air tool, in addi-
tion to all safety rules for the air compressor.
Following this rule will reduce the risk of seri-
ous personal injury.
• Never direct a jet of compressed air toward
people or animals. Take care not to blow dust
and dirt towards yourself or others. Following
this rule will reduce the risk of serious injury.
• Do not use this air compressor to spray chemi-
cals. Your lungs can be damaged by inhaling
toxic fumes. A respirator may be necessary in
dusty environments or when spraying paint.
Do not carry while painting.
• Inspect hoses periodically and, if damaged,
have repaired at your nearest Authorized Ser-
vice Center.
• Check damaged parts. Before further use
of the air compressor or air tool, a guard or
other part that is damaged should be care-
fully checked to determine that it will operate
properly and perform its intended function.
Check for alignment of moving parts, binding
of moving parts, breakage of parts, mounting,
and any other conditions that may affect its
operation. A guard or other part that is dam-
aged should be properly repaired or replaced
by an authorized service center. Following this
rule will reduce the risk of shock, fire, or seri-
ous injury.
• Never store a tool with air connected. Storing
the tool with air connected can result in un-
expected ring and possible serious personal
injury.
• Protect your lungs. Wear a face or dust mask
if the operation is dusty. Following this rule
will reduce the risk of serious personal injury.
• Save these instructions. Refer to them fre-
quently and use them to instruct others who
may use this product. If you loan someone this
product, loan them these instructions also.
FEATURES
KNOW YOUR TOOL
Before attempting to use this product, become
familiar with all of its operating features and
safety requirements.
1. 100 L TANK.
2. GASOLINE MOTOR.
3. BELT DRIVE.
4. HANDLE.
5. HUMIDITY DRAIN VALVE.
6. PNEUMATIC WHEELS.
12
5
6
3
1
24
COMP9100 manual.indd 12 28/05/15 14:35

ASSEMBLY & ADJUSTMENTS
HANDLE
The handle must be fitted in the following
manner:
1. Loosen the screws in each of the handle
xing tubes using an hexagonal key (not in-
cluded).
2. Insert the two ends of the
handle into the xing tubes.
3. Tighten the screws to se-
cure the handle in place, us-
ing an hexagonal key (Fig.1).
WHEELS
Fit the wheels as follows:
1. Position the back of the wheel onto the met-
al bracket located on the tank.
2. Then insert the wheel bolt through the
wheel and then through the hole in the brack-
et under the tank.
3. Attach and tighten the nut with washer, on
the inside of the bracket tightening with two
spanners. Repeat for the second wheel.
NOTE: Tires should be inated not exceeding
30 psi.
RUBBER FEET
1. To fit the two rubber feet
and fit a washer onto the
head of the bolt and pass
the bolt and washer through
the rubber foot as shown in
figure 2.
2. Place the bolt through the
hole in the front bracket and
secure it with the nut and
washer. Tighten the nut with
a spanner, whilst holding the
head of the bolt with your
thumb, do not over tighten.
Repeat for the other rubber foot (Fig.3).
OIL
WARNING: The air compressor must be
filled with oil prior first use. To prevent pos-
sible spillage of oil during transport, the com-
pressor oil is supplied in a separate container. It
must be added to the compressor before turn-
ing the compressor on. Failure to add the oil
will cause non repairable damage to the com-
pressor and will void the warranty.
1. Remove the plastic oil fill-
ing cap (Fig.4) located on the
top of the crank case of the
compressor housing.
2. Use the oil supplied to fill
the crank case until the oil
level as seen in the oil level
glass is up to the mid point
of the red circle (Fig.5).
3. Replace the oil filling cap.
Make sure the cap is fully fit-
ted and firmly in position.
OPERATION INSTRUCTIONS
PRE-START ROUTINE
1. Ensure that the location
for the compressor is clean,
dry and well ventilated.
2. Ensure the crank case has
been filled with oil and is at
the correct level, and the air
filter has been fitted (Fig.7
CLOSED).
3. Open the regulated out-
put valve. Open the valve by
rotating the air tap so it is in
line with the air outlet (refer
to Fig.6 OPEN). To close the
valve, rotate the air tap so it
is facing to the right or the
left side of the air valve (re-
fer to the CLOSED picture).
4. Start the compressor by following the pro-
cedure in the section “To start and stop the
compressor”.
For the first time of operation, run the com-
pressor for 10 minutes with no load and with
the outlet valve open to ensure all parts are
well lubricated.
WARNING: Be aware that pressurised air
will be discharged from the outlet and care
should be taken that this discharge is not di-
rected towards you the operator, or other per-
sons within the area.
STARTING THE UNIT
WARNING: Gasoline is very dangerous. Seri-
ous injury or death may result from fire caused
by gasoline contacting hot surfaces.
Fig.1
Fig.2
Fig.3
Fig.4
Fig.5
Fig.6
open
Fig.7
closed
13
ENGLISH•User’s manual
COMP9100 manual.indd 13 28/05/15 14:35

1. Do not ll the fuel tank with the engine run-
ning.
2. Turn off the engine and wait 2 minutes be-
fore filling the tank.
3. Do not spill fuel while relling tank.
4. Do not mix oil with gasoline.
5. Follow all the instructions and warnings in
the engine manual.
PRE-START PREPARATION
Before starting the generator, check for loose
or missing parts and for any damage which
may have occurred during shipment.
STARTING THE ENGINE
1. OPEN the fuel valve.
2. Turn the engine switch to the ON position.
3. CLOSE the choke lever.
4. Pull the starter lightly until resistance is felt,
then pull it briskly until starts.
5. OPEN choke.
6. Move the run lever to the "RUNNING" posi-
tion.
IMPORTANT: Do not allow the starter grip
to snap back against the engine. Return it gen-
tly to prevent damage to the starter.
CAUTION: Before first use, run the air com-
pressor at zero tank pressure with the drain
valves fully open for 30 minutes.
NOTE: Once the air compressor is started, pres-
sure inside the air tank will build until the
compressor reaches 120 psi. After reaching
maximum tank pressure the engine will idle
allowing the pressure inside the air tank to
decrease until it reaches a preset level. When
the pressure falls below the preset level, the
engine will accelerate and provide additional
air pressure.
DANGER: Provide adequate ventilation for
toxic exhaust gases and cooling air ow.
• Do not start or run the generator in an en-
closed area, even if doors or windows are open.
• Engines operation produces carbon monox-
ide, an odorless, colorless, poison gas.
• Breathing carbon monoxide can cause nau-
sea, fainting or death.
TO STOP THE ENGINE:
• Put the on/stop switch in the OFF position.
MAINTENANCE
1. After the first 10 hours of working, empty
the crank case of oil and refill with clean oil by
removing the crank case oil plug (left hand side
of the crank case at the bottom).
NOTE: Use good-quality compressor lubricat-
ing oil.
2. Replace oil after the first 50 hours of opera-
tion. Check oil every 150 hours of operation
and replace every 300 hours of operation.
3. After each day of operation, use the drain cock
under the tank to drain off any condensate.
4. Check daily the operation of the safety valve.
This check should be performed when the tank
contains close to max pressure in the tank. To
check the valve, pressurize the tank, and pull
the ring OUTWARDS on the safety valve.
Air should discharge from
the valve. Release the ring
of the safety valve. When
the ring is released the
air discharge must stop
(Fig.10).
Release the ring of the safety valve. When
the ring of the valve is released, air discharge
stops. If the safety valve does not operate cor-
rectly in any of the previous indications, turn
off the compressor immediately and take it to
a service center for inspection the compressor
safety valve.
Fig.10
14
2
TURN “ON“
6
LEVER TO "RUN"
POSITION
5
“OPEN“
CHOKE LEVER
1
“OPEN“
FUEL VALVE
3
4
“CLOSE“
CHOKE LEVER
PULL STARTER
COMP9100 manual.indd 14 28/05/15 14:36

DO NOT CONTINUE USING THE COMPRES-
SOR FOR ANY REASON IF THE SAFETY VALVE
SHOULD NOT WORK AS.
AIR FILTER
WARNING: Regularly check the foam air fil-
ter inside the air filter assembly and clean or
replace the foam filter when necessary.
1. Use an hexagonal key to
remove the two screws hold-
ing the air filter cover on.
2. Remove the air filter as-
sembly and take off the
cover and remove the foam
insert (Fig. 11).
3. Wash the foam filter in clean solvent,
squeeze out the remaining solvent and allow
it to dry completely.
4. Add a few drops of machine oil to the foam
filter and squeeze to distribute.
5. Fit the outer cover into
the air filter foam, and fit
the second half of the cover
enclosing the foam filter
(Fig. 12).
CLEANING
1. Keep the tool’s air vents unclogged and
clean at all times.
2. Remove dust and dirt regularly. Cleaning is
best done with a soft brush or a rag.
3. Re-lubricate all moving parts at regular in-
tervals.
4. If the body of the compressor needs clean-
ing, wipe it with a soft damp cloth. A mild de-
tergent can be used but nothing like alcohol,
petrol or other cleaning agent.
5. Never use caustic agents to clean plastic
parts.
CAUTION: Water must never come into
contact with the tool.
TROUBLESHOOTING
Engine will not start
On/stop switch is in off position. Turn the on/
stop switch to ON.
No fuel. Fill fuel tank.
Fuel valve is off. Turn fuel valve on.
Spark plug faulty, fouled, or improperly
gapped. Replace spark plug.
Choke lever is in RUN position. Move choke
lever to START position.
Tank is full of air. Compressor will turn on
when tank pressure drops to cut-in pressure.
Engine lacks power
Fuel element clogged. Check air filter element.
Clean or replace as needed.
Defective pressure unloader. Take compressor
to service center.
Air tank pressure drops when compressor
shuts off
Loose connections (fittings, tubing, etc.).
Check all connections with soap and water so-
lution and tighten.
Loose drain valve. Tighten drain valve.
Pressure unloader leaking. Take compressor to
service center.
Excessive moisture in discharge air
Excessive water in air tanks. Drain tanks.
High humidity. Move to area of less humidity;
use air line filter.
Compressor runs continuously
Defective pressure unloader. Take compressor
to service center.
Excessive air usage. Decrease air usage; com-
pressor not large enough for tool’s require-
ment.
Piston rings are worn. Replace piston rings;
Call customer service for assistance.
Air output lower than normal
Broken inlet valves. Take compressor to service
center.
Connections leaking. Tighten connections.
Fig.11
Fig.12
TECHNICAL DATA
15
ENGLISH•User’s manual
TANK CAPACITY
VOLUME AT 90 PSI
MAXIMUM PRESSURE
POWER
HEAD SPEED
WEIGHT
100 L
10,6 CFM
8 bar (116 PSI)
7 HP
3 400 r/min
70 kg (154,3 lb)
COMP9100 manual.indd 15 28/05/15 14:36

COMP9100
Urrea Herramientas Profesionales S.A. de C.V.
Warranties this product for a period of 1 year in
its parts, components and manual labour against
any manufacture defect from the purchasing date.
Purchase date: ____/____/____
Product:____________________
Brand:______________________
Model:______________________
______________________________
Distributor seal and signature
Sold and Imported by:
Urrea Herramientas Profesionales S.A. de C.V.
km 11,5 Carretera A El Castillo, El Salto, Jalis-
co, México. C. P. 45680, Tel. (33) 3208 7900,
RFC UHP900402Q29
Terms:
In order to make warranty effective you must pres-
ent the product along with the warranty properly
filled and signed to an authorized distributor or
service center.
Urrea Herramientas Profesionales S.A. de C.V.
will cover the transportation cost related to the
warranty.
This warranty is not applicable in the follow-
ing cases:
· When the product has not been used according
to normal conditions or natural wear of its parts.
· When the product has not been used according
with this user’s manual instructions.
· When the product has been xed or modied by
unauthorized or unqualified person.
Urrea Herramientas Profesionales S.A. de C.V.
garantiza este producto por el termino de 1 año
en sus piezas, componentes y mano de obra con-
tra cualquier defecto de fabricación a partir de la
fecha de entrega.
Fecha de venta: ____/____/____
Producto: ___________________
Marca: ______________________
Modelo: ____________________
______________________________
Sello y firma de distribuidor
Comercializado e Importado por:
Urrea Herramientas Profesionales S.A. de C.V.
km 11,5 Carretera A El Castillo, El Salto, Ja-
lisco, México. C. P. 45680, Tel. (33) 3208 7900,
RFC UHP900402Q29
Condiciones:
Para hacer efectiva la garantía deberá presentar
el producto junto con la póliza de garantía debi-
damente firmada y sellada por el establecimiento
donde la adquirió, en cualquiera de los centros de
servicio autorizados.
Los gastos de transportación que se deriven del
cumplimiento de la garantía serán cubiertos por:
Urrea Herramientas Profesionales S.A. de C.V.
Esta garantía no será valida en los siguientes
casos:
· Cuando el producto haya sido utilizado en condi-
ciones distintas a las normales o al desgaste natu-
ral de sus partes.
· Cuando el producto no haya sido operado de
acuerdo al instructivo de uso que lo acompaña.
· Cuando el producto haya sido alterado o repara-
do por personas no autorizadas.
ESPAÑOL
PÓLIZA DE GARANTÍA
ENGLISH
WARRANT POLICY
16
COMP9100 manual.indd 16 28/05/15 14:36
Table of contents
Languages:
Other Urrea Air Compressor manuals

Urrea
Urrea COMP825 Dimensions and installation guide

Urrea
Urrea COMP824L Dimensions and installation guide

Urrea
Urrea COMP9235 Dimensions and installation guide

Urrea
Urrea COMP9100A Dimensions and installation guide

Urrea
Urrea COMP9303 User manual

Urrea
Urrea COMP8100 User manual

Urrea
Urrea COMP9505 User manual

Urrea
Urrea COMP8115 User manual
Popular Air Compressor manuals by other brands

Atmos
Atmos ATMOS C 21 operating instructions

Rocker
Rocker 320 manual

Atlas Copco
Atlas Copco XRYS 577 instruction manual

Elektra Beckum
Elektra Beckum Compresor Power 260 operating instructions

VacuumChambers
VacuumChambers PC2123S operating manual

King Industrial
King Industrial KC-10020SQ instruction manual