URSUS TROTTER UT-ECKART 2 User manual

MANUAL DE USUARIO Y LETRA DE GARANTÍA
ELEKTRISCHE TOASTER
Tostador 2 panes

Manual de Instrucciones
ELEKTRISCHE TOASTER
UTECKART
Lea atentamente este manual antes de usar el tostador y
guárdelo para consultas futuras.
Importantes instrucciones de seguridad
Al usar aparatos electrodomésticos se deben seguir las
instrucciones de seguridad que se indican a continuación:
1. Lea todas las instrucciones.
2. Verique que el voltaje de la red coincida con el voltaje
indicado en la placa de identicación del tostador.
3. No toque las supercies calientes. Use sólo los
mangos.
4. Para evitar el riesgo de descargas eléctricas, no
sumerja el cable eléctrico, el enchufe ni ninguna parte del
tostador en agua ni en otro tipo de líquidos. Desenchufe
el tostador cuando no esté en uso y antes de limpiarlo.
5. Déjelo enfriar antes de instalar o retirar piezas.
6. Los niños deben estar supervisados en todo momento
para evitar que jueguen con el tostador.
7. Deje que el tostador se enfríe completamente antes
de limpiarlo o guardarlo.
8. No use el tostador si el cable eléctrico o el enchufe
están dañados o si no funciona correctamente; llévelo
a un centro de servicio técnico autorizado para que lo
revisen, reparen o ajusten.
9. No deje el cable eléctrico colgando sobre una mesa/
mesón y evite que esté en contacto con supercies
calientes.
10. No coloque el tostador sobre o cerca de un quemador
eléctrico o a gas caliente ni dentro de un horno caliente.
11. Use el tostador sólo para los nes para los cuales fue
diseñado.
12. No se deben introducir en el tostador alimentos de
gran tamaño ni envoltorios o utensilios metálicos ya que
pueden causar un incendio o una descarga eléctrica.
13. El pan se puede quemar, por lo tanto, no use el tostador
cerca de cortinas u otros materiales combustibles; es
necesario supervisarlo cuando esté en uso.
14. El uso de accesorios no recomendados por el
fabricante pueden causar accidentes.
15. Use el tostador sobre una supercie de trabajo
estable y nivelada.
16. No intente sacar los alimentos cuando el tostador
está en uso.
17. Asegúrese de sacar el pan con cuidado una vez
tostado para evitar accidentes por quemaduras.
18. El tostador no debe ser operado con un timer externo
ni por un sistema de control remoto separado.
19. Este aparato no ha sido diseñado para ser utilizado
por personas (incluidos niños) con discapacidades físicas,
sensoriales o mentales o por personas que no cuenten
con experiencia ni conocimientos necesarios acerca
de su uso; sólo podrán usarlo si están debidamente
supervisadas por alguien responsable de su seguridad o
han sido debidamente capacitadas para usarlo en forma
segura.
20. Los niños deben estar supervisados en todo
momento para evitar que jueguen con el tostador.
21. No use el tostador al aire libre.
22. Este aparato ha sido diseñado para uso doméstico y
otros similares, por ej.:
– Areas de cocina en tiendas, ocinas y otros ambientes
de trabajo;
– Granjas;
– Por clientes de hoteles, moteles y otros ambientes
residenciales;
23. Se puede producir incendio si el tostador está
cubierto o en contacto con materiales inamables, por
ejemplo, cortinas, telas, muros y similares cuando se
encuentra en uso.
Piezas del tostador

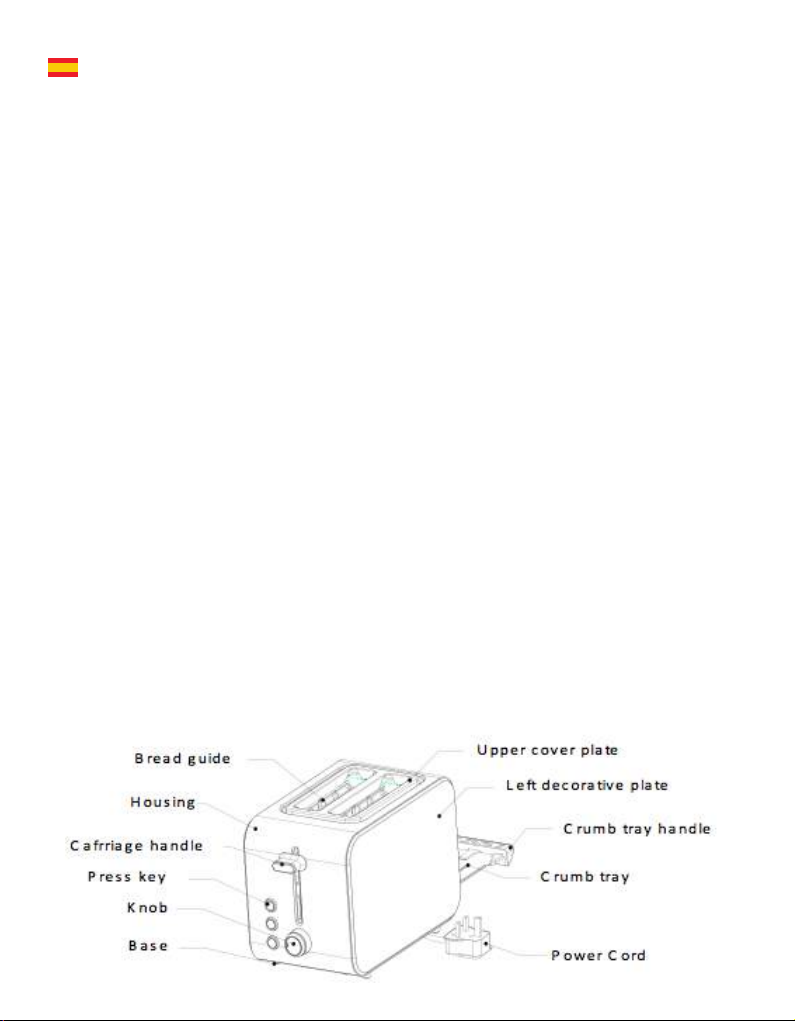
BREAD GUIDE – GUIA PARA EL PAN
HOUSING - CARCASA
CARRIAGE HANDLE – PALANCA PARA TOSTADO
PRESS KEY – BOTON EYECTOR
KNOB - PERILLA
BASE - BASE
UPPER COVER PLATE – PLACA SUPERIOR
LEFT DECORATIVE PLATE – PLACA DECORATIVA IZQ
CRUMB TRAY HANDLE – MANILLA DE BANDEJA DE
MIGAS
CRUMB TRAY – BANDEJA DE MIGAS
POWER CORD – CABLE ELECTRICO
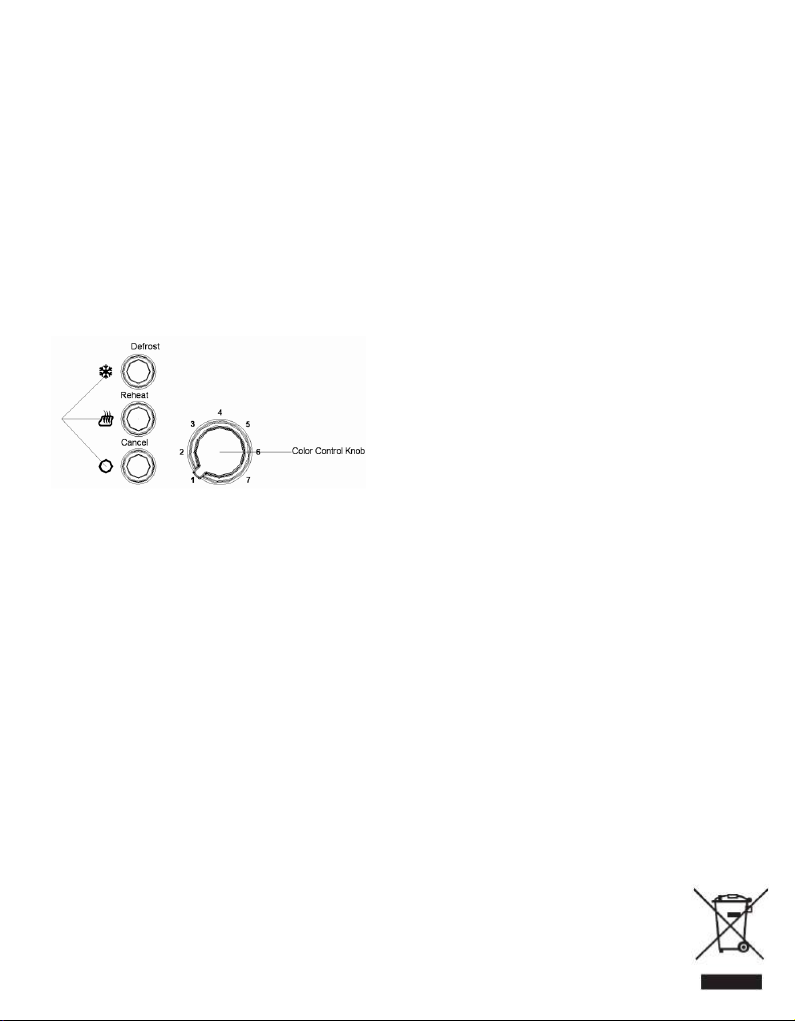
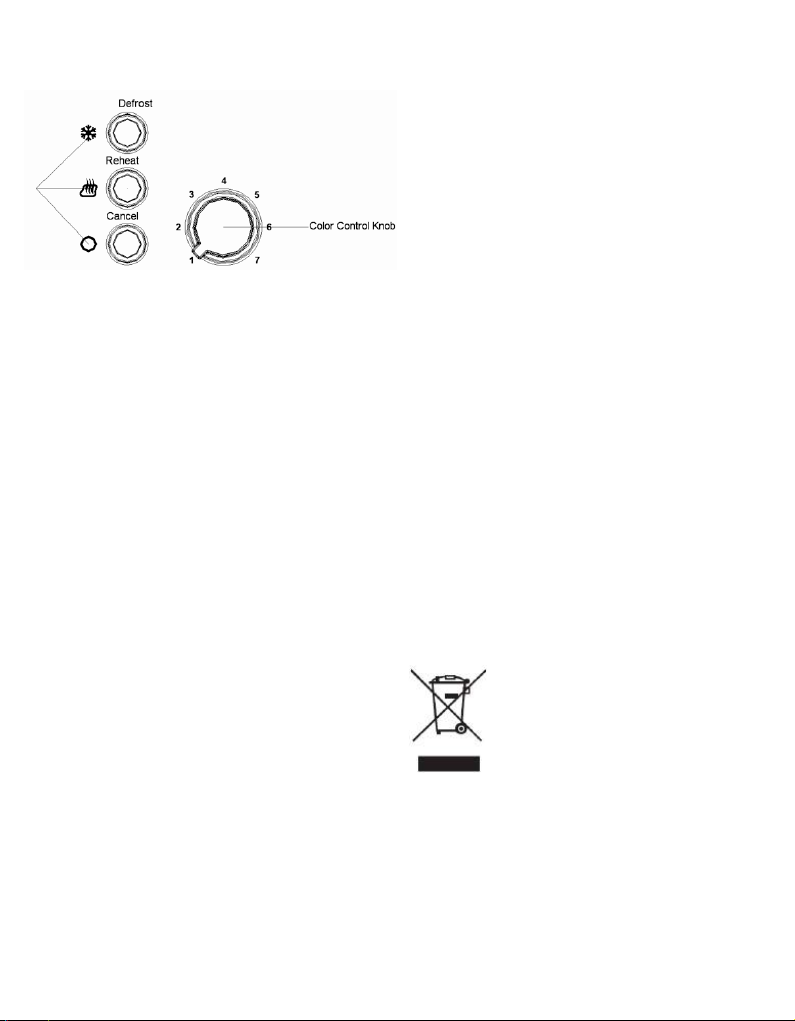
Panel de control (ver a continuación)
Defrost - Descongelar
Reheat - Recalentar Color Control Knob – Perilla de
Control
Cancel - Cancelar
Antes de usar el tostador por primera vez
Debido a que quedan residuos de fabricación o
aceite en el tostador o en los elementos calefactores,
normalmente emitirá olor al usarlo por primera vez.
Esto es normal y no volverá a ocurrir después de usar
el tostador varias veces. Al usar el tostador por primera
vez, se recomienda seguir los pasos que se indican a
continuación (sin pan), dejarlo enfriar y después colocar
la primera rebanada de pan.
OPERACION
1. Introduzca la rebanada de pan dentro de la ranura – se
pueden colocar hasta dos rebanadas al mismo tiempo.
Nota: Asegúrese de que la bandeja de migas esté en la
posición correcta antes de usar el tostador.
2. Enchufe el cable eléctrico al tomacorriente.
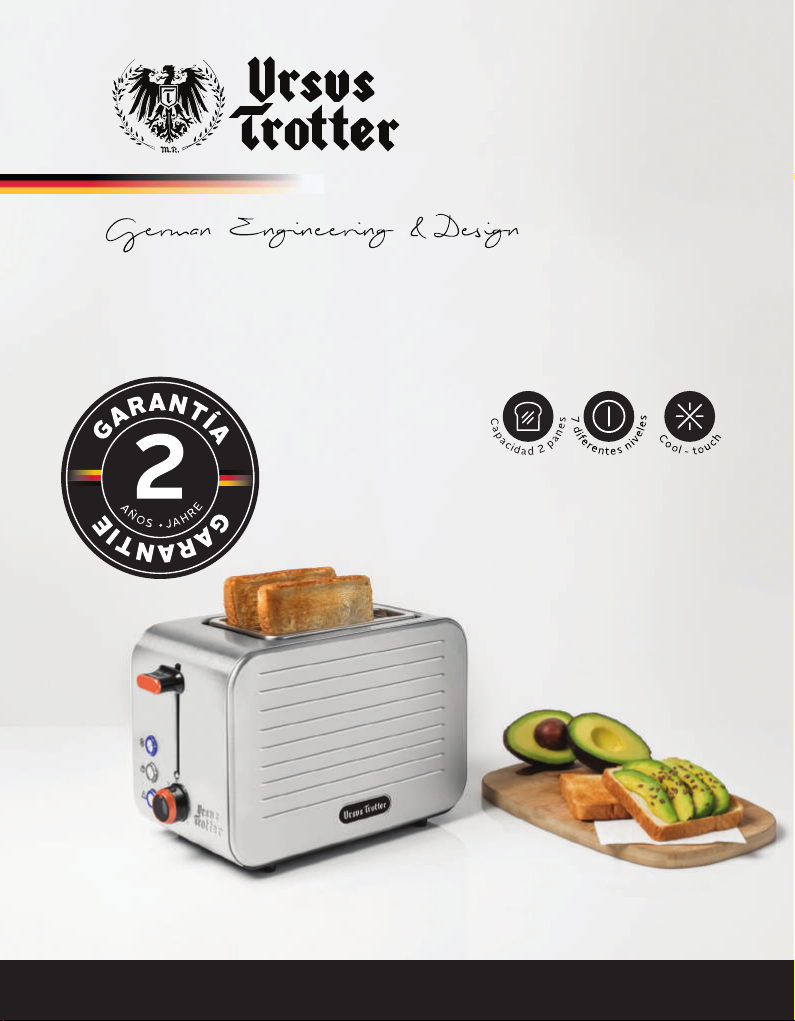
3. Gire la perilla de control al color deseado. Hay 7 niveles
(colores); la posición más baja (blanco) - ‘1’ - es para
un tostado suave y las más alta – ‘7’ - para un tostado
oscuro. Al colocar la perilla al medio – ‘4’ - , se obtiene
un tostado dorado.
Nota:
1. Si se coloca sólo una rebanada de pan, el tostado es más
intenso que al colocar dos rebanadas usando la misma
posición de la perilla de control.
2. Si se usa el tostador en forma continuada, el tostado
de los panes obtenidos al nal es más intenso que el de
los primeros panes usando la misma posición de la perilla
de control.
4. Baje la palanca para tostar el pan hasta que
quede correctamente enganchada, y el tostador
inmediatamente comenzará a tostar el pan.
Nota: La palanca para tostar solo queda enganchada
cuando el tostador se encuentra enchufado.
5. Una vez que el pan ha alcanzado el nivel de tostado
programado, la palanca automáticamente subirá. Para
sacar el pan más fácilmente suba con la mano la palanca
un poco más.
Nota: Durante el proceso de tostado, puede observar
el color del tostado. Si el tostado está en el punto que
desea, presione el botón Cancel para cancelar el proceso
(puede hacer esto en cualquier momento), sin embargo,
no levante la palanca para cancelar el proceso de tostado.
PRECAUCION
1. Si el tostador emite humo, presione el botón Cancel
para interrumpir inmediatamente el proceso de tostado.
2. Retire todo el material de embalaje antes de comenzar
a tostar.
3. Evite tostar alimentos que contengan ingredientes que
escurran, p.ej., mantequilla.
4. No saque las tostadas que quedan atascadas en las
ranuras sin antes desenchufar el tostador. Evite dañar
el mecanismo interno o las piezas calefactoras al sacar
el pan.
5. Para lograr un color de tostado parejo, recomendamos
esperar por lo menos 30 segundos entre una tostada y
otra de manera que el control de color se pueda resetear
automáticamente.
Limpieza y mantenimiento
1. Antes de limpiar el tostador, desenchúfelo y déjelo
enfriar completamente.
2. Limpie la supercie exterior del tostador con un paño
suave y seco, no use limpiadores para pulir metal.
3. Retire la bandeja de migas que está en la parte inferior
del tostador y vacíe las migas. Si el tostador se usa
frecuentemente, las migas acumuladas se deben retirar
por lo menos una vez a la semana. Antes de volver a usar
el tostador, revise que la bandeja esté correctamente
instalada.
4. Enrolle el cable eléctrico y déjelo debajo del tostador
cuando no lo use o al guardarlo.
DISPOSICION AMBIENTAL
¡Ayude a proteger el medio ambiente!
Recuerde cumplir con las normativas
locales: deposite los electrodomésticos
en un centro de reciclaje debidamente
autorizado.

Instruction Manual
ELEKTRISCHE TOASTER
UTECKART
Read this manual thoroughly before using and save it for
future reference
Important safeguards
When using electrical appliance. Basic safety precautions
should always be followed including the following:
1. Read all instructions.
2. Make sure that your outlet voltage corresponds to the
voltage stated on the rating label of the toaster.
3. Do not touch hot surface. Use handles or knobs only.
4. To protect against electrical shock, do not immerse
cord, plug, or any part of the toaster in water or other
liquid. Unplug unit from outlet when not in use and
before cleaning.
5. Allow to cool before putting on or taking o parts.
6. Children should be supervised to ensure that they do
not play with the appliance.
7. Allow the unit to cool completely before cleaning or
storing.
8. Do not operate any appliance with a damaged cord
or plug or after the appliance malfunctions or has been
damaged in any manner. Return appliance to the nearest
authorized service facility for examination, repair, or
adjustment.
9. Do not let the cord hang over edge of table or counter,
or touch hot surface.
10. Do not place on or near a hot gas or electric burner,
or in a heated oven.
11. Do not use the appliance for other than its intended
use.
12. Oversized food, metal foil packages or utensils must
not be inserted in the toaster as they may cause re or
electric shock.
13. As bread may burn, toasters must not be used near
or below curtains and other combustible materials, they
must be watched.
14. The use of accessory attachments not recommended
by the appliance manufacturer may cause injuries.
15. Use the appliance on a level and stable work surface.
16. Don’t attempt to dislodge food when toaster is
plugged in.
17. Be sure to take the bread out carefully after toasting
so as to avoid injuries.
18. The appliance is not intended to be operated by
means of an external timer or separate remote-control
system.
19. This appliance is not intended for use by persons
(including children) with reduced physical, sensory or
mental capabilities, or lack of experience and knowledge,
unless they have been given supervision or instruction
concerning use of the appliances by a person responsible
for their safety.
20. Children should be supervised to ensure that they do
not play with the appliance.
21. Don’t use the appliance outdoors.
22. This appliance is intended to be used in household
and similar applications such as:
– Sta kitchen areas in shops, oces and other working
environments;
– Farm houses;
– By clients in hotels, motels and other residential type
environments;
– Bed and breakfast type environments.
23. A re may occur if toaster is covered or touching
ammable material including curtains, draperies, walls,
and the like, when in operation.
Know your toaster

Control panel: (see below)
For the rst use
As there is manufacturing residue or oil remained in the
toaster or heat element, usually it will emit the odor for
the rst use. It is normal and will not occur after several
times use, for the rst use it is suggested operating
according to the below steps, except without bread, then
let the toaster cool down and begin toasting the rst
slice.
OPERATION
1. Insert regular bread slice into the bread slot, which can
be inserted with two slices at most each time.
Note: Make sure the crumb tray is completely positioned
in place before use.
2. Plug the power cord into the outlet.
3. Turn color control knob to your desired color. There
are 7 color levels, the lowest “1” is for white and the
highest “7” is for dark. The middle “4” can toast the bread
to golden color.
Note: 1). Toasting color for one slice is darker than that for
two bread slices at the same level.
2). If toasting continuously, toasting color for the latter
bread is darker than that
for the anterior bread at the same level.
4. Lower carriage handle down vertically until it is latched
in place, and the appliance will begin toasting at once.
Note: Carriage handle can be latched only when the unit
is plugged in.
5. Once the bread has been toasted to the preset color,
the carriage handle will be automatically pop up. Also you
can uplift the carriage handle a little to remove the bread
readily.
Note: During toasting, you may also observe the toasting
color. If it is satisfactory, you can press the Cancel button
to cancel the operation at any time, but never lift carriage
handle to cancel toasting.
CAUTION
1. If toaster starts to smoke, press Cancel button to stop
toasting immediately.
2. Remove all protective wrappings prior to placing bread
slice into toaster.
3. Avoid toasting the food with extremely runny
ingredients such as butter.
4. Never attempt to remove bread jammed in the slots
without unplugging the toaster from the electrical outlet
rst, Be sure not to damage the internal mechanism or
heating elements when removing bread.
5. In order to achieve uniform color we recommend that
you should wait minimum 30s between each toasting so
that color control can reset automatically.
5. The bread slot is only applicable for toasting regular
bread.
Cleaning and maintenance
1. Before cleaning, unplug from the appliance and let the
appliance cool down completely 2. Wipe the outside with
soft dry cloth, never use metal polish.
3. Pull out crumb tray at bottom of toaster and empty it.
If toaster is used frequently, accumulated bread crumbs
should be removed at least once a week. Make sure the
crumb tray is completely closed before using the toaster
again.
4. When not in use or storage, the power cord may be
twisted under the bottom of toaster.
ENVIRONMENT FRIENDLY DISPOSAL
You can help protect the environment!
Please remember to respect the local regulations:
hand in the non-working electrical equipments to
an appropriate waste disposal center.

POLIZA GARANTIA 24 MESES 2014 CR.ai 1 07-03-14 14:59
URSUS TROTTER SMALL APPLIANCES S.A.
Una empresa Chilena con precisión Alemana que da conanza
San Pablo - Tel.: - Fax.:
Casilla 3234- Santiago - Chile
ventas@ursustrotter.cl - www.ursustrotter.cl
Sujeto a alteración sin previo aviso.

POLIZA GARANTIA 24 MESES 2014 CR.ai 2 07-03-14 14:59

ursustrotter.cl
Table of contents
Languages:
Other URSUS TROTTER Toaster manuals