US Steam SeaHawk User manual

2
Components ______________________________________________________
3
Steam
and Vacuum Controls __________________________________________ 4
Quick
Start _______________________________________________________ 5
Shut Down ________________________________________________________
7
Extraction _____
___________________________________________________ 8
Accessories ____
___________________________________________________ 9
Troubleshooting
___________________________________________________
10
Tools
& Accessories _______________________________________________ 9
Maintenance
_____________________________________________________
11
De
-scaling _______________________________________________________
12
Notices __________________________________________________________
13
Warranty
& Repair _________________________________________________
14
Table of Contents
ØD0 NOT leave the steam cleaner unattended while plugged in
ØTurn off all controls and unplug the electrical cord when not in use
ØDO NOT use with a damaged cord or plug
ØIf the steam cleaner is not working as it should, has been dropped, damaged, left outdoors or dropped into
water, call for service before using
ØNEVER attempt to disassemble this steamer
ØDO NOT handle the electrical plug with wet hands
ØDO NOT use near children
ØDO NOT pull or carry by power cord
ØKeep cord away from heated surfaces
ØALWAYS set safety switch on hose handle into the locked position when not in use
ØNot setting safety switch to locked position could result in an injury
ØKeep body, hands, and feet away from accessories or nozzle when steam is in active use
ØALWAYS test a small area before cleaning a large area on any type of surface to make sure no damage will
occur
ØThe steam cleaner should be the only appliance plugged into an outlet
ØUse only a 12 gauge / 15 AMP rated or higher rated extension cord with max length of 25ft
ØAny alteration of electrical cord supply on this steam cleaner will void all warranties

Vacuum Button
ØPush to Turn ON
Steam Pressure Control
Removable Lid
3
Water Fill Tank
Lid Clamps
ON / OFF
Steam Button
ØPush to start making steam
Components
Va c u u m C o l l e c t i o n Ta n k

4
Add tap water to extraction bottle
Steam Pressure Control
Increase Decrease
Most cleaning jobs can be performed on
low or medium steam setting.
Vacuum ON/OFF
ØPush button to turn ON vacuum
ØLight must be solid before
starting (no blinking light)
ØVa c u u m p r e s s u r e c a n b e a d j u s t e d
on the hose handle
ØWet/dry vacuum can be used
independently or with the steam
and extraction
ØUtilize the vacuum to reduce
surface moisture while cleaning
ØVa c u um w i l l o nl y o p e r a t e o n
Low & Medium when using
steam
ØMax Speed can only be used
when using the vacuum
independently without steam or
extraction
Steam Button
ØPush button to start building
steam pressure.
ØBlinking light = boiler is
heating and building pressure.
ØLight will turn solid when
ready.
ØSteam light will start blinking
during use. This means boiler
is heating.
ØRED light = low water
Vacuum & S team C ontrol

5
1) REMOVE TANK LID
ØLift both silver handles to remove lid
2) ADD WATER
1) Steam Reservoir Tank
ØLift lid and add water (tap water)
2) Va c u u m C o l l e c t i o n Ta n k :
ØAdd water to fill mark
ØReassemble into SeaHawk and lid
3) Extraction Bottle
ØAdd water and insert
3) ATTACH HOSE
ØInsert the vacuum hose with the release button on top
4) PLUG INTO ELECTRICAL OUTLET
ØThe SeaHawk should be the only appliance plugged into the power
outlet
ØUse only a 12 gauge / 15AMP rated or higher extension cord
ØIt will take 5 minutes for the SeaHawk to heat and be ready to use
5) ON/OFF –Push BOTH the Steam & Vacuum Button
ØOnce the boiler reaches working pressure, the Orange light will go solid and
the SeaHawk is ready to use
ON/OFF
Vacuum Steam
Quick Start

!
!
6
6) BLEED THE HOSE
Pull the trigger on the hose handle for 10 seconds to BLEED excess water from the hose.
Hold over sink to catch excess water.
ØWhen only steam is released from the hose, your SeaHawk is ready to use
8) VA C U U M
Push the vacuum button on the SeaHawk to turn ON the vacuum.
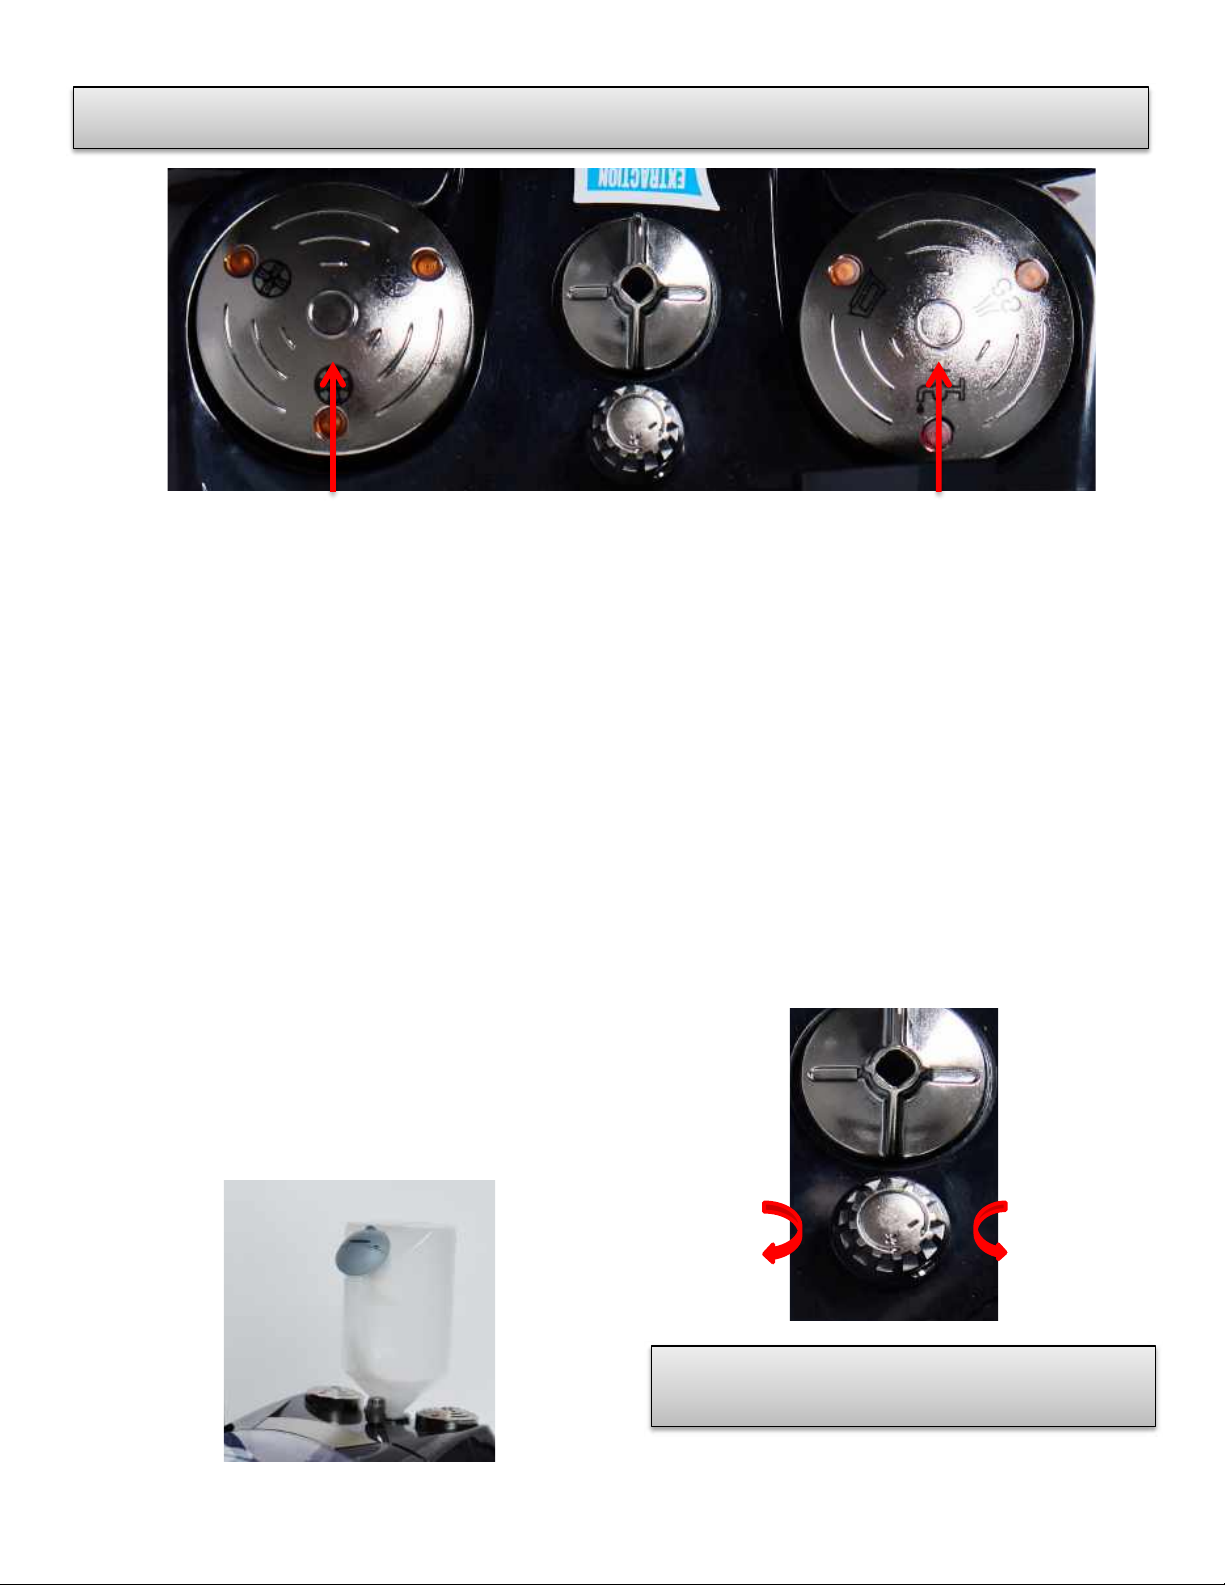
ØOne solid light = LOW vacuum
ØTwo lights = Medium vacuum
ØIf lights are blinking, push the vacuum button again on the SeaHawk
ØPress the vacuum button on the hose handle to activate
ØIncrease or decrease suction, push and HOLD the vacuum power
button on the handle
ØTo turn the vacuum OFF, push the power button on the handle
The vacuum can only be used on low or medium setting while
using the steam or extraction function.
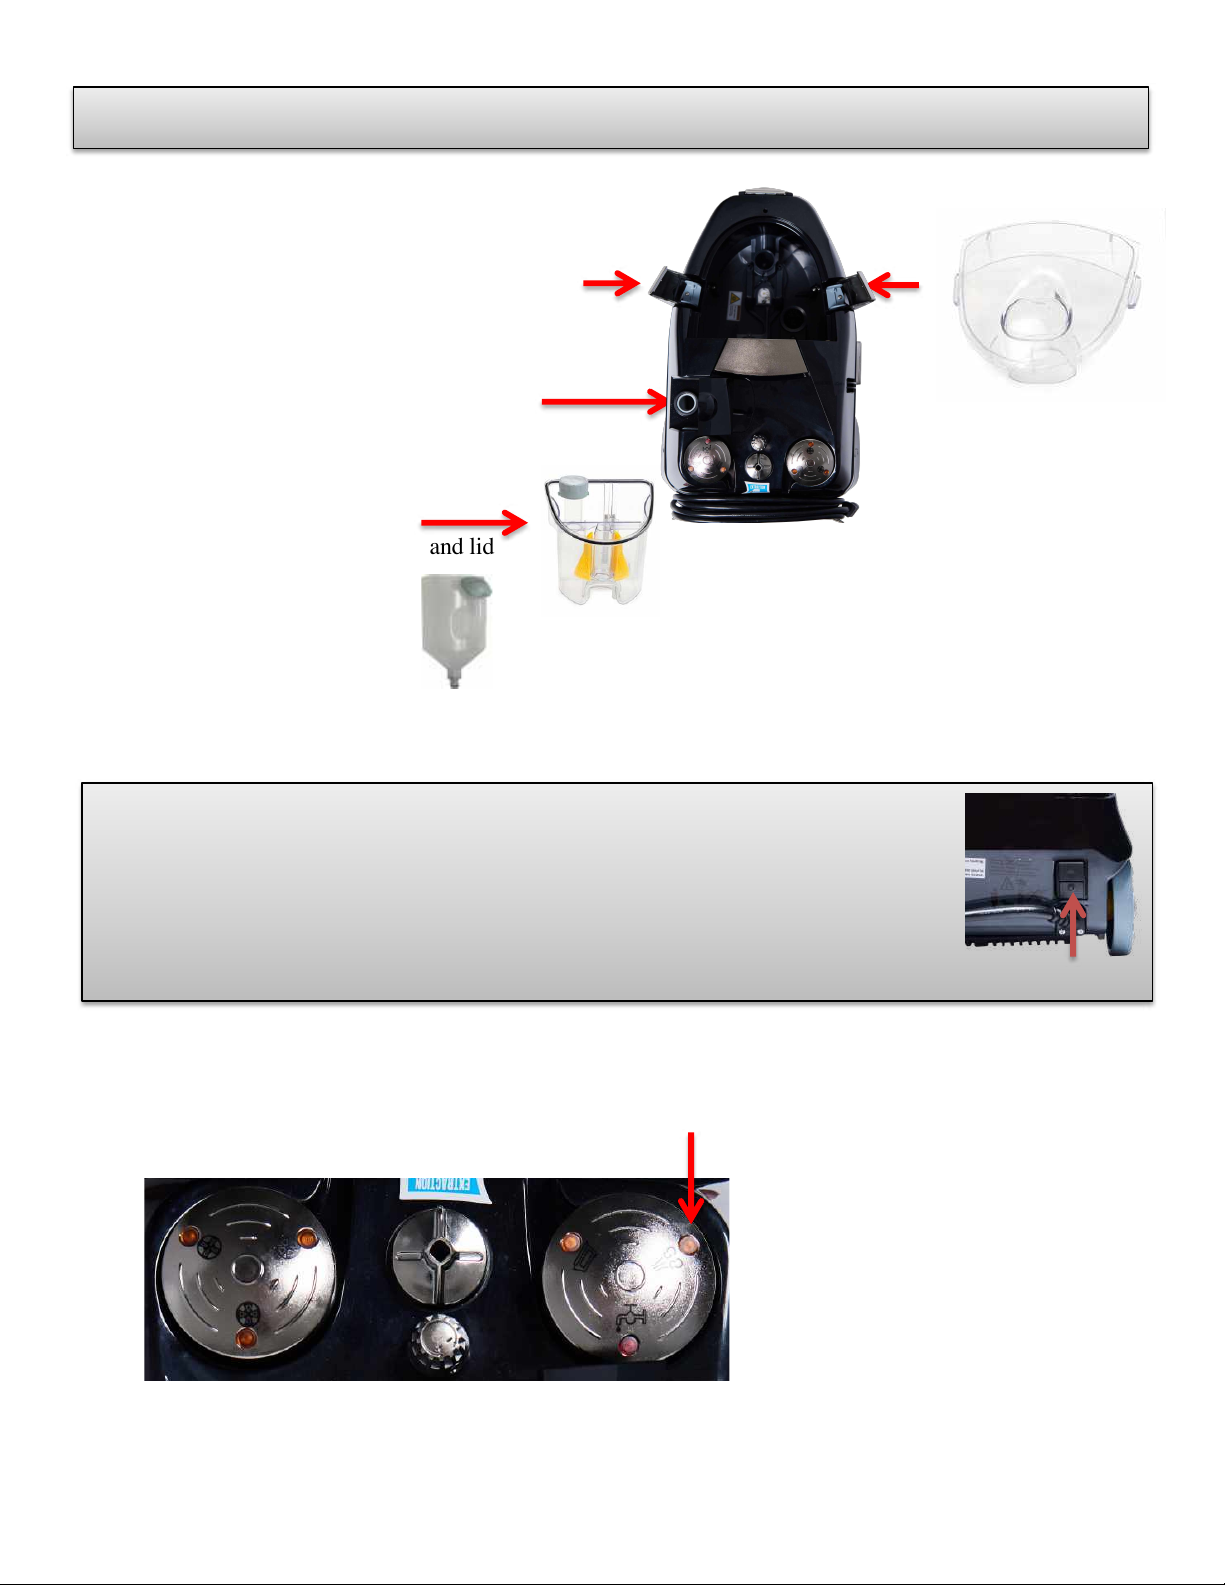
9) EXTRACTION
When activated, the extraction feature sprays hot water along with steam
for deep cleaning.
ØFill extraction bottle with water and insert on back of the SeaHawk.
ØActivate: Push and hold the button on the hose handle
ØThe light on the handle turns ON during extraction mode
10) REFILLING
ØWhen your SeaHawk runs low on water, the Red low water light on the SeaHawk
comes on and the steamer will start beeping
ØPush the steam button on the SeaHawk to reset the alarm
7) STEAM CONTROL DIAL controls the amount of steam released.
ØIncrease steam pressure by turning the dial toward the (+) sign
ØDecrease steam pressure by turning the dial toward the (-) sign
ØTurning the dial all the way to (-) is the lowest possible setting
and no steam will be released from the hose
Quick Start

7
SHUT DOWN
1) Push ON/OFF button.
2) Clean vacuum collection Tank.
3) Remove the collection tank and drain contents from the vacuum reservoir and steam
reservoir tank. Clean the tank and remove the yellow nebulizers for additional cleaning.
Rinse with hot water until all residue and stains on the tank wall have been removed.
4) Empty hot water / extraction bottle.
5) Clean the exterior of the SeaHawk with a wet cloth.
ØDo not use solvents or detergents that could damage the plastic surface
ØUse hot soapy and water to clean brushes and nozzles
If you have been cleaning a dirty or greasy surface, it is recommended that you clean the
vacuum hose before shutting down.
ØClean vacuum hose by activating the vacuum mode and suck water through the hose
HELPFUL HINTS
1) Set steam control to low or medium steam pressure for most cleaning applications. High
steam pressure is best utilized for only extreme stains or dirty areas.
2) Use tap water for quicker heating. You may use distilled water, but the SeaHawk will take
longer to heat.
3) Use steam only when sanitizing a surface area.
4) Extraction is best used for deep cleaning including floors and upholstery.
After each cleaning, prepare the SeaHawk for its next use,
by refilling all water and vacuum tanks.
Shut Down & Helpful Hints

NO ATTACHMENT Carpet / Curtains / Furniture
Mattresses / Soft Surfaces
Windows / Mirrors / Walls
All hard surfaces
Use the nylon brush to agitate the
surface area before extracting
Squeegee / Brush Insert
Squeegee Insert
Nylon Brush Insert
Carpet / Curtains / Furniture
Mattresses / Soft Surfaces
NO ATTACHMENT
Squeegee / Brush Insert
Windows / Mirrors / Walls
All hard surfaces
Small Extraction Nozzle
Large Extraction Nozzle
Squeegee Insert 8
___________________________________________________________
Extraction
Your steam vacuum u s e s a separate reservoir tank to inject water in to th e steam as
it’s released from the extraction nozzle. Use the extraction function in combination
with the vacuum for deeper cleaning of soft and hard surfaces.
ØUse the extraction nozzle for cleaning furniture, curtains, mattress, windows,
walls, and floors.
ØAfter cleaning, use the vacuum to remove excess water for faster drying.

Hose
(Part # SV7778)
Extension Wands –Set of 2
(Part # SV1594)
Floor Brush (# SV0596)
Small Extraction Nozzle
(Part # SV7314)
Large Extraction Nozzle
(Part # SV8011)
9
Accessories (to order visit www.ussteam.net)
Long Jet Nozzle
(Part # SV5439)
Short Jet Nozzle
(Part # SV7302)
Va c u um A t t a c h me n t
(Part # SV5645)
Brushes
1” Round Nylon
1” Round Brass
3” Round Nylon
3” Triangle Nylon
3” Round Brass
Squeegee / Brush Insert
(SV#8012)
Squeegee Insert
(SV#8015)
Squeegee Insert / (SV#7329)
Nylon Brush Insert (SV#7664)
Squeegee / Brush Insert (SV7326)
Extraction Bottle (#SEA5168)

10
PROBLEM SOLUTION
Beeping
1) The steam tank or the extraction bottle is out of water. Refill
both tanks and restart the SeaHawk using the ON/OFF Button.
2) The vacuum collection tank is full. Empty and refill with clean
water.
Orange light is flashing This is OK, it means the boiler is working and heating.
No power
The SeaHawk should be the ONLY appliance plugged into the
electrical outlet:
ØCheck the fuse box for tripped circuit breaker
If using an extension cord, it must meet the following requirements:
ØUse Minimum 12 gauge / 15AMP
Ø25 ft. max length
No steam coming out of hose
1) Is the water in the boiler heated and the orange indicator light
changed to solid?
2) Is the steam control adjustment knob turned to the closed
position?
3) Check the child lock on the hose handle.
No response from buttons on
hose handle
Check and reconnect the hose
During the warm-up phase the
alarm signals
The
boiler has pulled all the water from the steam reservoir tank:
ØRefill the steam reservoir tank
ØPush the ON/OF button on the console to reset alarm
When attempting to use the
extraction function, the alarm
signals
Is the extraction bottle inserted on the SeaHawk correctly?
ØCheck water in the extraction bottle
ØCheck and reconnect hose
Va c u u m p o we r i s i n s u f f i c i e n t
Empty and replace water in vacuum collection tank.
ØCheck the hose and accessory connections
ØCheck the hose and accessories for particle blockage
The hose or accessories have an
unpleasant odor Dirt has accumulated in the hose or filter: Clean both and reinsert.
Troubleshooting

11
AFTER EACH USE
1) Use hot, soapy water to clean brushes and nozzles.
2) Clean vacuum hose by activating the vacuum mode and suck water through the hose.
3) Clean the exterior of the SeaHawk with wet cloth.
ØDo not use solvents or detergents that could damage the plastic surface
4) Clean Vacuum Collection Tank:
ØRemove the tank and drain water from the vacuum and reservoir tanks
ØClean the tank and remove the yellow nebulizers for additional cleaning
ØRinse with hot water until all residue and stains on the tank wall have been removed
EVERY 6 MONTHS
ØDe-Scale the boiler
YEARLY
ØReplace the O-Rings on hose handle and extension wands
31
Look foward to it.
31
Look foward to it.
Hose Handle Extension Wands
Maintenance
WA R N I N G
The yellow nebulizers may be removed for cleaning but must be
replaced before using. Using the SeaHawk without nebulizer filters
could lead the serious damage.

12
To extend the life of your SeaHawk, we recommend de-scaling the boiler and the electronic
sensor every 6 months. After prolonged periods of activity, lime scale deposits build up in the
boiler and can make the boiler unusable.
How to De-Scale:
1) Unplug from the wall.
ØThe boiler should be cooled to room temperature
ØRemove the vacuum collection tank and empty
2) Turn the steamer upside down, identifying the boiler cap.
ØUnscrew by turning counter-clockwise and remove
ØClean the sensor on the boiler cap with a scouring pad removing any encrusted deposits
3) De-scaling the boiler:
ØPour de-scaling solution consisting of 1 cup of vinegar and 1 cup of water into the boiler
and replace the cap by turning clockwise until tight
4) Turn the SeaHawk ON for approximately 1 minute, then turn off.
ØLeave de-scaling solution in the boiler for 60 minutes
6) Empty the de-scaling solution from the boiler by turning over the SeaHawk and removing
cap draining the excess de-scaling solution.
7) Fill boiler with tap water to rinse.
8) If the rinse water is clear of mineral deposits, then the SeaHawk is ready for use.
ØYou may ne e d t o re-rinse the boiler if the water is not clear
De-Scaling

13
Read all instructions before using this steam cleaner.
WA R N I N G : S T E A M G E N E R AT E D B Y T H E S T E A M C L E A N E R I S E X T R E M E LY H O T A N D W I L L
CAUSE INJURY IF IT COMES IN CONTACT WITH THE SKIN OR EYES. USE AS DIRECTED BY
THE MANUAL AND ONLY AIM THE STEAM HANDLE AT THE CLEANING AREA.
ØDO NOT leave the steam cleaner plugged in while unattended
ØTurn off all controls and unplug the electrical cord when not in use
ØDO NOT use with a damaged cord or plug
ØNEVER attempt to disassemble this product in a way not instructed in this manual
ØDO NOT handle the electrical plug with wet hands
ØDO NOT use near children
ØDO NOT pull or carry by cord
ØKeep body, hands, and feet away from nozzle or brush steam / Steam can cause burns
ØALWAYS set safety switch on hose handle into the locked position when not in use
ØNot setting safety switch to locked position could result in an injury
ØALWAYS test a small area before cleaning a large area on any type of surface to make sure no damage will
occur
ØDO NOT expose machine to freezing temperatures while not in use
ØDO NOT store gasoline or other flammable vapors and liquids in the vicinity of this or any other appliance
ELECTRICAL CONNECTIONS
The steam cleaner uses 110 Volts and will pull 13.1 Amps. It should be the only appliance plugged into an
outlet.
ØUse only a 12 gauge / 15AMP rated or higher extension cord
ØAny alteration of electrical cord supply on this steam cleaner will void all warranties
ØMake sure all switches on front of unit are in the off position before plugging unit into electrical outlet
ØFor circuit breaker protection, plug the unit into an outlet isolated from other equipment or turn the other
equipment off while using the steam cleaner
ØThe combined electrical amperage of other equipment and the steam cleaner together may cause a circuit
breaker to trip.
ØAlways press the power button to OFF before you unplug the unit
ØRemoving the ground prongs from the power cord will void any and all warranties and can cause risk of
shock or injury
In order to reduce the risk of fire, electric shock, personal injury or damage to property, follow these
instructions carefully. When using electrical appliances, basic safety precautions should be followed.
KEEP FOR YOUR RECORDS. THIS MANUAL MUST BE RETAINED FOR FUTURE REFERENCE.
PLEASE READ, UNDERSTAND AND FOLLOW THE INSTRUCTIONS AND WARNINGS
CONTAINED IN THIS MANUAL BEFORE USING THIS VAPOR STEAM CLEANER.
Notices

14
SERVICE AND SUPPORT
Many issues can be resolved by calling our service center at (817) 888-8313 / Monday-Thursday 9-5 p.m. CST,
and Friday 8-12 p.m.
WA R R A N T Y
Yo u r s t e am e r c o m e s w i t h a w a r r a nt y w hi c h b e c o me s e ff e c t i v e o n t h e d a t e o f p u r c ha s e f r o m U S S T E AM a n d i s
granted to the initial customer and is nontransferable. Any claims under this warranty must be made before the
end of the applicable warranty period.
Yo u r s t e am e r i s w a r r a nt i e d f o r a p e r i o d o f 1 -year from original date of purchase for defective material, parts,
and workmanship. The warranty EXCLUDES accessories, attachments and normal wear parts, when used in
accordance with operating instructions under normal and reasonable use.
During the term of the warranty, all labor and parts to place your product in proper operating condition will be
a covered service. You have an EXTENDED warranty covering 2 additional years for defective boiler or
heating element. Extended warranty does not include labor cost and return shipping. US STEAM’s
responsibility is limited to repair, replacement, credit or refund, any of which may be selected by US STEAM
at its sole discretion.
The limited warranty covers only defects arising from normal use and does not include malfunctions or failures
arising from: misuse, abuse, neglect, alteration, usage not in accordance with user manual and instructions,
depletion of consumables, acts of nature, or damage caused by repairs where such repairs were made without
US STEAM’s express approval.
Warranty is Void:
ØDamage due to misuse, abuse, negligence, and normal wear related to the product usage
ØAny repair or attempted repairs outside of the US STEAM Service Center will void all warranties
ØLack of proper maintenance or use not in accordance with the provided instructions and/or owner’s manual
ØDisassembly or attempted disassembly of your steamer
ØIf the steamer is designated for residential but utilized in a commercial application
ØUsing an improper electrical source such as using an extension cord that is not at least 12 gauge / 15AMP
rated or higher extension cord
ØAdding chemicals or cleaning solution to the boiler or reservoir tank
ØParts subject to wear and tear not determined defective or items such as O-rings, brushes, hoses, accessories
GOVERNING LAW, JURISDICTION AND COSTS
All disputes arising out of or related to the warranty shall be governed by the laws of the State of Texas. In the
event the customer and US STEAM® LLC are unable to resolve any customer dispute, and any collection
action, suit, or other judicial proceeding is commenced, the prevailing party in any such action, suit, or
proceeding shall be entitled to recover any cost and attorney fees incurred.
All repairs must have an RMA.
RMA’s can be requested from the website: https://ussteam.net/repair
Steps for Repair:
1. Request RMA.
2. RMA number will be emailed along with a shipping label.
3. Box up your steamer and include Repair Form.
4. Go to FedEx for drop off.
5. DO NOT SEND IN A REPAIR WITHOUT AN RMA.
Warranty & Repair

Restaurant
Hospital
Floors, Kitchen, Grills & Bathrooms
Chemical free cleaning in all food prep and storage areas.
Patient Beds, Wheelchairs & Curtains
Steam is a proven killer of virus and infection causing germs
Delis, Freezers & Butcher
Chemical free cleaning in areas of food storage and preparation.
Desk, Tables & Partitions
Cleaning with steam guarantees a clean, germ-free work environment increasing
productivity, employee retention and reducing sick days.
High Touch Areas, Bathrooms, Locker Rooms & Gym Mats
Steam kills on contact, no dwell time.
Equipment, Lockers & Saunas
Kill viruses and germs found on workout equipment and gym floors.
Toy s, P l aygrounds & Beds
Steam clean high touch areas where kids pass germs. Extreme cleaning with
steam can reduce sick days for kids and employees.
Seats & Floors
Combine steam and extraction into one system for more efficient detailing.
A Better Way to Clean
Grocery
Office
School
Gym
Day Care
Automotive
US STEAM®
2440 Chamber Street, Ste A
Ve n u s , T X 7 6 0 8 3
www.ussteam.net
(817) 297-7745
Other manuals for SeaHawk
2
Table of contents
Other US Steam Vacuum Cleaner manuals