usha MG 2853 User manual

MIXER GRINDER
MG 2853, MG 3753
INSTRUCTION MANUAL

2
Dear Customer,
Congratulations!
You are now the proud owner of Usha Mixer Grinder.
Innovatively designed, using only the highest quality material and components, your
Usha Mixer Grinder is designed for years of trouble free performance.
Please read this Instruction Manual carefully before using and keep it cautiously after
reading for future reference.
Best Wishes

3
DO’S
- Place your MG at a convenient height so that you can operate it easily. You should
be able to look down into the attachments to check the circulation of ingredients.
- Clear out some space around the machine. You will need it for keeping various
items required while operating the MG.
- Keep the MG away from direct heat or sun.
- In dry grinding, friction may heat up the jar. It has nothing to do with the motor, so
do not worry.
- Remember MG operates at optimum efficiency at the specified voltage only. Wide
voltage fluctuations during operation may affect quality of grinding even though the
motor may still be safe. If your area faces such periodic fluctuations and if you
cannot get a voltage stabilizer try to operate the machine during steadier voltage
stretches.
- Hold down the jar cover lightly with hand while mixer is in operation.
DON’TS
- Do not run the machine unless jar is in position. Lids too should be firmly placed.
- Do not allow children to handle MG.
- Do not burden motor with loads heavier than those specified in the instructions.
- Do not run MG without any load.
- MG should not run for more than 30 minutes at a stretch normally. Stop for 10
minutes before starting again. When hot air comes out of the ventilator, switch it off
for a while.
- Your MG cannot substitute for a storage container. So avoid storing food in
the jar.
- Never lay any thin plastic sheet or cloth under the basic unit. It may get sucked up
and block ventilation holes in the base.
- Blades should not be left inside the jar.
- Do not grind sugar in your MG. It may cause damage to the MG motor.
- Do not attempt to repair MG at home or allow any unauthorized person to do it
either. In the event your MG needs attention, contact Usha Care.
IMPORTANT PRECAUTIONS

4
IDENTIFICATION OF PARTS
BASIC UNIT
1. Basic Unit
2. Speed Switch with pulse
3. Overload Switch
4. Cord Plug
5. Spatula
LIQUIDISING JAR (large)
6. Wet Grinding Jar Assembly
7. Shaft Katori
8. Lid 1500 ml Jar
9. Ring Liquidising Jar
10. Coupler
11. Wet Grinding Blade
GRINDING JAR (medium)
12. Dry Grinding Jar Assembly
13. Dry Grinding Jar lid
14. Dry Grinding Rubber Ring
15. Dry Grinding Blade
SMALL QTY. GRINDING
JAR (Small)
16. Small Dry Grinder
Jar Assembly
17. Blade / Shaft Assembly
18. Small Jar lid
19. Small Rubber Ring
20. Blade Knob
BASIC UNIT /
BLENDING JAR
MIXER / DRY
GRINDER JAR

5
TECHNICAL DATA
HOW TO FIT JARS
Hold the jar in one hand and check if the blade moves freely and rotates. Place
ingredients in the Steel Jar. Cover the Jar with dome / lid. Place the jar on the basic
unit, press it slightly downward and
then turn it clockwise to lock it in the
top body socket. Plug in, support
cover gently by hand and switch on
using the slowest speed (position
1 of switch) and then moving on to
higher speeds as per requirements
(position 2, 3 of switch). Switch off
after operation. For unlocking the
jar, press the jar downward, then
turn it anti clockwise and lift the jar
from the basic unit.
S. NO. Items Details
1. Model Type and no. Usha Mixer Grinder MG 2853, MG3753
2. Voltage 230C AC, 50 Hz
3. Power Consumption 500W
4. Motor Universal 500W, 18000 RPM Approx.
(Under no load)
5. Speed Control 3 Speed with rotary action switch and
integrated 4 inching position for whipping.
6. Material of Jars Stainless steel - polished
7. Material of blades Stainless steel – polished
8. Overload protector Resetting type

6
HOW TO USE YOUR MIXER GRINDER
Usage of Control Panel
The control panel is a 3 speed rotary switch with an inbuilt 4” inching position for whipping
operation. For Whipping, turn the rotary switch in the anti clockwise direction.
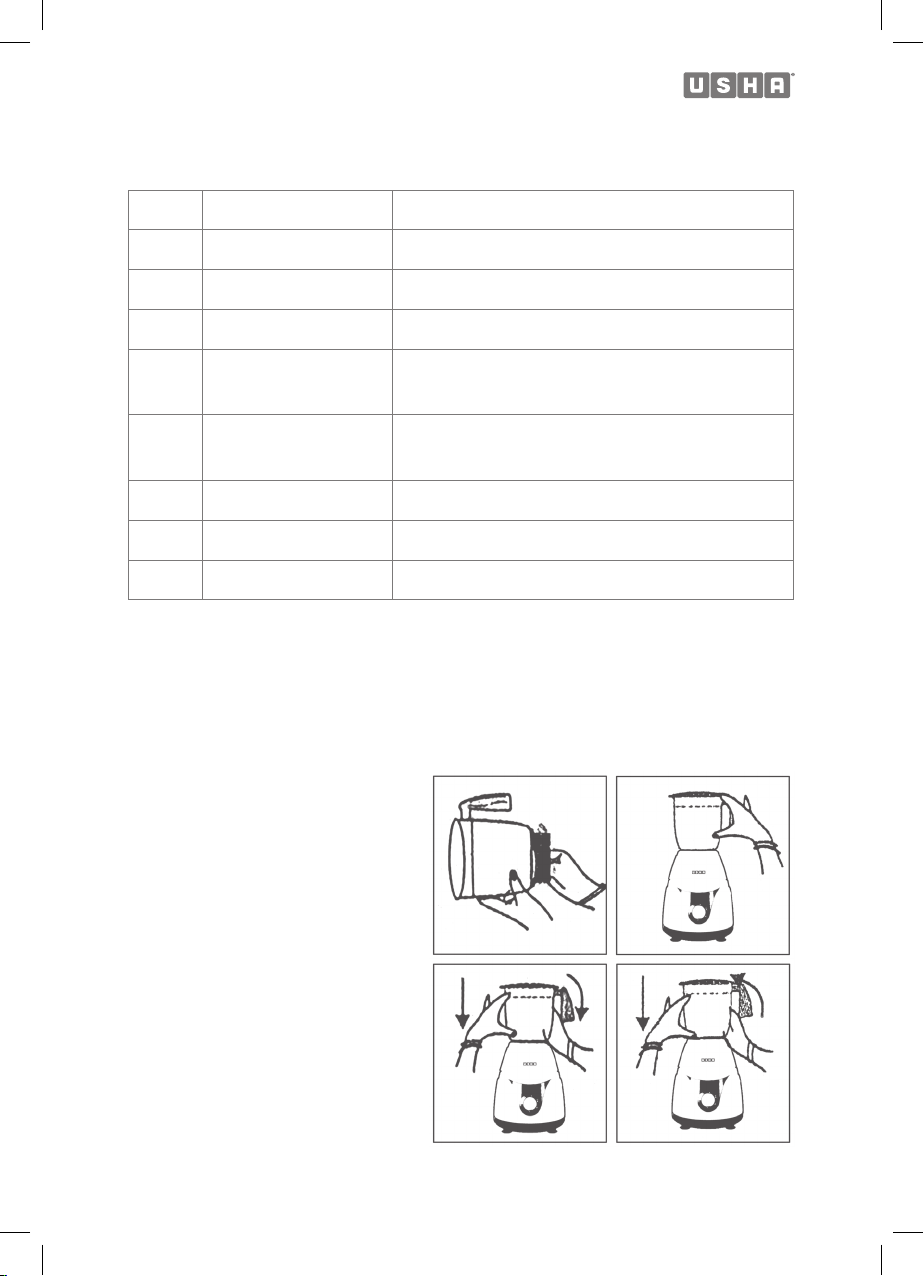
For the usage of control panel refer following table / figures.
FUNCTION & PURPOSE IMPORTANT INSTRUCTIONS
DRY GRINDING
(To be done in medium jar)
Roasted Coffee, Red Chili, Pepper,
Bajra, Coriander Seed, Wheat for
Porridge etc.
Capacity:
Min.: Up to blade level,. Max.: 1/2 jar.
1. Ensure that the jar is absolutely clean
and dry.
2. While dry grinding, friction may heat
up the jar, it has nothing to do with the
motor. So don’t’ worry.
3. For fine grinding, sieve ground
substance through a fine nylon sieve
for consistency required. Leftover
can then be put in the jar, regrind and
sieve again.
WET GRINDING / LIQUIDISING
(To be done in large Jar)
Wet grinding for Urad Dal paste for
idli and Dosa, for soaked Raw/ boiled
rice, Liquidising for fruit juices, soups
cocktails, mild shakes with fresh fruits.
etc.
Capacity:
Min.: 1/3 jar, Max.: 2/3 jar.
1. Fix the dome on jar whenever in use.
2. If ingredients need to be stirred during
use, stop mixer, insert spatula and stir.
You will find that such stirring may be
necessary in wet grinding.
3. To remove blade assembly, gently
unscrew in clockwise direction.
P
0
1
2
3
P
0
1
2
3
P
0
1
2
3
P
0
1
2
3
P
0
1
2
3

7
Whipping / Churning
(To be done in large Jar)
Frothy hot and cold coffee, fluffy
Omelette, stiff egg whites, fresh cream
and also butter churning and mayonnaise
etc.
Capacity:
Min.: Up to blade level, Max.: 3/4 jar.
1. While whipping, use the rotary switch
by turning it in anti clockwise direction.
2. The pulse is a momentary position
and as long as it stays in position the
motor will run.
3. For whipping & butter churning use
speed 1 only.
CHUTNEY GRINDING
(To be done in Small Jar)
Chutney grinding, small quantity dry
grinding etc.
Capacity:
Min.: Up to blade level, Max.: 1/3 jar
1. Hold the cover of jar firmly with your
hands as the jar may vibrate.
HOW TO FIX THE BLADES
To fit the blade, hold the jar coupler on the underside of the jar with one hand and hold
the plastic nut of the blade with the spanner (provided on the handle of spatula). Tighten
by rotating plastic nut anti clockwise, till the blade is firmly locked.
OVER LOAD PROTECTOR
Your mixer grinder is protected against sudden overload. In
case such a situation does occur, your MG will automatically
trip off and overload indicator will be ‘ON’ and hence protect
the motor. To restart the machine, please wait for 2-3
minutes to allow the motor to cool down and also remove
the cause of overload. The red button of the circuit breaker
switch located on the back side of the control panel mixer
grinder has to be pressed for reoperation.
CLEANING OF STAINLESS STEEL JARS
To prevent the shaft from getting stuck, once in a fortnight fill about half jar with luke
warm water and add little mild detergent (do not use abrasive cleaning powders since
these will scratch the jar) and put on cover and stopper. Switch on the motor and run it at
the lowest speed for about 30 seconds. This clears out particles sticking under the blade.

8
To remove blade assembly, gently unscrew in clockwise direction. Cleaning instructions
for Dry Grinding Jar & Chutney Jar are same.
IMPORTANT NOTES
1. Please note that initial empty running of jars will throw out some oil impregnated in
bushes. Therefore, it is advised to thoroughly clean it before actual use.
2. Blending/ liquidizing operation should be done at first speed only. In case a higher
speed is used then chances are that the lid may fly off.
3. Turmeric grinding should be done in medium & small jar only. For this break turmeric
into small pieces before grinding.
4. Before starting the machine for the first time after long gap:
(i) Rotate the motor shaft by hand through the coupler so that it works smoothly.
(ii) After connecting, run machine at speed 1 for few seconds to ensure that the
motor works properly.
(iii) Before fixing the stainless steel jar on the basic unit, rotate jar shaft by hand to
make sure that it turns freely.

9
NOTES

10
NOTES

11
WARRANTY CARD
This appliance is warranted for 2 year on product and 5 years on motor (motor warranty
only applicable for MG 3753) against all manufacturing defects from the date of sale. In
the event of any complaint, please contact Usha Care at Toll Free No. 1800 1033 111.
The warranty is valid only when:
1) The appliance has been installed, used and maintained in accordance with the
instruction manual.
2) The warranty card and cash memo duly signed by the authorized dealer are
presented with the complaint.
3) The appliance has not been opened or tampered with, by any unauthorized
person.
This warranty does not apply for:
1) Damages due to chipping, peeling, plating and denting.
2) Breakage or damage to components made out of Bakelite, Urea, ABS, SAN and
such plastic materials, rubber parts and cord.
3) Normal wear and tear of parts.
4) Damage resulting from accidents, mishandling or negligence on part of the
customer.
Liability for consequential loss or damage is neither accepted nor implied.
S.NO: ______________________________________________________________
CASH MEMO __________________________DATE: _________________________
DEALER’S NAME AND ADDRESS: _______________________________________
___________________________________________________________________
OWNER’S NAME & ADDRESS: __________________________________________
___________________________________________________________________

ISO 9001:2015
Certified Company
This manual suits for next models
1
Table of contents
Other usha Grinder manuals