manuals.online logo
Brands
  1. Home
  2. •
  3. Brands
  4. •
  5. UTV
  6. •
  7. Automobile Accessories
  8. •
  9. UTV Firestorm User manual

UTV Firestorm User manual

Can Am Maverick Firestorm Heater Kit Instructions.
www.utvpartsandaccessories.com 1 800 596 0785 Version 10/31/13
Please read all instructions before beginning installation.
When working on cooling systems always allow vehicles to cool to avoid being burned or scalded by hot coolant.
Always disconnect vehicle’s negative battery lead before working on electrical systems. Please note: Before drilling
any holes check area behind firewall or dash panels to make sure no damage will occur by drilling holes.
Carefully cut out heater hose hole in rubber shield on firewall as shown in Figure 1 by making an X cut with a utility knife
in the rubber shield.
Take the heater support brackets and install U-Nuts onto bracket as shown in Figure 2.
Remove bolt located just behind dash lower panel on center panels as shown in Figure 3. Using factory bolt place
through right heater support bracket then fitting the large ¼”fender washer, install right heater support bracket as
shown in Figure 3. Do not tighten bolt fully, tighten so the bracket still can be adjusted.
Can Am Maverick Firestorm Heater Kit Instructions.
www.utvpartsandaccessories.com 1 800 596 0785 Version 10/31/13
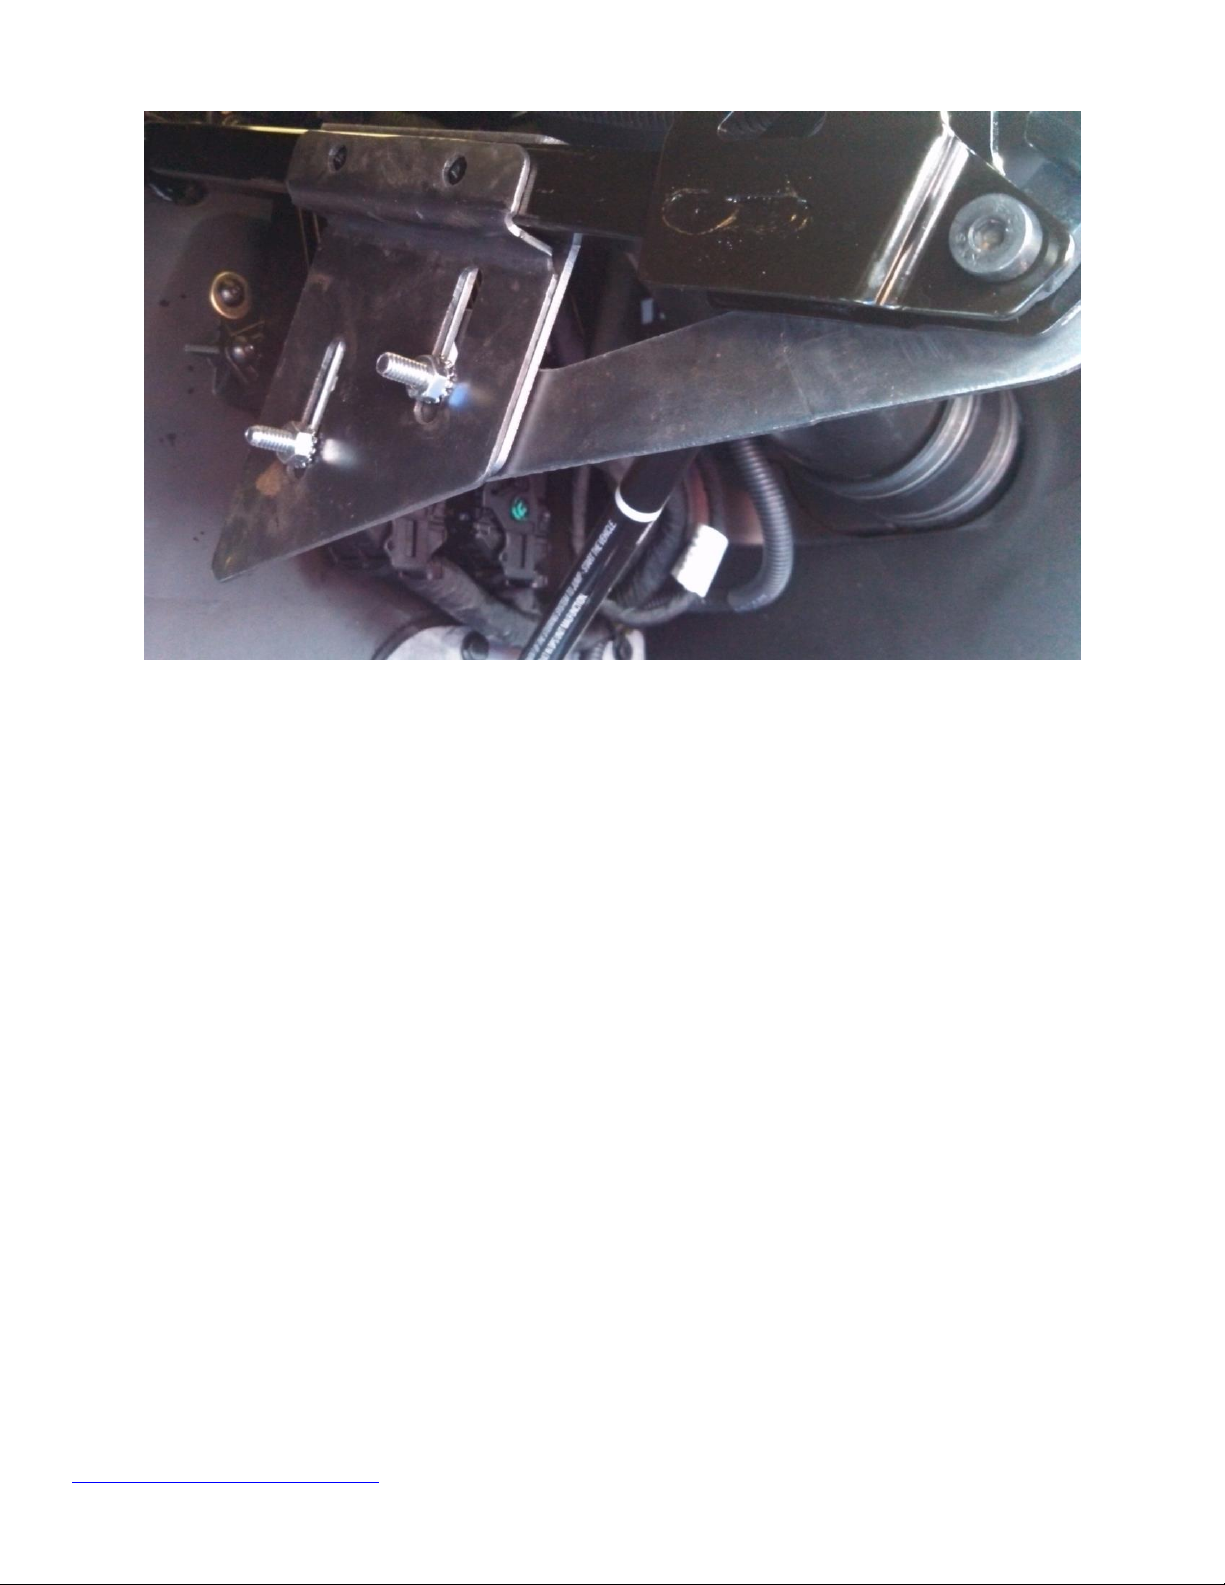
Fit steering support brackets over the Maverick steering support as shown in Figure 4 and attach left heater support
bracket as shown in Figure 5 using two supplied 1/4” x ¾ bolts and nuts. Do not tighten bolt fully, tighten so the bracket
still can be adjusted.
Take main heater mounting bracket and hold up under dash aligning heater support brackets, check mounting
alignment. Adjust heater support brackets as needed, tighten bolts. Do not over tighten right heater support bracket
bolt. Once all adjustment/alignment of heater is completed, use supplied self drilling screws to attach left heater
support bracket to Maverick steering support.
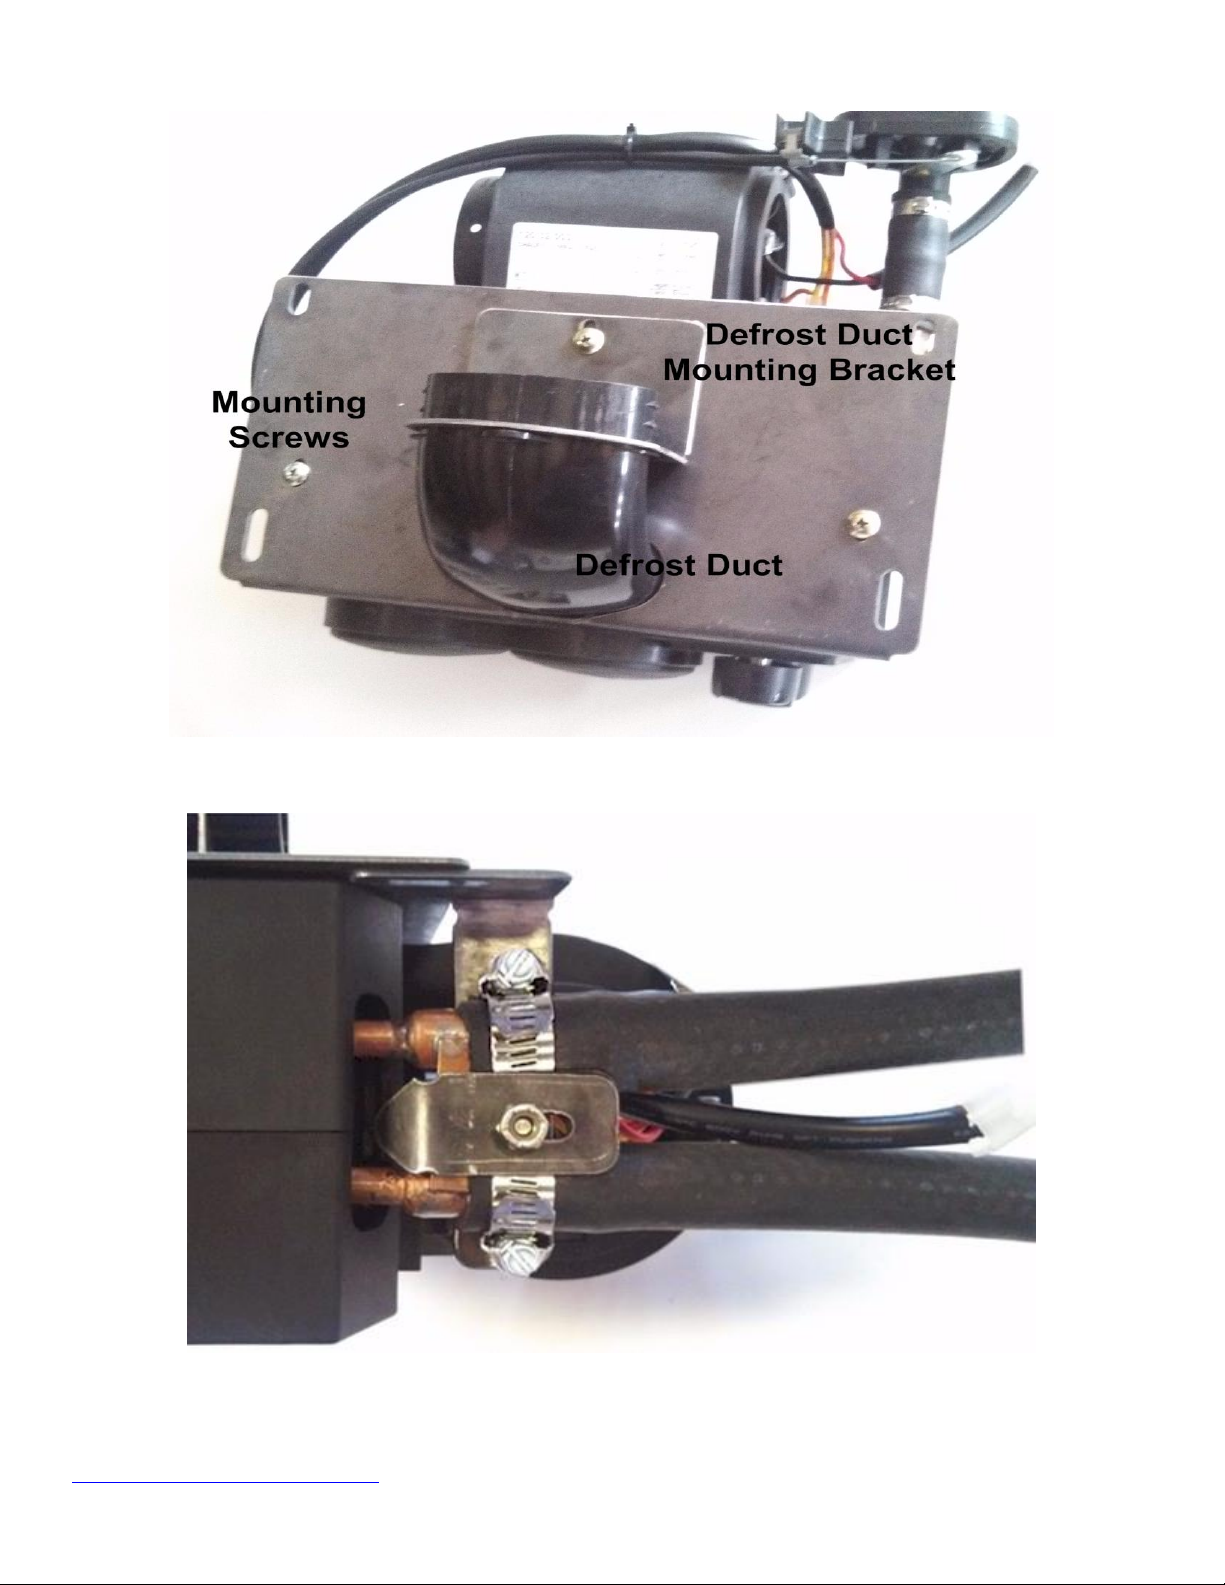
Install main heater mounting bracket, defrost duct with the end tabs toward duct mounting bracket and defrost duct
mounting bracket to heater as shown in Figure 6 and attach using supplied plastic mounting screws on both top and
bottom side of bracket.
Using supplied heater hose, pass each end through the X cuts in the rubber shield from the radiator side of the firewall,
do not cut hose to do this. Attach heater hoses to heater unit pushing the hose completely on the core fitting (Please
note hose clamp placement as shown in Figure 7). Do not install temperature control valve at this time. Install heater
core support bracket to hoses as shown in Figure 7. Do not over tighten through bolt.
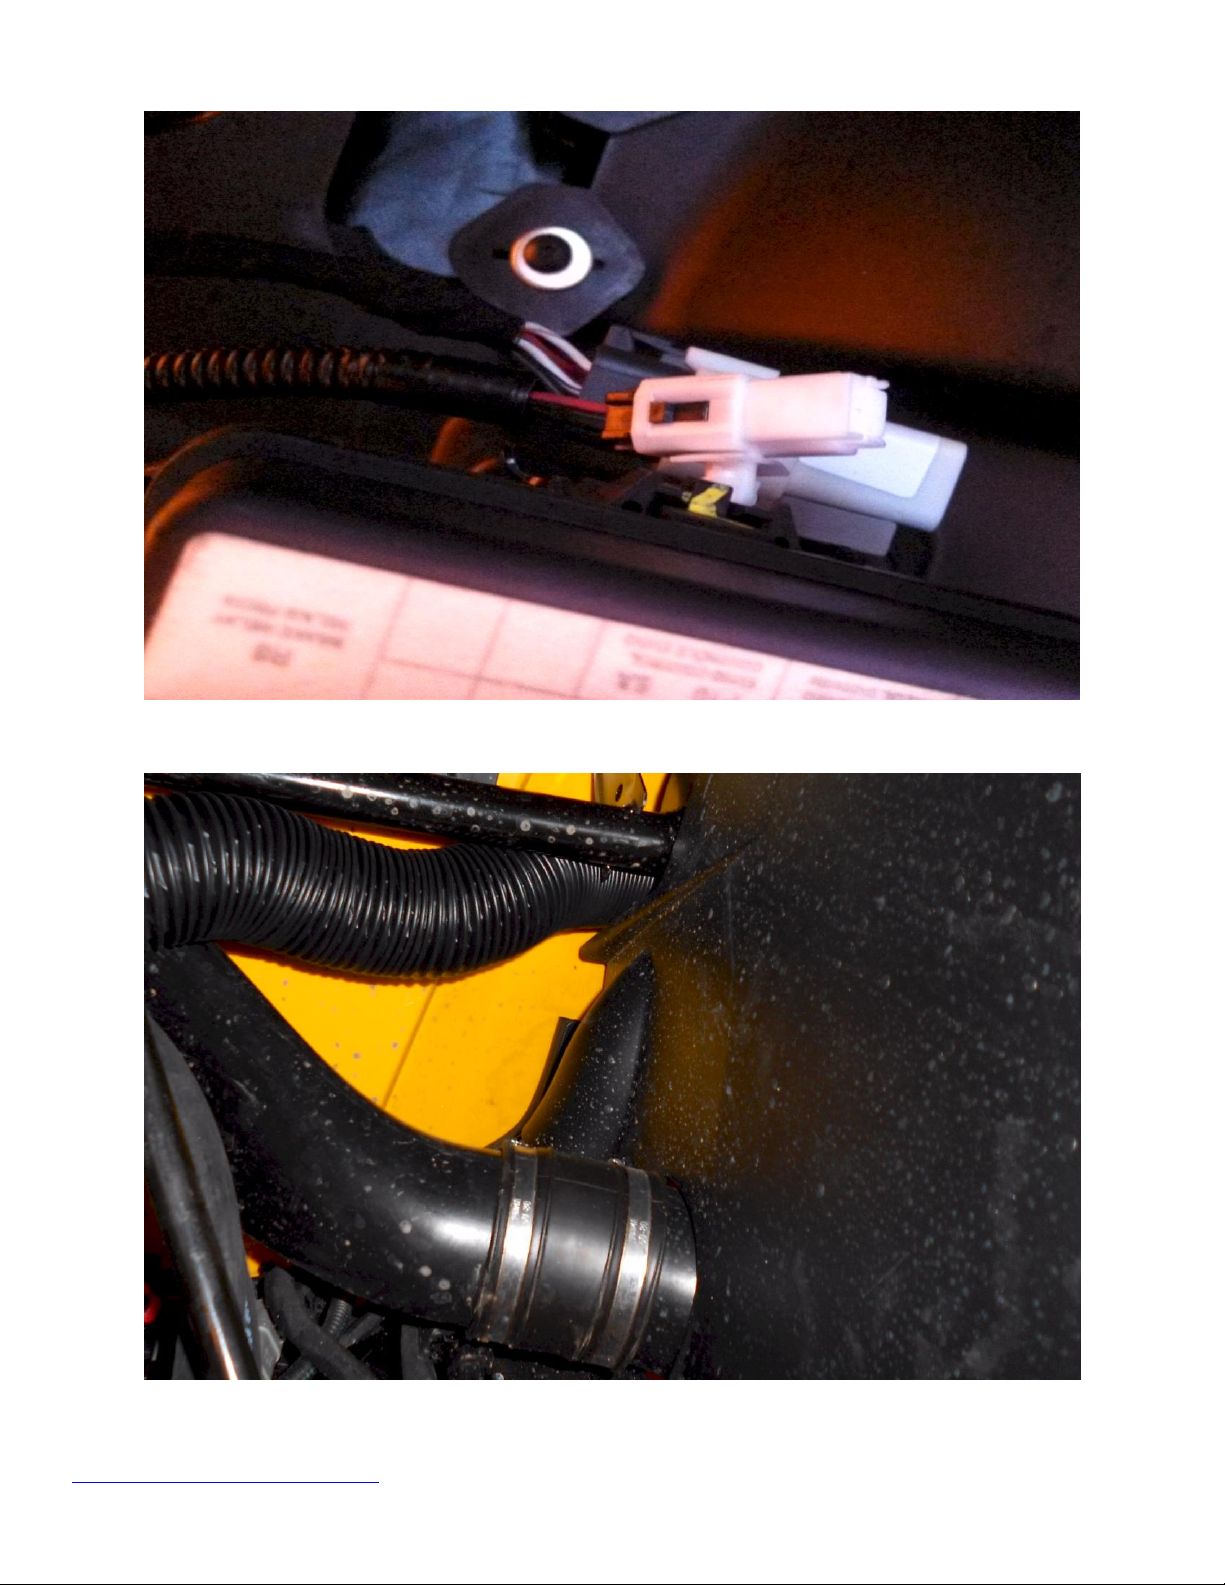
Connect wiring loom to heater, red wire to red and black wire to black. Locate plug near the fuse box as shown in Figure
8, run wiring to the plug and use the quick connector to attach red wire of wiring loom to the red wire at plug. Connect
black wire to one of the self drilling screws used to attach left heater support bracket. Reconnect battery, turn key on to
check fan operation, disconnect battery. Use cable ties as necessary to secure loom as required.
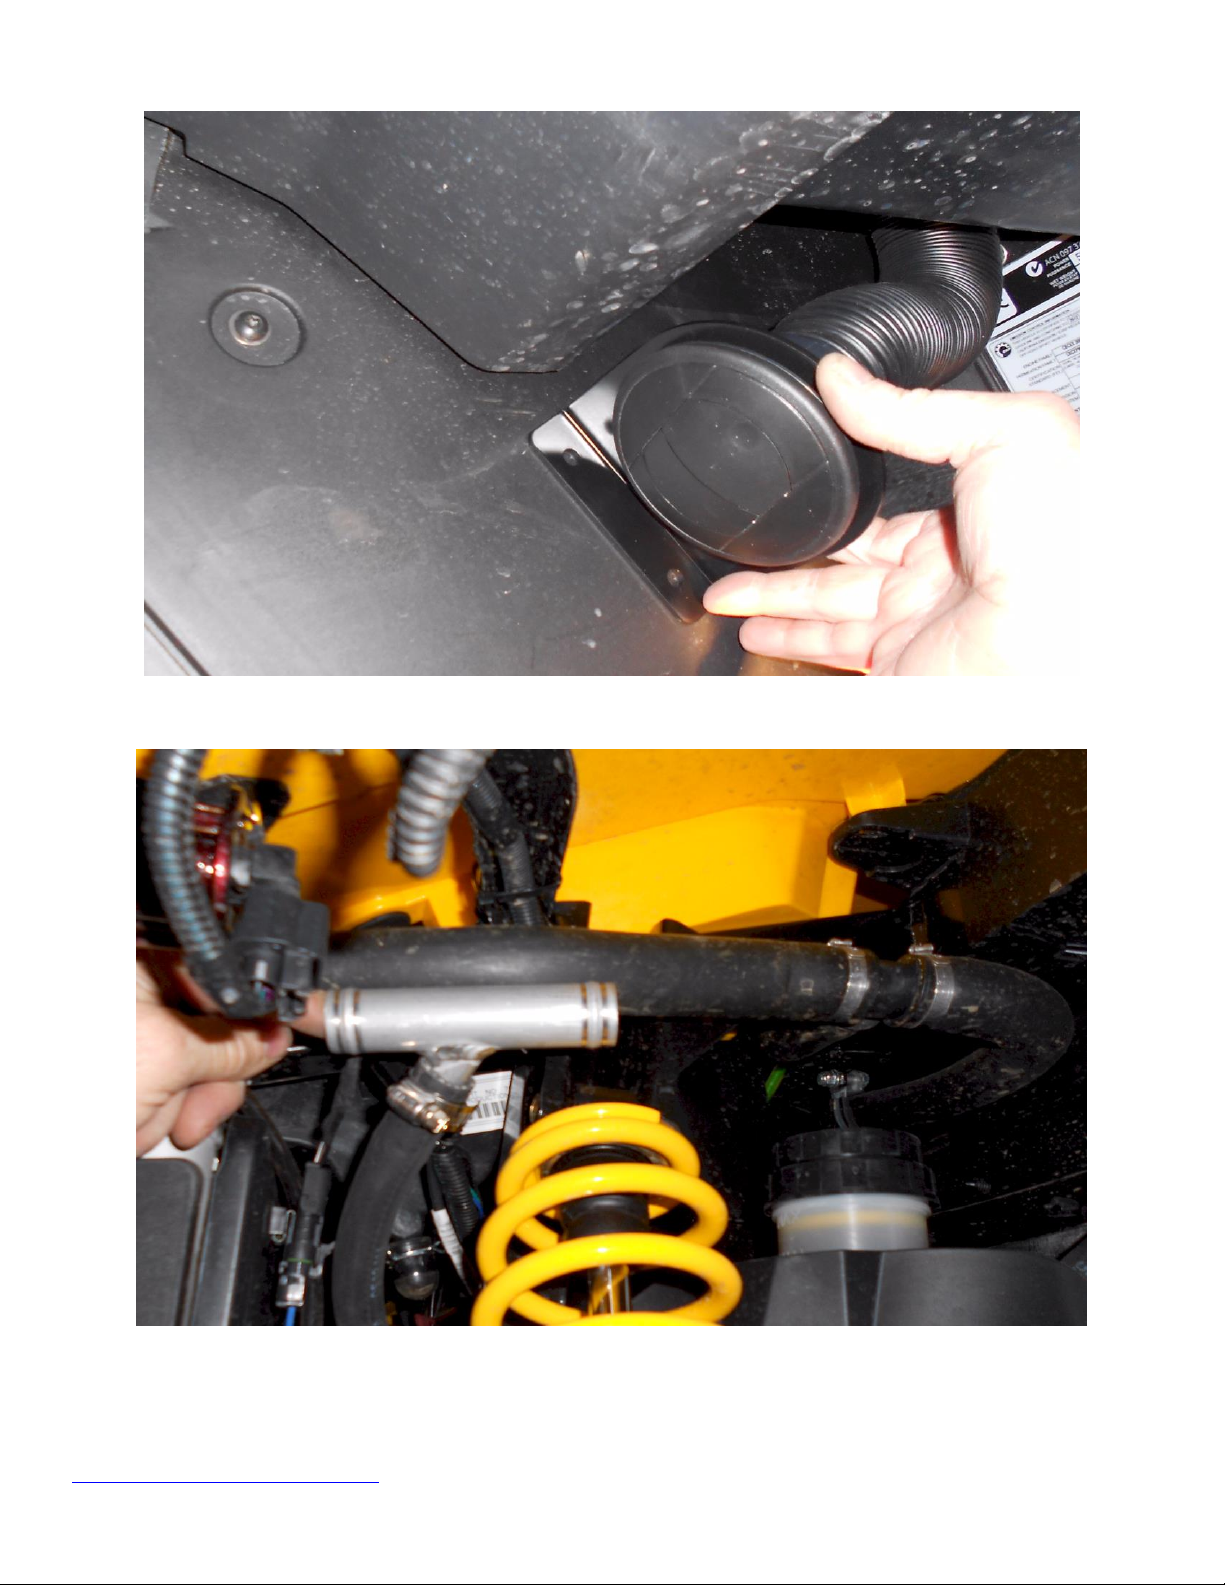
Take 2.5” duct hose and pass up under the dash and over the center section to the passenger compartment as shown in
Figure 9 and 10. Fit vent to vent mounting bracket, connect duct hose to vent, secure with cable tie. Decide where you
wish to mount vent mounting bracket as shown in figure 10. Once position is determined, mark mounting holes and drill
with ¼” drill bit. Use supplied pushpins to secure bracket.
Optional defrost duct install, carry out this step before installing heater. Using defrost vent template as shown in
Figure 13a and supplied hole saw drill holes for vents. Cut into duct hose that runs from heater to passenger
compartment fitting duct Y to duct hose as shown in Figure 13b and 13c and using Figure 13d as a guide, secure hoses
with cable ties. Using stepdowns attach 2” hose to y’s and run each hose out to the vent holes and pass through the hole
in dash and attach to vent inlet and secure with cable ties. Place vents in to holes, push down carefully until vents snap
into place. Important Tip: Cleaning any burs from around hole with a knife will make installing the vent into place easier.
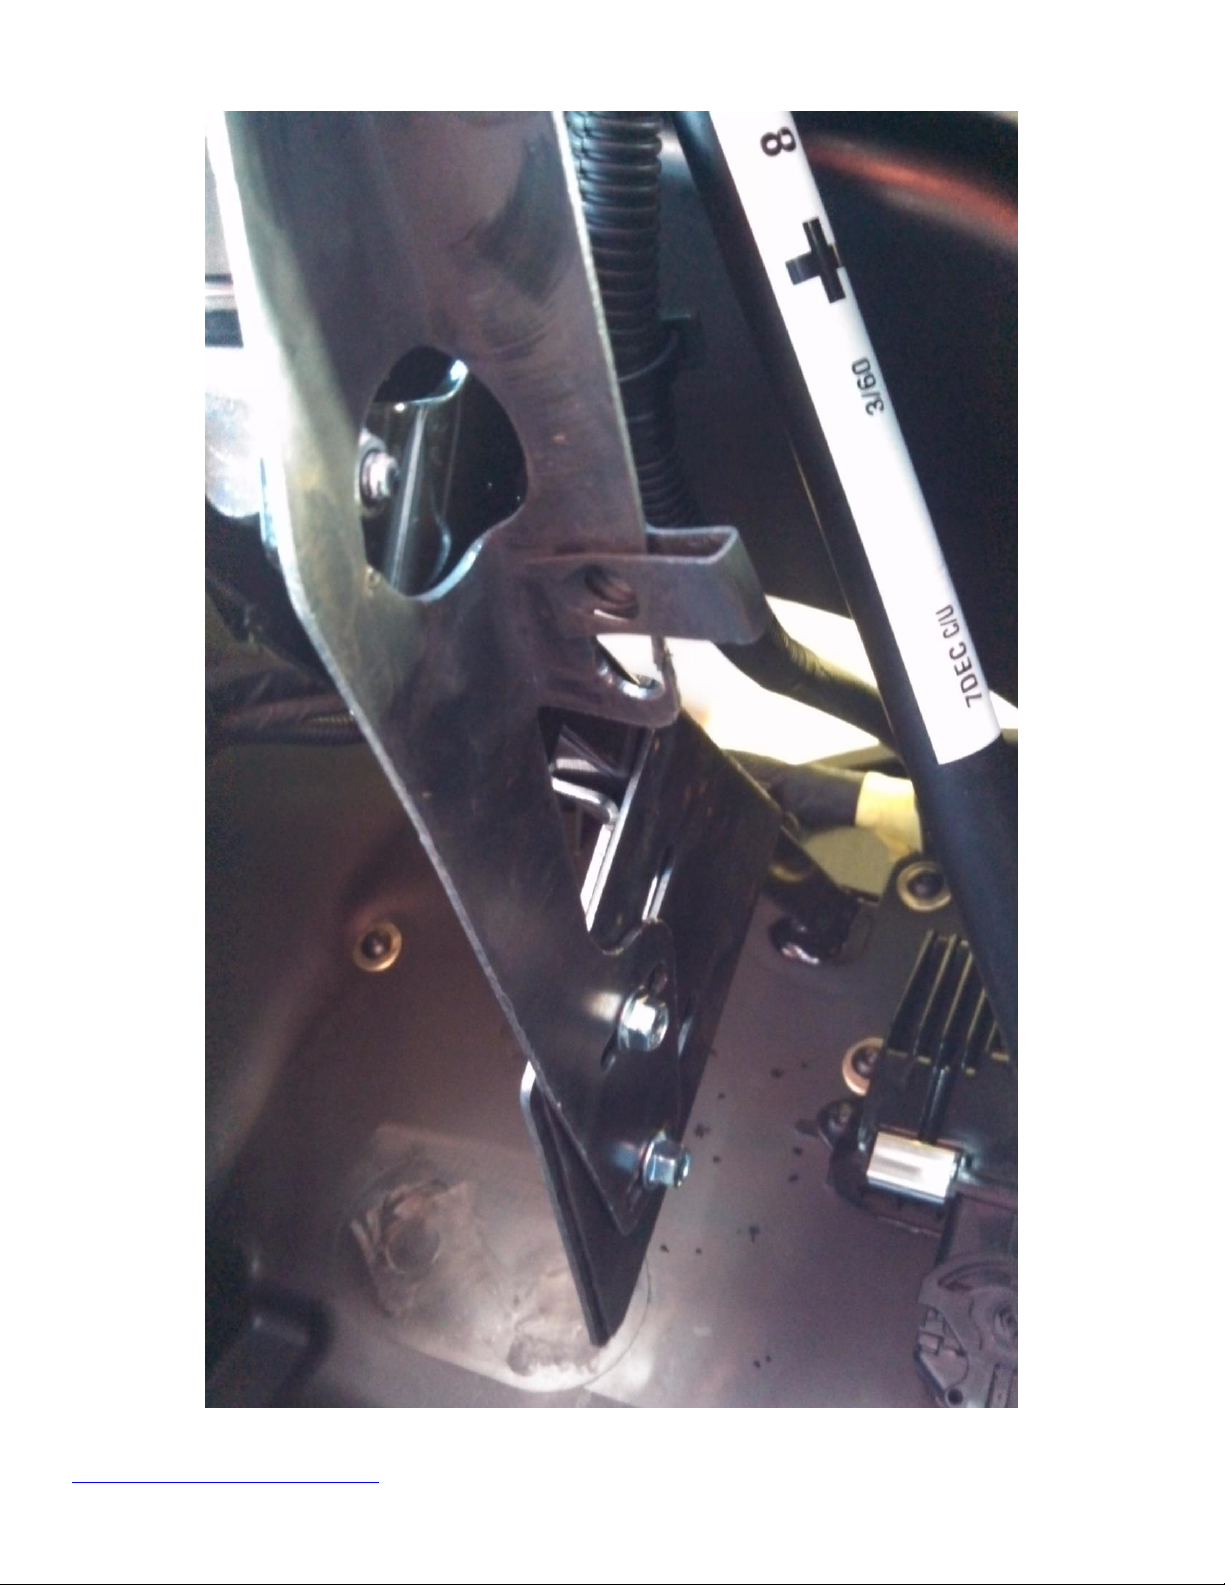
Attach Duct hose to defrost duct outlet on heater, and secure with cable tie. Lift heater up into position pushing hoses
back through firewall. Fit ¼ mounting bolts, move heater into correct position making sure the heater is not interfering
with dash or steering shaft etc. Adjust heater support brackets if needed. Tighten mounting bolts. Use the supplied self
drilling screws to secure steering support brackets when heater position has been finalized.
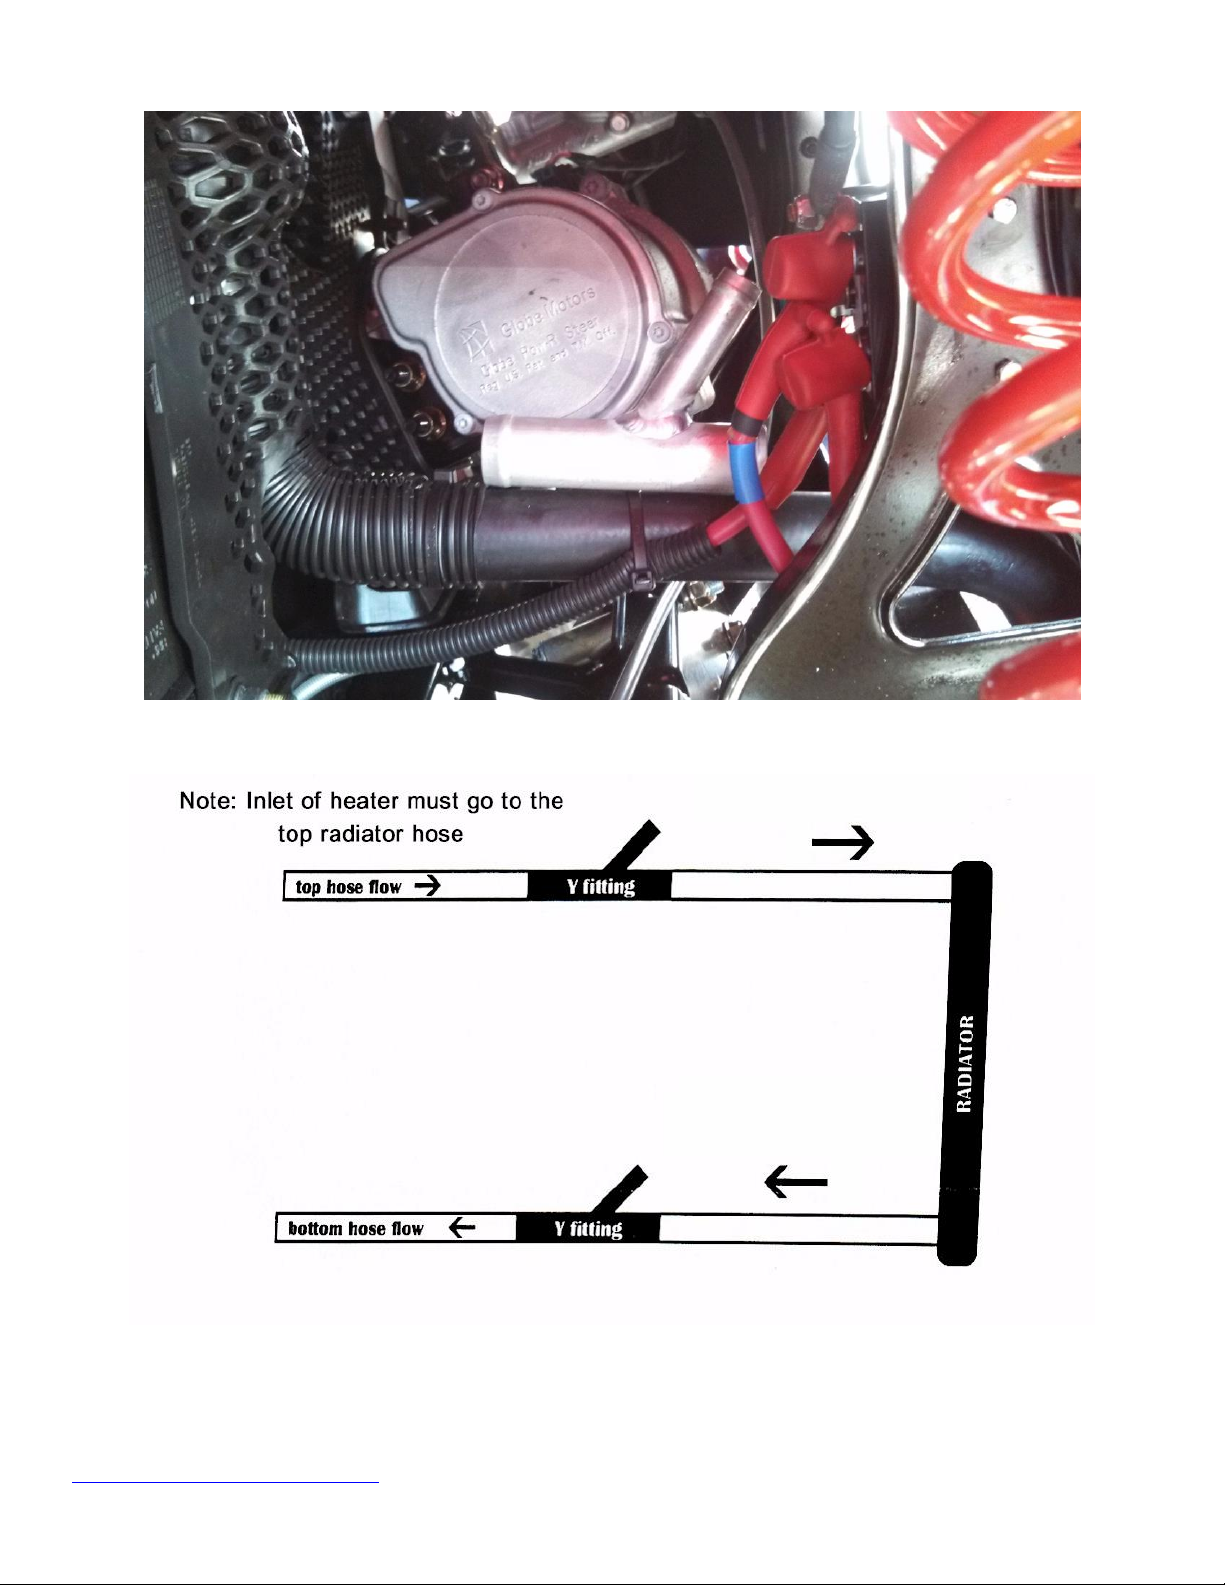
To install temperature control valve locate a suitable position in the top heater hose just behind the heater, cut hose
and install temperature control valve in hose making sure the valve is not interfering with the steering shaft.
Drain cooling system by removing lower radiator hose. Important Tip: Raise front of vehicle on jack stands or ramps
before draining cooling system. This will help in preventing air locks and you won’t have to drain the whole cooling
system. Cut Radiator hoses as shown in Fig 11a and 11b. Insert the Y connectors exactly as shown in Fig 11c in the
Can Am Maverick Firestorm Heater Kit Instructions.
www.utvpartsandaccessories.com 1 800 596 0785 Version 10/31/13
radiator hoses. Before cutting the radiator hoses, be sure that the placement of Y’s will not interfere with any part of
the vehicle. Be sure the hose connected to the temperature control valve of the heater is connected to the top radiator
hose. Cut heater hoses to length. Before connecting the hoses to the Y connectors, take a garden hose and run water
through the heater hose and heater assembly, make sure the temperature control valve is fully open i.e. the max heat
position. This will help remove air from the system and stop air locks, this step must be carried out. Fit hose to Y fittings
and tighten clamps. Make sure all hoses are as far away as possible from driveshaft, steering shaft and sharp areas etc.
Use cable ties as necessary.
Refill cooling system as per manufacturer’s procedure. Start and run the vehicle at a fast idle and run up to normal
operating temperature. Check for leaks. Check heater operation. Allow vehicle to cool and recheck cooling system level
and coolant ratio, fill and/or alter coolant ratio as required. Refit front side wheel well panels.
If the heater fails to blow hot/warm air once the vehicle is up to operating temperature, there may be an air lock in the
heater unit. Temporarily block off the top/inlet radiator hose between the Y fitting and radiator. Start and run vehicle up
to operating temperature. Feel the outlet/lower hose from heater until it feels hot. The heater now should be blowing
hot/warm air. Remove clamp from radiator hose. The heater should continue to blow hot/warm air. This procedure may
have to be repeated a few times to remove air from system. Allow vehicle to cool, restart the vehicle and run up to
operating temperature, recheck heater operation. Please note heater output will be limited at idle, all testing should be
done at a fast idle.
Figure 1
Can Am Maverick Firestorm Heater Kit Instructions.
www.utvpartsandaccessories.com 1 800 596 0785 Version 10/31/13
Figure 2
Figure 3
Can Am Maverick Firestorm Heater Kit Instructions.
www.utvpartsandaccessories.com 1 800 596 0785 Version 10/31/13
Figure 4
Can Am Maverick Firestorm Heater Kit Instructions.
www.utvpartsandaccessories.com 1 800 596 0785 Version 10/31/13
Figure 5
Can Am Maverick Firestorm Heater Kit Instructions.
www.utvpartsandaccessories.com 1 800 596 0785 Version 10/31/13
Figure 6
Figure 7
Can Am Maverick Firestorm Heater Kit Instructions.
www.utvpartsandaccessories.com 1 800 596 0785 Version 10/31/13
Figure 8
Figure 9
Can Am Maverick Firestorm Heater Kit Instructions.
www.utvpartsandaccessories.com 1 800 596 0785 Version 10/31/13
Figure 10
Figure 11a
Can Am Maverick Firestorm Heater Kit Instructions.
www.utvpartsandaccessories.com 1 800 596 0785 Version 10/31/13
Figure 11b
Figure 11c
Can Am Maverick Firestorm Heater Kit Instructions.
www.utvpartsandaccessories.com 1 800 596 0785 Version 10/31/13
Figure 12a
Figure 12b
Can Am Maverick Firestorm Heater Kit Instructions.
www.utvpartsandaccessories.com 1 800 596 0785 Version 10/31/13
Figure 12c
Figure 12d
Can Am Maverick Firestorm Heater Kit Instructions.
www.utvpartsandaccessories.com 1 800 596 0785 Version 10/31/13
Can Am Maverick Firestorm Heater Kit Instructions.
www.utvpartsandaccessories.com 1 800 596 0785 Version 10/31/13
Defrost Duct Kit If Supplied
Can Am Maverick Firestorm Heater Kit Instructions.
www.utvpartsandaccessories.com 1 800 596 0785 Version 10/31/13
Heater Build Info.

This manual suits for next models

1

Popular Automobile Accessories manuals by other brands

Hawk HA-009 PKE User's and installer's manual

Hawk

Hawk HA-009 PKE User's and installer's manual

Pyle PLCAPE30 install guide

Pyle

Pyle PLCAPE30 install guide

Webasto Diavia Santana XL Fitting instructions

Webasto

Webasto Diavia Santana XL Fitting instructions

Crux SWRGM-49 manual

Crux

Crux SWRGM-49 manual

Whispbar K732W Fitting instructions

Whispbar

Whispbar K732W Fitting instructions

iDataLink maestro Rr install guide

iDataLink

iDataLink maestro Rr install guide

Curt Group ARIES AL234046 installation manual

Curt Group

Curt Group ARIES AL234046 installation manual

Camos RV-566 instruction manual

Camos

Camos RV-566 instruction manual

Directed DS4+ installation guide

Directed

Directed DS4+ installation guide

Car-Interface TV-Free manual

Car-Interface

Car-Interface TV-Free manual

Audiovox Rear Observation System Package RVMPKG2 owner's manual

Audiovox

Audiovox Rear Observation System Package RVMPKG2 owner's manual

FVC SP0105B installation guide

FVC

FVC SP0105B installation guide

Dometic FAN-TASTIC VENT Installation and operating manual

Dometic

Dometic FAN-TASTIC VENT Installation and operating manual

Fortin EVO-GMT1 manual

Fortin

Fortin EVO-GMT1 manual

Marquardt AK1A user manual

Marquardt

Marquardt AK1A user manual

GO Industries 45661 installation instructions

GO Industries

GO Industries 45661 installation instructions

Yakima K1188 instructions

Yakima

Yakima K1188 instructions

Kenwood KEC-301 instruction manual

Kenwood

Kenwood KEC-301 instruction manual

manuals.online logo
manuals.online logoBrands
  • About & Mission
  • Contact us
  • Privacy Policy
  • Terms and Conditions

Copyright 2025 Manuals.Online. All Rights Reserved.