V-TAC VT-5127 User manual

R
TABLE OF CONTENTS
ENGLISH........................................................................1-8
FRENCH.........................................................................9-16
GERMAN........................................................................17-24
BULGARIAN...................................................................25-32
CROATIAN......................................................................33-40
SPANISH.........................................................................49-56
HUNGARIAN...................................................................57-64
ITALIAN...........................................................................65-72
POLISH ..........................................................................81-88
ROMANIAN.....................................................................89-96
CZECH............................................................................97-104
GREEK ...........................................................................73-80
PORTUGUESE...............................................................41-48

INSTALLATION INSTRUCTION
DVR (VT-5127)
INTRODUCTION
Thank you for selecting and buying V-TAC product. V-TAC will serve you the best.
Please read these instructions carefully before starting the installing and keep this
manual handy for future reference. If you have any another query, please contact
our dealer or local vendor from whom you have purchased the product. They are
trained and ready to serve you at the best.
Multi-Language Manual QR CODE
Please scan the QR code to access the manual
in multiple languages.
R
WEEE Number: 80133970
11
ENGLISH

HARD DISK INSTALLATION DIAGRAM
Unscrew and remove recorder’s
rear panel
Screw bottom screws from outside
of recorder
Connect SATA Cable and power cord securely to hard disk.
SATA and power cable inside
Recover recorder’s cover and
re-screw all screws.
2
ENGLISHENGLISH

MACHINE SETTINGS
A. GUIDE/STARTUP WIZARD
DVR INSTALLATION DIAGRAM
The system will open "Setting Wizard" screen automatically, for guiding user to setup
basic setting.
3
ENGLISH

After connection and powering the recorder, the front panel indicator light will be
turned on, and system will display normal boot screen.
After completion of loading, login interface will popup. Default account is [admin],
password is blank as shown below.
Please set corresponding network parameters through the following steps:
[Main Menu] > [System Settings] > [Network Settings]. Default IP
Address:192.168.1.10. And click OK, system will access to corresponding surveil-
lance video automatically
B. LOGIN PANEL
C. NETWORK SETTING
4
ENGLISH

You can enter video playback interface through desktop shortcut menu, or through
the following steps: [Main Menu] > [Video Function] > [Record Playback]
D. RECORD PLAYBACK
Right click mouse on main interface, operate as the following: [Main Menu] >
[System Information] > [Version Information], then you can search out that
recorder’s serial number and network state. When NAT shows connection
success, then you canv view live video by entering serial number on your
mobile phone and computer. As shown below:
E. VERSION INFORMATION
5
ENGLISH

IOS APP
ANDROID APP
DOWNLOAD THE APP
• Google Play Store - Search “XMEYE”
• IOS (Apple Store) - Search “XMEYE”
• Android phones and IOS (Iphone) can download by scanning the following
QR codes.
REGISTER NEW ACCOUNT
1. Tap on “Register” to sign up
with your email address as
user ID and tap on “Next”
to get confirmation Code.
2. The APP will send a
confirmation code to your
email ID. Please confirm the
code to complete the
registarion process. Enter
new user ID and password.
6
ENGLISH

Insert the CD installer, download, and install CMS for Windows. Login (default
admin + password is empty) and go to System Setting >Monitoring Point Manage-
ment > Add Area. Select an area then click 'Add Device’, then ‘Add Settings’. Now,
you can see a preview in the software for equipment management. Note: Remote
Viewing can only be activated by logging on to the cloud (http://www.xmeye.net.-
main) and entering the serial number.
After successfully logging in, click the ‘+’ icon on the top right corner to add device
1) automatically by the XMEYE QR Code or 2) manually by entering the device name,
username (arbitrary), and the password (default password is empty). Click the
device name, and choose your preferred channel.
GUIDE TO MANAGING CMS ON YOUR COMPUTER
7
ENGLISH

Access www.xmeye.net on IE browser. Go to
'Device Login’. Enter your serial number.
Now you can access remote viewing with
playback operation and more.
REMINDER:
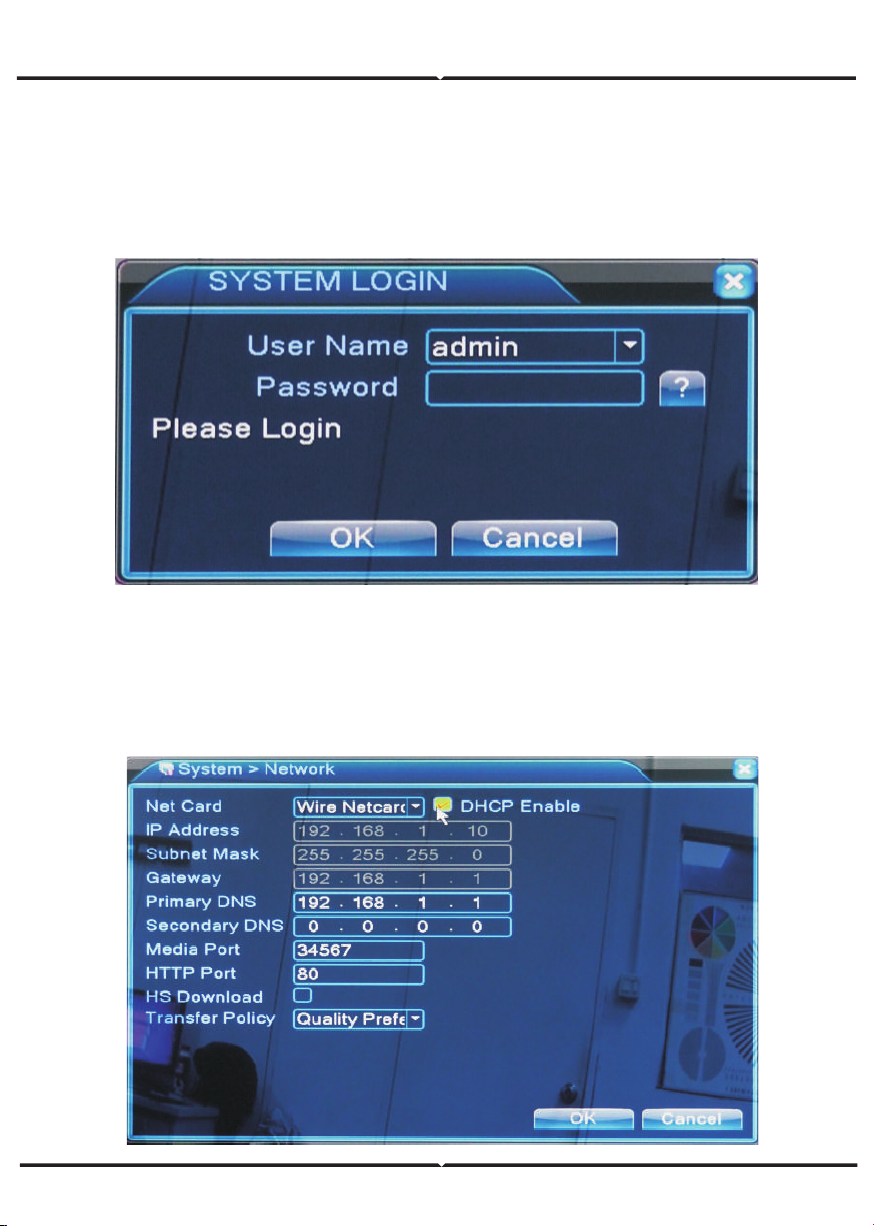
When remote viewing has failed, click the
main menu on your left-hand side. Go to
System Information > Version Information
to check equipment status. If it is searching
DNS, please check if your network connec-
tion is normal or not and remove the ‘Auto-
matically Obtain IPAddress’ option. Manually
change the IP address of LAN and match the
gateway with the routing gateway.
1. AHD/CVI/TVI/IP/CVBS 5 in 1 Hybrid DVR,4CH
2. H.264
3. Analog Video Input(25fps):4*1080N;4*960P;4*720P
4. Hybrid Video Input(25fps):2*960P(Analog)+2*720P(IP)
5. IP Video Input(25fps):4*720P;4*1080P;8*720P;8*1080P;1*1080P
6. 4CH Playback 1080N*25fps
7. Video Input Port:4CH BNC
8. Audio:4ch Input/1ch Output
9. No alarm(can be extended into 4ch alarm input/1ch alarm output,price is higher)
10. Support 1pc HDD(Maximum 6TB)
11. Power Supply:EU Plug 12V/2A
12. Support RS485 PTZ protocol
13. Support 3G,WIFI(should be extended by USB)
14. Network Interface:RJ45 10M/100M
15. USB:2CH USB 2.0
16. VGA、HDMI HD Output
17. Supports motion detection
18. Supports iCloud
19. PC monitoring software CMS & cellphone monitoring software XMYEYE
20. Supports Iphone,Android
21. Supports remote monitoring
REMOTE VIEWING THROUGH IE BROWSER
KEY FEATURES
8
ENGLISH

INSTRUCTION D’INSTALLATION
DVR (VT-5127)
INTRODUCTION
Merci d’avoir choisi et acheté un produit à V-TAC. V-TAC vous offrira le meilleur.
Veuillez lire attentivement ces instructions avant de commencer l’installation et
conservez ce manuel à portée de main pour référence ultérieure. Si vous avez
d’autres questions, veuillez contacter notre distributeur ou le fournisseur local
auprès duquel vous avez acheté le produit. Ils sont formés et prêts à vous servir
au mieux.
WEEE Number: 80133970
FRENCH
9

SCHÉMA D’INSTALLATION DE DISQUE DUR
Dévissez et retirez le panneau arrière de
l’enregistreur
Visser les vis du bas de l’extérieur
de l’enregistreur
Raccordez le câble SATA et le câble d’alimentation au disque dur.
SATA et le câble d’alimentation
sont à l’intérieur
Remettez le couvercle de l’enreg-
istreur et revissez toutes les vis.
FRENCH
10

RÉGLAGES DE LA MACHINE
A. GUIDE/ASSISTANT DE DÉMARRAGE
SCHÉMA D’INSTALLATION DE DVR
Le système ouvrira automatiquement, écran « Assistant de réglage » qui guidera
l’utilisateur dans le réglage de base de configuration.
Bloc d’alimentation
Écran
Caméra
Haut-parleur Microphone
Routeur
Internet
Télécommande
Ordinateur
Mouse
USB
Caméra PTZ
FRENCH
11

Après connexion et mise sous tension de l’enregistreur, le voyant du panneau avant
s’allume, et le système affichera l’écran de démarrage normal.
A l’issue du chargement, l’interface de connexion apparaîtra. Le compte par défaut
est [admin], mot de passe est vide comme indiqué ci-dessous.
Veuillez définir les paramètres réseau correspondants par les étapes suivantes:
[Menu principal] > [réglages système] > [réglages réseau]. adresse IP par défaut:
192.168.1.10. Cliquez sur OK, le système accèdera automatiquement à la vidéo-sur-
veillance correspondante
B. PANNEAU DE LOGIN
C. RÉGLAGES RÉSEAU
FRENCH
12

Vous pouvez entrer dans l’interface de lecture vidéo par le biais de menu de
raccourci sur le bureau ou les étapes suivantes: [Menu principal] > [fonction
vidéo] > [lecture enregistrement]
D. LECTURE D’ENREGISTREMENT
Faites un clic droit de la souris sur l’interface principale, opérez comme suit: [Menu
principal] > [informations système] > [informations sur la version], ensuite vous
pouvez rechercher le numéro de série de cet enregistreur et l’état du réseau.
Lorsque NAT indique une connexion avec succès, vous pouvez visualiser la vidéo en
direct en saisissant le numéro de série sur votre téléphone mobile et votre ordina-
teur. Comme indiqué ci-dessous:
E. INFORMATION SUR LA VERSION
FRENCH
13

IOS APP
ANDROID APP
TÉLÉCHARGEMENT DE L’APPLICATION
• Google Play Store - recherche “XMEYE”
• IOS (Apple Store) - recherche “XMEYE”
• Les téléphones Android et IOS(Iphone) peuvent la télécharger en scannant les
codes QR.
CRÉER UN NOUVEAU COMPTE
1. Tapez sur «S’inscrire» pour
vous inscrire avec votre adresse
électronique comme ID utilisateur
et tapez sur «Suivant» pour
obtenir un code de confirmation.
2. L’application enverra un code
de confirmation à votre identifiant
de courriel. Veuillez confirmer le
code pour compléter le processus
d’inscription. Entrez le nouveau
nom d’utilisateur et mot de
passe.
FRENCH
14

Une fois connecté avec succès, cliquez sur l’icône « + » dans le coin supérieur droit
pour ajouter un dispositif 1) automatiquement par le code QR de XMEYE ou 2)
manuellement en entrant le nom du dispositif, le nom d’utilisateur (arbitraire) et le
mot de passe (le mot de passe par défaut est vide). Cliquez sur le nom du dispositif,
puis choisissez votre canal préféré.
GUIDE DE GESTION DE CMS SUR VOTRE ORDINATEUR
Insérez le CD d’installation, téléchargez et installez CMS pour Windows. Connexion
(par défaut admin + mot de passe qui est vide) et allez dans réglage système >
Gestion de point de contrôle > Ajouter zone. Sélectionner une zone, ensuite cliquez
sur «Ajouter dispositif», ensuite «ajouter des réglages». Maintenant, vous pouvez
voir un aperçu du logiciel pour la gestion de l’équipement. Remarque: La visualisa-
tion à distance ne peut être activée qu’en vous connectant sur le nuage (http://ww-
w.xmeye.net.-principal) et en entrant le numéro de série.
FRENCH
15

1. AHD/CVI/TVI/IP/CVBS AHD/CVI/TVI/IP/CVBS Enregistreur DVR hybride 5 en
1,4CH
2. H.264
3. Entrée vidéo analogique (25fps):4*1080N;4*960P;4*720P
4. Entrée vidéo hybride (25fps):2*960P(Analogique)+2*720P(IP)
5. Entrée IP Vidéo (25fps):4*720P;4*1080P;8*720P;8*1080P;1*1080P
6. Lecture 4CH 1080N*25fps
7. Port d’entrée vidéo:4CH BNC
8. Audio:4ch Entrée/1ch Sortie
9. Sans alarme (peut être étendue en entrée d’alarme 4ch/sortie d’alarme 1ch, le
prix est plus élevé)
10. Support 1pc HDD(Maximum 6TB)
11. Alimentation électrique: prise EU 12V/2A
12. protocole de support RS485 PTZ
13. Support 3G,WIFI(peut être étendu par USB)
14. Interface réseau:RJ45 10M/100M
15. USB: 2CH USB 2.0
16. VGA, HDMI HD Output
17. Supporte détection de mouvement
18. Supporte iCloud
19. logiciel de surveillance PC, CMS & logiciel de contrôle de téléphone cellulaire
XMYEYE
20. Supporte Iphone, Android
21. Supporte télésurveillance
PRINCIPALES CARACTÉRISTIQUES
Accéder à www.xmeye.net par le navigateur
Internet Explorer. Allez à «Connexion
périphérique». Entrez votre numéro de série.
Maintenant vous pouvez obtenir un accès à
distance à la fonction de lecture et autres.
RAPPEL:
Si la vue à distance a échoué, cliquez sur le menu
principal à gauche de l’écran. Allez sur «informa-
tions système» > «informations sur la version»
pour vérifier l’état de l’équipement. Si c’est
«recherche de DNS», vérifiez si votre connexion
réseau est normale ou pas et supprimez l’option
«Recherche automatique d’adresse IP». Changez
manuellement l’adresse IP du LAN et connectez le
portail à la passerelle routage.
MÉTHODE DE VUE SUR IE
FRENCH
16

INSTALLATIONSANWEISUNG
INFÜHRUNG
Wir danken Ihnen, dass Sie ein V-TAC ausgesucht und gekauft haben. V-TAC wird
Ihnen die besten Dienste erweisen. Lesen Sie, bitte, diese Gebrauchsanweisung
vor der Montage aufmerksam durch und halten Sie sie für Auskünfte in der Zukun-
ft parat. Sollten Sie weitere Fragen haben, kontaktieren Sie, bitte, unseren lokalen
Händler oderVerkäufer, von dem Sie das Produkt gekauft haben. Sie sind ausgebil-
det und bereit Sie auf die bestmögliche Art und Weise zu unterstützen.
WEEE Number: 80133970
GERMAN
DVR (VT-5127)
17

FESTPLATTEINSTALLATIONSDIAGRAMM
Schrauben Sie die Rückseite des Record-
ers ab
Schrauben Sie die unteren Schrauben
von der Außenseite des Recorders
Schließen Sie das SATA-Kabel und das Netzkabel fest an die Festplatte an.
SATA- und Stromkabel sind im
Inneren
Stellen Sie die Abdeckung des
Recorders wieder her und schrauben
Sie alle Schrauben wieder fest.
GERMAN
18

MASCHINENEINSTELLUNGEN
A. LEITFADEN / STARTASSISTENT (STARTUP WIZARD)
DVR-INSTALLATIONSDIAGRAMM
Das System öffnet automatisch den Bildschirm "Einstellungsassistent", um den
Benutzer zur Einrichtung der Grundeinstellung zu führen.
Netzteil
Anzeige
Kamera
Redner Mikrofon
Router
Internet
Fernbedienung
Computer
Maus
USB
PTZ-Kamera
GERMAN
19
Table of contents
Languages:
Popular DVR manuals by other brands

Abus
Abus TVVR30003 user manual

Seenergy
Seenergy SVR-204 quick guide

Lorex
Lorex DV700 Series Quick Mobile Guide

National Security Systems
National Security Systems HDR-5004AH user manual

Shenzhen Hongdian Technologies
Shenzhen Hongdian Technologies H332x user manual

Mitsubishi Electric
Mitsubishi Electric DX-TL4516E series Installer manual