Vaco Lavender AiRing VL08W User manual

Instruction Manual
Bedienungsanleitung
Air Purifier
Luftreiniger
Oczyszczacz powietrza
VAP-HA-P0809-N29W
Lavender AiRing
VL08W


CONTENTS
IMPORTANT SAFEGUARDS.........................................................................................................................................................2
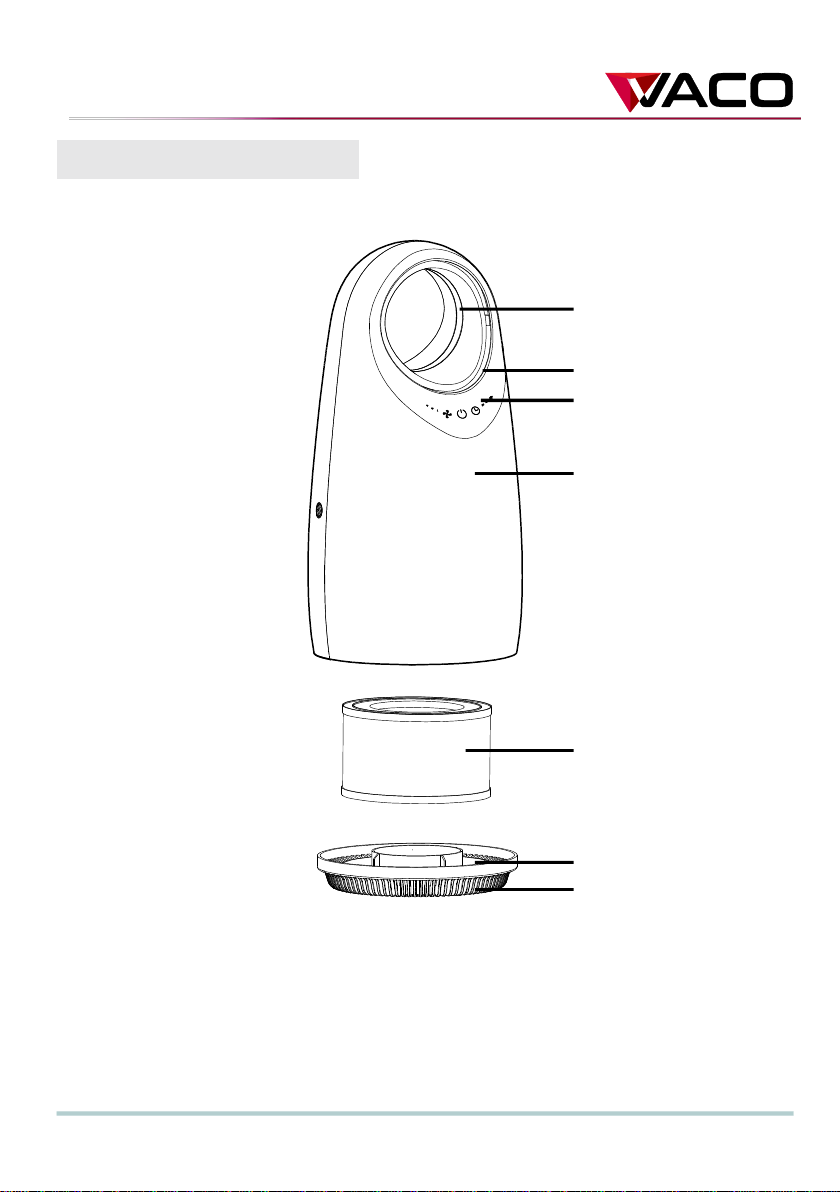
PRODUCT OVERVIEW......................................................................................................................................................................3
SPECIFICATIONS.................................................................................................................................................................................5
FILTER INSTALLATION....................................................................................................................................................................5
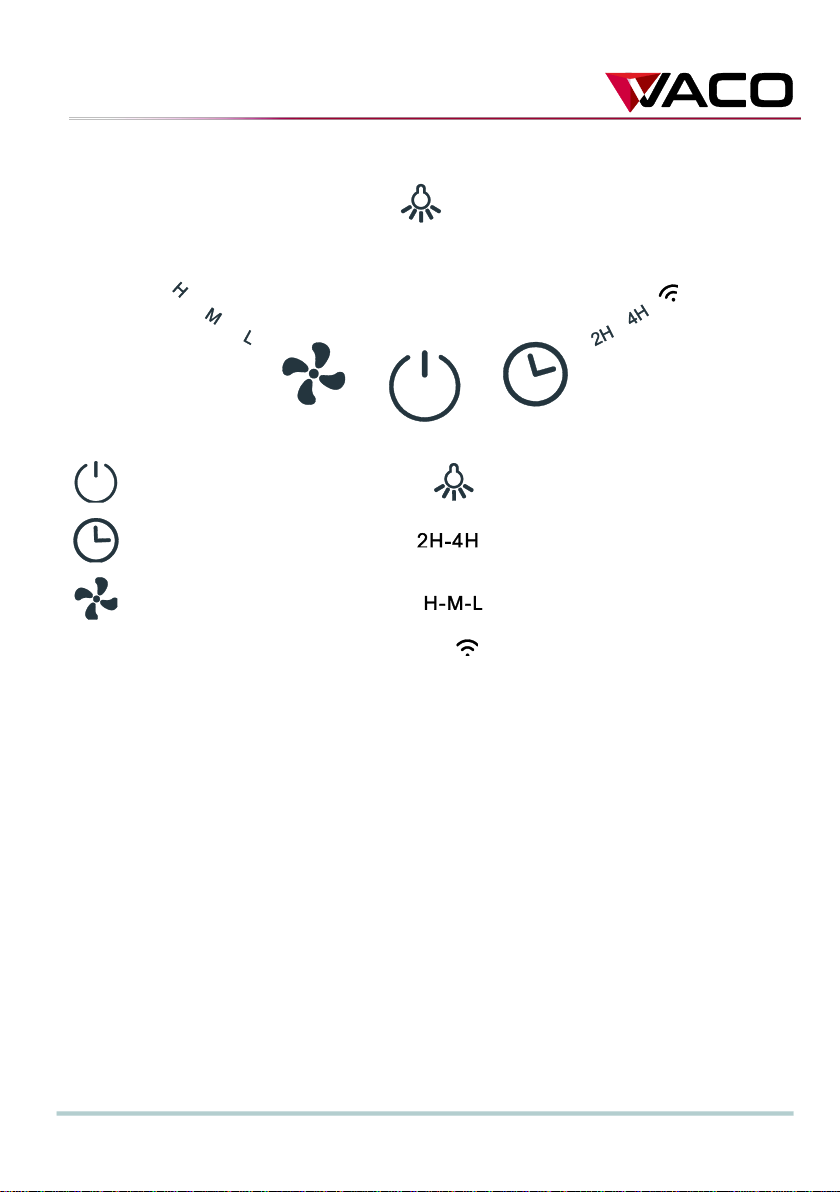
FUNCTIONS...........................................................................................................................................................................................7
SMART OPERATION..........................................................................................................................................................................9
MAINTENANCE.................................................................................................................................................................................15
TROUBLESHOOTING.....................................................................................................................................................................16
MODEL CODE BREAKDOWN:.................................................................................................................................................17
INHALT
WICHTIGE SICHERHEITSVORKEHRUNGEN.....................................................................................................................19
GERÄTEÜBERSICHT........................................................................................................................................................................20
TECHNISCHE EIGENSCHAFTEN.............................................................................................................................................22
INSTALLATION DES FILTERS....................................................................................................................................................22
FUNKTIONEN.....................................................................................................................................................................................24
SMART-BETRIEB................................................................................................................................................................................26
WARTUNG...........................................................................................................................................................................................32
FEHLERBEHEBUNG........................................................................................................................................................................33
MODEL NUMMER AUFSCHÜSSELUNG:...........................................................................................................................34
.........................................................................................................................................................................36
.........................................................................................................................................................................37
SPECYFIKACJA..................................................................................................................................................................................39
INSTALACJA FILTRA......................................................................................................................................................................39
FUNKCJE...............................................................................................................................................................................................41
.........................................................................................................................................................43
KONSERWACJA................................................................................................................................................................................49
.........................................................................................................................................50
ZNACZENIE KODU MODELU:.................................................................................................................................................51

Air purifier
Lavender AiRing
VL08W
VAP-HA-P0809-N29W
User Manual
BRM Sp z o.o.
05- -Grabina

2
IMPORTANT SAFEGUARDS
Please read this user manual carefully before using the product and keep it for future
reference.
Warning
1. To avoid electric shock and fire, do not allow any water, liquid or any flammable agents
to get into the product or use them to clean the product.
2. Do not spray insecticide, perfume or other flammable substances around the product.
3. Please check whether the local power supply voltage is consistent with voltage of the
product before connecting the power supply.
4. This product can not be used to replace normal ventilation, for daily dust collection or
as kitchen ventilation when cooking.
5. Ensure the product is used on a stable and horizontal surface.
6. Leave at least 30cm of space behind and on the sides the product, and at least 50cm of
space above the product when using.
7. Ensure both the filter and the cover are properly installed before using.
8. Do not insert finger or other things into the air outlet/inlet to prevent physical damage
or harm.

3
PRODUCT OVERVIEW
Components
Lamp Ring
Air Outlet
Control Panel
Body
Filter
Base
Air Inlet

4
Control Panel
Power Button
Light Control Button
Timer Button
Timing Indicator Light
Wind Speed Button
Wind Speed Indicator Light
Wi-Fi Indicator Light

5
SPECIFICATIONS
Model No.
VAP-HA-P0809-N29W
Size
213*213*432mm
Net Weight
2.4kg
Input
220-240V 50Hz/60Hz
Power
35W
CADR
80m3/h
Coverage Area
2
FILTER INSTALLATION
Note
●Please remove the filter packaging before using for the first time.
●Ensure the machine is unplugged before removing or installing the filter.
Filter Installation Steps
Unplug the machine from the power source before replacing or installing the filter.

6
1. Invert the machine and rotate the base along the direction marked "OPEN"
2. Take the filter out from the machine.
3. Remove the packaging of the filter.
4. Install the filter into the machine.
5. Install the base, then rotate and tighten the base along the direction marked "CLOSE".
Note: The device needs a filter replacement when the lamp ring flashes red. Please refer to
the steps above to install a new filter, then press the power button for about 7 seconds to
reset the filter replacement indicator.
Step 1
Step 2
Step 3
Step 5
Step 4
OPEN
CLOSE
OPEN
CLOSE
Filter
Filter
Packaging

7
FUNCTIONS
The device will make a beeping sound for 1 second when connected to power.
Button Operations
Power Button
1. Press the Power Button to turn on the machine, it will beep once, then the power
indicator and the low wind speed indicator light turns green.
2. Press the button again, the device will beep once and all the lights will turn off.
Note: The device will remember the fan speed when it is powered off without unplugging
from the power socket.
Timer Button
1. Press the Timer Button while the device is on and set the timer to 2H or 4H. The
corresponding indicator light will turn on.
2. Press the button again to turn the timer off. The timer indicator will turn off and the
machine will continue to operate without a timer.
3. When the timer is on, the machine will begin counting down. When the time is up, the
fan will stop and all the lights will turn off.
Note: The timer function does not work when the machine is powered down.
Wind SpeedButton
1. Press the Wind Speed Button while the device is on and the device will beep once.
2. Press again to adjust the wind speed. The selection will cycle between Low, Medium
and High and the corresponding indicator will turn on.

8
Note: The wind speed cannot be changed when the device is powered off.
Light Control Button
1. Press the Light Control Button while the device is on to set the light brightness to
either soft light or standard light mode.
2. Press the button again to turn the LED light off.
Note: The light control button does not respond when the device is powered off.
Filter Replacement Reminder
When the accumulated operation time of the air purifier reaches 2200 hours, the lamp ring
flashes in red, which indicates that a filter replacement is required. After replacing with a
new filter, press and hold the power button for about 7 seconds to reset the replacement
reminder.
Note
●Please clean the dust on the filter regularly. The filter should not be washed or reused.
●Before replacing the filter, be sure to turn off the machine and unplug it from the
power outlet.
●Do not use a vacuum cleaner to clean the filter.
●Please sterilize the filter under sunlight regularly.
●Please use the filter specifically designed for this product.

9
SMART OPERATION
Smart Life App
1. Download & Registration
●
to install the app.
●ster for a
-mail
address. Then sign in to the app.
2. Adding Devices in Easy Mode (Recommend)
Make sure your smart device is charged and your mobile phone is connected to your Wi-Fi
network. The Wi-Fi indicator on the smart device will flash when the smart device is in
now ready for configuration.
●-Fi network
your mobile phone is connected will be automatically fetched to configure your device.
●Your device will now be listed in your app.
3. Adding Devices in AP Mode
●If the device cannot be added in Easy Mode, users can try adding devices in AP Mode.
●and the Wi-Fi indicator light begins to flash quickly. Then press and hold the Timer
Button for another 7 seconds until
begins to flash slowly. This means the device is ready for configuration in AP Mode.

10
●on the top right of the app. Tap
your mobile phone and select the Wi-
to it.
●
●and your device will be listed in your app.
You can now control your smart device via your mobile phone app at anytime and
anywhere (make sure your mobile phone and smart device are both connected to the
network). You can share your devices with your friends and family after your devices have
been added successfully.
4. FAQ
(1)
aMake sure the device is powered on and close to your mobile phone when adding the
device.
bMake sure your mobile phone is connected to the Wi-Fi network and that your Wi-Fi
router is working properly.
c
dMake sure the number of connected devices have not reached the maximum number
supported by the Wi-Fi router. If so, please disconnect some devices from the network.
eMake sure the Wi-Fi password is correct when adding the new device.
fMake sure you have not used any Chinese characters when naming your Wi-Fi
network.
(2) Can I control devices over a 2G/3G/4G/5G network?
When adding a device for the first time, your mobile phone and device must be
connected to the same Wi-Fi network. After adding the device successfully, you can
remote control your device over a 2G/3G/4G/5G network.

11
(3) How can I share my device with others?
Open your Smart Life app and select your device, then tap the button in the top right
-mail
address) you want to share with. (Please make sure the phone number or e-mail is
registered).
(4) How do I manage devices shared by others?
You can operate shared devices by opening your Smart Life app and tapping the
page.
(5) How do I remove devices?
sounds which means the device has been removed. The Wi-Fi indicator light will then begin
to flash quickly.
option at the bottom and the Wi-Fi
indicator light on the device will begin to flash quickly.

12
Using with Echo
1. What you need to get started
Before using Echo to control your smart devices, make sure you have the following.
●A stable Wi-Fi network that can access Amazon servers. (For mainland China
users)
●An Echo device, including Echo, Echo Tap, or Echo Dot.
●An Amazon account.
●The Smart Life app and an account.
●Smart devices.
2. Add devices in the Smart Life app (Refer to App Instruction)
You can skip this part if you've already added some devices to your Smart Life account.
The device names are easily recognized.
(1) Download the Smart Life app (Refer to App Instruction)
Scan the QR code below to download the Smart Life app:
You can also search "Smart Life" in either the App Store or Google Play to install the
app.
(2) Register a Smart life account and sign in to the app (Refer to App Instruction)
Open the Smart Life app and tap "Register" to register an account, then sign in to the
app.
(3) Add device and change device name (Refer to App Instruction)
Sign in with the Smart Life account, add the device, then change device name to an
easily recognized word or phrase, like "Halo".

13
3. Setting up Amazon Echo and enabling the Smart Life Skill
We suggest using a web browser for configuration in mainland China since the Alexa
app is not available in the region.
Users can configure Echo through the web or with the Alexa app.
Web configuration link: http://alexa.amazon.com/spa/index.html
Search "Amazon Alexa" in the App Store or Google Play to install the app.
App configuration will be used as an example for illustrative purposes. Configuration
through web and app are basically the same.
(1) Set up Echo with the Alexa app
You can skip this part if your Echo is already set up.
1. Make sure your Echo device is powered on.
2. Open the Alexa app by tapping the app icon on your mobile device.
3. Type in your Amazon account name and password, then tap "SIGN IN".
4. Tap the menu on the top left corner and select "Settings", then tap "SET UP A
NEW DEVICE".
5. Select your Echo model, choose your preferred language, then tap "CONNECT TO
WI-FI".
6. Long press the dot button on the top of your Echo device until the orange light
lights up, then tap "CONTINUE". When your phone is connected to Echo, tap
"CONTINUE".
7. Select a Wi-Fi network so that your Echo can access the internet. Type in the Wi-Fi
password, then tap "CONNECT". Echo may take several minutes to connect to the
network.
8. Tap "CONTINUE" when Echo is connected to the network. After watching the
introduction video, tap "CONTINUE" to finish the setup.
(2) Link Smart Life account to Alexa
1. Tap "Skills" in the hamburger menu, then search for "Smart Life". Select "Smart
Life" and tap "ENABLE" to enable the Skill.

14
2. You will be redirected to the account link page. Type in your Smart Life account
and password, don't forget to select the country/region where your account
belongs to. Then tap "Link Now" to link your Smart Life account. The
country/region, the account, and the password must match exactly with the
details entered in Step 2.(2)
4. Control your smart devices through Echo
(1) Discover devices
Echo needs to discover your smart devices before it can control them. You can say
"Alexa, discover devices" to Echo. Echo will discover devices which have already been
added in the Smart Life app.
You can also tap "DISCOVER" to discover the smart devices. Discovered devices will be
shown in a list.
Note: Every time you change a device's name on the Smart Life app, Echo must re-discover
it before you can control it.
(2) Control devices using voice commands
Now you can control your smart devices through Echo. You can use the following
●Alexa, turn on/off Halo
●Alexa, set Halo to one (low fan speed mode)
●Alexa, set Halo to two (mid fan speed mode)
●Alexa, set Halo to three (high fan speed mode)
Note: Alexa only supports controlling the on/off and wind speed statuses.

15
MAINTENANCE
Note
●Ensure the machine is unplugged before performing any maintenance.
●Do not immerse the air purifier into water or any liquid.
●Do not use abrasive, corrosive or flammable cleaning agents (such as bleach or
alcohol) to clean any part of the unit.
Cleaning & Storage
1. Ensure the machine is powered off and unplugged.
2. Use a soft cloth and a neutral cleaning agent to wipe away any dust or debris from the
surface of the unit and from the air inlet/outlets.
3. After the machine is completely dried, cover it up in a bag and place it in a cool and
well ventilated place.
4. xtended period of time, turn the machine on
for a few minutes from time to time in accordance to the previous instructions to
ensure it keeps working well.
Note: Do no drop any water into the machine when cleaning the air outlets.

16
TROUBLESHOOTING
SITUATION
REASON
Not working
●Is it plugged into a power socket? Is there a power outage?
●Has the home leakage switch or fuse tripped?
●Is it time to replace the filter?
Poor performance
●Is there any dust on the surface of pre-filter?
●Is there any obstacle blocking the air inlet/outlet.
Noisy
●Is there anything stuck on the fan in the air outlet?
●Is the machine tilted?
●Set a lower wind speed if the noise is too loud, or set to low
wind speed when using during bedtime.
Unpleasant odour
●It is normal for the machine to emit a plastic smell when
using for the first time.
●The machine may emit an unpleasant odour if the filter is
dusty. Please clean or replace the filter.
●If there is a burning smell coming from the machine, please
unplug from the power socket and contact the supplier or
customer service.
The filter replacement
reminder did not reset
after replacement.
●Press and hold the power button for 7s to reset the
machine. The filter lifespan counter will also restart.
Note: If the troubleshooting information did not solve your problem and you require further
maintenance, please contact the supplier or the after-sales service centre. Do not
disassemble the machine or perform maintenance by yourself.

17
MODEL CODE BREAKDOWN:
VAP-HA-P0809-N29W
VAP
H
A
P
08
09
N
29
W
VAP Vaco Air Purifier
H HEPA filter
A Active carbon
P Prefilter
08 80 m³ CADR
09 90 m³ air delivery
N Bladeless fan
29 - Internal No.
W Wi-Fi
This manual suits for next models
1
Table of contents
Languages: