Vakaros Atlas 2 User manual

Atlas 2 User Manual
Welcome to the future of sailing. Built on the foundation of the award-winning Atlas, the Atlas 2
is the culmination of years of work and the cornerstone of a growing ecosystem of sensors and
displays. This guide 1.0 covers the 0.7.0 of the Atlas 2 firmware.
Atlas 2 User Manual
Revision 2022-3-07
1

Vakaros Connect App 3
Atlas 2 Overview 4
Power: 5
Display & Buttons: 5
Primary Sailing Screens 6
Line Screen — Start line setup 7
Graphical Starting Screen 8
Angle Menu — Shift tracking and reference angles 8
LED display 9
Other Connect-controlled functionality 9
Data logging 10
Customizable User Interface 10
Other Connect-controlled capabilities 11
Backlight 11
Profiles 11
Clock 11
Orientation Offset 11
Starting Timer 11
Bow offset 11
Magnetic Heading 11
GPS Dampening 11
IMU Dampening 11
Other Cool Hardware Features 12
Long-life Battery 12
Dual Waterproof Speakers 12
High Visibility Screen 13
Sensors 14
Mounting 14
Care Instructions: 15
Atlas 2 User Manual
Revision 2022-3-07
2

Vakaros Connect App
First things first. To MAXIMIZE your experience with your new device, it is imperative that you
download the latest version of the Vakaros Connect App. Available for either iOS or Android,
Vakaros Connect links wirelessly with your Atlas to provide access to a wide range of device
settings, firmware updates and a live data view.
This is really important; it will make sure that you have the latest software on your Atlas 2,
ensuring you have all the latest features. Make sure you have Bluetooth enabled, then search
for ‘vakaros connect’ in the store, or simply scan the appropriate code:
After you get the app installed and started, Vakaros Connect will walk you through the process
of connecting to your Atlas 2. If your Atlas 2 is not yet powered on (we know how hard it is to not
start playing), turn it on by tapping the power button on the top right. Turning our attention back
to the app, you should have an orange ‘ADD DEVICE’ button on the phone screen.
After pressing this button, a screen appears that allows you to connect to your device. The app
can use Bluetooth to do this wirelessly, but the best way to do this (especially if there are other
Atlas devices around) is to use your phone’s camera to scan the serial number via a built-in QR
code. A quick tap on the power button brings up an about device screen like this:
Atlas 2 User Manual
Revision 2022-3-07
3

Scanning this code will register your device, and also make sure it has the latest firmware. Your
Atlas 2 might reboot a few times during this process; wait for the steps to finish before
continuing on. We’ll come back to the app, but let’s get ready to dig into the Atlas 2!
We’re going to focus first on some key physical parts; the display, the buttons, and the LEDs.
Atlas 2 Overview
Atlas 2 User Manual
Revision 2022-3-07
4

Power:
Press and hold the Power button to turn the Atlas on or off. You’ll hear a power-on sound and
the LEDs progress as the Atlas 2 wakes up. To turn the Atlas off, press and hold the power
button until you hear a shutdown sound and see the display go blank. While on, a short tap on
the power button brings up the about device screen, tapping it again to return to the previous
screen.
Speaking of power; to charge the Atlas 2 simply connect the included charging cable to a USB
charger. Then attach the included charging pad to the other end. Placing the Atlas 2 on the pad
automatically starts the charging process; you’ll see a battery icon and a percent of charge
displayed. If you don’t see anything on the screen that's OK, it simply means that your Atlas 2 is
100% charged! It is recommended to charge your Atlas to full capacity at least once every 3
months.
Display & Buttons:
The info bar displays device information like Battery Level and Current Time. If the time is not
showing, it simply means that the GPS/GNSS module has not yet found enough satellites.
Usually taking just seconds, that process might take a few minutes, in particular if this is the first
power-on or if the device doesn’t have a clear view of the sky, for example, while indoors.
Obviously, the better view of the sky, the better. The clock also might show 24 hour GMT
based-time; don’t worry we can change that in settings later.
Buttons 1 - 4 are contextual and can change function based on what screen is being displayed.
The button bar displays the current functions of each of the 4 buttons. The default and most
common functions are: LINE, ANGLE, RESET, and START. LINE is used to set the starting
marks (see Line Menu, below). ANGLE is used to set and view reference angles for tracking
shifts, RESET and START control the start timer. There is often a BACK button to allow you to
return directly to the previous screen.
The Home button is very important; it allows you to return to the home screen from any menu
and is used to cycle through your configured layouts.
Atlas 2 User Manual
Revision 2022-3-07
5

Primary Sailing Screens
Pressing the home button at the bottom of the Atlas will cycle through all of the different screens
currently set up on your Atlas. Each screen is populated by widgets, which display different
kinds of data. A few of the default screens that ship with the Atlas 2 are shown above. Using
Vakaros Connect, you can add screens and change the existing ones to best suit your needs.
The default main screen, also designated the ‘home’ screen, has 4 widgets: Heading, Speed,
Heel, and Trim. The heading widget includes a shift tracking display, with a lift/header indicator
in degrees and a trend graph, both determined relative to the current reference angles, see
Angle menu, below. The speed widget shows current speed in knots, as well as the max and 10
second average. The heel and trim displays show the current value in degrees and consistency
bars, measuring how steady the boat has been in heel and trim. We suggest that you use this
default home screen for your first few sails until you get a feel for the capabilities of the Atlas 2.
Note that via the Customizable UI feature ANY screen can be designated the ‘home’ screen,
which is the screen that the Atlas 2 shows at power-up, and switches to at the end of the start
sequence.
Atlas 2 User Manual
Revision 2022-3-07
6

Line Screen — Start line setup
Before we dive into the dedicated start screens, let’s look at gathering and recording some of
the key data they will need to inform a great start. The Atlas 2 is designed to help you get a
great start to any race, showing a highly accurate measure of distance to line (DTL), time to line
(TTL), as well as a start timer. The first thing we need to do is capture the location of the line.
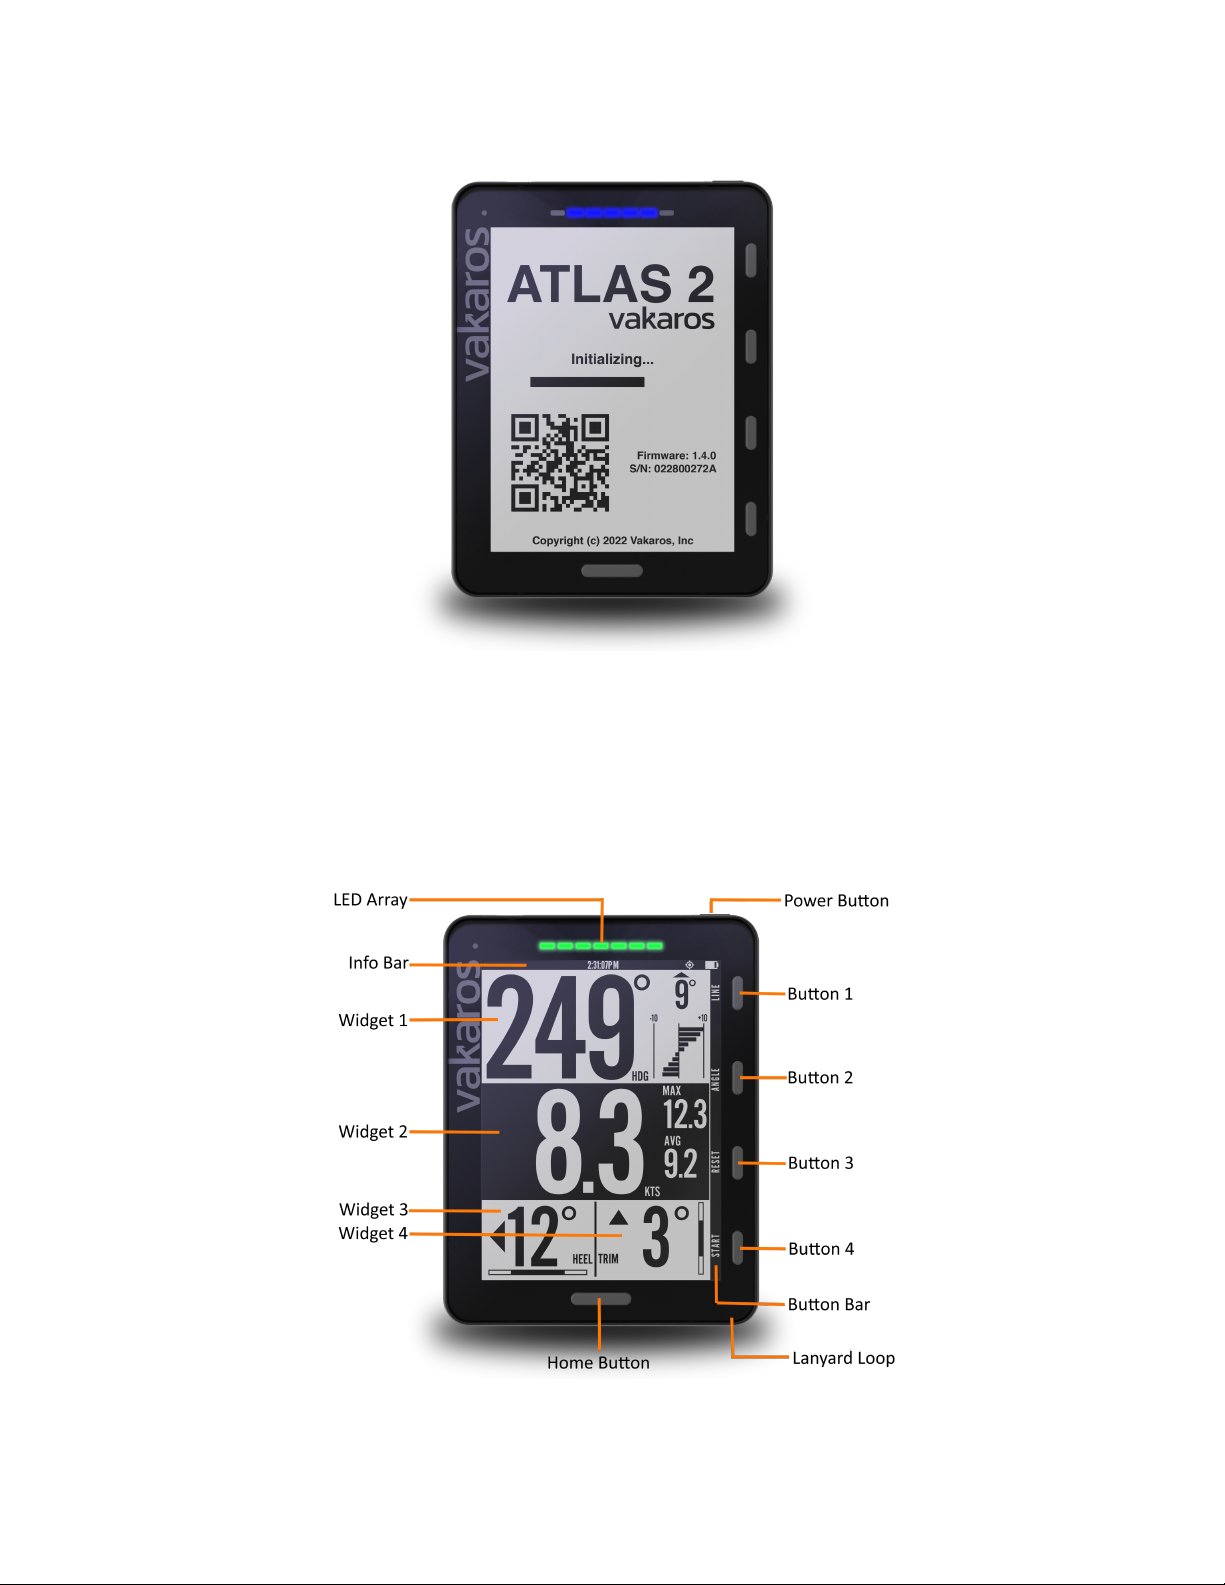
Begin by pressing the LINE button to record the locations of the marks which define the starting
line. This brings up the Line Screen, and dedicates buttons 1 and 2 to recording the locations of
the Boat and Pin. Each time the BOAT or PIN button is pressed, the Atlas will save the current
GPS coordinates as the location of that mark, replacing any previous pings. Once both marks
have been recorded, the Line Menu will show additional information about the starting line,
including line length (between pings) and perpendicular heading. Line bias and advantage
information is displayed if shift tracking reference angles have been set, see below. Exit the
Line Screen by pressing the Back button or the Home button.
Once the starting marks have been recorded, the Atlas 2 automatically displays DTL on the
starting screen, measured in meters. DTL can be calculated with a bow offset, a key feature if
your Atlas 2 is mounted on the mast. By setting this value in the Connect app, it allows you to
‘ping’ the line by simply sighting down the mast, and the Atlas 2 continuously calculates the
distance from the line to the bow, no matter the orientation of the boat.
To start the countdown timer, press Start. The timer will start counting down from the default
value set in the Connect app for the current profile. Minutes can be added to the timer using the
+1 button. The Start button becomes Sync while the timer is running, syncing DOWN to the next
whole minute. Under 1 minute to go, and the Sync button syncs UP to 1 minute. Pressing Reset
will stop the countdown timer and reset it to the default value.
Atlas 2 User Manual
Revision 2022-3-07
7

After the countdown timer reaches zero, the Atlas will automatically change to the home screen.
The timer will continue counting up in the background, until the End button is pressed.
It is a good idea to press the End button at the finish. Along with the starting line, both the start
and end of the race are recorded in the data log. As long as you remember to press End, this
will save you from manually determining them later.
Graphical Starting Screen
Along with the numerical starting screen, your Atlas 2 possesses a graphical starting screen that
shows a representation of your boat relative to the starting line in real time. First introduced on
the original Atlas, we’ve taken it to the next level with the introduction of the LEDs on the Atlas 2
which can show a range of starting information. Starting is a busy time, and we want you to be
able to choose the data YOU want to see to nail that start. Using the Customizable UI feature,
you can choose which starting screen (numerical or graphical) is the primary or default starting
screen. To give an overview of the graphical start screen, we created a short video contained in
this blog entry.
https://www.vakaros.com/blog/visual-time-to-line-explained-visually
Atlas 2 User Manual
Revision 2022-3-07
8

Angle Menu — Shift tracking and reference angles
To set up shift tracking on the Atlas, press the ANGLE button to bring up the ANGLE Menu.
There are two options for setting port and starboard reference angles, an automatic method and
a manual method:
1. Automatic method
Start automatic reference angle capture by pressing the AUTO button on the ANGLE menu. The
Atlas will walk you through sailing a short upwind leg, recording data while you sail and
determining your reference angles automatically. Follow the on-screen prompts, and in about a
minute, you’ll be all set to track shifts. In most conditions, this method will provide the best
results, as it minimizes the impact of small oscillations and waves, while allowing the crew to sail
the boat normally, without needing to interact with the Atlas once the process is started. It also
records your windward VMG in current conditions, vital data for the Time To Line and Time To
Burn functions to work.
2. Manual method
You can also set the Port and Starboard reference angles by pressing the corresponding PORT
and STBD buttons on the ANGLE screen to record the current heading. Keep in mind that an
instantaneous snapshot can introduce some error in the reference angles. Note that this method
does NOT capture your windward VMG.
We recommend checking your reference angles before every race and resetting them if
necessary. The ANGLE screen also shows some additional useful information, including an
estimate of the wind direction (the midpoint between the Port and Starboard reference angle),
the dead downwind angle, the tacking angle and average upwind speed.
LED display
The Atlas has an innovative row of 7 RGB LEDs that can be used to display key sailing/racing
data, provide alerts, and also inform on RaceSense status. The following functions are available
in the current firmware, and more are being developed:
● Start Timer
● Distance to Line (DTL)
● Time To Burn (TTB)
● Heel Angle (HA)
● Shift Tracking
● None (off)
These are set as part of the Custom UI Layout configuration in the Connect app. Details are
below, and there is more information at the blog entry covering LEDs.
Atlas 2 User Manual
Revision 2022-3-07
9

https://www.vakaros.com/blog/led-functionality-overview
Other Connect-controlled functionality
The connect app is really the control center of your Atlas experience. While it is totally possible
to use the Atlas 2 without touching the app, you’ll be missing out on these features:
Data logging
One of the hallmark features of the Atlas 2 is its ability to log sensor data for later review. Due to
its high logging rate and wireless connectivity, the Atlas 2 has become a favorite of Olympic
teams world-wide. When enabled, the Atlas 2 logs data whenever it is on. The data rate can be
set from 1Hz to an industry-leading 10Hz.
A long and detailed blog entry was created to explain all of this, and can be reviewed here:
https://www.vakaros.com/blog/telemetry-logging-its-here
Customizable User Interface
While the UI of the Atlas 2 was created by design experts and top sailors for maximum flexibility,
that does not mean that it will be perfect for everyone. That's why we created the custom UI
builder. This capability allows you to easily design your own screens with a graphical builder,
and then publish those screens to the Atlas 2. It also allows you to add controls (we call them
widgets) to the screens to support external sensors. Again we have a detailed blog entry
explaining it all.
https://www.vakaros.com/blog/an-introduction-to-the-atlas-customizable-ui
Atlas 2 User Manual
Revision 2022-3-07
10

Other Connect-controlled capabilities
The capabilities of the Connected app are deep and constantly growing. Best discovered by
exploring; we’ll highlight them here:
Firmware Updates
The software that runs the Atlas 2 (known as firmware) is constantly evolving, with new features,
improved algorithms, and more. Vakaros Connect will let you know when a new version is
available, and walk you through the installation process. Updates are installed wirelessly on the
Atlas 2, and the whole process only takes about a minute!
Backlight
The Atlas 2 has a vision-protecting red backlight, and the level can be controlled via the app.
The backlight also backlights the side buttons, and lightly backlights the LEDs (so you can see
which ones are OFF, a key RaceSense feature). Future versions of the Atlas 2 firmware will add
on-device backlight control, as well as an automatic mode that uses the ambient light sensor
built into the Atlas 2 to turn the backlight on when needed.
Profiles
Atlas profiles are collections of boat data and settings that can be switched as a unit. That
means you can set settings for a J70 racing with a 3 minute rolling clock, and a Star using a 5
minute sequence, and save settings (like bow offset) for each. Switching is a click away.
Clock
Switch timezone, set seeing a 12 or 24 hour clock.
Orientation Offset
Correct for mounting offset in all three planes (Heel, Trim, and Yaw).
Starting Timer
Set minutes to the starting signal, and choose if the Atlas makes countdown sounds.
Bow offset
Choose to use one or not, and if yes select the distance and the units used.
Magnetic Heading
Choose if the compass will display in degrees magnetic or true, and the dampening level.
GPS Dampening
Select the amount of dampening for both Speed over Ground (SOG) and Course Over Ground
(SOG) readings.
IMU Dampening
Select the amount of dampening for both heel and trim.
Atlas 2 User Manual
Revision 2022-3-07
11

Other Cool Hardware Features
Long-life Battery
When you’re sailing hard, the last thing you want to have to think about is the battery in your
compass. That’s why we gave the Atlas 2 the longest battery life in the business, BY FAR. Over
100 hours on a wireless charge. Forget your charging pad? Use any Qi compatible charging
pad, like the one you might use for your phone. And if you ever run low, you can get a full day of
battery life while charging during breakfast. Even better, we sourced a battery so capable that
we could design the Atlas 2 to never drain the battery to near empty, or charge fully. This
scheme maximizes the battery longevity of your Atlas 2. You’ll never have to worry about it.
Ever.
Dual Waterproof Speakers
Often the Atlas 2 will want to get your attention when you’re not looking. And the best way to do
that is sound. Lots of it. So the Atlas 2 has a pair of loudspeakers built into the bottom of the
case, protected by a clever waterproof membrane. Sound can get out, but water cannot get it.
Volume and sounds are customizable in the Connect app, naturally. Look for more sound
options in future versions of Vakaros Connect.
Atlas 2 User Manual
Revision 2022-3-07
12

High Visibility Screen
The 4.4 inch (diagonal) transflective LCD screen is by far the easiest screen to read on the
water. It is bonded to the latest generation Gorilla Glass outer screen for maximum protection.
While small, the key to its legibility is its very high contrast ratio and high (91) pixel per inch
count. By customizing the display layout, we have crews use the Atlas on boats in the 35-50
foot range. And due to its advanced technology, the brighter the sun, the easier the Atlas is to
read. Sailing at night? Turn on the backlight with the Vakaros Connect app. Future versions of
the fireware will support auto-backlight via the built-in light sensor.
Atlas 2 User Manual
Revision 2022-3-07
13

Sensors
We’ve got big plans for external sensors for the Atlas family. This includes wireless wind,
wireless depth+water speed, and also load sensors. Not just real-time data, but trends you can
use, and alerts that warn you of changing conditions. Racers have been beta testing the
capability for some time, and we’re putting the finishing touches on it. We want it to be as
accurate and reliable as the built-in sensors you know and trust from Vakaros, so we’ll have it
for you in the first firmware update that we do.
Atlas 2 User Manual
Revision 2022-3-07
14

Mounting Bracket
In order to mount the Atlas to your boat, you will need to install the included Atlas Mount. The
mount can be attached directly to a mast track, bulkhead, or any flat surface using the two
provided M4-14 screws or by running the included velcro straps through the holes in the side.
The mount can be installed in either orientation, with the release tab facing up or down. Be sure
that the release tab will be accessible with the Atlas installed—pulling this tab is the only way to
remove the Atlas from the mount.
To attach the Atlas to the mount, first hook the solid end of the mount into one of the slots on the
back of the Atlas, then push the Atlas towards the quick-release end of the mount until it clicks
securely into place. If you don’t hear a click, double check the alignment and try again. To
remove the Atlas, press the Atlas gently towards the mount, pull on the quick-release tab, tilt the
Atlas away from the mount to remove it.
For maximum mounting security, tie a safety line to the lanyard loop on the bottom right corner
of the Atlas.
In order to use the magnetic compass, heel, and trim, the Atlas must be mounted to a fixed
location on the boat (i.e. not on a boom or rotating mast). Offset angle settings for heel, trim and
heading to account for different mount orientations can be set in the Connect App.
A section of mast brackets designed for the Atlas 2 are available in our store.
https://www.vakaros.com/store
Atlas 2 User Manual
Revision 2022-3-07
15

Care Instructions:
Store the Atlas 2 in its case to avoid scratching the anti-reflective & hydrophobic coating on the
glass.
Wipe away salt & salty water when finished sailing.
To clean the Atlas 2, use a soft cloth. Dampen cloth with water if necessary.
Don't leave the Atlas 2 outdoors when not in use.
Don't leave the Atlas 2 submerged in water for extended periods. It will be fine, but it will get
slimy!
The Atlas 2 is covered by an industry-leading 2-year warranty, and contains no user serviceable
parts. If your Atlas 2 ever acts 'strangely’ try power-cycling the device, followed by a full charge.
Additionally, make sure you have the latest Atlas 2 firmware installed. If that fails to correct the
problem, contact our technical support for more assistance.
Atlas 2 User Manual
Revision 2022-3-07
16
Table of contents