VALBERG FIH 60 EGK 756C User manual


EN
WARRANTY CONDITION
This product is guaranteed for a period of 2 years from the date of purchase* against
any failure resulting from a manufacturing or material defect. This warranty does not
cover defects or damage resulting from incorrect installation, improper use or abnormal
wear of the product.
*as shown on the sales receipt.
FR
CONDITION DE GARANTIE
Ce produit est garanti pour une période de 2 ans à partir de la date d’achat*, contre
toute défaillance résultant d’un vice de fabrication ou de matériau. Cette garantie ne
couvre pas les vices ou les dommages résultant d’une mauvaise installation, d’une
utilisation incorrecte ou de l’usure anormale du produit.
*sur présentation du ticket de caisse.
NL
GARANTIEVOORWAARDEN
Dit product wordt gegarandeerd voor een periode van 2 jaar vanaf de aankoopdatum*,
voor elke storing die het gevolg is van een fabricagefout of het materiaal. Gebreken of
schade door slechte installatie, onjuist gebruik of abnormale slijtage van het product
worden niet gedekt door deze garantie.
*op vertoon van kassabon.
ES
CONDICIONES DE GARANTÍA
El certificado de garantía de este producto tiene una duración de 2 años a partir de la
fecha de compra* que se limita a los defectos de fabricación y averías del material.
Se excluyen de la garantía deficiencias o daños originados por una mala instalación,
errores en la manipulación o por un uso inadecuado.
*previa presentación del comprobante de compra.
MADE IN PRC
ELECTRO DEPOT
1 route de Vendeville
59155 FACHES-THUMESNIL
FRANCE

08/2022-V2
974840 - FIH 60 EGK 756C (v4)
974861 - FIH 90 EGK 756C (v4)
Extractor hood
Hotte aspirante
Dampkap
Campana extractara
INSTRUCTIONS FOR USE ....................02
CONSIGNES D'UTILISATION ....................16
GEBRUIKSAANWIJZINGEN ....................30
INSTRUCCIONES DE USO ....................44
2/2


1 42 53


2 EN2 FR2 EN
Thanks!
Thank you for choosing this VALBERG product.
Chosen, tested and recommended by ELECTRO DEPOT,
the products of the VALBERG brand are easy to use,
reliable and of an impeccable standard.
Thanks to this appliance, you can be sure that each
use will bring you satisfaction.
Welcome to ELECTRO DEPOT.
Visit our website: www.electrodepot.fr

3 EN3 FR3 EN
Table of contents
APreview of the
appliance
CUseful information
BUsing the appliance Wall mounting installation
Installation without external opening
Replacement the lamp
Maintenance of the appliance
Troubleshooting
Description of the appliance

4 EN
Preview of the appliance
A
Description of the appliance
Touch controls 1
1On/Off button
It's used for turning on/off the fan.
2Speed decrease button
For decreasing the speed of the fan.
3Digital display
Fan speed display:"1" for Low speed, "2" for Medium speed, "3" for High
speed.
4Speed plus button
For increasing the speed of the fan
5Light button
BOOSTER FUNCTION
Press
+
to speed 4, enter into highest speed while the hood is in use and it will increase
speed for 5 minutes, after that slowing down again.

5EN
Using the appliance
B
Wall mounting installation
Prepare for installation
f you have an outlet to the out side, your cooker hood can be connected as below picture by means
of an extraction duct (enamel, aluminum, flexible pipe or inflammable material with an interior
diameter of 150mm)
Before installation, turn the unit off and unplug it from the outlet.
The cooker hood should be placed at a distance of 65~75cm above the cooking plane for best effect.

6EN
Using the appliance
B
Installation of the cookerhood
Drill 3 x 8 mm holes for hood holding bracket. Tighten the bracket with the screws and plugs
provided.
Wall holes
Screw plug
Wallbracket
4 x 30 mm - screw
Lift the hood up and hang it onto the wall bracket.

7EN
Using the appliance
B
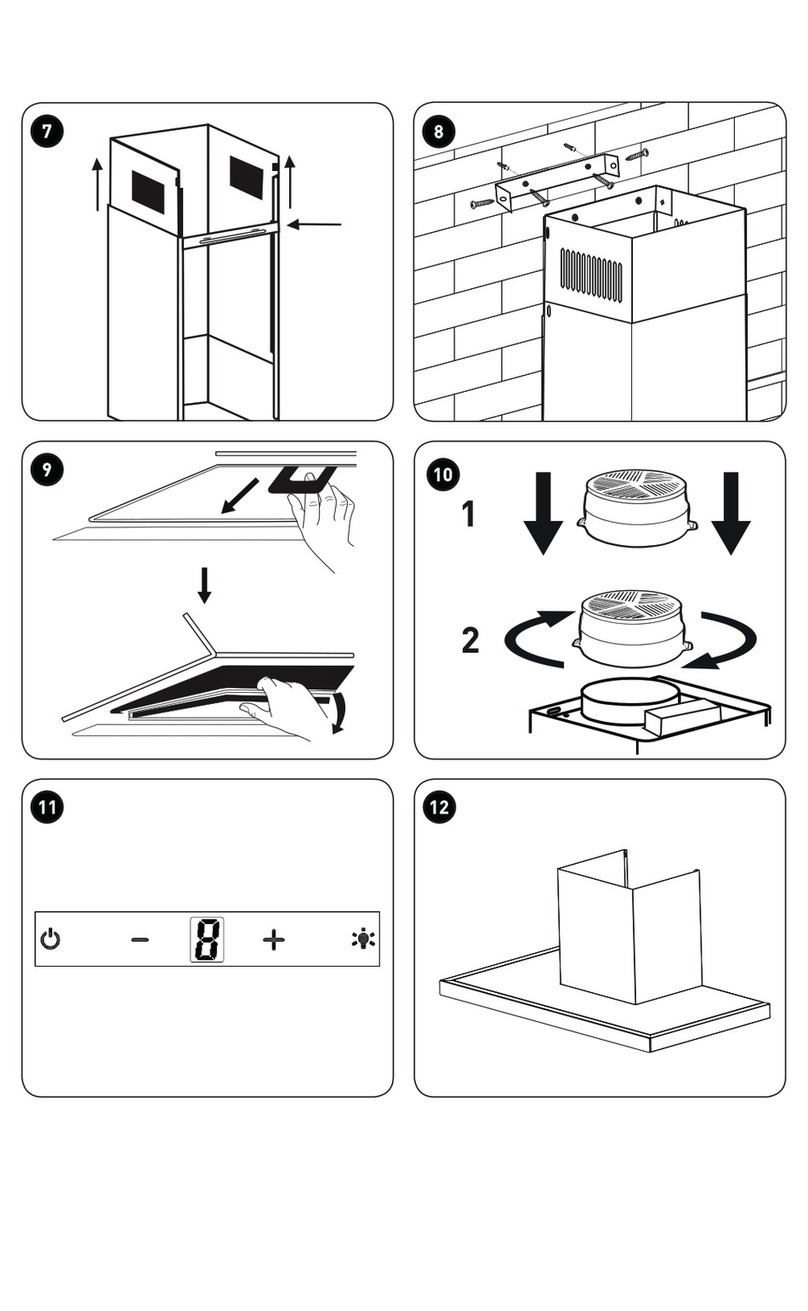
Open the glass panel and remove the aluminum grease filter. Mark the four holes for the installation
from the inside of the hood.
Take the hood back down again. Drill the four ø 8 mm holes at the marked locations. Insert four
wall plugs into the holes and four screws into the wall.
Hang the extractor hood back in the wall bracket and tighten the four screws on the inside of the
extractor hood.

8EN
Using the appliance
B
Upper decorative chimney (Inner)
Lower Chimney bracket
Lower decorative chimney (Outer)
Put the chimney on the cooker hood. Fix the lower chimney bracket on the wall by 2 screws(4mm
x30mm).
Then pulling out the upper chimney upwards to the target height. Adjust to reach the height required.
Fix the upper chimney on the upper chimney bracket by 2 screws (4x8mm). Then fix the upper
chimney bracket on the wall. Before fixing the bracket on the wall, you can decide the upper
chimney bracket fixing holes for installation.

9EN
Using the appliance
B
Fix the lower chimney with 2 pcs of 4x8mm screws on the cooker hood.

10 EN
Using the appliance
B
Screw
Warning: For safety reason, please use only the same size of fixing or mounting screw which are
recommended in this instruction manual.
Warning: Failure to install the screws or fixing device in accordance with these instructions may
result in electrical hazards.

11 EN
Using the appliance
B
Installation without external opening
Recycling version
Contact your supplier to obtain active carbon
filters to transform the extractor hood into a
recycling hood.
Installing the active carbon filter (cassette)
•
Check that the diameter of the active
carbon filter corresponds to the outlet
diameter.
•
If necessary, remove the pre-installed
diameter adapter.
•
Position the active carbon filter on the
outlet and attach it in place by turning it
anticlockwise.
Installing the active carbon filter (cut-out)
•
The metal filter has to be removed before
the active carbon filter is installed.
•
To open the metal filter, press on
the locking device and pull the filter
downwards.
•
Place the pre-cut filter on top of the
metal filter. Hold it in position using the
•
metal rods (supplied depending on the
model).
•
Replace the metal filter in its original
position.
PLEASE NOTE
Make sure that the filter is properly attached; otherwise,
it could become dislodged and cause a hazard.
Installing a carbon filter reduces the extraction power of
the hood.

12 EN
Using the appliance
B
Replacement the lamp
Light source in this product can only be replaced by qualified professionals.
Please contact after-sales service if the light source fails. The light source shall be removed
at the end of the product's useful life, with sorting and recycling done separately.

13 EN
BUsing the appliance
Page 1 / 1
974840 FIH 60 EGK 756C (v4)
974861 FIH 90 EGK 756C (v4)
1 2 3
FR / ERRATUM : CONSIGNES D’UTILISATION
Maintenance de l’appareil : Resserrage des écrous du support d’arrêt
1) Ouvrir la partie vitrée supérieure
2) Utilisez une clé M10 (Spanner) pour serrer l’écrou M10 (Nut) en A
3) Effectuez la même opération pour l’autre côté en B
REMARQUE : La partie vitrée ne doit pas être ouverte en utilisation normale, celle-ci ne
doit être ouverte que pour le nettoyage et la maintenance.
NL / ERRATUM : GEBRUIKSAANWIJZINGEN
Onderhoud van het apparaat : Aandraaien van de moeren van de aanslagbeugel
1) Open het bovenste glazen gedeelte
2) Gebruik een M10-sleutel (Spanner) om de M10-moer (Nut) bij A
3) Keer dezelfde bewerking uit voor de andere kant in B
OPMERKING : Het glazen gedeelte mag bij normaal gebruik niet worden geopend, het
mag alleen worden geopend voor reiniging en onderhoud.
ES / ERRATA : INSTRUCCIONES DE USO
Mantenimiento del dispositivo : Reapriete de las tuercas del soporte de tope
1) Abra la parte superior de vidrio
2) Use una llave M10 (Spanner) para apretar la tuerca M10 (Nut) en A
3) Realice la misma operación para el otro lado en B
NOTA : La parte de vidrio no debe abrirse durante el uso normal, solo debe abrirse
para limpieza y mantenimiento.
Retighten stop bracket nuts
1) Open the upper glass part
2) Use an M10 spanner to tighten the M10 nut in A
3) Perform the same operation for the other side in B
NOTE: The glass part should not be opened in normal use, it should only be opened for
cleaning and maintenance.
Maintenance of the appliance
This manual suits for next models
3
Table of contents
Languages:
Other VALBERG Ventilation Hood manuals
Popular Ventilation Hood manuals by other brands

Windster
Windster WS-50E30SS user manual

Innocenti
Innocenti AGS60PK manual

Gorenje Plus
Gorenje Plus GHI92X Instruction on mounting and use

La Germania
La Germania Prima KPL60PLAG1XRA Use and maintenance instructions

Dacor
Dacor DHI361 use and care manual

Luxair
Luxair CH60CURVA/BLK Installation, maintenance and usage