Valcom VIP-804B User manual

1 947546
ISSUE 2
VIP-804B
QUAD NETWORK AUDIO PORT
INTRODUCTION
The VIP-804B Quad Network Audio Port enables
voice access to four zones of one-way paging over
an IP network, allowing page zones to be extended
anywhere network connectivity is available. The
VIP-804B can be programmed as a SIP (Session
Initiation Protocol) device with four identities (one
per audio channel) for connectivity to virtually any
Voice over IP (VoIP) telephone system.
SPECIFICATIONS
Features
4 Audio Outputs or Inputs
4 Form A relay contacts
4 Contact Closure Inputs
4 SIP identities for registering to a SIP
telephone system
RJ-45 jack for network connection
Front panel activity LED
Provides audio for up to 40 Valcom one-way
amplified speaker assemblies per zone
Output control contact closure provided during
paging output
Contact closure or VOX operation of audio
inputs
VM-186 RJ-45 Connector provided for audio
and relay interface
Page with music output, music mutes during
page
AUX audio input via RCA Jack for background
music
Compatible with 25 or 70 Volt amplifiers
2.5mm jack for optional DC power
Power over Ethernet (PoE) 802.3af compatible
Dimensions/Weight
1.72”H x 7.00" W x 11.88" D
(4.36cm H x 17.78cm W x 30.18cm D)
Weight: 2.5 lbs. (1.13 kg)
Nominal Specifications
Input Impedance: 600 Ohms
Input Level: -10dBm nominal
Voice Switch Sensitivity: -21dBm
AUX Input Impedance: 8 to 600 Ohms
AUX Input Level: -10dBm nominal
Output Impedance: 50 Ohms
Output Level: - 10dBm nominal
Relay Current: 1 AMP @ 24VDC
Nominal Power Requirements
Via back panel barrel connector:
Voltage: 24VDC
Current: 325mA
Via 802.3af PoE Ethernet Switch:
802.3af: Class 3
These products are intended for use with a UL
Listed power source marked “Class 2” or “LPS”
rated 24VDC, or 48VDC (PoE).
PoE and all interconnected ITE are intended for
intra-building.
Environment
Temperature: 0 to +40° C
Humidity: 0 to 85% non-precipitating
Precautionary Designations
WARNING-To Reduce The Risk Of Fire Or
Electric Shock. Do Not Expose This
Apparatus To Rain Or Moisture.
AVERTISSEMENT - Afin de réduire les
risques d'incendie ou de décharge
électrique, évitez d'exposer le système à la
pluie ou à l'humidité.

2 947546
CAUTION: To reduce the risk of electric shock,
Do not remove cover.
No user serviceable parts inside.
Refer servicing to qualified service personnel.
CAUTION
RISK OF ELECTRIC SHOCK
DO NOT OPEN
This symbol indicates that dangerous
voltage constituting a risk of electric
shock is present within this unit.
This symbol indicates that there are
important operating and maintenance
instructions in the literature accompanying
this unit.
Apparatus shall not be exposed to
drippingor splashing and no objects filled
with liquids,such as vases, shall be placed
on the apparatus.
L’appareil ne doit pas être exposé à des
égouttements et éclaboussures et aucun
Objet Rempli de liquide, comme vase, ne
doit être placé sur l’appareil.
FCC Information
This equipment has been tested and found to
comply with the limits for a Class A digital
device, pursuant to Part 15 of the FCC Rules.
These limits are designed to provide
reasonable protection against harmful
interference when the equipment is operated in
a commercial environment. This equipment
generates, uses and can radiate radio
frequency energy and if not installed and used
in accordance with the instruction manual, may
cause harmful interference to radio
communications. Operation of this equipment
in a residential area may cause harmful
interference in which case the user will be
required to correct the interference at his own
expense.
General Mounting Information
A) Elevated Operating Ambient - If installed in a
closed or multi-unit rack assembly, the operating
ambient temperature of the rack environment may
be greater than room ambient. Therefore,
consideration should be given to installing the
equipment in an environment compatible with the
maximum ambient temperature (Tma) specified by
the manufacturer.
B) Reduced Air Flow - Installation of the equipment
in a rack should be such that the amount of air flow
required for safe operation of the equipment is not
compromised.
C) Mechanical Loading - Mounting of the
equipment in the rack should be such that a
hazardous condition is not achieved due to uneven
mechanical loading.
D) Circuit Overloading - Consideration should be
given to the connection of the equipment to the
supply circuit and the effect that overloading of the
circuits might have on overcurrent protection and
supply wiring. Appropriate consideration of
equipment nameplate ratings should be used when
addressing this concern.
E) Reliable Earthing - Reliable earthing of rack-
mounted equipment should be maintained.
Particular attention should be given to supply
connections other than direct connections to the
branch circuit (e.g. use of power strips).
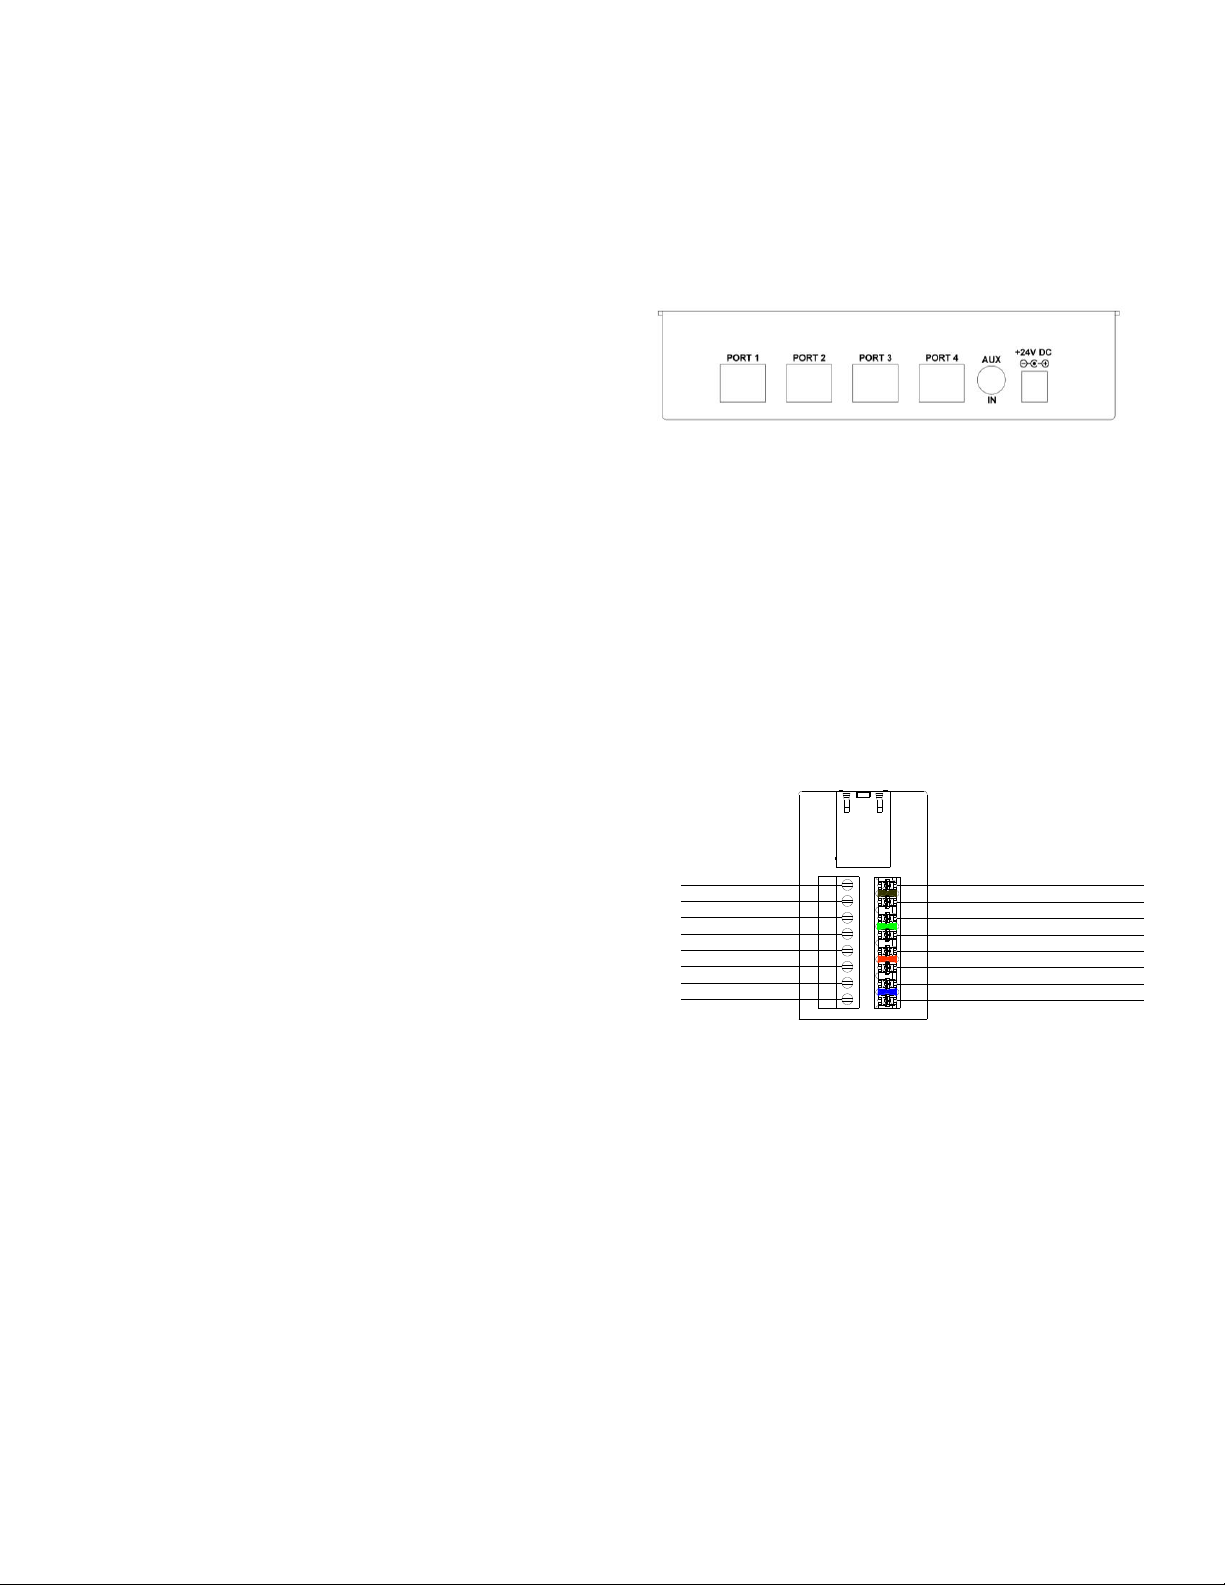
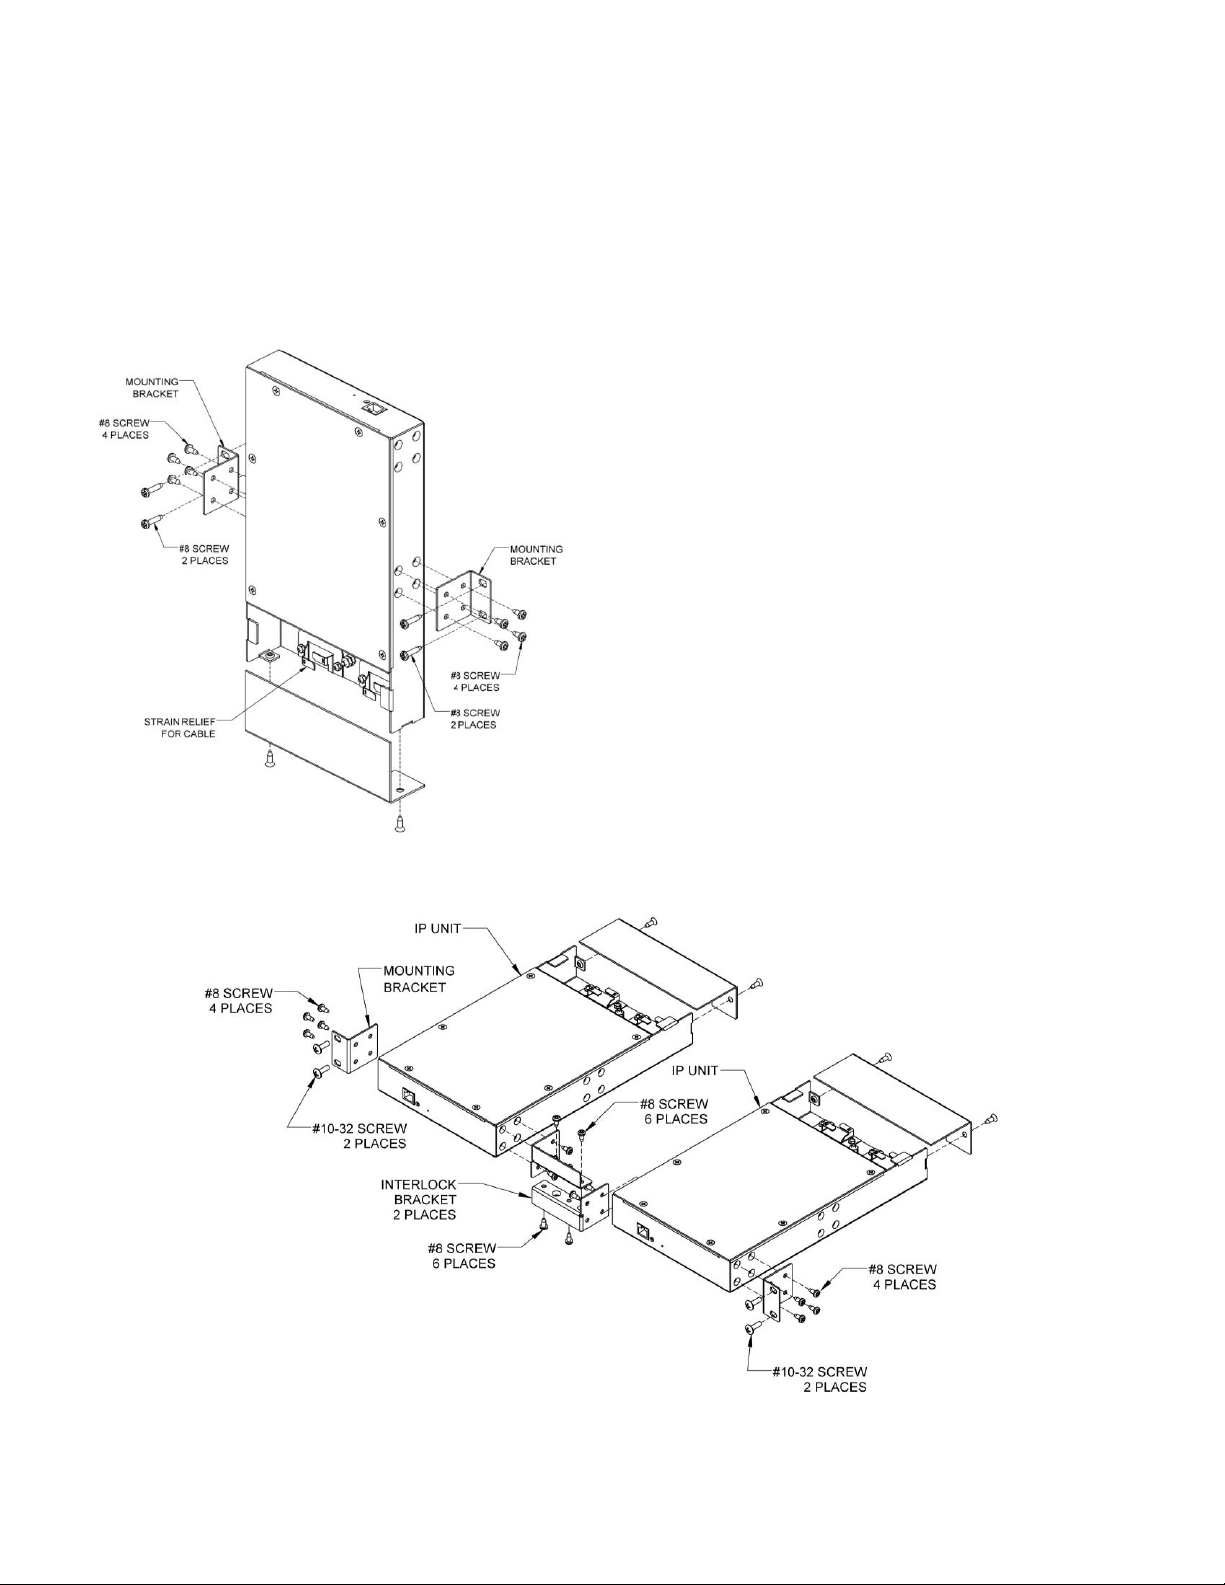
INSTALLATION
Mounting
Wall: Using #8 screws (included), attach the wall
mounting brackets to each side of the VIP-804B as
shown in Figure 2. Use the included wood screws
to attach the VIP-804B to the wall. For surfaces
other than wood, use hardware appropriate for the
surface (not provided).
Rack: Two VIP-804B units may be joined together
and installed into a 1U rack slot. Using Figure 3 as
a guide, attach the interlock brackets and end
IMPORTANT SAFETY INFORMATION
CONSIGNES DE SÉCURITÉ IMPORTANTES
1. Read these instructions.
Lisez ces instructions.
2. Keep these instructions.
Conservez ces instructions.
3. Heed all warnings.
Respecteztous les avertissements.
4. Follow all instructions.
Suivez toutes les instructions.
5. Do not use this apparatus near water.
Ne pas utiliser cet appareil près de l'eau.
6. Clean only with dry cloth.
Nettoyer avec un chiffon sec.
7. Do not block any ventilation openings. Install in accordance with the manufacturer’s
instructions.
Ne pas bloquer les ouvertures de ventilation. Installer formément aux instructions du
fabricant.
8. Do not install near any heat sources such as radiators, heat registers, stoves or other
apparatus (including amplifiers) that produce heat.
Ne pas installer à proximité de sources de chaleur telles que radiateurs, registres de
chaleur, poêles ou autres appareils (y compris les amplificateurs) produisant de la chaleur.
9. Do not defeat the safety purpose of the polarized or grounding-type plug. A polarized plug
has two blades with one wider than the other. A grounding type plug has two blades and a
third grounding prong. The wide blade and the third prong are provided for your safety. If
the provided plug does not fit into your outlet consult an electrician for replacement of the
obsolete outlet.
Ne pas contourner le dispositif de sécurité de la fiche polarisée ou demise à la terre. Une
fiche polarisée possède deux lames dont une plus large que l'autre. Une fiche de terre a
deux lames et une troisième broche de mise à la terre. La lame large et la troisième
broche sont fournies pour votre sécurité. Si la fiche fournie ne rentre pas dans votre prise,
veuillez consulter un électricien pour le remplacement de la prise obsolète.
10.Protect the power cord from being walked on or pinched particularly at plugs, convenience
receptacles and the point where they exit from the apparatus.
11.Only use attachments/accessories specified by the manufacturer.
N'utilisez que des fixations / accessoires spécifiés par le fabricant.
12. Use only with the cart, stand, tripod, bracket or table specified
by the manufacturer or sold with the apparatus. When a cart is
used, use caution when moving the cart/apparatus combination
to avoid injury from tip-over.
Utilisez uniquement avec le chariot, stand, trépied, support ou table spécifié par le
fabricant ou vendu avec l'appareil. Quand un chariot est utilisé, Soyez prudent lorsque
vous déplacez l'ensemble chariot / appareil pour éviter des blessures dues au
renversement.
13. Unplug this apparatus during lightning storms or when unused for a long period of time.
Débranchez cet appareil pendant les orages ou lorsqu'il n'est pas utilisé pendant une
longue période de temps.
14. Refer all servicing to qualified service personnel. Servicing is required when the
apparatus has been damaged in any way. Such as when the power supply cord or plug is
damaged, liquid has been spilled, objects have fallen into the apparatus or the
apparatus has been exposed to rain or moisture and does not operate normally or has
been dropped.
Confiez toute réparation à un personnel qualifié. Une réparation est nécessaire lorsque
l'appareil a été endommagé de quelque façon. Par exemple lorsque le cordon
d'alimentation oula fiche est endommagé, du liquide a été renversé, si des objets sont
tombés dans l'appareil ou le appareil a été exposé à la pluie ou àl'humidité et ne
fonctionne pas normalement ou s'il est tombé.

3 947546
VM-186
RJ45
BLUE
ORANGE
GREEN
BROWN
BROWN
BLUE
N/O RELAY OUTPUT
AUDIO INPUT
CONTACT CLOSURE INPUT
AUDIO OUTPUT
WHITE/BLUE
BLUE
WHITE/ORANGE
ORANGE
WHITE/GREEN
GREEN
WHITE/BROWN
BROWN
mounting brackets to each of the VIP-804B units,
then mount the combined units into an available
rack slot.
Table: Provided with the VIP-804B are four rubber
pads. Peel the pads from their carrier backing and
place at the four corners of the bottom of the unit.
Power Connections
The preferred method of powering a VIP-804B is
via a Power over Ethernet (PoE) switch meeting
the 802.3af specification.
If the rear panel barrel connector is used for power,
the preferred power supply is a Valcom VIP-324D.
Make all required signal connections before
applying power to the unit. If powering via PoE,
make sure all signal connections via the back
panel are made then connect the VIP-804B to the
Ethernet switch.
If power is supplied via the barrel connector, make
sure all signal connections are secure. Attach the
unit to the network via the front panel RJ-45
Ethernet connector. Apply power by connecting
the power supply into the VIP-804B via the barrel
connector on the rear of the VIP-804B.
Network Connection
The VIP-804B has one RJ-45 Ethernet network
connector on the front panel.
Use a standard Ethernet patch cable to connect
the VIP-804B to an Ethernet switch.
Status Indicator Lights
The VIP-804B has 3 status indication lights on the
front panel:
STATUS: Illuminates at regular intervals during
normal operation. On steady indicates unit is in
reset mode.
The network jack provides two LED indicators:
Green LED: (Link) Indicates Ethernet connection
when illuminated.
Yellow LED: (Activity) Indicator flashes to indicate
network activity.
Signal Connections
The VIP-804B has five signal connectors on the
rear panel:
1 RCA jack for AUX audio input
4 RJ-45 connectors for signal connections for
each networked channel
AUX Input: Local audio may be input via the rear
panel RCA jack. Nominal input impedance is 600
Ohms. Connect any compatible audio source using
an RCA patch cable. Audio supplied through the
rear panel RCA jack is transformer coupled to all
Audio Out channels when Audio Out is idle. This is
typically used for background music and can be
enabled or disabled for each channel.
Rear View
Networked Channels: Access to the networked
audio output, audio input, contact closure input and
relay closure output is provided via four rear panel
RJ-45 connectors. Provided with the VIP-804B are
four RJ-45 patch cables and four VM-186 RJ-45
Connectors. Signal connections are made by
connecting one end of a patch cable to the
VIP-804B, Port 1, 2, 3, 4, and the other end of the
patch cable to the VM-186 connector. Access to
the signals is via screw connections or 110-style
punch down block connection on the VM-186 (see
Figure 1). Signals are present on pairs of pins, as
shown in the following chart:
Figure 1. VM-186 RJ-45 Connector
Setup
Information specific to your application will need to
be programmed into the VIP-804B using a
computer. The PC used for programming should
be connected to the same subnet as the VIP-804B.
Setup will be done using the IP Solutions Setup
Tool. Download the latest version of the free IP
Solutions Setup Tool from the Valcom web site at
www.valcom.com/vipsetuptool.

4 947546
TECHNICAL ASSISTANCE
When trouble is reported, verify power is being
supplied to the unit and there are no broken
connections. If a spare unit is available, substitute
a spare unit for the suspected defective unit.
Assistance in troubleshooting is available from the
factory. Call (540) 563-2000 and press 1 for
Technical Support or via email at
support@valcom.com.
When requesting assistance, you should include
all available information. General information and
troubleshooting procedures are available on the
Valcom website at www.valcom.com.
Valcom equipment is not field repairable. Valcom,
Inc. maintains service facilities in Roanoke, VA.
Should repairs be necessary, attach a tag to the
unit clearly stating your company name, address,
phone number, contact person and the nature of
the problem. Send the unit to:
Valcom, Inc.
Repair & Return Dept.
5614 Hollins Road
Roanoke, Va. 24019-5056
WARRANTY
Warranty information may be found on our website
at www.valcom.com/warranty.
Figure 2. Wall Mounting
Figure 3. Mounting Two joined Units
Table of contents
Other Valcom Telephone Accessories manuals

Valcom
Valcom V-1109RTHF User manual

Valcom
Valcom V-9941A User manual

Valcom
Valcom V-1109RTVA User manual

Valcom
Valcom V-1109RTHF User manual

Valcom
Valcom V-9924C User manual

Valcom
Valcom V-1109RTVA User manual

Valcom
Valcom VIP-812B User manual

Valcom
Valcom V-9936A User manual

Valcom
Valcom V-9923B User manual

Valcom
Valcom V-9980A-4 User manual
Popular Telephone Accessories manuals by other brands

ISAFE MOBILE
ISAFE MOBILE ORBIT 2.0 Quick start manual and safety instructions

Premier Technology
Premier Technology DVR 1800 Series Quick start manual

SSS Siedle
SSS Siedle Siedle Steel SBTLM 650-04 Product information

Viking
Viking DVA-LPA user guide

Connectland
Connectland HC21J user manual

Grandstream Networks
Grandstream Networks HT801 Administration guide