Vallone vao 5100-80-0010-MW Manual

vao
TECHNISCHE INFORMATIONEN
TECHNICAL INFORMATION
Wandhängendes Tiefspül-WC
Wall-hung washdown WC

2V.2022.12.1
vao
ARTIKELNUMMER
ITEM NUMBER
BESCHREIBUNG
DISCRIPTION
MASSE
DIMENSIONS
GEWICHT
WEIGHT
WEISS MATT 5100-80-0010-MW
WHITE MATT
SCHWARZ MATT 5100-80-0010-MB
BLACK MATT
WANDHÄNGENDES TIEFSPÜL-WC,
SPÜLRANDLOS, KERAMIK
WALL-HUNG WASHDOWN WC,
RIMLESS, CERAMIC
550 X 350 X 370 MM
23 KG
PRODUKTINFORMATIONEN
PRODUCT INFORMATION
ZUSÄTZLICH ERFORDERLICHES PRODUKT
ADDITIONAL REQUIRED PRODUCT
WC SITZ
WEISS MATT 5100-80-0011-MW
WHITE MATT
SCHWARZ MATT 5100-80-0011-MB
BLACK MATT
LIEFERUMFANG
SCOPE OF DELIVERY
WC
WC
BEFESTIGUNGSKIT
FASTENING KIT
STREUSIEB
STRAINER

3V.2022.12.1
vao
Alle Maße in Millimetern. Produktionstoleranzen vorbehalten.
All dimensions in millimeters. Production tolerances reserved.
MASSZEICHNUNG
DIMENSIONAL DRAWING
100
550
350
420 27
55
230 100
180
55
330
365
160

4V.2022.12.1
vao
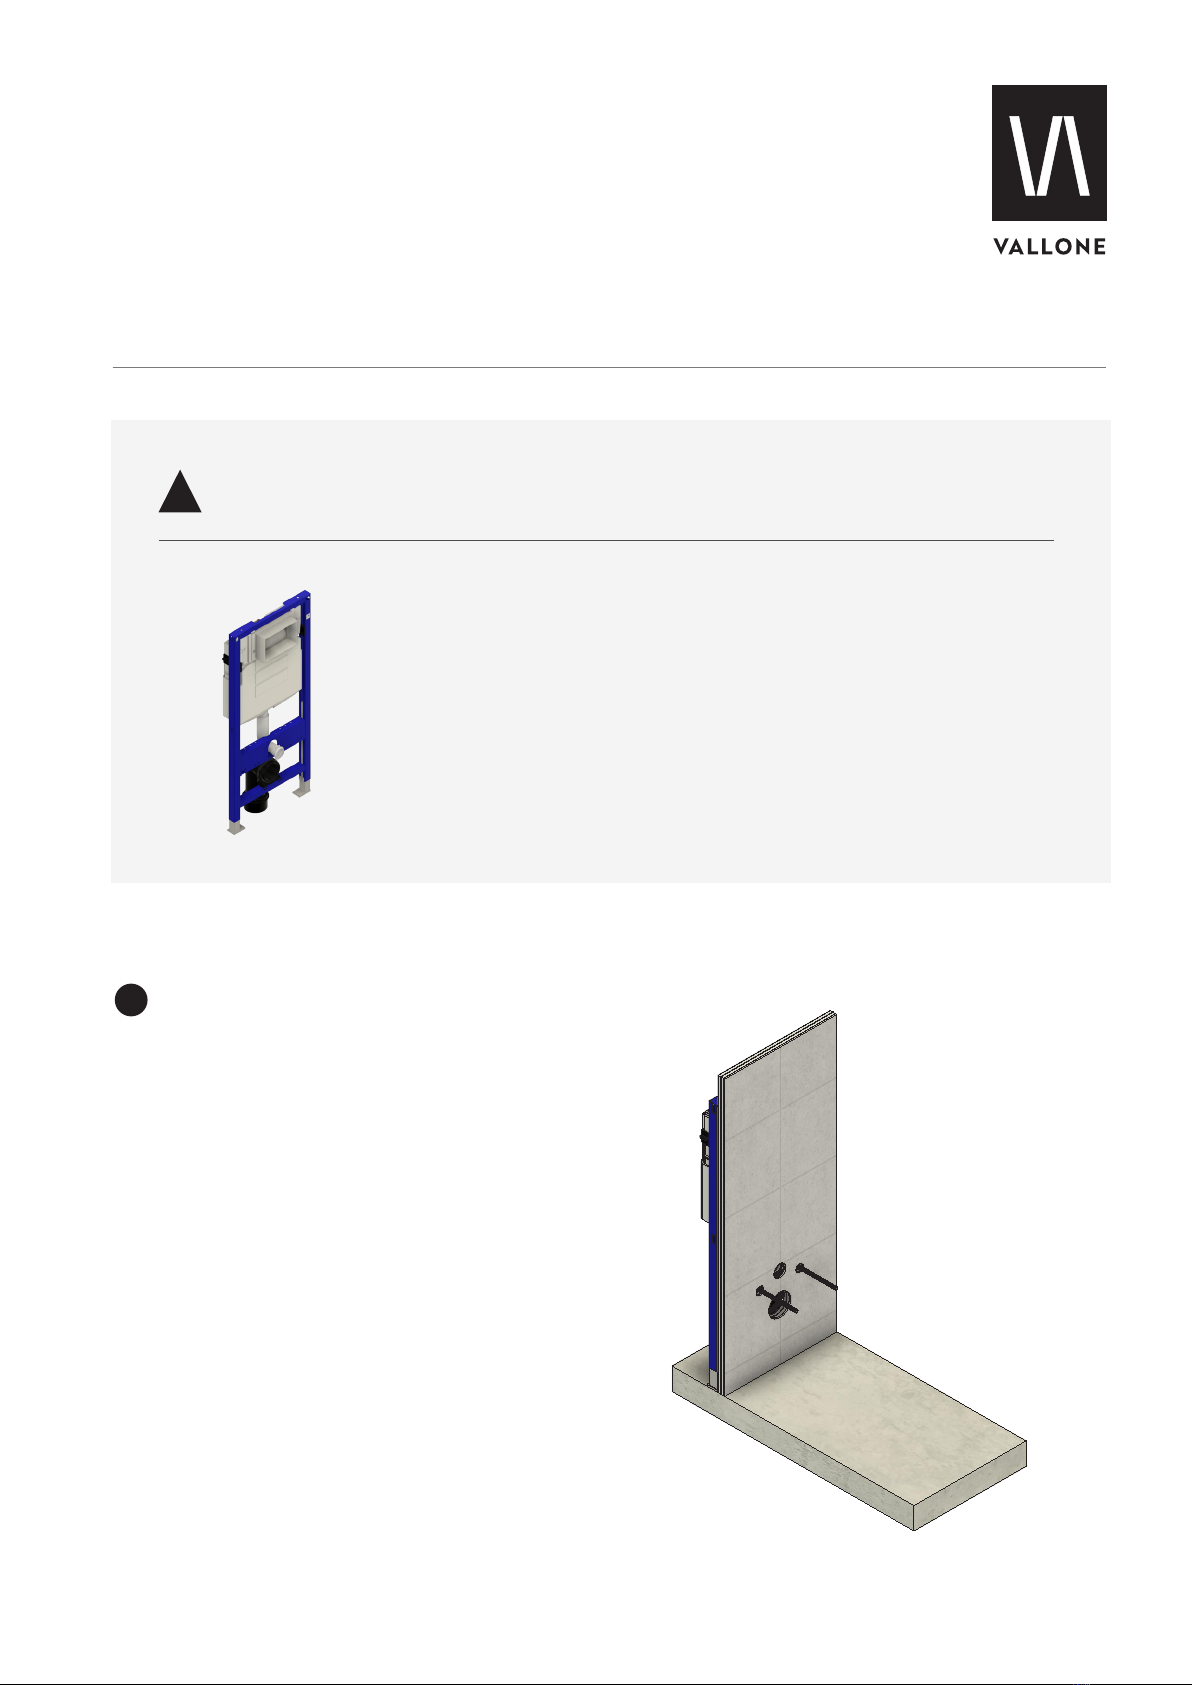
• Die Installation darf nur von geschultem Fachpersonal unter Be-
rücksichtigung der Montageanleitung und den allgemein an-
erkannten Regeln der Technik (a.a.R.d.T.) durchgeführt werden.
Nach erfolgter Installation ist die Montageanleitung dem Endan-
wender auszuhändigen.
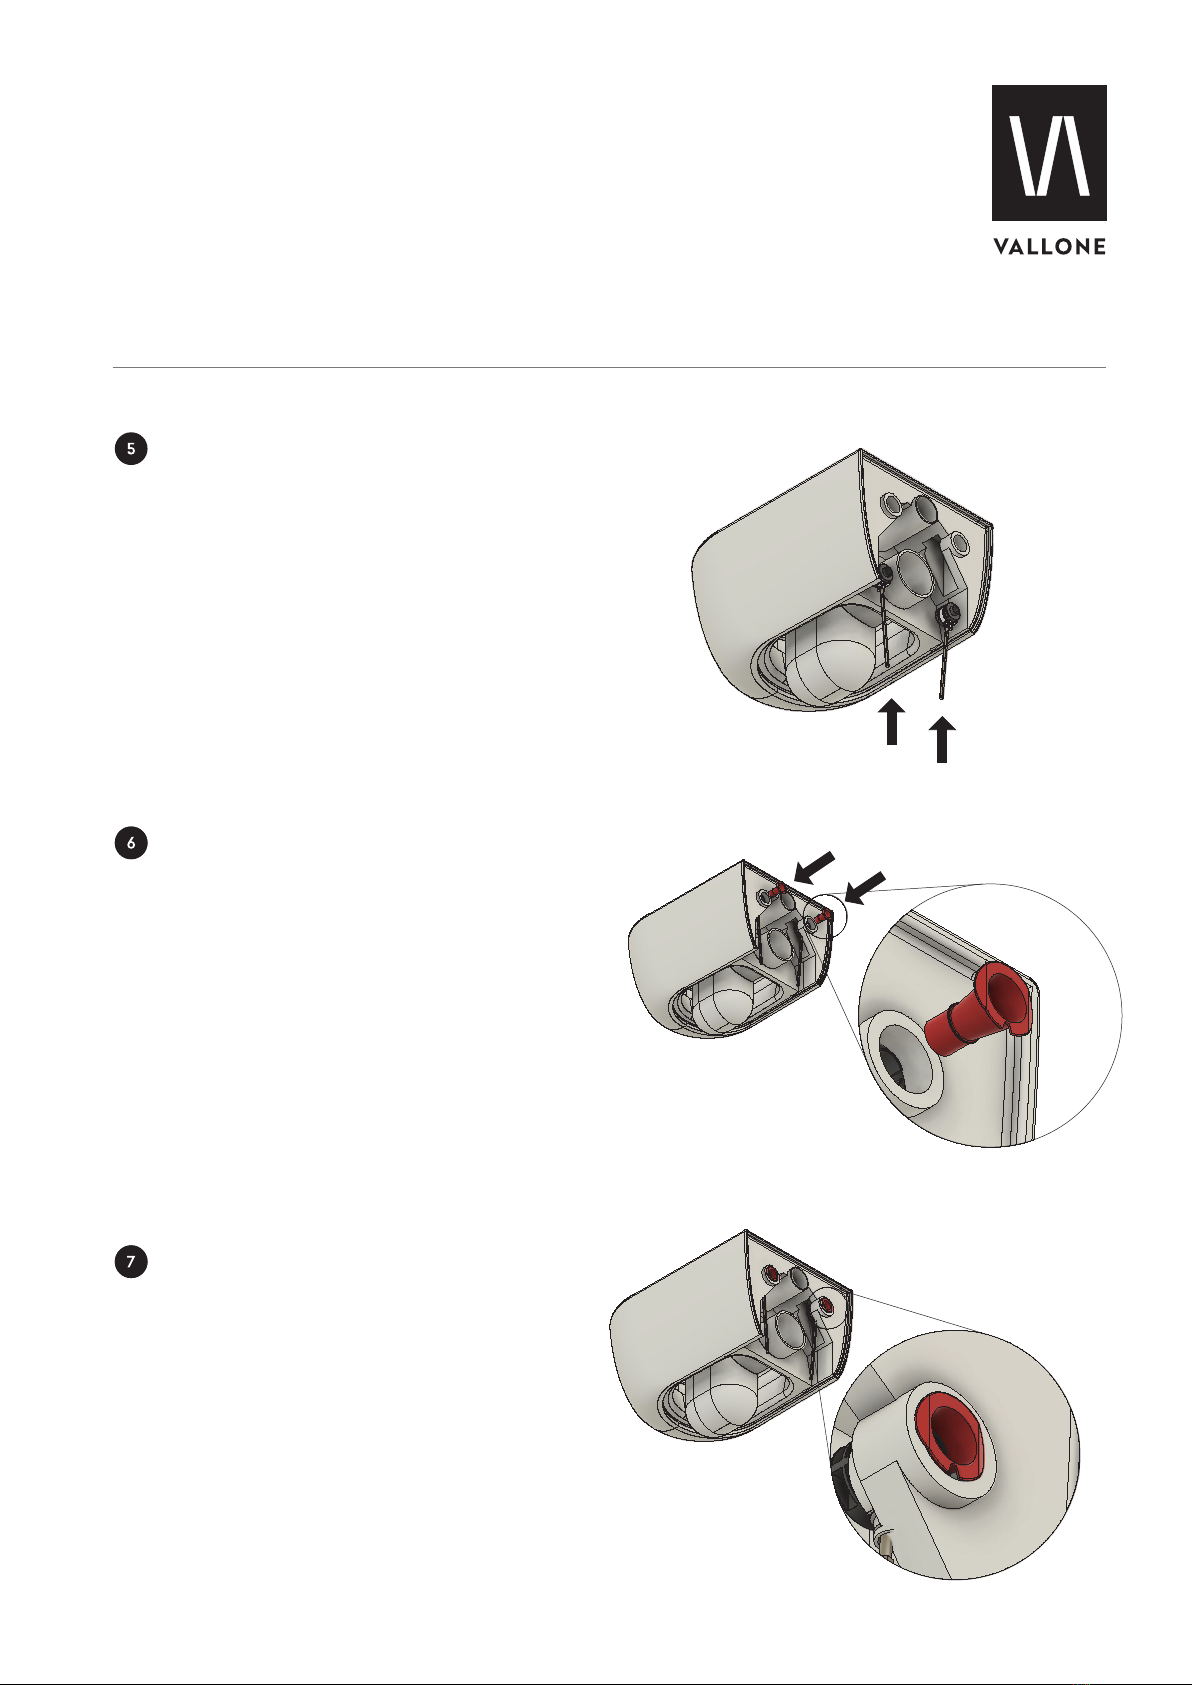
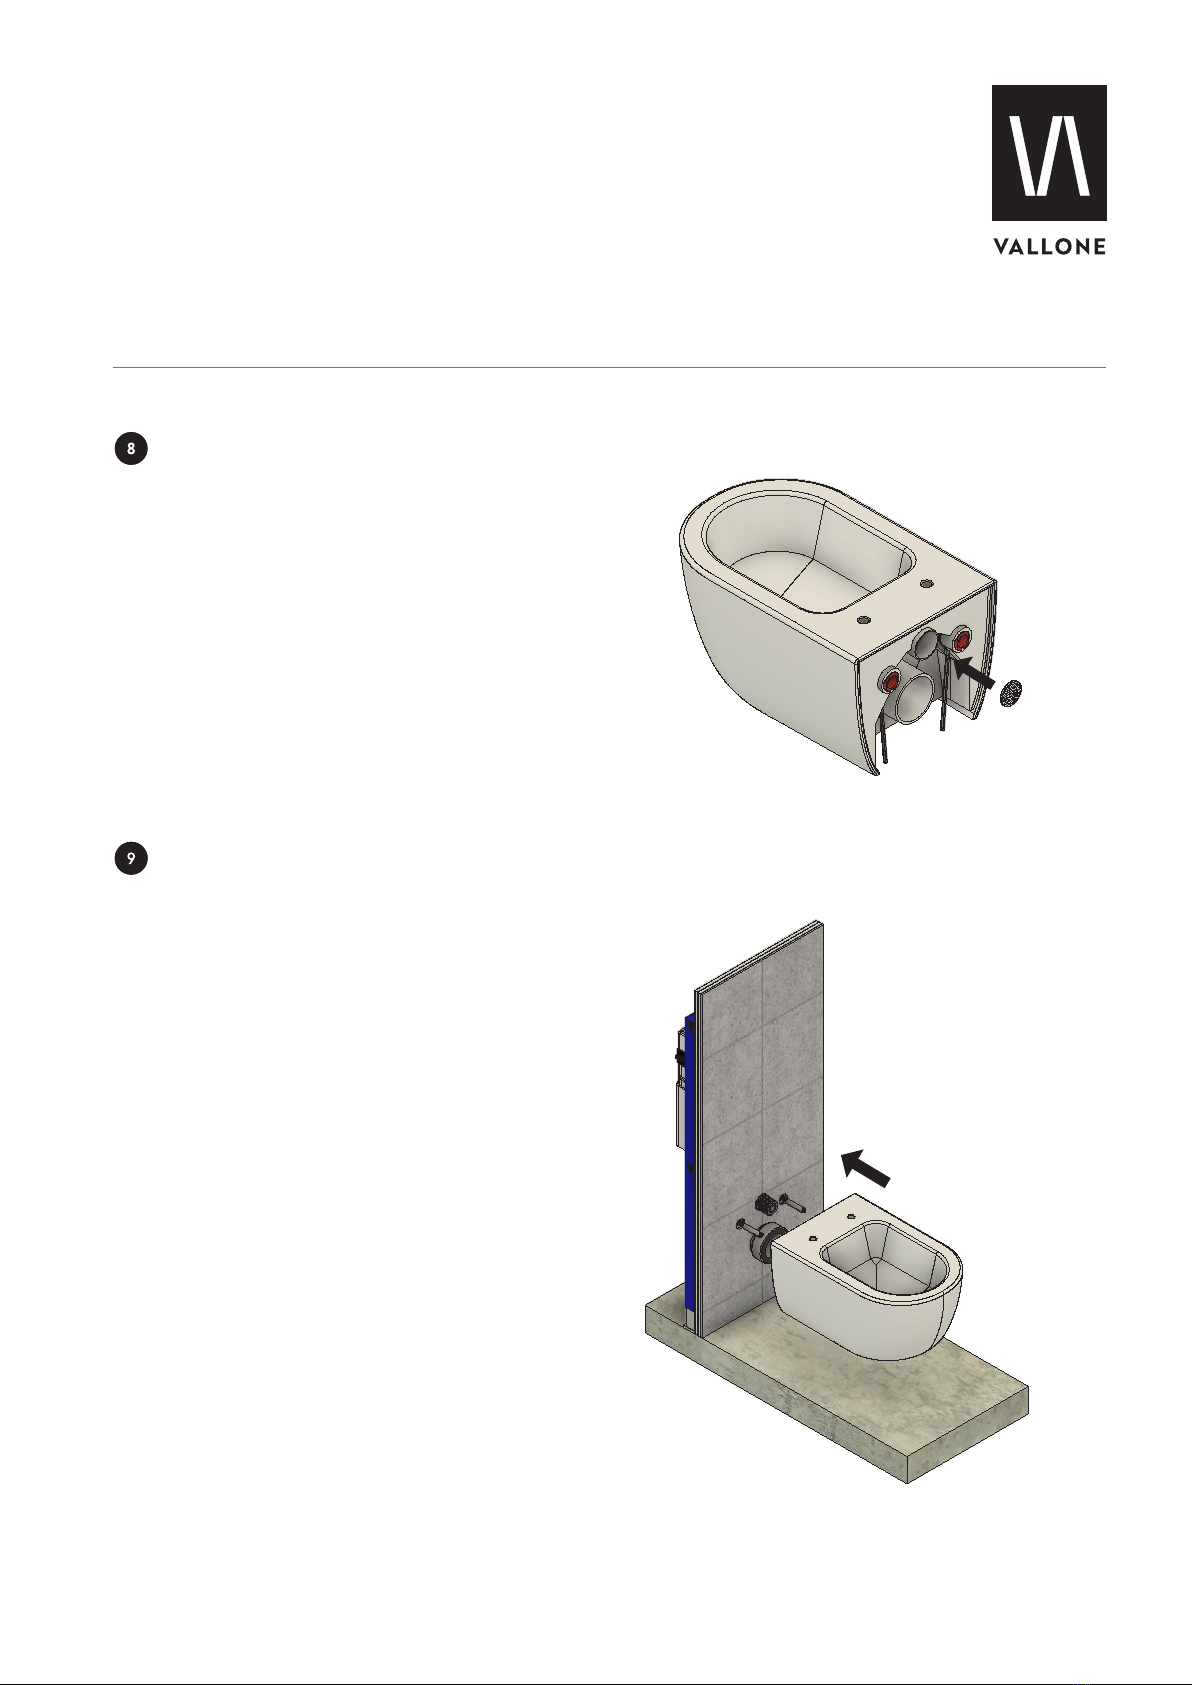
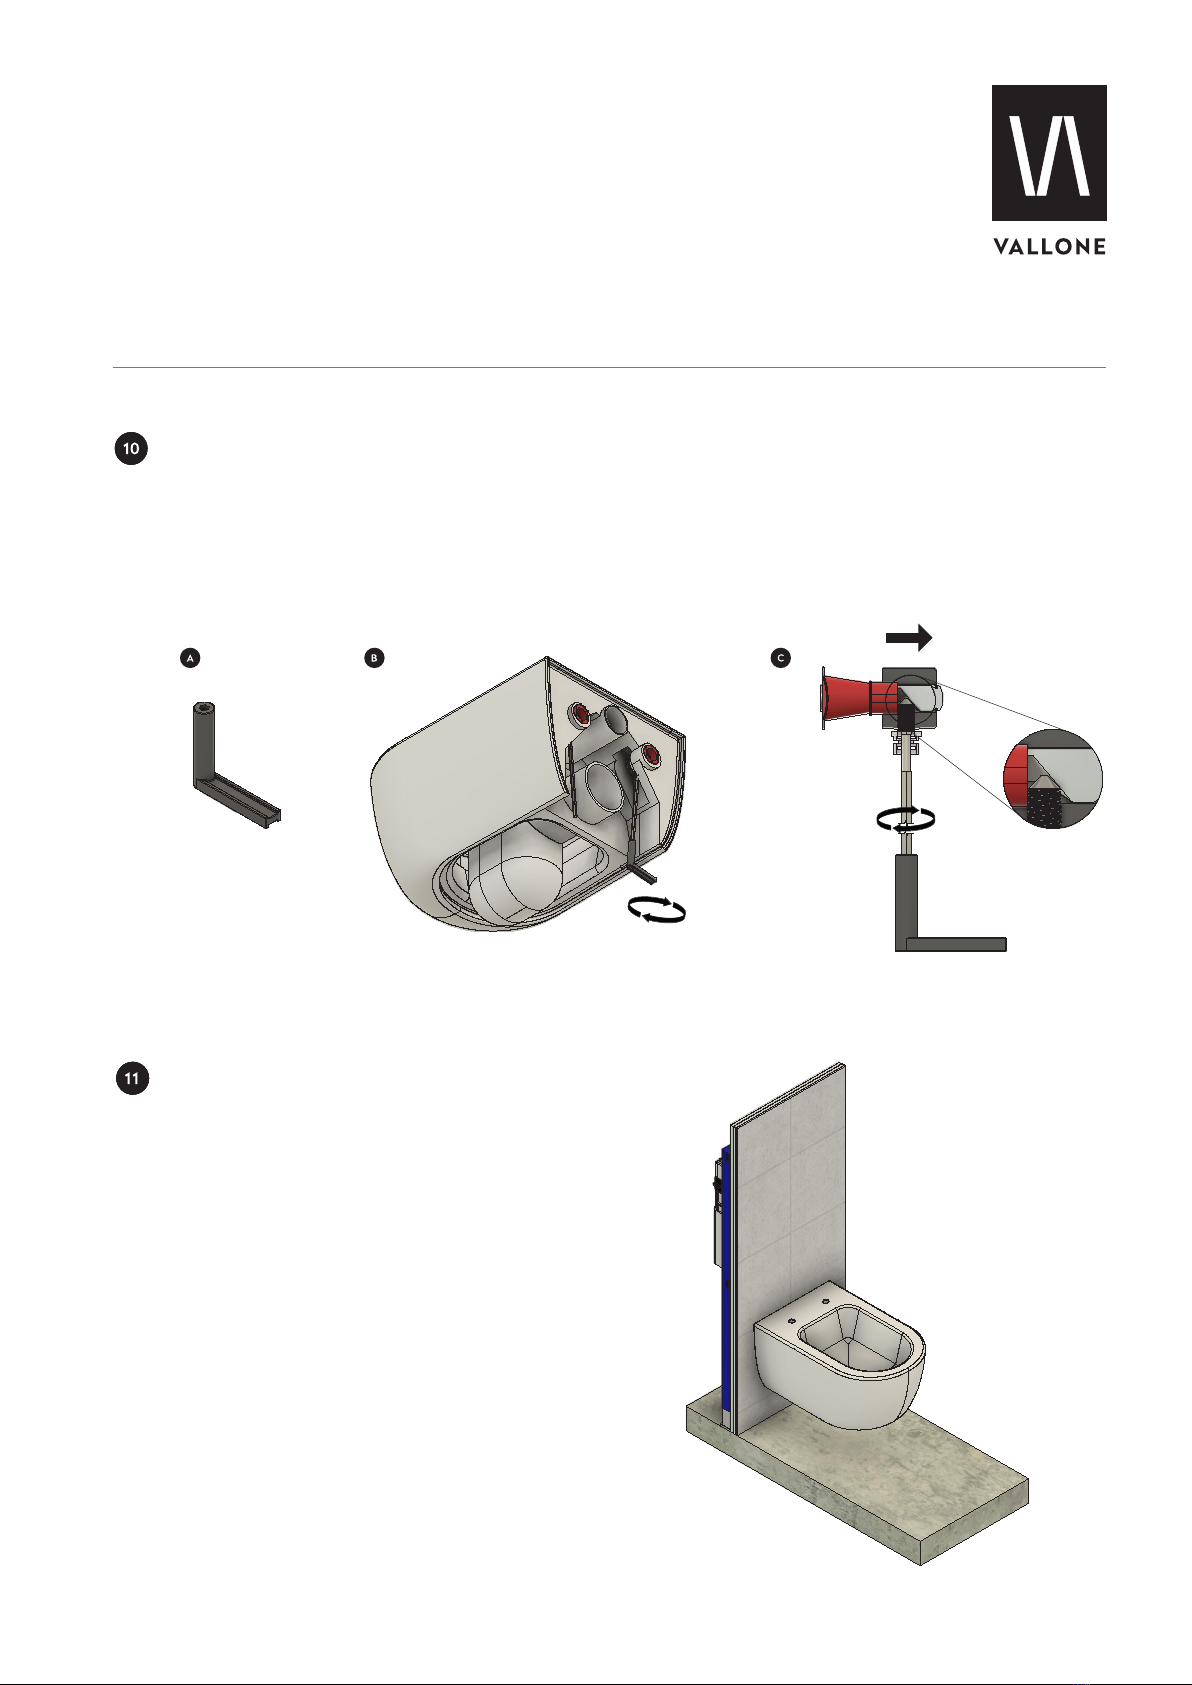
• Um eine korrekte Funktion des Produktes zu gewährleisten,
müssen die Anweisungen und Schritte der Montageanleitung be-
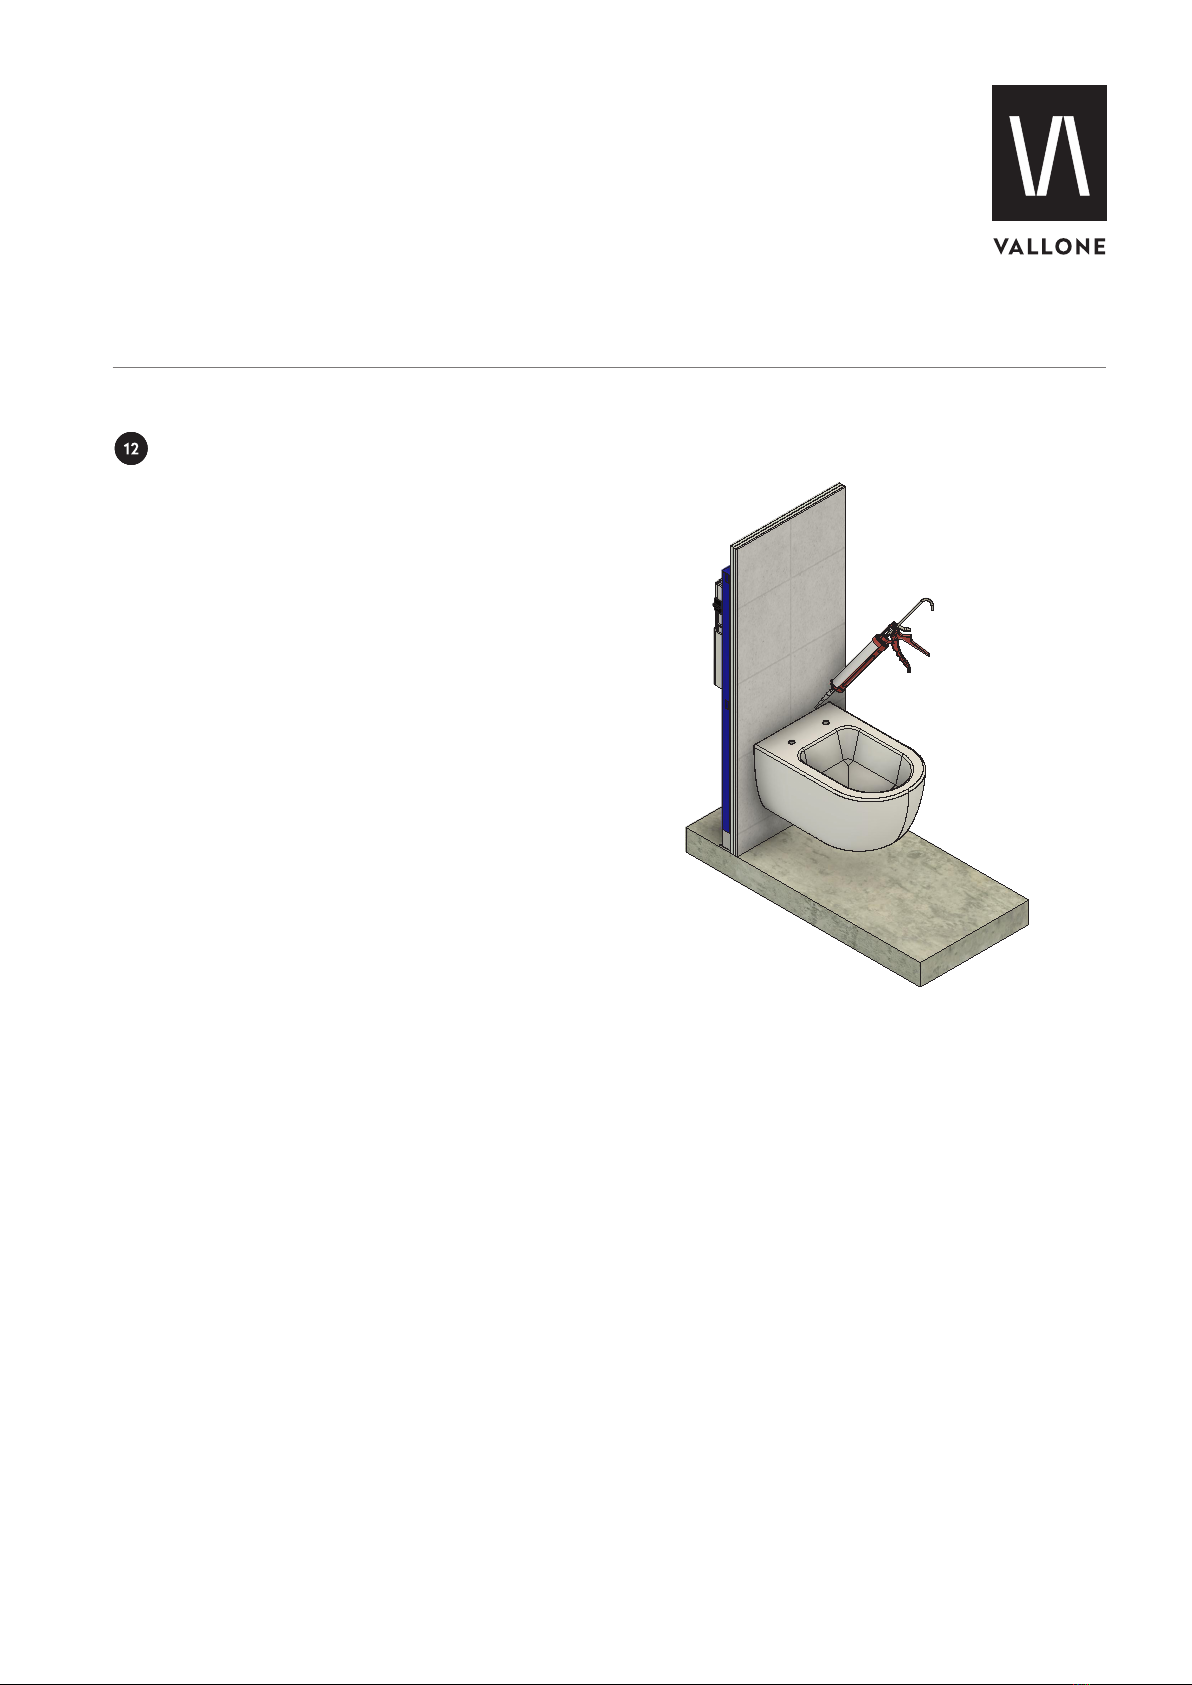
folgt werden. Das WC ist so zu installieren wie in der
Montageanleitungen angegeben.
• Offensichtliche Schäden am Produkt sind vor der Installation zu
reklamieren. Nach der Installation kann die Reklamation offensicht-
licher Schäden nicht mehr berücksichtigt werden.
• Installation may only be carried out by trained technical staff
and in compliance with the installation instructions and the
generally recognised rules of technology (a.a.R.d.T.). After suc-
cessful installation, the installation instructions must be handed
over to the end user.
• To ensure correct functioning of the product, the instructions
and steps in the installation instructions must be observed. WCs
must be installed as specified in the installation instructions.
• Obvious damage to the product must be reported before instal-
lation. Complaints about obvious damage can no longer be
considered after installation.
VOR DER INSTALLATION IST FOLGENDES ZU BEACHTEN:
!
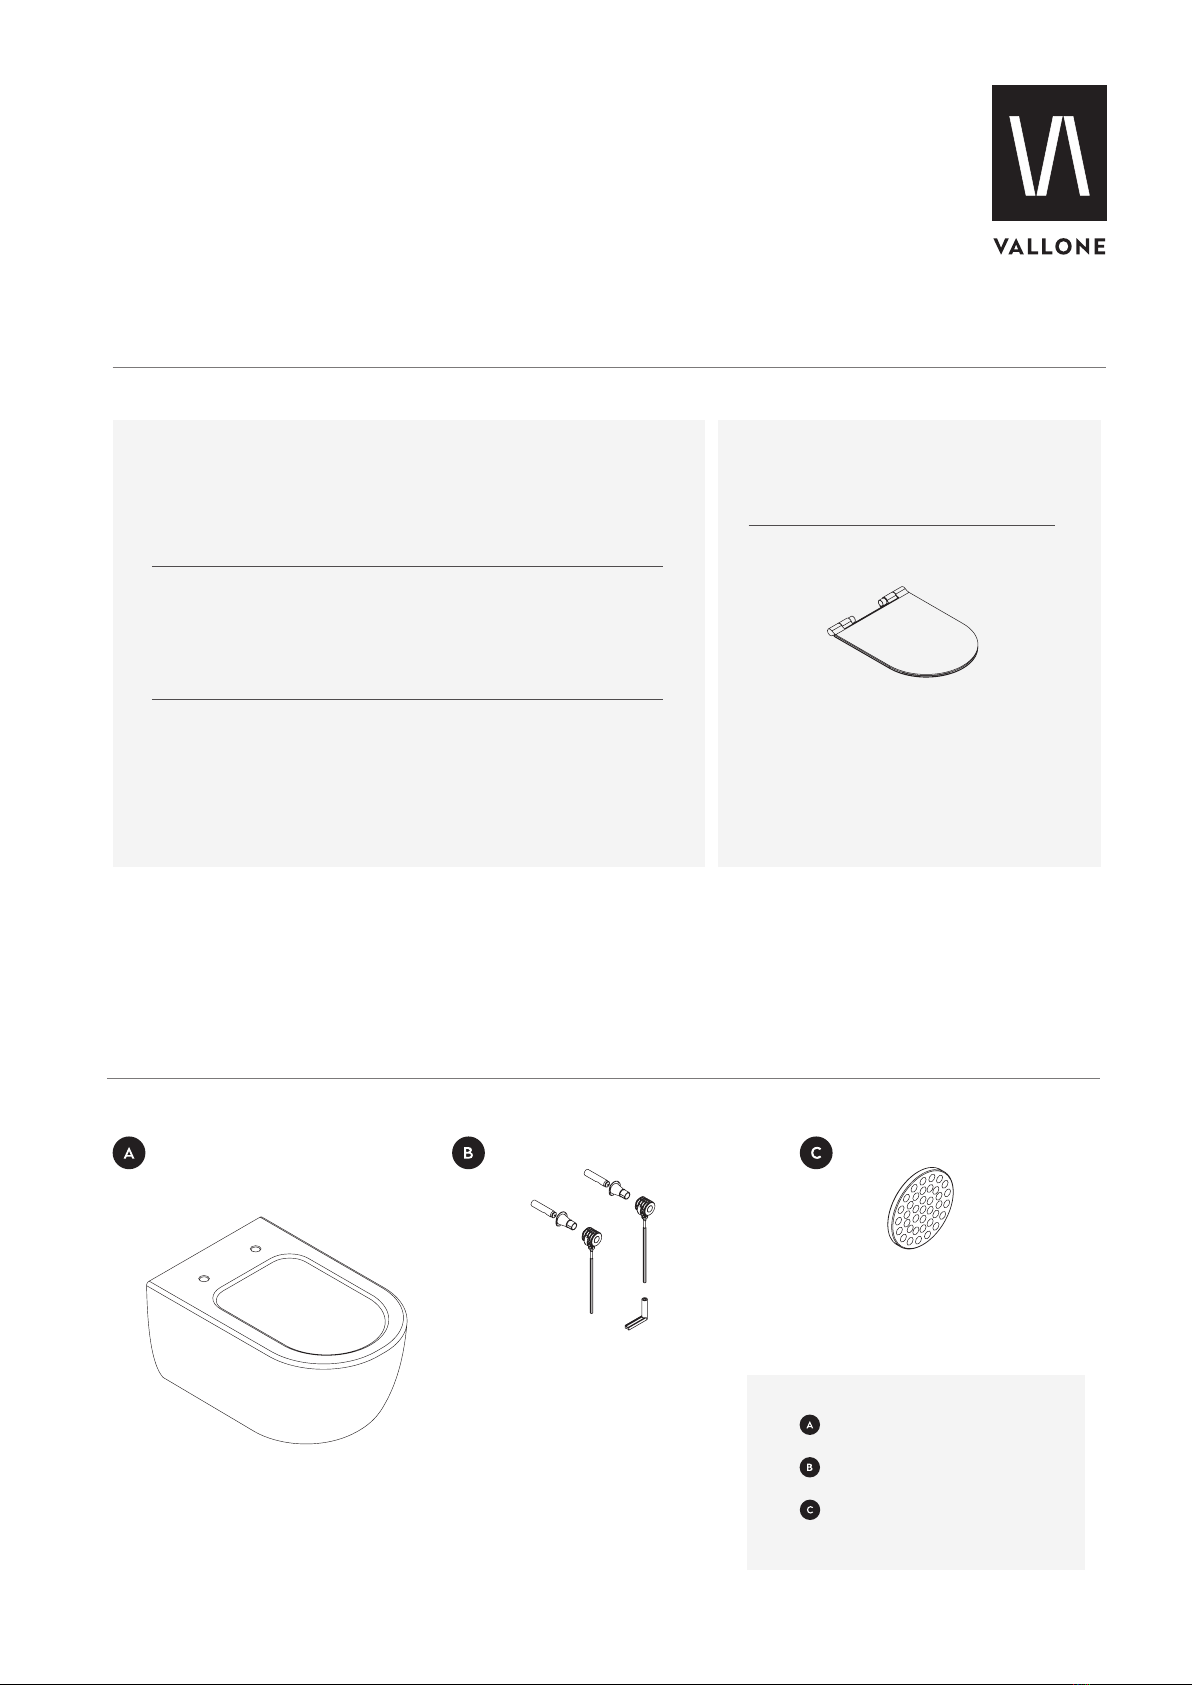
• Vor der Installation ist zu prüfen, ob alle Teile des Lieferumfangs
vorliegen und das Produkt vollständig ist.
• Scharfkantiges Werkzeug sowie schmutziges Arbeitsmaterial
sollten nicht auf dem Produkt abgelegt werden.
• Die einzelnen Komponenten des Produktes oder das Produkt
selbst dürfen nicht verändert oder modifiziert werden. Wir über-
nehmen keine Gewährleistung für Modifikationen und weisen
darauf hin, dass auch die gesetzliche Gewährleistung durch eine
Modifikation des Produktes eingeschränkt oder vollständig auf
gehoben werden kann.
• Die Montageanleitung ist vom Endanwender aufzubewahren.
• Sharp-edged tools as well as dirty working material should not
be placed on the product.
• Before installation, make sure that all parts of the scope of deliq
very are included and that the product is complete.
• The individual components of the product or the product itself
must not be changed or modified. Modifications of the product
are not covered by any warranty and the legal warranty may also
be limited or completely voided due to a modification.
• The installation instructions must be kept by the end user.
PLEASE TAKE NOTE OF THE FOLLOWING BEFORE INSTALLATION:
HINWEISE ZUR MONTAGE
NOTES ON ASSEMBLY

5V.2022.12.1
vao
MONTAGEANLEITUNG
INSTALLATION INSTRUCTION
Beginnen Sie die Montage mit einem vorbereiteten
Spülkasten und einem fertig angelegtem Fliesenspiegel.
Schützen Sie den Boden und das WC selbst mit dem
Auslegen einer Schutzfolie oder Decke.
Start the installation with a prepared mounting rack and
ready laid tiles. Protect the floor and the toilet itself with
the laying of a protective film or blanket.
1
BITTE BEACHTEN SIE:
PLEASE NOTE:
!
Für eine einfache und schnelle Montage des
WC QUAD empfehlen wir unverbindlich die Ver-
wendung eines GEBERIT Unterputzspülkastens.
VALLONE® empfiehlt das Produkt:
Geberit Duofix Element für Wand-WC, 112 cm,
mit Sigma UP Spülkasten 12 cm
Artikel: 111.300.00.5
For easy and quick installation of the WC
QUAD, we recommend non-binding using a
GEBERIT concealed cistern. VALLONE® recom-
mends the product:
Geberit Duofix element for wall-mounted WC,
112 cm, with Sigma concealed cistern 12 cm
Article: 111.300.00.5

6V.2022.12.1
vao
Überprüfen Sie den Abstand der Flächen A und B zuein-
ander, wie in der Skizze gezeigt. Dieser Abstand wird im
Folgenden mit X beschrieben.
Check the distance between surfaces A and B as shown
in the sketch. This distance is described by X in the
following.
X
AB
Falls nötig, kürzen Sie die Gewindebolzen des Montage-
gestells ein. Die überstehende Länge der Gewindestan-
gen soll X -8 mm betragen.
If necessary, shorten the threaded bolts of the mounting
rack. The protruding length of the threaded rods should
be X -8 mm.
Schrauben Sie die beiden Bolzen des Befestigungs-Sets
auf die Gewindestangen. Der Abstand zwischen der
Rückseite des Bolzens und der Vorderkante der Fliesen
beträgt den Wert X - 33 mm. Achten Sie darauf, dass
die Öffnungen der Bolzen nach unten zeigen.
Screw the two bolts of the fixing set onto the threaded
rods. The distance between the back of the bolt and the
front edge of the tiles is the value X -33 mm. Make sure
that the openings of the bolts point downwards.
X - 8 mm
X - 33 mm

7V.2022.12.1
vao
MONTAGEANLEITUNG
INSTALLATION INSTRUCTION
Positionieren Sie die Montagehalter des Befestigungs-
Sets so auf der Innenseite des WCs, dass sie in der dafür
vorgesehenen Aussparung Platz finden.
Position the mounting brackets of the fixing set on the
inside of the WC so that they fit into the recess provided.
Setzen Sie die beiden roten Hülsen auf der Rückseite des
WCs in die Montagelöcher.
Place the two red sleeves on the back of the WC in the
mounting holes.
Durch Anpressen der beiden roten Hülsen fixieren Sie
den Montagehalter.
Connect the mounting bracket with the red sleeves by
pressing them together.
CLICK!

8V.2022.12.1
vao
MONTAGEANLEITUNG
INSTALLATION INSTRUCTION
Setzen Sie das Streusieb in den Wasserzulauf des WCs.
Bei der Funktionsprüfung des WCs kann dieses bei zu
geringer Spülwassermenge wieder entnommen werden.
Place the strainer in the water inlet of the WC. During the
functional test of the WC, this can be removed again if
the flushing water quantity is too low.
Setzen Sie nach erfolgter Anpassung der Zu- und Ab-
wasserleitung (Anschluss-Set) das WC auf die Monta-
gebolzen. Achten Sie darauf, dass die Montagebolzen
hörbar im WC einrasten.
After adjusting the supply and waste water lines (con-
nection set), place the WC on the mounting bolts. Make
sure that the mounting bolts audibly engage in the WC.
CLICK!

9V.2022.12.1
vao
MONTAGEANLEITUNG
INSTALLATION INSTRUCTION
Nutzen Sie den schwarzen Kunststoff-Schlüssel (A), um
die Verlängerungen der Montagehalter zu rotieren (B).
Durch das Drehen im Uhrzeigersinn fixieren Sie das WC
an der Wand (C).
Use the black plastic key (A) to rotate the mounting
bracket extensions (B). Turn clockwise to fix the WC to
the wall (C).
max. 6 Nm
Überprüfen Sie den festen Sitz des WCs an der Wand
und die einwandfreie Spülleistung des WCs. Sollten die
Spülwassermenge zu gering sein, kehren Sie zu Schritt 8
der Anleitung zurück. Je nach verwendetem Spülsystem
kann das Spülverhalten variieren.
Check that the WC is firmly seated on the wall and that
it flushes properly. If the flushing water quantity is too
low, return to step 8 of the instructions. Depending on
the flushing system used, the flushing performance may
vary.

10V.2022.12.1
vao
MONTAGEANLEITUNG
INSTALLATION INSTRUCTION
Versiegeln Sie das WC nach erfolgreicher Funktionsprü-
fung mit einer dauerelastischen Wartungsfuge.
Seal the WC with a permanently elastic maintenance
joint after successful functional testing.

11V.2022.12.1
vao
MONTAGE WC SITZ
INSTALLATION WC SEAT
Setzen Sie die Bolzen des WC-Sitzes in die vorgesehenen
Löcher. Fixieren Sie die Bolzen wie auf der Skizze gezeigt.
Fixieren Sie die Bolzen nur so weit, dass eine Bewegung
für die Ausrichtung des Sitzes möglich ist.
Place the bolts of the WC seat in the holes provided. Fix
the bolts as shown in the sketch. Fix the bolts only to the
extent that movement is possible for the alignment of
the seat.
1
Setzen Sie den WC-Sitz auf die Bolzen und richten ihn aus.
Place the WC seat on the bolts and align it.

12V.2022.12.1
vao
MONTAGE WC SITZ
INSTALLATION WC SEAT
Fixieren Sie die Bolzen nach der Ausrichtung des Sitzes
vollständig.
Fix the bolts completely after aligning the seat.
Setzen Sie den WC Sitz auf die Bolzen. Die Montage ist
somit abgeschlossen.
Place the WC seat on the bolts. The assembly is now
complete.
Achtung:
Lassen Sie die Soft-Close-Mechanik immer von
alleine schließen, ein manuelles Nachhelfen kann die
Scharniere des Sitzes beschädigen.
Attention:
Always allow the soft-close mechanism to close on
its own, manual assistance may damage the seat
hinges.

13V.2022.12.1
vao
Die Reinigung des WC-Sitzes sollte getrennt von der Reinigung der
WC Keramik erfolgen. Verwenden Sie zur Reinigung des WC Sitzes
nicht die Medien, die auch für die Keramik verwendet werden - die
Werkstoffe beider Produkte weisen unterschiedliche Verträg-
lichkeiten gegenüber Reinigungsmitteln auf. Verwenden Sie zur
Reinigung des WC Sitzes ausschließlich ein transparentes Ge-
schirrspülmittel mit Tensiden sowie ein weiches Microfaser- oder
Baumwolltuch. Verwenden Sie keine Scheuermilch oder abrasive
Medien, da diese die matte Oberfläche des Sitzes beschädigen.
Cleaning the WC seat should be done separately from cleaning
the WC ceramics. Do not use the media for cleaning the WC
seat that are also used for the ceramic - the materials of the two
products have different compatibility with cleaning agents. To
clean the WC seat, use only a transparent dishwashing detergent
with surfactants and a soft microfiber or cotton cloth. Do not use
scouring agents or abrasive media, as these will damage the matt
surface of the seat.
REINIGUNG DES WC SITZES
CLEANING THE WC SEAT
PFLEGE UND WARTUNG - FÜR MATTE KERAMIK WCS
CARE AND MAINTENANCE - FOR MATT CERAMIC WCS
Reinigungsmittel zum Lösen von Kalk sind oft sehr sauer (pH-Wert
unter 5) oder enthalten starke Säuren. Diese lösen mineralische
Verbindungen, daher sind sie für die Reinigung von WCs aus
Keramik ungeeignet. Verwenden Sie stattdessen zum Lösen von
Kalkrückständen und Wasserflecken ein mit Essig getränktes
Papiertuch. Legen Sie das Tuch auf die entsprechende Stelle und
lassen Sie es einige Minuten einwirken. Spülen Sie anschließend
mit ausreichend Wasser nach. Zum Entfernen von Verschmutzun-
gen natürlichen Ursprungs können handelsübliche Reinigungsmit-
tel für WCs verwendet werden.
Achten Sie darauf, dass diese Mittel keine Tenside enthalten und
alkalisch sind (pH-Wert über 7). Auch nach der Verwendung von
alkalischen Reinigungsmitteln sollte die WC Keramik gründlich mit
Wasser nachgespült werden. Verwenden Sie keine Scheuermilch,
diese kann die seidenmatte Oberfläche beschädigen. Ebenso
sollten nur weiche Microfaser- oder Baumwolltücher verwendet
werden.
Cleaning agents used to dissolve lime are often very acidic
(pH below 5) or contain strong acids. These dissolve mineral
compounds, so they are unsuitable for cleaning ceramic WCs.
Instead, use a paper towel soaked in vinegar to dissolve lime-
scale residues and water stains. Place the cloth on the cor-
responding spot and let it soak for a few minutes. Then rinse
with sufficient water. Commercially available cleaning agents
for WCs can be used to remove stains of natural origin.
Make sure that these agents do not contain surfactants and
are alkaline (pH above 7). Even after using alkaline cleaning
agents, the WC ceramics should be thoroughly rinsed with
water. Do not use scouring agents, they can damage the silky
matt surface. Likewise, only soft microfiber or cotton cloths
should be used.
Unsere matt gebrannten Keramik WCs zeichnen sich durch eine
edle, seidenmatte und robuste Oberfläche aus, die bei korrekter
Pflege und Reinigung lange mit ihrer Schönheit begeistert.
Beachten Sie folgende Hinweise zur Reinigung, um die langfristige
Funktion und Oberflächenbeschaffenheit Ihres WCs zu erhalten.
REINIGUNG DER WC KERAMIK
CLEANING THE WC CERAMICS
Our matt-fired ceramic WCs are characterized by a noble,
silk-matt and robust surface, which will inspire you with its
beauty for a long time if cared for and cleaned correctly.
Follow these cleaning instructions to maintain the long-term
function and surface finish of your WC.

14V.2022.12.1
vao
NOTIZEN
NOTES

KONTAKT
CONTACT
+49. 201. 806 943 0
PHONE
VALLONE®
TECHNICAL SUPPORT
www.vallone.de/support
WEB
This manual suits for next models
1
Table of contents
Other Vallone Toilet manuals