VARDE OVNE Nova 1 User manual

1
Installation and
User guide
Revision 1
Varde Nova 1
Pottemagervej 1, 7100 Vejle, Denmark. www.vardeovne.dk
1. edition 21.04.2020 UK

2
Congratulations on the purchase of your new wood-burning
stove from Varde.
Wood-burning stoves from VARDE stand on the stylistic bedrock of
Scandinavian design – created with the ambition of unifying
quality, functionality and design.
With a VARDE stove, you and your family are ensured a warm
gathering point and tranquil quality moments for many years into
the future.
Index
Welcome and index Page 2
Technical specifications Nova 1 Page 3
Regulations and approval Page 4
Flooring and distance Page 5
Chimney Page 6
Air supply Page 7
Operation Page 8
How to light and stoke a fire Page 9
List of accessories Page 10
Vermiculite Page 11
How to choose the wood Page 12
Maintenance Page 13
Troubleshooting Page 14
Spare Parts and rear connection of flue pipe Page 15
Fresh Air supply Page 16
DOP Page 17
Warranty Page 18
Henrik Nøhr
CEO
Varde Ovne A/S

3
Model Nova 1
Height (mm) 1036
Wide (mm) 484
Depth (mm) 369
Weight (kg) 103
Effect 3-6 kW
Nominal Output 5,4 kW
Heated area 30-105m2
Efficiency 76%
EEI 101
Flue gas data: 5,9 g/sek., 286°C ved 20°C,
12 pa.
Technical Specifications Nova 1
Combustion chamber: (H x W x D):
380 x 350 x 250mm
Flue outlet Ø 15 cm
Installation height top: 102cm
Installation height rear: 91cm
Distance to non-flammable: : 5-10cm
(recommended)
Distance to flammable materials:
Rear = 25cm, Sides = 40cm, In front = 100cm

4
EC declaration of confirmaty.
MANUFACTURER
Name: Varde Ovne A/S
Adress Pottemagervej 1, 7100 Vejle, Danmark
Test Center
Name: Technology institute
Adress:: Kongsvang Alle 29, 8000 C Århus, Denmark
Notified body number 1235
Product Varde Nova 1
Type code Heating stove, suitable for intermittent combustion
Standard Costruction products (89/106/EC/) standard used
EN 13240
Application Residential Heating
Fuel Wood
Special conditions Non
CE-Markning
Issued 2020
Nominal Output 5,4 kW
Fuel type Wood
Fluegas temperature 286 °C
Efficiency 76 %
Co-release 0,10 %
Important!
Before lighting up your Varde Stove for the
first time, we recommend that you read these
instructions carefully and contact your local stove
vendor or building authoorities to inquire about
existing regulations regarding the intallation of
stoves. Please follow these regulations closely.
Inspection of installation
It is very important that the installation is in-
spected by a qualified chimney sweeper before
the stove is used the first time.
Regulations
All local regulations as well as National and
European, should be adhered to when instal-
ling your stove.
All Varde Ovne stoves are closed fireplaces.
The stove is designed for intermittent com-
bustion and can be connected to a chimney
used by other fireplaces, as long as the app-
ropriate rules and regulations are adhered to.
This Varde Stove
Has passed the
Danish /European Standard DS/EN 13240
Norwegian (NS) and the
German (Stufe 2) test , and have thereby proved
to be a environmentally friendly product.
Proffesional installation
We recommend that you consult with the
dealer where you purchased the stove or an
other competent installer, as there may be
specific things to consider during the installa-
tion. You should also reseive the applicable
rules for installing the stove and follow them.
Please Note!
You are by law required to register your stove at the local chimney-sweeper.
Until installation keep the stove dry and not to cold. The stove cannot stand moisture.That an
existing chimney, not necessarily is effective enough for a new modern stove.Vermiculite is a
very porous material, therefore handle with care. When refilling the stove, put the wood careful-
ly, use the glove.
Henrik Høhr
CEO
Varde Ovne

5
Flooring:
If the floor on which the stove is to be placed is inflammable, the floor must be covered with non
-flammable material, such as steel or glass plate, floor tiles or artifical slate, covering an area of
at least 15 cm from the sides of the stove and at least 30 cm from the front of it. Regarding the
front, however, we recommend 50 cm. Also, the Floor construction must be capable of carrying
the combined weight of stove and chimney.
Installation distance:
If walls are non-inflammable, the stove can be placed closer to them. However, we recommend
a minimum distance of 5-10 cm, to allow for cleaning behind the stove. The cleanout gate must
be accessible. Optimal combustion can only be obtained if fresh air is constantly admitted. It is
important, therefore, to ensure that this is the case. The best way to provide a steady flow of
fresh air is by installing 1-2 air vent’s in the room where the stove is situated. (One in each side
of the room).
According to existing regulations, stoves must be placed with the following minimum distances
in mm to inflammable walls and materials.
NB: Note that D(from chimney to the wall) is a recommendation. There may be
different local/national rules.
The stove must in accordance with applicable
rules comply with the following minimum distan-
ces from inflammable walls and materials:
Sides : 40 cm
Rear : 25 cm
Distance to furniture : 100 cm
Weight Steel
Varde Nova 103 kg
Varde Uniq
A250 mm C250 mm
B400 mm D450 mm
F1000 mm E750 mm

6
The chimney:
Always use a chimney with a diameter of at least 15 cm. This corresponds to a clear of 175
cm2. Make sure the chimney is of a sufficient height, that it draws well and that smoke does not
bother your neighbours.
We recommend that you fit your chimney with a damper, allowing for draft control. This may
prove particularly important on windy days.
Note: the damper must never shut off draught completely – always allow at least 20 cm² free
passage through the chimney.
With nominal usage the stove has tested a flue gas flow of 5,9 g/second and with a flue gas
temperature of 286°C and at a room temperature of 20 °C.
Varde stoves are always fitted with a smoke plate which redirects smoke to make its way to the
chimney as effectively as possible. This ensures that the heat from the smoke is emitted inside
your home rather than outside it. The smoke plate is moveable and placed in top of the Com-
bustion Chamber. You should make sure that it is pushed all the way back against the back wall
of the combustion chamber.
New chimney
If you shall install a new chimney, it is recommended to consult your local chimneysweeper, as
there can be specific local circumstances that can have influence on the height or routing of the
chimney. You can find inspiration, and common guideline on www.vardeovne.dk
Is my existing chimney good enough?
The chimney is the motor of the stove, the chimney is driven by heat, so it is important that you
have a well function chimney in order for the stove to work properly.
A modern wood burning stove puts up higher demands for the chimney than older stoves. A
modern stove burns both cleaner and more efficient than older stoves, the higher efficient will
give more heat in your living room for the same amount of firewood. The higher efficiency of a
modern stove also have that effect, that there are used less heat to generate draft your chim-
ney.
It can be a possibility that your old chimney will not be able to build up a sufficient draft to run a
modern clean burning stove, be course of the lesser heat lead into to the chimney.
This may occur with shorter or older brick chimneys, especially without an insulating core.
It is very rare that a steel chimney or modern insulated brick chimney not will be sufficient.
Typical effects of insufficient draft, smoke come out when door is opened and soot on the glass.
If you have a chimney with draft problems, a draft booster could be a solution.
It is recommended that you consult with your local chimneysweeper for more specific advice.
Arrow mark for the hole. Now the condensate – hole is Carefully punch a hole with a
Information about the new cast iron adapter
Your stove is equipped with the new cast iron adapter from Varde Ovne.
The adapter is suitable for smoke pipes with inner diameter on 150 mm.
If you need it, it’s now possible for you to make a condensate drain-hole in the adapter.
Carefully punch a chisel or the like through the bottom of the outer groove (at the ar-
row mark). This way you can establish a condensate drain hole in the adapter if
needed
For rear connection of flue pipe see page 15

7
Continual fresh air
A continual supply of fresh air is required in the
room in wich the stove is situated. This can be
achieved by installing 1-2 vents, whilst also ensur-
ring that these can not be blocked. The quantity
of air used for burning,
is approx. 20 m³ / h.
Overheating
Occors if too much wood is placed in the
stove or if the Fire receives too much air.
The Shake grate
The Shake grate is situated
at the bottom of the fire-
chamber. By moving the
handle the ashes will be
shaken into the ashpan.
Running the stove after ignition
pull the handle towards you to open for the air.
Push the handle away from you to close for the
air.
The Shake grate is opera-
ted by moving the handle
in and out .
Ignition Air
Pull the handle towards yourself to open.
The Air Regulator is situated on the rear side
of the combustion chamber.
Push the handle in when fire has a good grip
to close the Air Inlet.
Push in
close
Pull out
open
Open
Close

8
How it works
Shake grate.
The Shake grate is placed in
the bottom of the chamber.
During normal operation,
the Shakegrate must be
closed.
Start
1 Pull the handle towards
yourself to open the Air
Inlet.
2 Pull the aircontrol handle
out to open fully for the air.
Your stove is now ready,
in start position.
Once the fire has a good
grip, the first you do is
close the Air Inlet 1. After
this the stove is regulated
using the handle 2.
1
1
2
2
Open
Remember to close after ignition
Open
Pull the handle towards you
to open for the air.
Push the handle away from
you to close for the air

9
How to light and stoke a fire
The first time you light up the stove, the enamel will temper and give off some smoke and a
slightly burnt smell. We recommend that you leave doors and windows open, as airing the room
will make the smell disappear.
This tempering softens the enamel, making it susceptible to damage. Therefore exercise caution
and avoid touching the enamel. We also recommend opening the door to the stove at regular
intervals during the first couple of hours to prevent the rope seal from sticking to the enamel.
Never use highly flammable liquids such as methylated spirit or petrol for lighting up!
We recommend using ‘top-down’ lighting, where you light the wood at the top of the combustion
chamber and not at the bottom. This is the most environmentally friendly method to light a fire.
The method will also help keep the glass clean. Place two small logs on the bottom plate of the
combustion chamber (approx. 0,5– 0,8 kg) with a small distance between each log. Place 10 –
15 smaller sticks (approx. 0,8-1,2 kg) in a cross on top of the logs, and 2 – 3 firelighters at the
top and in between the sticks.
A thin layer of ash at the bottom of the stove makes it easier to light the fire.
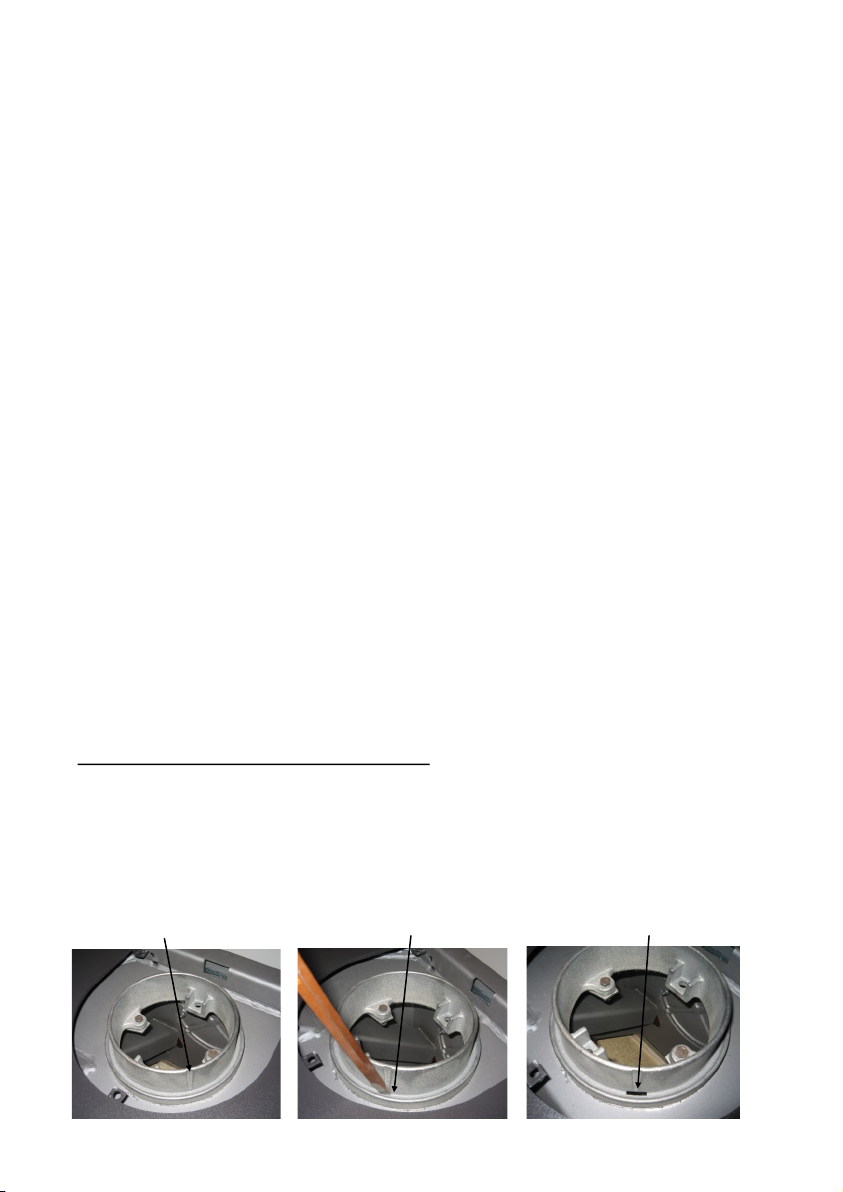
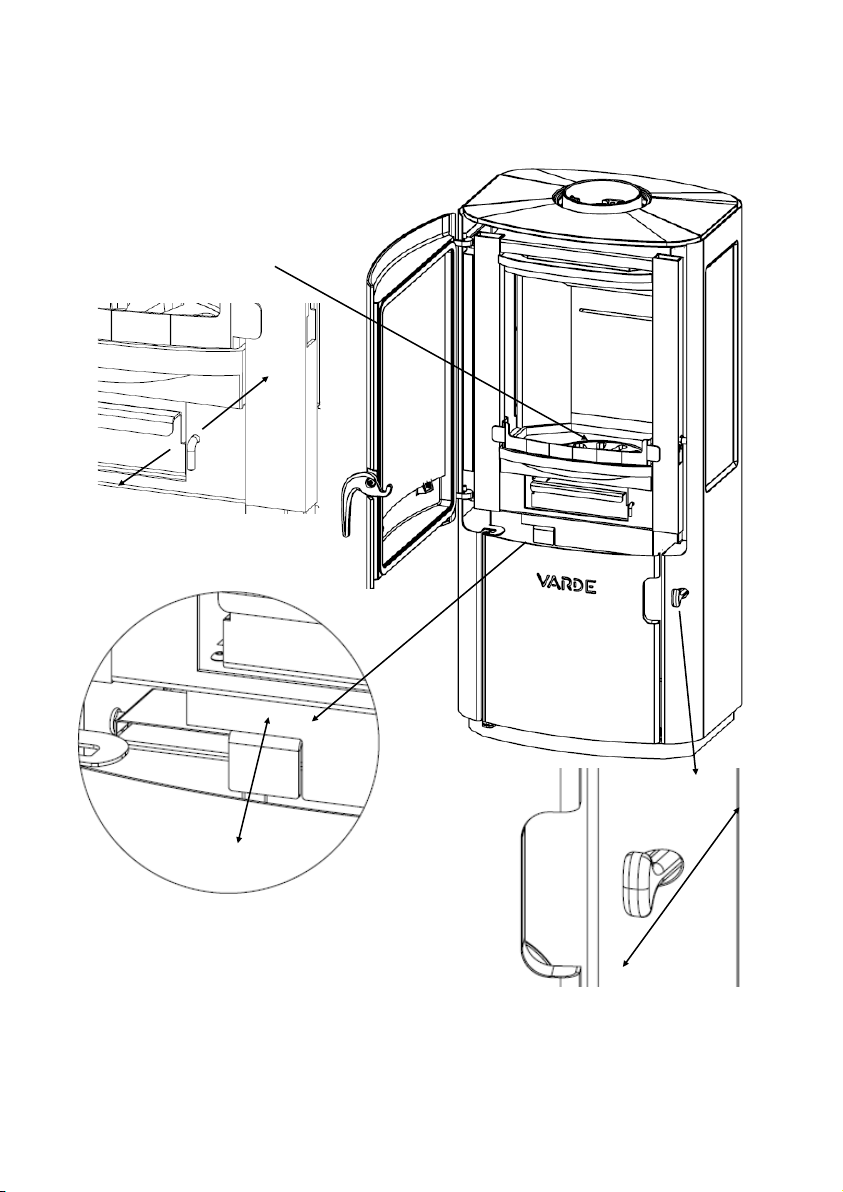
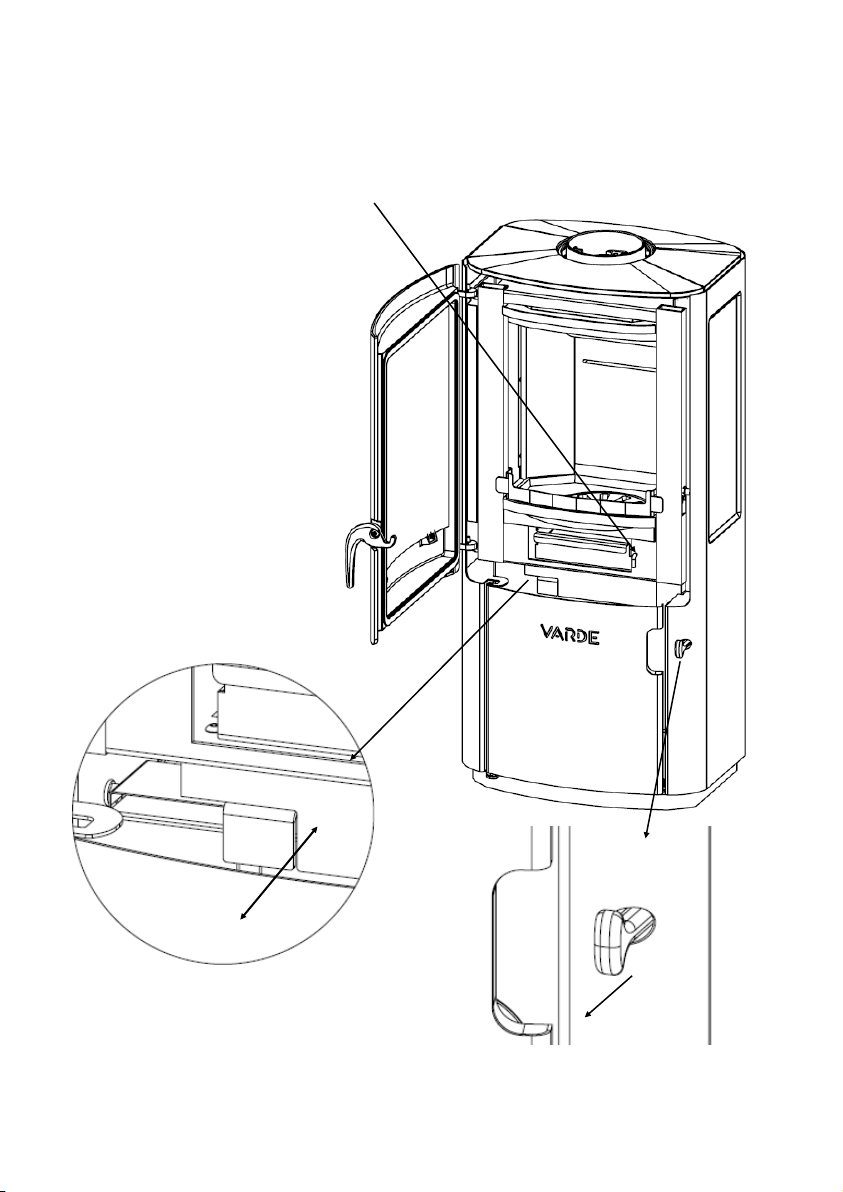
Before lighting the stove, (See page 10 for how)
Once the Fire burns, remember to close the Air Inlet again. Otherwise, the stove and chimney
might become overheated, which would invalidate the warranty.
A slight amount of soot may build up on side glass during the start-up fire. This is normal and
vanishes after a period.
Once the kindling has reduced to embers, we recommend opening the door slightly for a couple
of seconds to neutralise the negative pressure in the combustion chamber before opening the
door completely.
Place 2 to 3 logs in a cross on top of the embers (approx. 1.2 kg) and close the door again. To
make sure the wood ignites quickly, we recommend briefly opening the ignition air vent and
make sure you remember to close it again once the fire gets going. You can then adjust the
combustion air according to your heating requirements.
Take care not to shut off the air supply completely, otherwise the fire will die. The fire should
always burn bright and clear.
In most instances, however, you will have to identify the best combustion air settings yourself,
as the height and draught of your chimney as well as the quality of the firewood are decisive
factors in determining the best settings for your particular stove.
If the nominal heat output of your stove is too high compared to your heating requirements, you
can reduce the output as follows:
- Stoke a smaller amount of wood than usual, for example 1 kg, preferably consisting of 2 – 4
smaller pieces of wood. Apply full air to ignite the wood properly before reducing the combustion
air, perhaps down to approx. 40%. Be careful not to reduce the air supply to the point that the
fire dies. The fire should always burn bright and clear.
With this method it is possible, depending on the chimney, wood quality, etc., to reduce the
stove’s heat output from a nominal 5,5 kW down to perhaps 3,5 kW.
Please be aware that it can lead to poor combustion if you reduce the combustion air too much,
resulting in a lower efficiency and increased emission levels (increased pollution).
When refilling the stove with wood, we recommend opening the stove door once only embers
are left in the combustion chamber. Opening the door while flames are still burning and produc-
ing smoke and gas might cause smoke to escape into the room.
If you have problems lighting or operating the stove, see the section on Troubleshooting.

10
Operation
1. Shake grate
2. Wood catch
3. Vermiculit plates
4. Ash tray
5. Cast iron Door
6. Cast iron Top
7. Flue collar
8. Handle for Air regulation
9. Handle for Ignition Air
10. Storgage
7
65
1
4
3
2
9
8
10

11
Vermiculite
The plates in the combustion chamber are called vermiculite plates and w ill eventually
become worn, as will the smoke guide plate. Accidental breakage of a plate, for instance by
hitting it hard with a piece of wood, will not affect the quality of the combustion. You do not
need to replace the plate until the gap is approx. 5 mm wide.
Vermiculite
A special, non-flammable material that looks like chipboard. The plates act as insulation and at
the same time protect the stove against wear and tear. The vermiculite plates and the smoke
guide plate are not covered by the warranty.
Vermiculite is a very porous material and should be handled with care. When refilling the stove,
stoke the wood carefully and use a glove.
Only use original parts from Varde Ovne A/S
How to replace the Vermiculite
1. Edge out the smoke guide plate 1
2. Lift up the upper back plate 5, then tilt out the side plates 3 and 4
3. Edge out the upper back plate 5
4. take out the back plate 4
When fitting the new vermiculite plates, begin with the back plate 4 and repeat the steps in the
reverse order, finishing with step 1
2
1
3
Vermiculit set,
Item no.: 100310
1. Smoke guide plate
2. Left side plate
3. Right side plate
4. Back plate
5. Upper back plate
4
5
Max height of firewood

12
The new stove
The first time you light up the stove the ena-
mel will temper, and give off some smoke and
a slight smell. We recommend that you leave
doors and windows open, as airing the room
will make the smell disappear. This tempering
softens the enamel making it susceptible to
damage. Therefore exercise caution and avoid
touching the enamel. Likewise we recommend
opening the door to the stove at regular inter-
vals for the first hours to prevent the insulati-
ons rope from sticking to the enamel.
What kind of wood to use?
Generally, beech wood is considered the best
type of wood for burning. It burns evenly
without producing much smoke and ashes are
clean and take up little space. Ash, birch and
maple wood are fine alternatives.
How big the firewood?
Split firewood with a diameter larger than 10
cm. Use firewood with a length on 20-25 cm.
The use of larger quantities of fuel than recom-
mended in the tabel belove will overtax the
stove and resulte in increased temperatures in
the chimney as well as a lowered efficiency.
This may cause damage to both chimney and
stove, and the annulment of the warranty. Also,
never use toxic materials such as chipboard,
painted or impregnated wood.
What to burn.
This Varde Stove is tested and approved for
the burning of wood. Only dry wood with a
moisture content of maximum 18 percent and
the size to fit into the combustion chamber
should be used. The burning of moist wood
will result in an increased amount of tarry
soot, pollution and uneconomic fuel consump-
tion. Newly chopped wood contains about 60-
70 percent moisture, which makes it comple-
tely unsuitable as fuel. Allow newly chooped
firewood to dry in a open shed for a couple of
years before using it in the stove.
Do not use! - Consider the environment
Also, never use toxic materials such as
chipboard, painted or impregnated wood.
The use of larger quantities of fuel than re-
commended in the tabel belove will overtax
the stove and resulte in increased temperatu-
res in the chimney as well as a lowered effici-
ency. This may cause damage to both chim-
ney and stove, and the annulment of the war-
ranty.
The following optimal register and fuel quanitty settings are recommended(in case of similar chimney
draught):
Fuel Quanti-
ty
[kg]
Primary Air
open
[%]
Combustion
Air open
[%]
Nominal
Output
[kW]
Chimney
Draught
[PA]
Efficiency
[≥ i %]
Refill interval at
nominal output
[minuts]
1,3 0 (closed) ca. 80 (almost
open) 5,4 12 76% ca. 45
Kindling
Lenght: 25 –33 cm
Diameter: 2-5 cm
Amount per firing: 1,3—1,7 kg
(approx. 10-12 finely chopped pieces)
Feeding Wood: Chopped wood
Lenght: 25-30 cm
Diameter: 6-8 cm
Normal amount: 1.3 kg/hour (2 to 3 pieces)
Max amount: 2.0 kg/hour (max 3 pieces per insertion. Max 1.5 kg
per insertion)
Topdown lightning

13
Maintenance:
As with anything else that you use on a daily basis, your stove must of course be maintained.
You should only clean your stove when it is cold. Wipe the outside using a dry cloth, do not use
water or cleaning detergents, it will wear out the heat resistant paint on the stove very fast. You
should as well clean it regularly on the inside. The actual combustion chamber should be cleaned
of ash and soot remnants. You should also remove the smoke guide plate, because dirt and soot
will build up behind it, and check that there is free access through the flue and chimney. You
should also check that the gaskets in the door and ash pan are not worn out. If the gaskets do
not seal properly, they must be replaced. Remember to lubricate the door hinges and other
moving parts as required.
Glass
We recommend the use of VARDE glass cleaner to clean the glass panels; this can be bought
from our dealers. Be aware off! If you are using other brands of glass cleaning products then
Varde’s, must it not contain potassium, this can give a milky white film on the glass there not
can be removed.
The ash pan must be emptied regularly, and the ash can be disposed of along with your
domestic waste. But you must of course make sure that the ash does not contain any embers. If
you are unsure about how to clean or maintain your wood-burning stove, contact the dealer who
sold you the unit or contact your chimney inspector.
In particular, following a long period of time where you have not used the stove, before using it
again you must make sure that there is nothing blocking the flue or the chimney.
Some exposed areas of the stove’s painted surface can over time become w orn out
e.g. through cleaning or overheating of the wood-burning stove. However, this can be repaired
using a special coating, Senotherm®, which comes in a spray can and can be purchased from
your dealer.
The panels in the combustion chamber are known as vermiculite panels and will become worn
over time. If a piece of wood damages a vermiculite panel, it has no effect on combustion. You
do not need to replace the panels unless the crack in the panel is more than about ½ cm wide.
Only original spare parts from Varde Ovne A/S may be used.
The door is fitted on a lock spring, which pulls the door in. This is a regulatory requirement in
certain countries. The spring is attached to the hinge, and can be removed if you do not wish to
have a spring-loaded door.
No unauthorised alterations may be made to the wood-burning stove.
All of the exterior parts of the wood-burning stove will become very hot during use.
You should therefore exercise necessary caution.
IMPORTANT!!
Chimney fires
If your chimney catches fire, you must follow this procedure:
- Close all of the air supplies to the stove and telephone 112.
(Most chimney fires will go out on their own once you have stopped any air from getting into the
stove).
As a minimum, you must contact your chimney inspector, who will then inspect the stove and
chimney for damage.

14
Troubleshooting.
Smoke enters the room
• Not enough draught in the chimney.
• Inspect the flue pipe or the chimney for blockage.
• Make sure the height of the chimney is correct.
The glass or the chimney soots up
• The wood is too moist.
• Not enough secondary air is supplied to the combustion process.
• You may have shut off the supply of ignition air too soon when lighting the stove.
• There should be clear flames in the combustion chamber at all times.
No heat is emitted from the stove
• The wood is too moist (all energy is spent on drying it) or of a poor quality.
• Inspect the position of the smoke deflector plate and make sure there is free pas-
sage for the smoke.
• The amount of combustion (secondary) air is insufficient.
Combustion is too intense
• Rope seals in the door or the ash pan are no longer tight and need replacement.
• The chimney draught is too strong; install a damper in the chimney.
• Check that the ignition air is shut off.
The shaking grate is stuck
• Inspect the grate for jammed wood, nails or the like.
• Make sure the lever is placed correctly.
Recycling
Packaging
For environmental reasons, the packaging should be disposed of together with household waste.
The packaging is 100% recyclable.
Ceramic glass
Ceramic glass should be deposited at the local recycling centre (together with pottery and porce-
lain).
Vermiculite
Vermiculite plates from the stove should be deposited at the local recycling centre.

15
Spare Parts
If Spare parts at any time should be needed, please chech the list below.
Vermiculit Set Item no.: 100310
Front glass, Item no.: 100284
Glass inside, Item no.: 100285
Glas - Sidepanels, Item no.: 100286
Sealings—Door , Item no.: 100351
Door , Item no.: 100993
Shake Grate, Item no.: 100471
Glass spring with screws, Item no.: 100876
Wood catch, Item no.: 100418
Spring for Door, Item no.: 100241
Connection of Flue pipe:
The Stove is mounted with Flue
adaptor on top or on the rear side.
When mounting on the rear side the
Flue adaptor and cover switch pla-
ces.
The cast iron cover is placed in the
hole on in top of the cast iron top.

16
Leave a 40 mm
gap between the
condensation insula-
tion and the bottom
of the stove.
Indirectly through the exterior wall Through the exterior wall
Through the floor and foundation Through the floor and crawl space
External air supply
These stoves are specific designed for external air supply. There can be many reasons for the need
of choosing an external air supply system, some of the more common reasons are:
Newer houses there are designed to be low energy houses
Houses where is not possible to have suffusion fresh air supply to the stove
Houses with climatic controls
External piping
If you have any doubts on how to make the piping through the walls or foundation,
we recommend that you consult with an building expert.
It is recommended that the flex hose, which comes from the stove, connects to a smooth pipe
as soon as possible. We do not recommended a flex hose longer than 1m.
We recommend that piping are in Ø100mm pipes.
You must be aware that external piping can generate condensation of water, both in the pipes,
flex hose and in the stove as well as in the chemney. A way to minimize the effect of the con-
densation is to have a small outwards decline in the piping, e.g. 2%, and insulating of the pi-
ping.
Varde cannot be hold responsible for the external piping, how it is conducted or any side effect
it may cause.

17
These stoves are specific designed for external air supply. There can be many reasons for the need

18
Pottemagervej 1, 7100 Vejle Denmark. www.vardeovne.dk
Varde Ovne A/S cannot be held responsible for any printing errors.
Guarantee/Warranty rights
Guarantee
All VARDE wood-burning stoves are subject to close quality control. We take great pride in
delivering uniform quality products every time. However, manufacturing defects can occur every
now and then, so we offer a 5-year guarantee.
The guarantee on your wood-burning stove does not cover:
Wear-and-tear parts, such as Vermiculite panels in the combustion chamber, glass panes,
seals, handles, cast iron bases and shaker grates.
Damage caused by improper operation, incorrect connection, lack of or incorrect mainte-
nance (see user manual).
Overheating/deterioration of materials due to use of e.g. incorrect type of firewood,
burning coke or excessive firewood.
Connection of your stove to a chimney with poor air draw (e.g. a chimney that is too short
or with leaks).
Damage to paintwork due to installation/storage in unheated or humid surroundings or that
is due to cleaning with damp cloths and cleaning products.
All normal wear to wear-and-tear parts/consumables and paintwork.
Damage that is caused by external forces of physical nature.
Compensation for any consequential damage, including damage to other objects.
Installation and/or disassembly for warranty repairs.
However, we offer a 6-month guarantee on all wear-and-tear parts that are not covered by
other guarantees.
For all other products – except wood-burning stoves and wear-and-tear parts – we offer a
2-year guarantee/warranty right pursuant to the Danish Sale of Goods Act.
Warranty rights
You have 2-5-year warranty on all our products, subject to the above conditions. This means
that you are entitled to make a warranty claim if the product has errors or deficiencies.
For any deficiencies that are covered by this warranty, upon delivery to the customer, or for
deficiencies that arise during the warranty period, VARDE Ovne accepts to either send a suitable
replacement component at no charge to remedy the deficiency, to exchange the item, to issue a
refund against return of the item or to offer a partial refund depending on the specific situation.
VARDE Ovne is under no obligation to assist in the installation/replacement of components.
In addition to the rights conferred by our guarantee, consumers also have rights pursuant to the
Danish Sale of Goods Act. These rights are conditional upon the claim being justifiable and that
it is not due to incorrect use or other behaviour that has damaged the product.
The claim must be presented within reasonable time of you having noticed the error or
deficiency to the product. A claim that is presented within two months of you having noticed the
deficiency shall always be considered timely.
All correspondence concerning warranty claims must be via the dealer from whom you pur-
chased your stove. Please bring your purchase invoice and pictures. Alternatively, you can
complete the warranty claim form on this website.
We will require a detailed description of the claim/problem so that we can deal with it quickly
and come up with a solution.
Table of contents
Other VARDE OVNE Wood Stove manuals