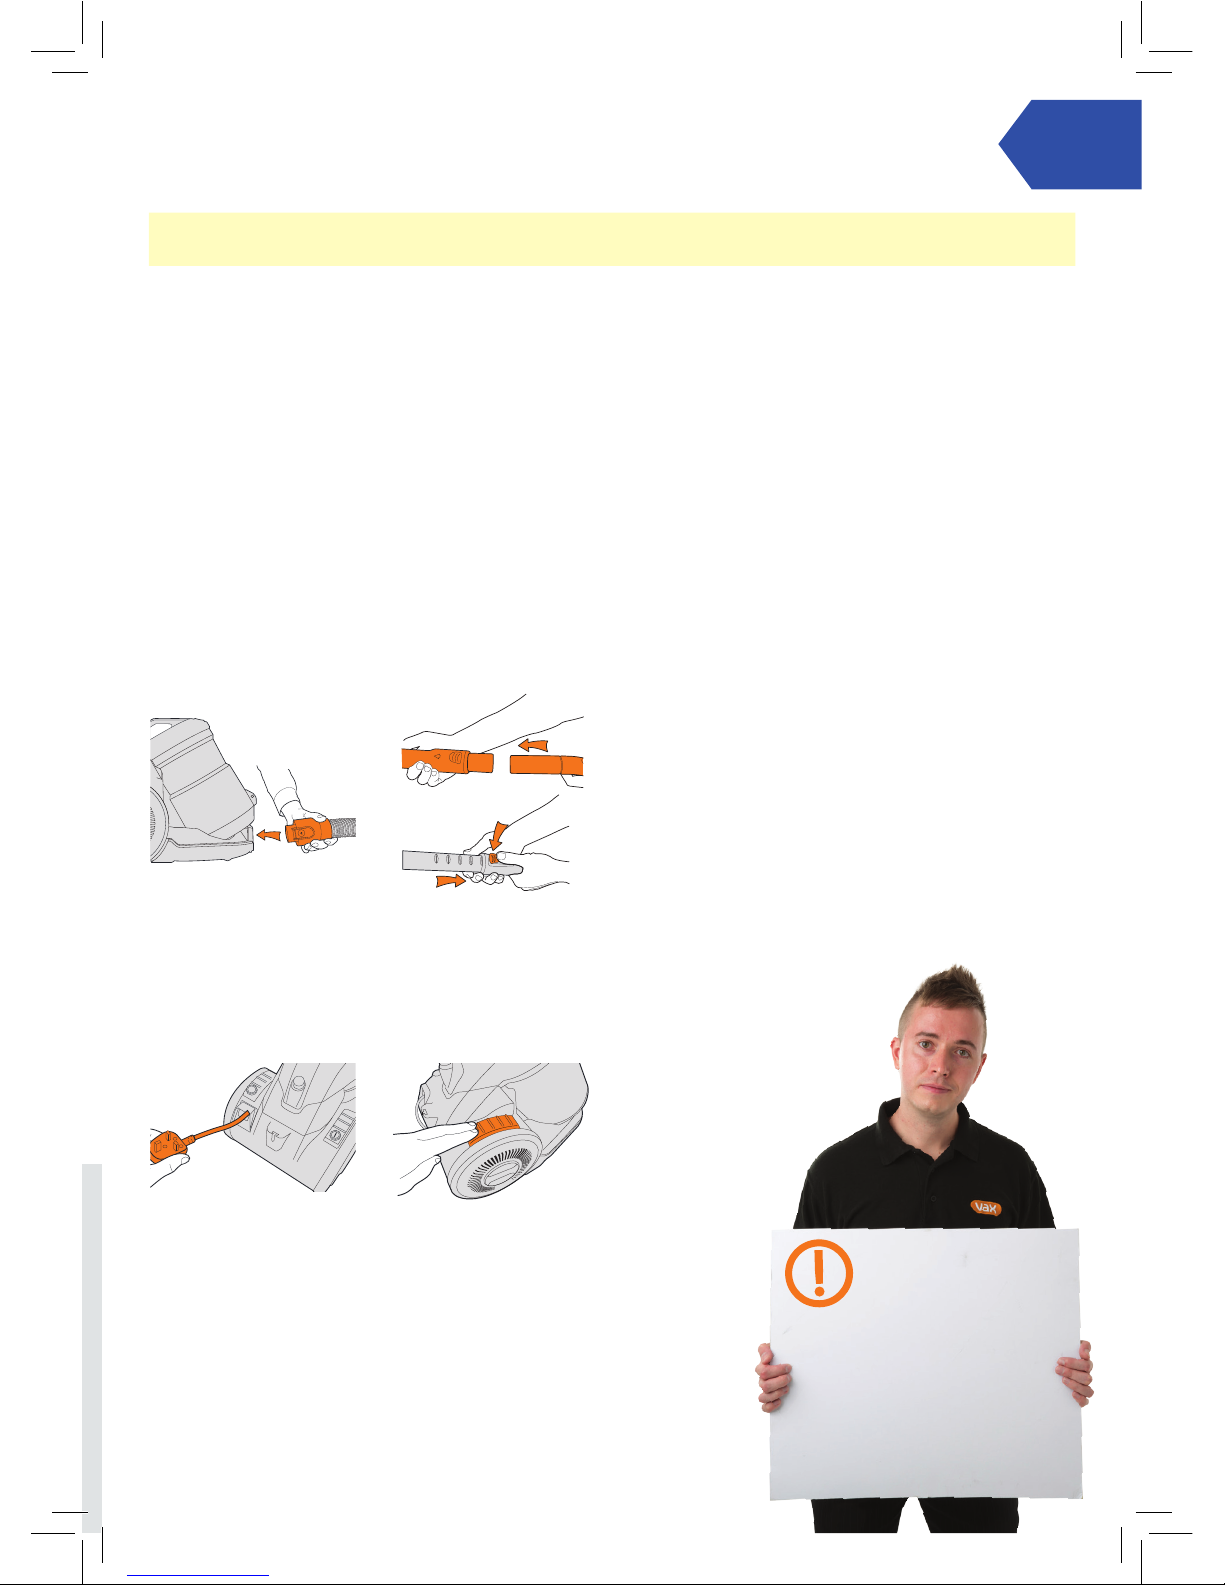
Vax VRS203 User manual

vax.co.ukVRS203, VRS204, VRS2041
VX3
Let’s get started

Let’s talk safety
Basic
safety
precautions
Don’ts
Do’s
Please keep instructions for further use and use only as
instructed in this guide. This vacuum cleaner is intended for
household use only and NOT for commercial or industrial use.
• Only use the vacuum cleaner indoors on dry surfaces and
keep the area you’re cleaning well lit.
• Keep ngers, hair and loose clothing away from moving parts
and openings whilst using the vacuum cleaner.
• Don’t use this vacuum cleaner if it has been dropped, damaged
or left outdoors.
• Don’t run over the power cord or use vacuum cleaner if the
power cord or plug is damaged. Please contact our Customer
Care Line on: 0330 026 8455 (Mon-Fri: 8.30am to 6.30pm,
Sat: 9.00am to 5.00pm).
• Don’t handle the plug or use the vacuum cleaner with wet hands.
• Don’t pull or carry this vacuum cleaner by the power cord.
Don’t use the power cord as a handle, pull the power cord
around corners, sharp edges or close a door over the power
cord. Don’t unplug vacuum cleaner by pulling on the power cord.
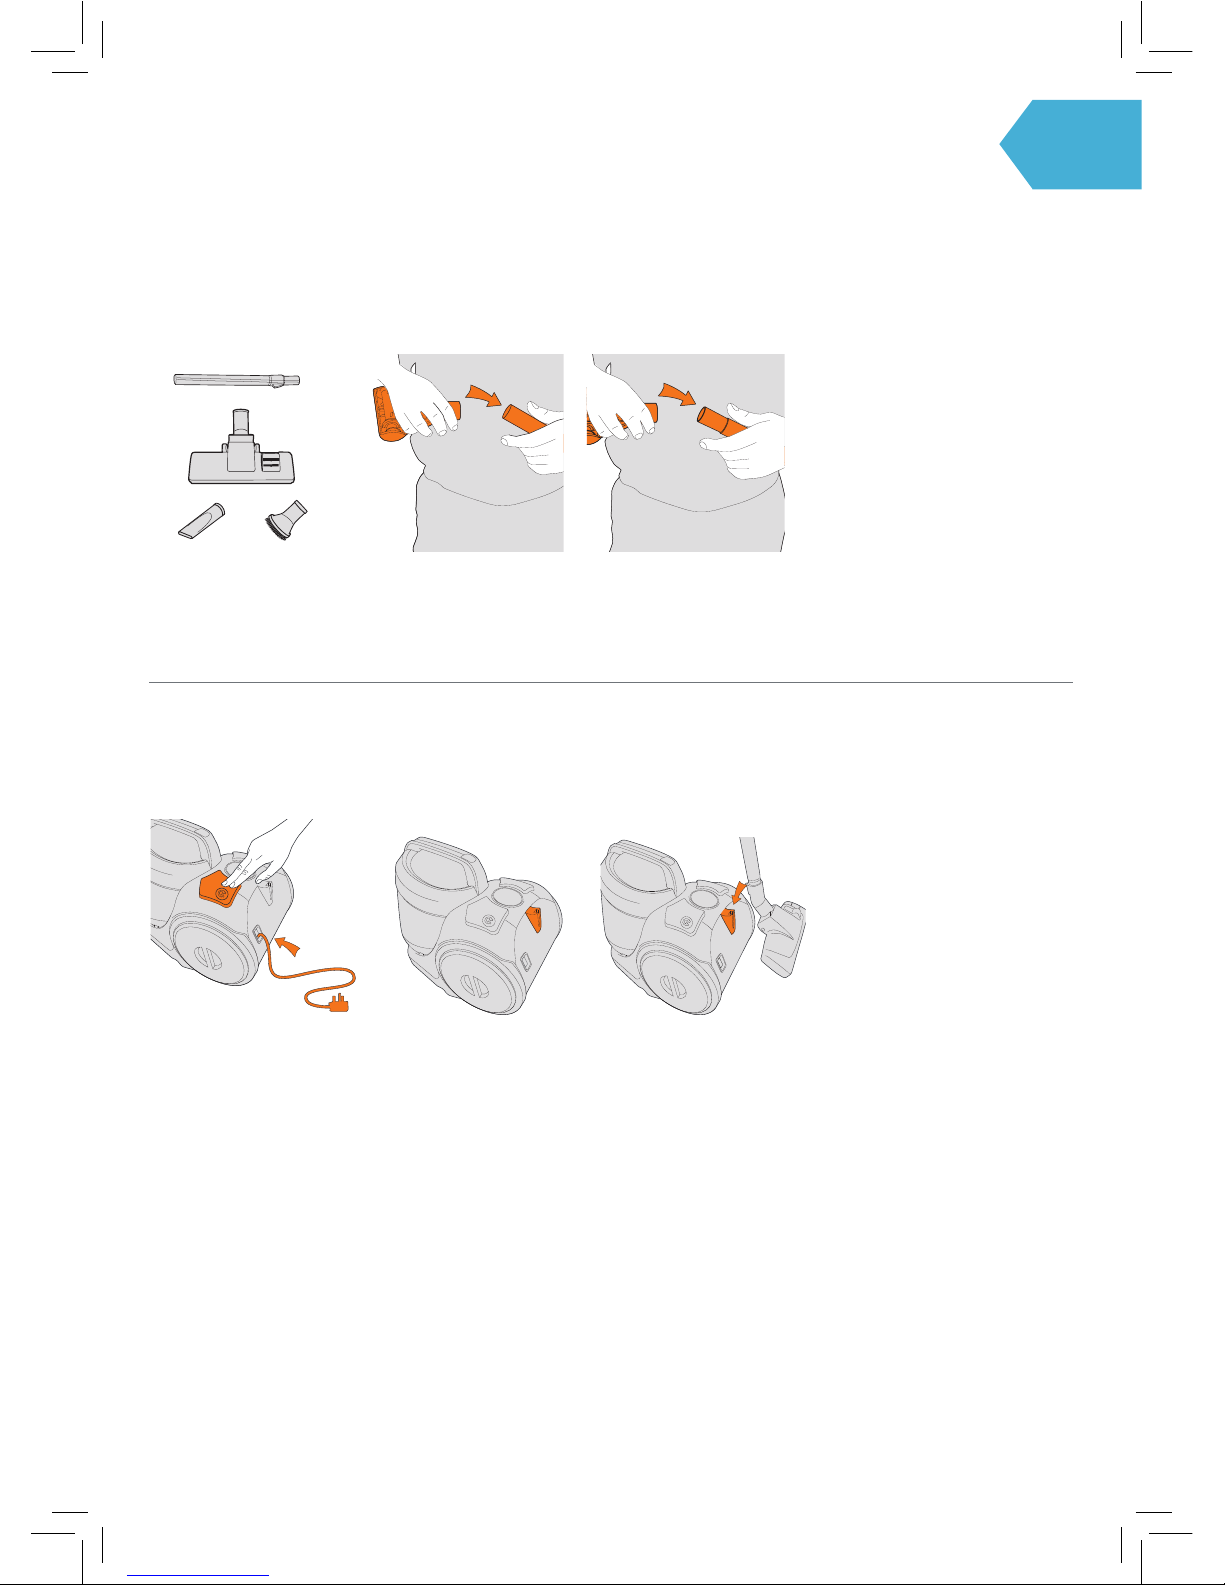
• Turn o all controls on the vacuum cleaner before
disconnecting or connecting the power cord.
• Always keep the power cord away from the brushes whilst
using your vacuum cleaner. After use always wrap the power
cord around the cord clips provided.
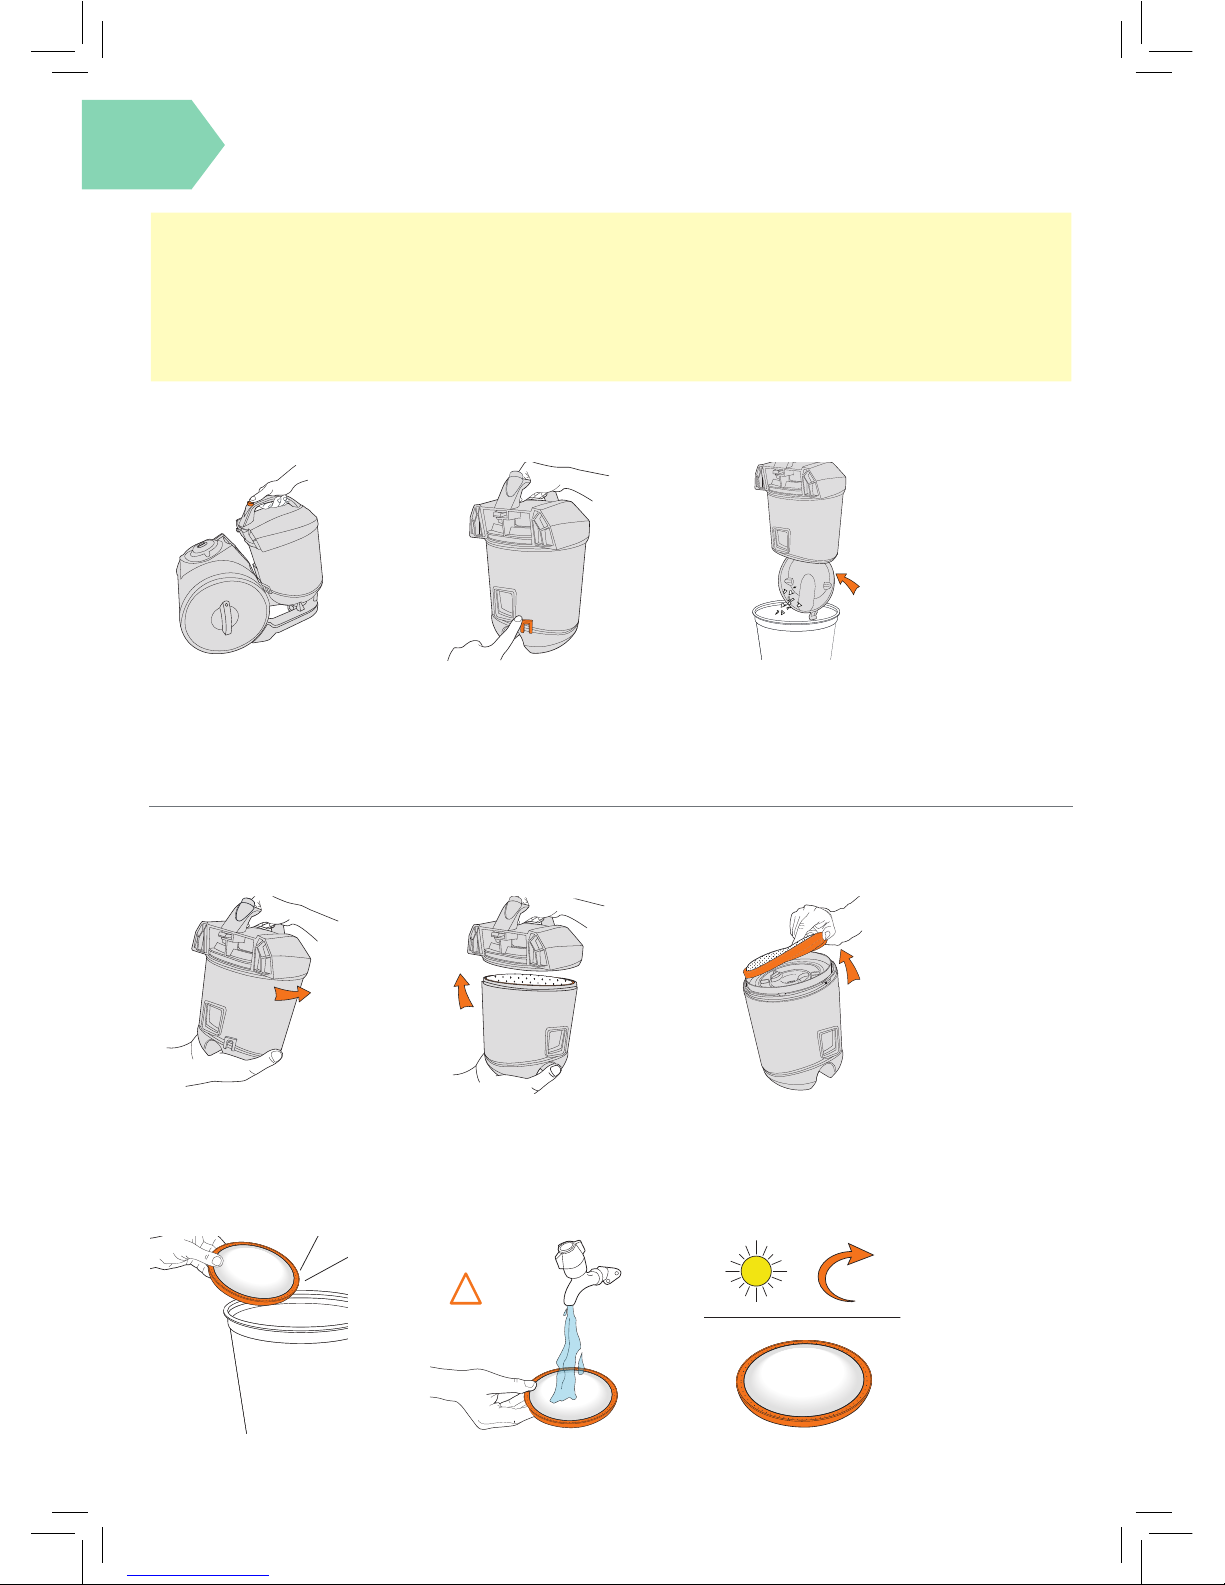
• Always make sure both the pre-motor/post-motor lters are
in place before use.
• Always make sure the brushbar is set to hard oor when
using your vacuum on the stairs and take extra care when
positioning the vacuum cleaner on the stairs.
• Always switch o the vacuum cleaner before disconnecting
or connecting the hose and accessories.

• This appliance can be used by children aged from 8 years and above and
persons with reduced physical, sensory or mental capabilities or lack of
experience and knowledge if they have been given supervision or instruction
concerning use of the appliance in a safe way and understand the hazards
involved. Children shall not play with the appliance. Cleaning and user
maintenance shall not be made by children without supervision.
• Only Vax recommended tools should be used with this vacuum cleaner.
• Don’t use this vacuum cleaner if it has been dropped, damaged
or left outdoors.
• Don’t run over the power cord or use vacuum cleaner if the
power cord or plug is damaged. Please contact our Customer
Care Line on: 0330 026 8455 (Mon-Fri: 8.30am to 6.30pm,
Sat: 9.00am to 5.00pm).
• Don’t handle the plug or use the vacuum cleaner with wet hands.
• Don’t pull or carry this vacuum cleaner by the power cord.
Don’t use the power cord as a handle, pull the power cord
around corners, sharp edges or close a door over the power
cord. Don’t unplug vacuum cleaner by pulling on the power cord.
• Don’t vacuum up any ammable or combustible materials (lighter uid, petrol,
kerosene etc.) or use the vacuum cleaner in an area with explosive vapours
or liquid.
• Don’t vacuum up hot coals, cigarette butts, matches or smoking hot burning
items or use in an area where there may be harmful uids (chlorine, bleach,
and ammonia drain cleaner).
• Don’t attempt to remove blockages with sharp objects as this may cause
damage to your vacuum cleaner.
• Don’t vacuum up hard or sharp objects such as glass, nails, screws or coins etc.
• Don’t use the vacuum cleaner with incorrect voltage as this may result in
damage or injury to the user. The correct voltage is listed on the ratings label.
• Keep all openings clear and free from debris as this may aect the
airow/suction.
• Always replace the fuse in the plug with a British 13amp fuse. Always protect
the power cable from heated surfaces and open ames.
• Use only CE approved 13amp extension cords, non-approved extension cords
may overheat. Care should be taken to arrange the extension cord as it could
be a trip hazard.
• Store the vacuum cleaner in a cool, dry area. If lters have been cleaned
as per user the guide instructions ensure they are thoroughly dry before
storing away.

Thank you for buying this VX3.
Taking care of your carpets and hard oors
The VX3 is designed to make vacuuming carpets and hard oors regularly, as eective and
ecient as possible and this user guide will help you get the most out of your machine.
Maintaining your carpets and hard oors will ensure they keep their appearance for longer.
You’ve chosen carpets and hard oors for your home for a reason and Vax will help you take
good care of them.
Taking care of your VX3
Also inside this guide are instructions on maintaining your new machine, so that it’s always ready
when you are to tackle your carpets and hard oors.
Let us know what you think @VaxUK
Taking care of you
We’re here if you need us. Instead of taking me back
to the shop, simply visit:
vax.co.uk/support or call:
(UK) 0330 026 8455 (ROI) 1-800 928 308
Monday-Friday 8.30am to 6.30pm, Saturday 9.00am to 5.00pm
Calls are charged at the UK local rate. Please make a note of the serial number and model number
of the product before calling.
Alternatively, you can write to us at:
Vax Ltd., Plot 302, Stonebridge Cross Business Park, Hampton Lovett, Droitwich, WR9 0LW, UK
This User Guide can be found online at: vax.co.uk/support

Contents
Let’s talk safety
Getting to know your machine
Getting started
Using your machine
Taking care of your machine
Let’s talk technical
What to do if it goes wrong
Getting in touch
Accessories
VX3
Included with
your machine
VX3 Pet
Accessory hose
Combination
oorhead
Dusting brush
Crevice tool
Tool connector
TurboTool
Telescopic
extension tube
Upholstery tool
Initial Setup for normal operation
1. Use the base accessories.
a. Shortest hose
b. Extension tube set to shortest practicable length.
2. Clean lters installed.
3. Dust receptacle empty.
4. All Bleeds must be closed.
5. Floorheads/tools set to Carpet Mode for carpet cleaning.
6. Mechanical Agitation turned ON for carpet cleaning.
7. Floorheads/tools set to Hard Floor Mode for hard oor cleaning.
8. Mechanical Agitation turned OFF for hard oor cleaning.

Getting to know your machine
Name VX3
Voltage 220-240V~50Hz
Wattage 800W
Cord length 5m
Weight 4.7kg
Technical Specication
Subject to technical change without notice.
Filter Kit (Type 95)*
1-1-134231-00
Pro Cleaning Kit (Type 2)
1-1-133326-00
Turbo Tool (Type 6)
1-1-134419-00
Accessories & Consumables
*To purchase consumables and accessories, please visit vax.co.uk
Getting started
Carry handle
Outer cyclone
Dirt container release button
Cord rewind button
Hose connector Base
Inner separator
Power on/o button
Wheel outer
Dirt container lid
Wheel inner
and lter housing
Dirt container

PLEASE READ ‘LET’S TALK SAFETY’ AT THE BEGINNING BEFORE USE
*To purchase consumables and accessories, please visit vax.co.uk
Getting started
Before you begin cleaning
• Always switch o and unplug the vacuum cleaner before connecting or disconnecting the hose/attachments,
or removing and emptying the dirt container.
• The vacuum cleaner is equipped with a thermal cut-out. If for any reason the vacuum cleaner does overheat the
thermostat will automatically turn the vacuum cleaner o. If this happens, switch the vacuum cleaner o and unplug
from electrical socket. Remove and empty the dirt container also check the vacuum cleaner for blockages. Allow the
vacuum cleaner to cool for approximately 1 hour (if you have cleaned the lters please wait 24 hours for the lters
to fully dry before putting back into the vacuum machine).
• Clean the pre-motor lter every time the dirt container is emptied and replace the post-motor lter every 12 months.
• If the vacuum cleaner is blocked, switch o and unplug before removing the blockage.
Assembling your cylinder
Insert the end of the hose
into the unit. Ensure the
hose has clicked into place.
Slot the metal telescopic extension
tube and hose handle together. All
accessories can be tted to the end
of the metal telescopic extension tube.
Fully unwind the power
cord. A yellow mark on
the cord indicates the
recommended cord length.
Do not exceed the cord
beyond the yellow mark.
Plug in and switch the
unit on by pressing the
power button.
When unwinding the power
cord always pull out to
the yellow marker but
no further.
CAUTION

Using your machine
For use on carpets, click
rocker switch forward. For
use on hard oors click
rocker switch back.
Slide vent cover on hose
grip open to reduce
suction if required.
Raise brushes for carpets. Lower brushes
for hard oors.
How to use
Using your machine
Brushes on the oorhead
should be visible when
using on hard oors.
TIP
IMPORTANT: The base of the vacuum cleaner should always be positioned at on the oor when starting and in use.
The dirt container should be locked into place before lifting the vacuum cleaner by the carry handle.

Cable rewind button
is located at the rear
of the machine. After
unplugging press the
cable rewind until the
cord is fully retracted.
For convenience there is a parking slot located at the
rear of the vacuum cleaner where the oorhead and
tubes can be attached for storage and carrying.
Using your machine
Using your machine
Choose an accessory. Attach accessory
to hose end.
If required use tool
connector.
Using accessories
Storage

Taking care of your machine
Cleaning the pre-motor lter
Remove dirt container
by pushing down the dirt
container release button and
lifting the dirt container.
Hold the dirt container and
twist the lid anti-clockwise.
Tap excess dirt from the lter. Rinse under a tap and leave to dry for 24 hours.
TAP
MAX
40˚C
!
MAX
40˚C
24hr
Hold the dirt container and press
the dirt release button located at
the rear of the dirt container.
Lift the lid to reveal the
pre-motor lter.
Hold dirt container over a
bin and press dirt release
button to open, allowing
dirt to fall out.
Lift out the pre-motor lter.
Emptying and cleaning the dirt container
Taking care of your machine
IMPORTANT: Always switch o and unplug the vacuum cleaner from the electrical socket before assembling,
opening or emptying the dirt container, or before connecting/disconnecting the attachments.
Pre-motor lter needs to be cleaned every time you empty the dirt container. Do not use your vacuum cleaner
without all of the lters in place.
The motor is equipped with a thermal cut-out. If for any reason the unit should overheat, the thermostat will
automatically turn the unit o.

Hold the dirt container
and twist the lid
anti-clockwise.
Cleaning the shroud
Post-motor lter maintenance
Lift the lid to reveal
the pre-motor lter.
Lift out the pre-motor lter. Hold the container and
twist the inner separator
anti-clockwise.
TAP
Post-motor lter is located in the
right side wheel. Hold the centre
of the wheel and twist wheel
cover anti-clockwise.
Remove the inner separator
from the container.
With the wheel cover o
the post-motor lter is
easily removed.
Dislodge any excess dirt
by gently tapping the inner
separator over a bin.
IMPORTANT: The exhaust lter is designed to oer long life with no maintenance. The lter should be checked
periodically and when heavily discoloured it should be replaced. Please do not wash, scrub or brush the lter
as this will damage the delicate lter media.
Check the post-motor lter
for discolouration.
Taking care of your machine
!
40˚C
MAX
24hr

Let’s talk technical
What to do if it goes wrong
Slide the locking ring
to remove.
Lift and separate
the housing.
Using a pair of scissors,
cut any hair or debris free
from around the brushes.
Removing blockages from the TurboTool (some models only)
Tabs
Line up the tabs on front of
housing and push together
to ret. Slide locking ring
into groove to secure.
Remove the hose from the vacuum cleaner and
telescopic extension tube. Remove any blockage
by inserting a wire coat hanger into the hose.
Removing blockages from the hose
To test for a blockage in
the hose, drop a small ball
of paper into the hose. The
paper will drop through if
the hose is clear.
TIP

• Check the ‘This pack contains’ panel on the box to make sure
the part is included with your machine.
• The plug may not be fully pushed into the electrical socket.
• Check the fuse in the plug if this needs replacing, always replace with
a British 13amp fuse.
• The motor thermostat may have tripped. If this has happened, unplug
the vacuum cleaner. Remove and empty the dirt container and check
the hose for blockages. Clean the lters and allow the vacuum cleaner
to cool for approximately 1 hour (if you have washed the lters you will
need to wait 24 hours for the lters to fully dry before putting them back
into the vacuum cleaner).
• The lters may be clogged, clean the lter. Go to ‘Taking care
of your machine’.
• The dirt container may not be correctly tted, remove the dirt container
from the vacuum cleaner and check it’s assembled correctly, ret
ensuring it’s locked into place.
• The lter may be clogged, clean the lter. Go to ‘Taking care of
your machine’.
• The dirt container may be blocked, empty the dirt container. Go to
‘Taking care of your machine’.
• There may be a blockage in the hose/tube. Disconnect from the
vacuum cleaner and carefully remove any blockages. Go to ‘Let’s
talk technical’.
SolutionProblem
CAUTION: To reduce the risk of personal injury, unplug the product before performing maintenance
/troubleshooting checks.
There is an
accessory missing.
Why won’t the carpet
washer turn on?
Why won’t the solution/
clean water dispense?
Why won’t the
brushes rotate?
What to do if it goes wrong

Getting in touch
Accessories
* Calls are charged at the UK local rate. Please make a note of the serial number and model number of the product before calling.

Getting in touch
Accessories
* Calls are charged at the UK local rate. Please make a note of the serial number and model number of the product before calling.
Pro Cleaning Kit (Type 2)
1-1-133326-00
All our best tools all in one kit that makes cleaning
your home quicker, easier and with even better
results. We’ve taken care of cleaning all of the hard
to reach areas such as on top of cupboards and in
between blinds to the dust that collates behind and
within the radiator.
Don’t forget your accessories!
Order at: www.vax.co.uk/spares-and-solutions
TurboTool (Type 6)
1-1-134419-00
Use the TurboTool for vacuuming your stairs,
upholstery and car interiors. It’s great for picking
up stubborn pet hair.
Fur ‘n’ Flu Tool
1-1-131392-00
Specically designed to remove extra stubborn
pet hair from upholstery, furniture and carpets.

EEC Statement of Compliance: Manufacturer/EEC importer: Vax Limited, hereby on our own responsibility,
declare that the C85-E3-(Be, Pe) is manufactured in compliance with the following Directives:
Safety: 2006/95/EC Low Voltage Directive. EMC: 2004/108/EC Electromagnetic Compatibility Directive.
Waste electrical products should not be disposed of with household waste. Please recycle where facilities exist.
Check with your Local Authority or retailer for recycling advice.
@VaxUK
© 2014 All rights reserved. VAX®, VAX Lozenge, are trade marks or registered trade marks of Techtronic Floor Care Technology Ltd.
Vax Ltd., 5th Floor 2 Colmore Square, 38 Colmore Circus, Queensway, Birmingham, B4 6BN, UK
This manual suits for next models
2
Table of contents
Other Vax Vacuum Cleaner manuals

Vax
Vax Zoom U87-ZM-B User manual

Vax
Vax C85-TO-Be User manual

Vax
Vax W87-RC-C User manual

Vax
Vax W88-CX4 Centrix User manual

Vax
Vax Air Series User manual

Vax
Vax C88-AM-Be User manual

Vax
Vax Air Cordless Switch User manual

Vax
Vax CADENCE V-044 User manual

Vax
Vax W86-DP-A series Installation instructions

Vax
Vax C91-P2 SERIES User manual

Vax
Vax VZL-6013 User manual

Vax
Vax H86-S6-B Installation instructions

Vax
Vax VS-033 Product information sheet

Vax
Vax U88-M8-B User manual

Vax
Vax powermax pet VRS7U User manual

Vax
Vax U-Vac UPV12 User manual

Vax
Vax VX42 User manual

Vax
Vax 7131 User manual

Vax
Vax Libretto Product information sheet

Vax
Vax INFINITY V-031B Series User manual