Veho MUVI Q-1 User manual

User Manual
VQD-002-Q1

1. What’s in the box? 4
2. Seng up the Q-1 Drone and equipment baeries 6
2.1Q-1Dronebaeryspecicaons
2.2ChargingtheQ-1Dronebaery
2.3InstallingtheQ-1Dronebaery
2.4Baeryprecauons
3. Preparing the Q-1 Drone 7
3.1Aachingthecamera
3.2Flightindicators
4. Q-1 Drone propellers 10
4.1Installingthepropellers
4.2Removingthepropellers
4.3Precauons
4.4PropellerGuards
5. Q-1 Drone controller 12
5.1JoysckandS1-S4switchfuncons
5.2Returntohomebuon
5.3Switchingonthecontroller
5.4Controllerantenna
5.5Controlleroperanginstrucons
5.6PairingthecontrollerandtheQ-1Drone’sreceiver
6. Flying the Q-1 Series 18
6.1Compasscalibraon
6.2Starng/stoppingthemotor
6.3Basicight
6.4Failsafeprotecons
6.5Howtoregaincontrolonthecontroller
6.6Baerylevelalarmfuncon
7. Follow Me mode 24
7.1TopairthetrackerwiththeQ-1Drone
7.2Indicatorsonthetracker
7.3Usingthetrackerinight
8. Advanced troubleshoong and calibraon 27
8.1Remotecontrol
8.2Accelerometer
8.3Tocalibratetheaccelerometer
8.4Gyroscope
9. Specicaons 34
Contents

4 5
1. What’s in the box?
1. Q-1 Drone x1
2. Propellers x4
3. PropellerGuards x4
4. Controller x1
5. CameraClip x1
6. SmartphoneMount x1
7. Q-1DroneBaery x1
8. Q-1DroneBaeryCharger x1
9. ToolSet(ScrewdriverandWrench) x1
10.FollowMeWatch&Charger x1
11.M3x12Screws x8
12. ControllerStrap x1
13. USBCable x1
1
2
3
4
5
6
7
8
9
10
12
13
11

6 7
2. Setting up the Q-Series
and equipment batteries
Equipment Power Supply
Controller 4xAABaeries
Q-1 Drone Q-1 DroneBaery(seebelow)
2.1 Q-1 Drone baery specicaons
Capacity 6800mAh
Charging ambient temperature 0°C-50°C/32-122°F
Discharging ambient temperature -20°C-50°C/-4-122°F
Charge/discharge ambient relave humidity < 80%
2.2 Charging the Q-1 Drone baery
ConnecttheQ-1DronebaerytotheQ-1Dronebaerychargerandthenconnectthe
chargertoanACpowersource(100-240V,60/60Hz).WhilstchargingtheLEDonthecharger
willturnred,whenfullychargedtheLEDwillturngreen.Aerthebaeryisfullycharged
pleaseremovethebaeryanddisconnectthecharger.
2.3 Installing the Q-1 Drone baery
EnsuringthattheQ-1Droneisswitchedo,insertthebaeryintothebaerycompartment
ontheQ-1Droneandlockthebaeryintoposion.Ifthebaerylockisnotfastenedthe
baerymaynotconnectcorrectlywhichmayaectightsafetyorstoptheQ-1Dronefrom
takingo.
2.4 Baery precauons
•DonotpulloutthebaerywhilsttheQ-1Droneisswitchedonasitmaydamagetheunit.
• Ifthebaeryisnotgoingtobeusedforalongmeitisrecommendedthatyou
dischargethebaerytoa40-50%chargelevelbeforestoring.Tomaintainbaerylife
dischargeandchargethebaeryevery3months.
• Donotconnuetouseorchargethebaeryifthereisanyexpansionordamagetothe
baery.
3. Preparing the Q-1 Drone
1. Propellers
2. Motor
3. FrontIndicator
4. Gimbal
5. LandingGear
6. Cameraclip/buckle
7. Q-1DroneBaery
8. TailIndicator
9. PowerSwitch
10.RearIndicator
11.BaeryLevelDisplay
12.BaeryLevelCheckBuon
1
2
3
87 9
10
11
12
4
5
6

8 9
3.1 Aaching the camera
TheQ-1DroneiscompablewiththeMuviK1,K2,K2S,K2NPNGandK2Procameras,as
wellasGoProHero3/4models.UsethecameracliptoHoldthecamerainplace,andthen
removethebuckle.Thecameraclipshouldsecurelyclipoverthenotchesatthetopand
boomofthegimbal.
3.2 Flight indicators
TheQ-1Dronehasthreeindicatorsonthefront,rearandtail.WhentheQ-1Droneis
switchedontheightindicatorswillturnon.Thefrontandtailindicatorsaregreen,therear
indicatorisred.
Funcon Front Indicator Rear Indicator Tail Indicator
Lowbaeryalarm–level1 Slowash(1son,1so) Slowash(1son,1so) N/A
Lowbaeryalarm–level2 Flashtwiceeverysecond Flashtwiceeverysecond N/A
Barometerabnormalstate Solidon Flashonceevery2seconds N/A
GPSabnormalstate Solidon Flashtwiceevery3seconds N/A
Compassabnormalstate Fastash Solidon N/A
Accelerometerabnormalstate Fastash Fastash N/A
Accelerometerneedscalibraon Switcheson,o,then Switcheson,o,then N/A
permanentlyon permanentlyon
Gyroabnormalstate Solidon Fastash N/A
Gyroneedscalibraon Solidon Slowash N/A
ControllerpairedtoQ-1Drone N/A N/A Flashonceevery
2seconds
GPSready N/A N/A Solidon
Readytoy Solidon Solidon Solidon
Frontindicator
Rearindicator Tailindicator

10 11
TheQ-1Droneuses10inchpropellers,twowithgreyrotorbladecapsandtwowithblack
rotorbladecaps.
Propeller Grey Black
Lock Turnclockwisetolock Turnanclockwisetolock
Unlock Turnanclockwisetounlock Turnclockwisetounlock
4.1 Installing the propellers
Aachthepropellerswiththegreycapstothemotorshaswithout“P”marksandaach
thepropellerswiththeblackcapstothemotorshaswith“P”marks(circledbelow).
Tightenthepropellersasperthelockdirecon(seeabove).
PLEASE NOTE: thepropellersaredesignedforautomacturning;thereforedonotghten
excessivelyduringinstallaon.
4.2 Removing the propellers
Whilstholdingthemotorwithyourhandorthesuppliedwrench,holdandrotatethe
propellerintheunlockingdirecon(seebelow).
4.3 Precauons
• Beforeeachight,checkthatthepropellers
arecorrectlyandrmlyinstalled.
• Ensureallpropellersareintactbeforeeach
ight.
• Keepyourdistancefromrotangpropellers
andthemotorstoavoidcutsandinjury.
• Onlyusepropellersthathavebeenprovided
byVehotoensureopmalperformance.
4.4 Propeller Guards
YoucanprotectyourQ-1Drone’spropellersfrombeingdamagedduringightsbyinstalling
thepropellerguards.ToinstallapropellerguardremovethetwoM3x8screwsattheendof
eachmotor,thenplacethepropellerguardinposionandaachusingtheM3x12screws
provided.Tightenthescrewsasrequired.PleasekeeptheM3x8screwsinasafeplaceand
replacewhennotusingthepropellerguards.
4. Q-1 Drone propellers
Unlockdirecon
Wrench

12 13
5. Q-Series controller
5.1 Joysck and S1-S4 switch funcons
Le joysck UpandDown–Throle/LeandRight–Yaw
Right joysck UpandDown–Pitch/LeandRight–Roll
S1 1SportMode2DriveMode3Economicmode
S2 1JoysckCalibraonOK2Null3CalibrangJoysck
(Tiltup)
S3 RelatedControltoServo Stop(Medium)
(TiltDown)
S4 1GPSMode2NormalMode3FollowMe
5.2 Return to home buon
PressandholdunltheLEDashesandthecontrollerwillbeeptoindicatethereturnto
homefeaturehasstarted.
Thedronewillytoaheightofapproximately40metres,thenytothelastplacethe
compasswassuccessfullycalibratedandlandslowly.
Whenthereturntohomeisprocessistakingplace,allbuonsexceptS3willbedisabled
unlthedronelands.Whenthedronehaslanded,pointthejoysckstotheouterboom
cornerstostopthemotor.
5.3 Switching on the controller
• Insert4AAbaeries(notprovided)intothebaerycompartmentasperposiveand
negavedirecons
• Ensurethatthetwojoyscksareinthecentreposion.PushswitchesS1totheboom
posionandS2tothetopposion.
• Pushthepowerswitchonthecontrollertoon.Thepowerindicatorwillturnonandstay
solidred.
Beforeeachusemakesurethecontrollerhassucientbaery.Ifthebaeriesarelowthe
controllerwillmakeasoundtoindicatelowpower.Pleaseremovethebaeriesifyoudonot
intendtousethecontrollerforalongme.
1.Antenna
2.Smartphonemount
3.S13posionswitch
4.S23posionswitch
5.S3Cameraanglecontrol
6.S43posionswitch
7.Returntohomebuon
8.FollowMe
9.Remotecontrolpowerindicator
10.Statusindicator
11.PhotoShoong&Video
RecordingIndicator
12.Lejoysck
13.Rightjoysck
14.Straphole
15.Stopvideobuon
16.Startvideorecordbuon
17.Photocapturebuon
18.Remotecontrolpowerswitch
19.Baerycompartment
1
8
2
9
6
10
11
19
12 13
14
1516
17
18
43 5 7

14
Controller Drone Direcon Control Method
TherightjoysckcontrolstheQ-1
Drone’sfront&backlt.
PushthejoysckupandtheQ-1Drone
willltandyforward.Pullthejoysck
downandtheQ-1Dronewillltandy
backwards.TheQ-1Dronewillkeeplevel
andstraightifthejoysckiscentred.
Movethejoysckfastertoincreasethe
ltangle(maximumis35degrees)and
forfasterightvelocity.
TherightjoysckalsocontrolstheQ-1
Dronele&rightlt.
PushthejoysckleandtheQ-1Drone
willltandyle.Pushthejoysck
rightandtheQ-1Dronewillltandy
right.TheQ-1Dronewillkeepleveland
straightifthejoysckiscentred.
Movethejoysckfastertoincreasethe
ltangle(maximumis35degrees)and
fasterightvelocity.
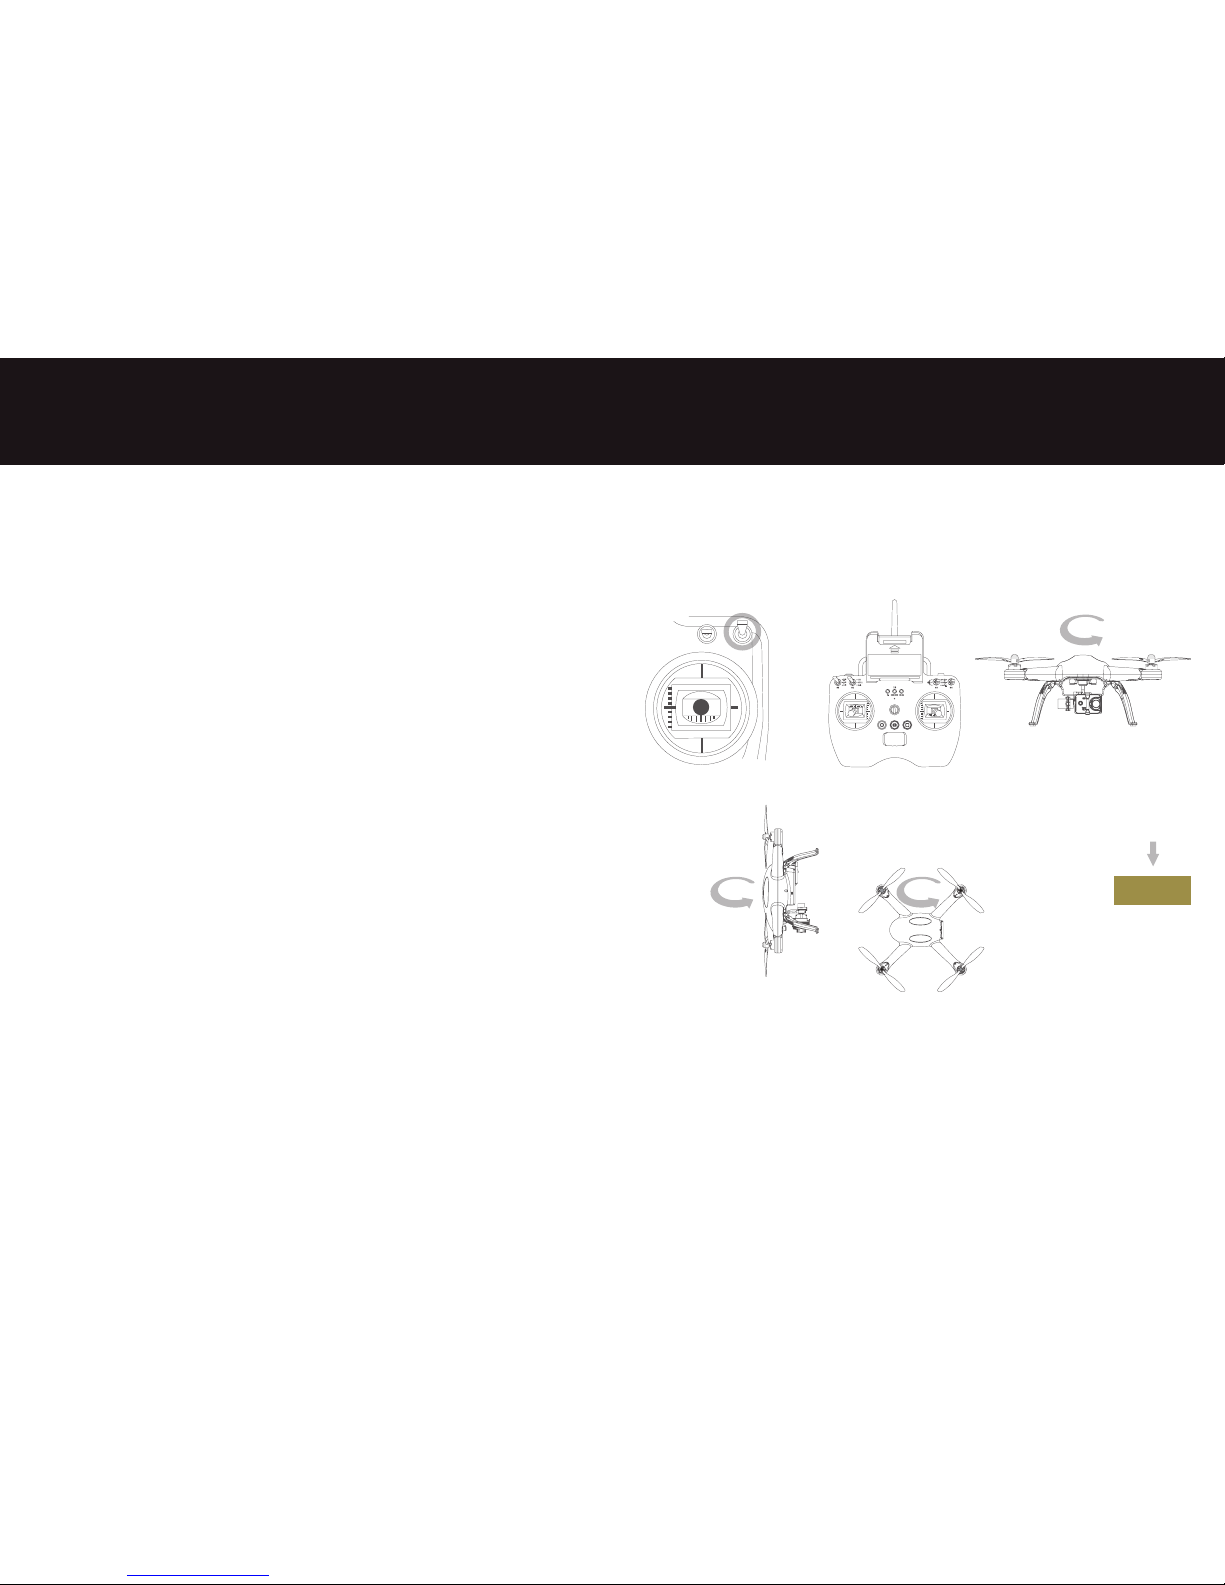
S1isusedtoselectightspeed.
Betweeneconomic,driveandsport.
Werecommendusingeconomicwhen
rstusingthedrone.
Alwaystakeoinposion3(economic),
thenchangetodriveorsportmode
whileintheair.
15
5.4 Controller antenna
TomaintainastrongcommunicaonbetweenthecontrollerantennaandtheQ-1Drone
receiverantennapleasekeepthecontrollerantennapoinngtowardstheskyandensure
thattherearenoobstaclesbetweenthecontrollerantennaandtheQ-1Dronereceiver.
YoumaylosecontroloftheQ-1Droneiftheantennaisobstructed.Makesurethatthe
smartphone(ifapplicable)doesnotblocktheantenna.
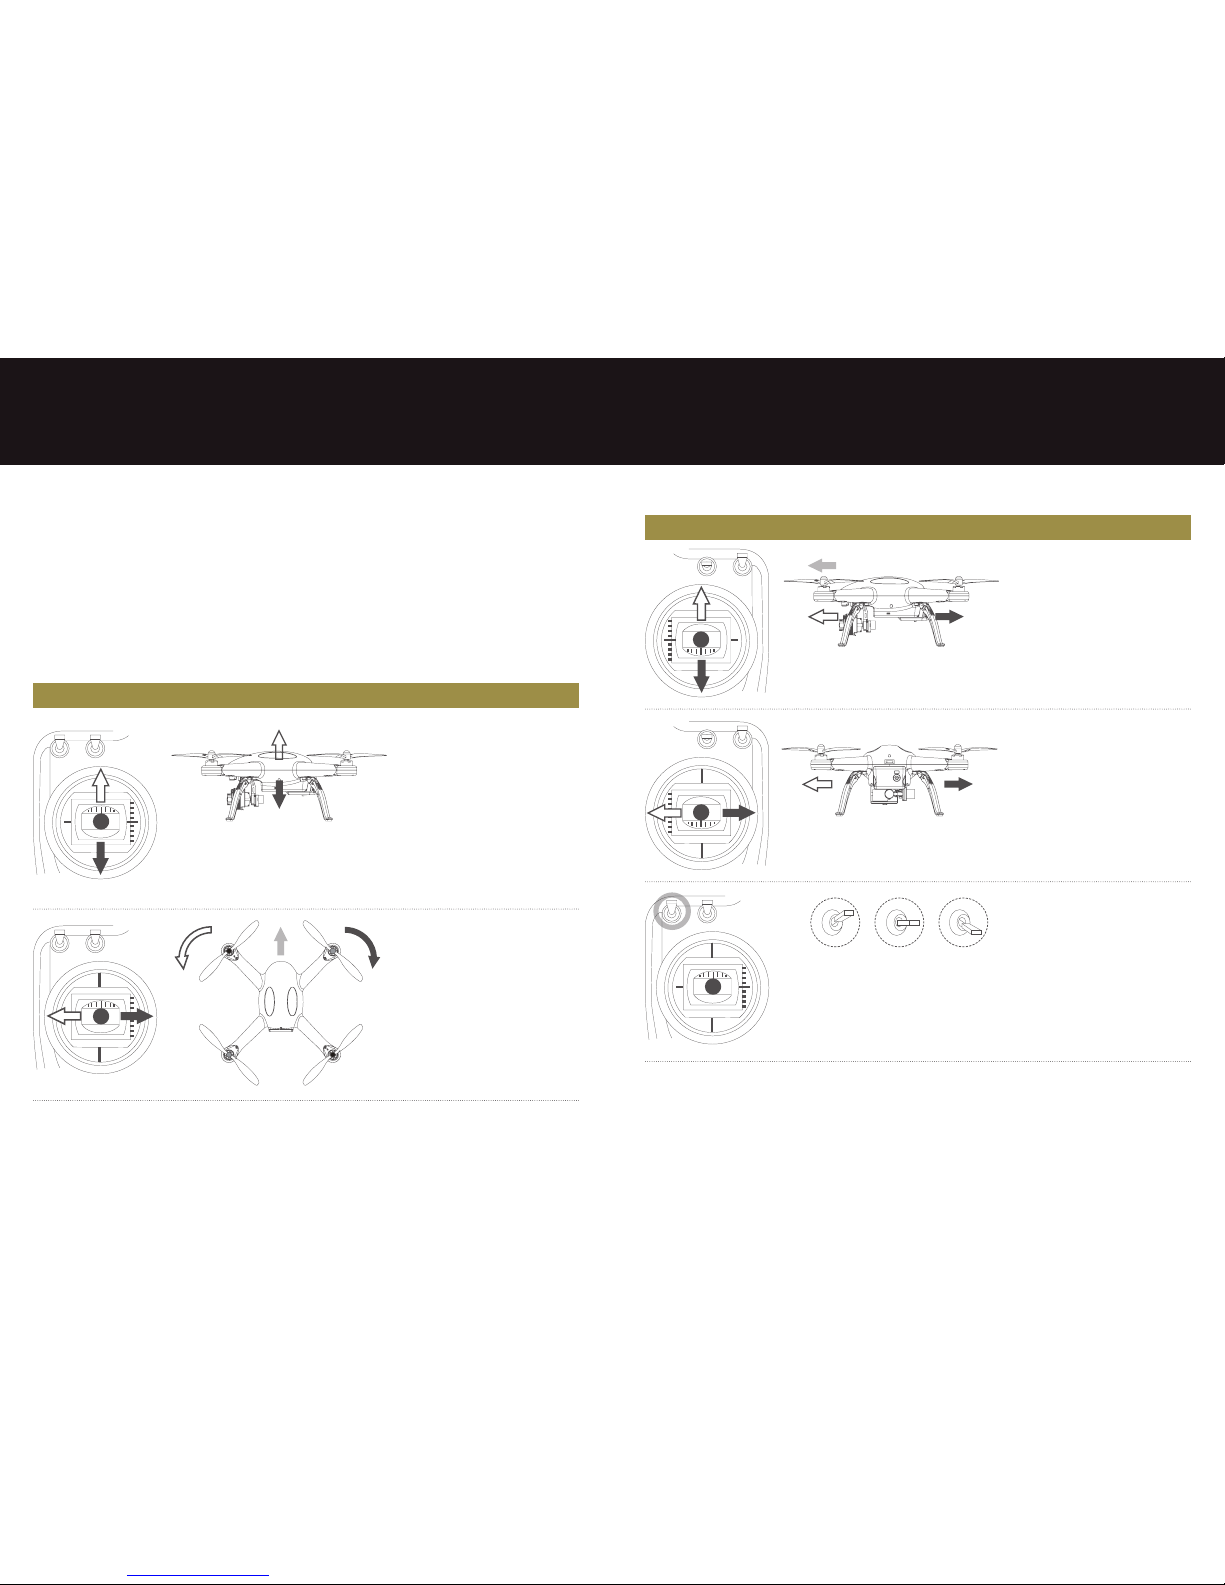
5.5 Controller operang instrucons
Controller Drone Direcon Control Method
ThelejoysckcontrolstheQ-1Drone
elevaon.
Pushthelejoysckupwardsoverthe
centreposiontomaketheQ-1Drone
takeofromtheground.(Pleasepush
thelejoysckslowlytopreventthe
Q-1Dronefromsuddenlyand
unexpectedlyrising).
Pushthejoysckup,theQ-1Dronerises.
Pullthejoysckdown,theQ-1Drone
descends.Keepthejoysckatthecentre
posionandtheQ-1Dronewillhoverat
thatparcularheight.
ThelejoysckalsocontrolstheQ-1
Dronerotaon.
PushthejoysckleandtheQ-1Drone
rotatescounter-clockwise.Pushthe
joysckrightandtheQ-1Dronerotates
clockwise.Ifthejoysckiscentred,the
Q-1Dronewillyinthesamedirecon
withoutrotang.
Thejoysckcontrolstherotangangular
velocityoftheQ-1Drone.Movethe
joyscktoincreaseQ-1Dronerotaon
velocity.
Posion 1 Posion 2 Posion 3

16
Controller Drone Direcon Control Method
S2isusedtocalibratetheleandright
joyscks.
MoveS2toposion3,andturnonthe
controller.Thenmovebothjoyscks
clockwiseandcounter-clockwisetwice,
ensuringeachrotaonreachesthe
maximumdegrees.Aerwards,release
thejoyscksandmoveS2toposion1.
Thevideorecordingindicator(green)
willlightupfor3secondstoindicatethe
compleonofthecalibraon.
S3isusedtocontrolthegimbalangle.
Pushtheswitchupordowntoincrease
ordecreasetheangleofthegimbal.
S4switchistheightmodetoggle
switch.
Posion1 GPSmode
Posion2 NRM(normal)mode
Posion3 Followmemode
Pressandholdthebuonfor3seconds
forthedronetoreturntothepointof
compasscalibraon.
PLEASE NOTE:TheQ-1Dronecannot
automacallyavoidobstaclesinitspath
whileitisinfailsafemode.
17
• InGPSmode,whenbothjoyscksareintheneutral(centre)posion,theQ-1Drone
willhoverataxed-point.
• Innormalmode,whenalljoyscksareintheneutral(centre)posion,theQ-1Drone
willremainlevel,butmaydriinahorizontaldirecon.
5.6 Pairing the controller and the Q-1 Drone’s receiver
ThecontrollerandQ-1Dronehavealreadybeenpairedtogetherpriortoshipping.You
onlyneedtofollowtheinstruconsbelowifthecontrollerorreceiverhavechanged.
MakesurethatthecontrolleristurnedoandthenturnontheQ-1Drone.Thefront,rear
andtailindicatorswilllightup.Whenyouheara‘beep’soundturnonthecontroller.The
videoindicatorwilllightupindicangthatpairinghascommenced.Whenthetailindicator
connuouslyashesfastthelinkbetweenthecontrollerandtheQ-1Dronereceiverhas
beensuccessfullyestablished.
Posion 1
Posion 1
Posion 2
Posion 2
Posion 3
Posion 3
Posion 1 Posion 2 Posion 3

18
Flying environment requirements
• DonotusetheQ-1Droneininclementweather,suchasstrongwinds,snow,rainandfog.
• Selectanopenareawithnotallbuildingsintheyingsite.Thepresenceofalarge
numberofsteelbuildingsintheareawillaectthecompass.
• WhileyingtheQ-1Dronestayawayfromobstacles,people,powerlines,shelters,
bodiesofwateretc.
• Donotyinacomplexelectromagnecenvironment(suchasnearmobilephonecase
staonsortowers)toavoidtransmierinterference.
• Donotyinrestrictedorno-yzonesandabidebyrelevantlawsandregulaons.
Pre-ight check
• Ensurecontroller,Q-1Droneandsmartphonearefullycharged.
• Ensurepropellersarecorrectlyinstalled.
• EnsurethemicroSDcardisproperlyinsertedbeforeusingthecameratocapturephotos
andvideos.
• EnsurethattheQ-1DroneisinEcomodebeforetake-obymovingswitch1tothe
boomposion.DonottakeowiththedroneinDriveorSportmodes.
• CheckifthemotorsstartproperlyaertheQ-1Droneisswitchon.
6.1 Compass calibraon
IMPORTANT:Makesuretocalibratethecompassbeforeuseorineverynewightlocaon.
Thecompassisverysensivetoelectromagnecinterference,whichcancauseabnormal
compassdataleadingtopoorightperformanceorevenightfailure.Regularcalibraonis
requiredforopmumperformance.
• Donotcalibratethecompassinastrongmagneceld.
• Donotcarryferromagnecmaterial,suchaskeys,mobilephones,etc.whilecalibrang
thecompass.
• Thepropellersmustberemovedbeforecalibraontoavoidaccidentalinjury.
Inawide,openareaturnonthecontrollerandQ-1Droneandmakesurethattheequipment
isworkingproperlyandfollowtheprocedurebelowtocalibrate.
When to Recalibrate
1. Whencompassdataisabnormal,frontindicator(green)blinksfast.
2. Theightlocaonisfarfromtheplacewherelastcompasscalibraonwasconducted.
3. TherearechangesinDrone’sphysicalstructure.
4. TheDronedrisalotwhileying,suchasitiesalongacirclewhenhovering.
19
AertheQ-1Dronepowerson(about
20secs).SwitchS46mesbetween
GPSandFollowMemode.TheQ-1
Dronewillentercalibraonstandby
mode(thetaillightwillashfast).
RotateQ-1Drone360
degreesvercallytwice
(nosedownwards).
RotateQ-1Dronevercally(nose
poinngle)unlthegreenlightgoes
o.PlacetheQ-1Droneontheground
Togglethejoyscksupandinwards.
Thefrontindicatorwillashgreen,
thenreleasethejoyscks.Compass
calibraoncommandhasbeenset
successfully.
RotateQ-1Drone360degrees
horizontallytwice(noseforwards).
Greenlightsturned
ONandsolid
SUCCEED
Fastlights
blinks
FAIL
RESTART
CALIBRATION
Step 1
Step 4 Step 5
Step 2 Step 3
6. Flying the Q-Series

20
6.2 Starng/stopping the motor
MakesurethattheS1-S4switchesareintheposionsshownbelow.Toggletheleand
rightjoyscksasshownbelowtostartthemotor.ThisisknownasCombinaonJoyscks
Command(CJC).Aerthemotorshavestartedreleasethejoyscksimmediately.
PLEASE NOTE:WhentheS4switchisinGPSmodethemotorscannotturnonunlthe
GPSisready.
TherearetwowaystostopthemotorsontheQ-1Drone:
1. AertheQ-1Dronelandstogglethethrole(le)joysck,andthenperformCJC.The
motorswillimmediatelystop.Releasethejoyscksassoonasthemotorshavestopped.
21
2. AertheQ-1Dronelands,togglethethrolejoyscktothelowestposionandhold
for3secondstostopthemotor.
IMPORTANT:DonotstopthemotorduringightorelsetheQ-1Dronewillcrash.
6.3 Basic ight
1. PlacetheQ-1Droneonat,opengroundandensurethatthetailindicatorfaces
towardyou.
2. TurnonthecontrollerandQ-1Drone.
3. WaitunlthetailindicatorashesslowlyandtheQ-1Droneentersasafeyingstate.
PerformCJCtostartthemotor.
4. Pushthethrole(le)joysckupslowlytosmoothlytakeo.Pleaserefertosecon
5.3fordetailedinstruconsoncontrolleroperanginstrucons.
5. Whenlanding,slowlypulldownthethrolejoyscktomaketheQ-1Dronedescend
slowlytotheground.
6. Aerlandingpullthethrolejoyscktothelowestposionandholdfor3seconds
orunlthemotorsstop.
7. Aerthemotorsstop,turnotheQ-1Droneandcontroller,oneaertheother.
Hold for 3 seconds
S1 S2 S3 S4
Toggle Le Joysck to boom le corner
Toggle Right Joysck to boom right corner

22
6.4 Failsafe protecons
IftheQ-1DronelosessignalfromthecontrollertheAutomacFlightControlSystemwill
returnittothehomepoint*andlandsafely.ThisreducesthechancesoftheQ-1Drone
genglostorcrashingincasethecontrollersignalislost.
*ThehomepointistheQ-1Drone’sposionwheretheQ-1Dronesuccessfullyscannedand
connectedtothesatellite.ToensurethattheQ-1Dronesuccessfullyiesbacktothehome
pointifitentersfailsafemodepleaseonlytake-oaertheQ-1Drone’sGPShassuccessfully
connectedtothesatellite.
IfyoulosecontroloftheQ-1DroneduringighttheQ-1Dronewillautomacallyfollow
theprocedurebelow:
1. TheQ-1Dronewillautomacallyslowdownandhoverinonelocaon.
2. IftheQ-1Droneregainssignalfromthecontrollerwithin2secondsitwillreturnto
normalightmodeandwillnotenterfailsafemode.
3. IftheQ-1Dronedoesnotregainsignalfromthecontrollerwithin2secondsitwillenter
failsafemodeandwilliniateautomacightcontroltoreturntothehomepoint.
• TheQ-1Dronewillconnuetohoverfor15secondsandwillevaluatethevercal
distancetothehomepoint
• Ifthedistanceismorethan15metrestheQ-1Dronewillcommenceyingbackto
thehomepoint.
• Ifthedistanceislessthan15metrestheQ-1Dronewillyupvercallyunlitis
15metreshigherthanthehomepointandthencommencethereturn.
• WhentheQ-1Dronereachesthehomepointitwillhoverfor5secondsandthen
automacallyland.
PLEASE NOTE:TheQ-1Dronecannotautomacallyavoidobstaclesinitspathwhileit
isinfailsafemode.
23
6.5 How to regain control on the controller
IftheQ-1DroneisoutofcontroltoggletheS4switchonthecontrollerseveralmesto
switchightmode.Whenthesignalisrestored,thecontrollerwillregaincontrolandyou
canconnuetousethecontrollertooperatetheQ-1Drone.
6.6 Baery level alarm funcon
WhentheQ-1Dronebaerychargeislowyoumustlanditassoonaspossibleorelseitmay
losepowercompletelyandcrash.TheQ-1Dronehasatwolevelbaeryalarmfuncon.
Level1isalowpoweralarmandlevel2isaseverelowpoweralarm.Bothlevelsare
indicatesbytheightindicatorlights:
Low power Flight indicator light status Low power risk prompt
alarm level
Level1 The2frontindicatorsandthe2rear Inlevel1alarmcondiontheQ-1Dronewill
indicatorswillashslowly. ynormallyforafewminutesandthen
iniatethelevel2alarm.
Becarefulwhileying,keeptheQ-1Drone
withinsightanddonotytohighortoofar.
Level2 The2frontindicatorsandthe2rear Inlevel2alarmcondiontheQ-1Dronewill
indicatorswillashquickly. ynormallyforafewminutesandiniate
thefailsafemodeandstarttoautomacally
land.
Wheninlevel2alarmcondionplease
returnandlandtheQ-1Droneassafelyas
possibleanddonotpushthethrolehard
ormakebigmovementsduringight.
DuringlowpowerautomaclandingyoucanregaincontroloftheQ-1Dronebyswitching
theightmode(S4switch).Howeverdonotdosorepeatedlyasitmayreducethebaery
lifeortheQ-1Dronemaycrashduetoinsucientpower.

24
Thefollowmewatchallowsyoutousethedronetolmatargetautomacally,asthedrone
willfollowthetargetwearingtheGPSwatch.
Turning the tracker on/o
PressandholdthePowerbuonfor3secondsunltheredindicatorislittopoweron
thewatch.Aer3seconds,thegreenindicatorstartsblinking,indicangthestart-upis
completed.
PressandholdthePowerbuonfor3secondsunlthegreenindicatorgoesouttopower
othewatch.Aer3seconds,theredindicatorgoesout,indicangthetrackerhasturned
o.
7.1 To pair the tracker with the Q-1 Drone
1. PutthetrackerwatchandQ-1Dronenexttoeachother.
2. Turnonthetrackerandwaitforthegreenindicatortostartblinking
3. Pressthepowerbuon3meswitha2secondintervaltostartpairing
4. TurnontheQ-1Droneandwait30secondsforthepairingprocesstocomplete,the
trackerwillashredquicklyduringpairing(5mespersecond)
5. Ifthepairingfails,thetrackerwillashredquickly(10mespersecond)
6 Ifthepairingsucceeds,thetrackerwillalternatebetweensolidandashing3mes
whilesearchingforaGPSsignal,thensolidgreenonceaGPSsignalhasbeenacquired.
25
Charging the tracker
Tochargerthetracker,pushthetrackeroutofthesiliconewatchandplaceitinthecharging
cradle.Chargethetrackerunltheredindicatorturnssolid.
7.2 Indicators on the tracker
Status Red Indicator Green Indicator Comment
PowerOn On Blinksaer3seconds Pressandholdthepowerbuonunl
theredledislit.
PowerO Turnsoaer3secs O Pressandholdthepowerbuonunl
thegreenledturnso
PairingFailed N/A Blinkingfast(10mes/second) TurnwatchandQ-1Droneoand
re-startpairingprocess
Pairing N/A Blinkingfast(5mes/second) Waingforpairingtocomplete
SearchingforGPS N/A Solid/3blinks/solid/3blinks… WaingforGPSsignal
GPSAcquired N/A On Readytouse
AbnormalSystem N/A O TurnwatchandQ-1Droneoand
re-startpairingprocess
LowBaery Blinkingfast N/A Chargethefollowmewatchassoon
aspossible
ChargingBaery Blinkingslow N/A N/A
BaeryFull On N/A N/A
7.3 Using the tracker in ight
1. PairthetrackertotheQ-1Drone
2. CalibratetheQ-1Droneandcheckitisreadyforight
3. Useswitches1and4toputtheQ-1DroneinEconomicmodeandGPSmodefortakeo
4. Onceintheair,pushswitch4totheF_Mmodeposion
5. TheQ-1Dronemustbelessthan100m(330feet)tostartfollowingthetracker.Ifthe
Q-1Droneisoutofrange,yitclosertothetracker,thenre-enterfollowmemode.
7. Follow Me mode
Charging
contacts
Status
indicator
Power
indicator
Power/
FunconKey

26
Whenfollowmemodeisacvated,theQ-1Dronewilltaketheshortestroutetoy10m
vercallyand15mhorizontallyawayfromthetarget.
Followmemodewillnotworkunlessthetrackeristurnedonandpairedtothedrone.
OnlyusethefollowmemodeinanopenspacewheretherearenoobstaclestheQ-1Drone
mayyintowhilefollowingthesubject.
Whileinfollowmemode,theQ-1Dronewillfollowthetargetle,right,forwardsand
backwards.TheQ-1Dronewillhoveronthespotwhenthetargetisnotmoving.Ifthe
trackermovesupordownvercally,theQ-1Dronewillalsomoveupanddowntomatch
thetracker.
OnlyusethefollowmemodeinanopenspacewheretherearenoobstaclestheQ-1Drone
mayyintowhilefollowingthesubject.
27
8.1 Remote control
TheremotecontrolmayneedcalibrangifyoucannotstartthemotorusingtheCJC.
1. Putswitchtwo(S2)inthedownposionandthenturnontheremotecontrol.
2. ThemiddleLEDshouldbeashingquickly
3. Spinbothjoyscks5-10mesinafullcircle,touchingall4corners.Spinthelejoysck
an-clockwiseandtherightjoysckclockwiseasshown.
4. TheLEDwillstopashing
5. Putswitchtwo(S2)backintheupposionandtherightLEDontheremotewilllightup
6. Aer3seconds,themiddleLEDwilllightuptoindicateremotecalibraoniscomplete
7. TurntheremoteandQ-1Droneoandbackonagain.
8.2 Accelerometer
Youmayneedtocalibratetheaccelerometerif:
• ThefrontandrearindicatorsareblinkingquicklyundertheQ-1Drone
• TheQ-1Droneisdriinginightinacertaindirecon
Alwaysremovethepropellersbeforecalibrang.
8. Advanced troubleshooting
and calibration

28
8.3 To calibrate the accelerometer
TurnontheRemotecontrol,
thentheturnonQ-1Drone.
PutSwitch2inthe“Null”posion
AertheQ-1Dronehasturnedonnormally,toggleSwitch
4betweenthedownandupposionsquicklyunlthetail
lightashesquickly
29
Putswitch4tothe“NRM”posion
Pushthejoyscksinwardsanddownasshownunlthe
4LEDsunderthedroneturno,thenreturnthejoyscks
totheircentreposions
Whenthefourarmlightsonthe
Q-1Droneturnonagain,place
theQ-1Droneontheground
upsidedown.Toavoidscratching
theQ-1Dronewerecommend
thatplaceitonaclothorsimilar
item.Togglebothjoyscksonthe
remotetogether,movingthem
downandinwardsasbeforeunl
thelightsgooutontheQ-1Drone
andthenreturnthejoysckstothe
middleposion.

30 31
WhenthefourarmlightsontheQ-1Drone
turnonagain,leanthefourarmsofthe
Q-1Droneagainstawall,withthenose
facingdownwards,tomakeitperpendicular
totheground.Togglebothjoysckson
theremotetogether,movingthemdown
andinwardsasbeforeunlthelightsgo
outontheQ-1Droneandthenreturn
thejoysckstothemiddleposion.
WhenthefourarmlightsontheQ-1Drone
turnonagain,leanthefourarmsofthe
Q-1Droneagainstawall,withthenose
facingtothele,tomakeitperpendicular
totheground.Togglebothjoyscksonthe
remotetogether,movingthemdownand
inwardsasbeforeunlthelightsgoout
ontheQ-1Droneandthenreturnthe
joysckstothemiddleposion.
WhenthefourarmlightsontheQ-1Drone
turnonagain,leanthefourarmsofthe
Q-1Droneagainstawall,withthenose
facingupwards,tomakeitperpendicular
totheground.Togglebothjoysckson
theremotetogether,movingthemdown
andinwardsasbeforeunlthelightsgo
outontheQ-1Droneandthenreturn
thejoysckstothemiddleposion.
WhenthefourarmlightsontheQ-1Drone
turnonagain,leanthefourarmsofthe
Q-1Droneagainstawall,withthenose
facingtotheright,tomakeitperpendicular
totheground.Togglebothjoyscksonthe
remotetogether,movingthemdownand
inwardsasbeforeunlthelightsgoout
ontheQ-1Droneandthenreturnthe
joysckstothemiddleposion.
WhenthefourarmlightsontheQ-1Drone
turnonagainthismeansthecalibraon
hasbeensuccessful.PlacetheQ-1Drone
backonthegroundthecorrectwayup
andturntheQ-1Droneandtheremote
o.

32 33
8.4 Gyroscope
Youmayneedtocalibratetheaccelerometerif:
• TherearindicatorsareblinkingquicklyundertheQ-1Drone
• TheQ-1Droneisdriinginightinacertaindirecon
TurnontheRemotecontrol,then
theturnonQ-1Drone.
PlacetheQ-1Droneonalevelandsllsurface,
ifthesurfaceisunevenormovingitwillaect
thegyroscopecalibraon
AertheQ-1Dronehasturnedonnormally,
toggleSwitch4betweenthedownandup
posionsquicklyunlthetaillightashesquickly
Putswitch4tothe“NRM”posion
Togglebothjoysckstogether,
movingthemupandoutwardsas
showunltherearlightsthe
Q-1Dronestartashingslowly
andthenreturnthejoyscksto
themiddleposion.Thismeans
thattheQ-1Dronehasentered
gyroscopecalibraonsuccessfully.
TherearLEDswillashredforaround15seconds.
Ifcalibratedsuccessfully,theywillturntoasolidred.
Ifthecalibraonfails,theywillashredquickly.
Ifcalibratedsuccessfully,moveswitch4forthe“GPS”posion.
Ifthecalibraonfails,movethedronetoadierentsurface
awayfromvibraonsandstandafewfeetawayfromthe
drone,thenre-startthecalibraonprocess.

34 35
9. Specifications Other Veho Products
Q-1 Drone
Baery 6800mAh LiPo
Weight 1.65kg / 3.64lbs
Hover Accuracy Horizontal: ±2.5m / 8.2 , Vercal: ±0.8m/2.62
Maximum lt angle 30°
Maximum climb/descent speed Climb: 6 m/s (19.69/s)
Descend: 4 m/s (13.12/s)
Maximum ight speed 20m/s – 65.62/s (not recommended)
Wheelbase 450mm/1.48
Flight me 20 minutes
Controller
Data transfer distance ≤700m (2296)
Baery life 20 hours
Operang current/voltage 150mA/6V
Baery 4 x AA baeries
MuviDronePropellerGuards–Packof4
VXD-A002-PRG
MuviDroneSpare5300mAhBaery
VXD-A003-SB
MuviDronePropellers–Packof4
VXD-A001-PR
MuviK-SeriesK-2Pro
VCC-007-K2PRO

veho-muvi.com
This manual suits for next models
1
Table of contents