dji WIND-4 User manual

WIND-4
Customized Flying Platform
User Manual
V1.1 2017.06.15

Searching for Keywords
Search for keywords such as “battery” and “install” to find a topic. If you are using Adobe Acrobat Reader to read
this document, press Ctrl+F on Windows or Command+F on Mac to begin a search.
Navigating to a Topic
View a complete list of topics in the table of contents. Click on a topic to navigate to that section.
Printing This Document
This document supports high resolution printing.

1
Information
The WIND-4 customized flying platform is a professional flying platform. Read the User Manual and take necessary
precautions when handling the WIND-4 to ensure your own safety. DJI assumes no liability for damage or injuries
incurred directly or indirectly from using the WIND-4 improperly.
Using This Manual
Legends
Before Flight
The following tutorials and manuals have been produced to help you get the most out of your WIND-4.
1. WIND-4 Disclaimer and Safety Guidelines
2. WIND-4 User Manual
3. WIND-4 Intelligent Flight Battery Safety Guidelines
We recommend that you read the WIND-4 User Manual,WIND-4 Disclaimer and Safety Guidelines and WIND-4
Intelligent Flight Battery Safety Guidelines carefully before flight.
Download the DJI GO App
Download and install the DJI GO app before use. Scan the QR code or visit http://m.dji.net/djigo to
download the app.
DJI GO supports iOS 8.0 (or later) or Android 4.1.2 (or later).

2
Warnings
The WIND-4 may cause serious damage and injury. The WIND-4 is not suitable for children under the age of 18 or
non-professionals.
Assembly Warnings
1. Ensure that the Intelligent Flight Batteries are fully charged and properly inserted before power-on.
2. Calibrate the compass before flight and confirm the Stick Mode.
3. Ensure that propellers are unfolded before unlocking the motors.
Environmental Considerations
1. Flying under 9,843 feet (3000 m) above sea level.
2. Fly in moderate weather conditions with temperatures between -10°C to +40°C (14°F to 104°F).
3. DO NOT fly in No Fly Zones.
4. Visit the following link to learn about No Fly Zones: http://www.dji.com/cn/fly-safe/category-mc
5. Maintain a safe distance from obstacles, people, high voltage power lines, tall trees and other hazards when
flying the aircraft.
6. Ensure that the aircraft is visible at all times.
Flight Warnings
1. The aircraft is resistant to water. Please fly it carefully in rainy or snowy days.
2. Ensure that all parts are in good condition before each flight. DO NOT fly with worn or damaged parts.
3. Ensure that the propellers and motors are installed correctly and propellers and frame arms are unfolded
before each flight.
4. Ensure that the DZ-12000 Intelligent Flight Battery for the WIND-4 is used.
5. Consult the dedicated technician before mounting third-party devices to the aircraft. DO NOT overload the
system.
6. DO NOT go near or touch the motors or propellers when they are spinning, as this can cause serious injury.
7. Disconnect the batteries during transportation to avoid damage or injury to the landing gears.
8. DO NOT stop the motors mid-flight.
9. DO NOT answer incoming calls during flight or fly under the influence of alcohol or drugs within eight hours.
10. In the instance of a Low Battery Warning, land the aircraft at a safe location.
11. Power off the aircraft and then turn off the remote controller after landing.
12. Only use compatible DJI parts.

3
Contents
Information......................................................................................................................................... 1
Using This Manual.............................................................................................................................. 1
Legends ...................................................................................................................................................................................1
Before Flight ...........................................................................................................................................................................1
Download the DJI GO App ...................................................................................................................................................1
Warnings............................................................................................................................................. 2
Assembly Warnings...............................................................................................................................................................2
Environmental Considerations............................................................................................................................................2
Flight Warnings ......................................................................................................................................................................2
Contents.............................................................................................................................................. 4
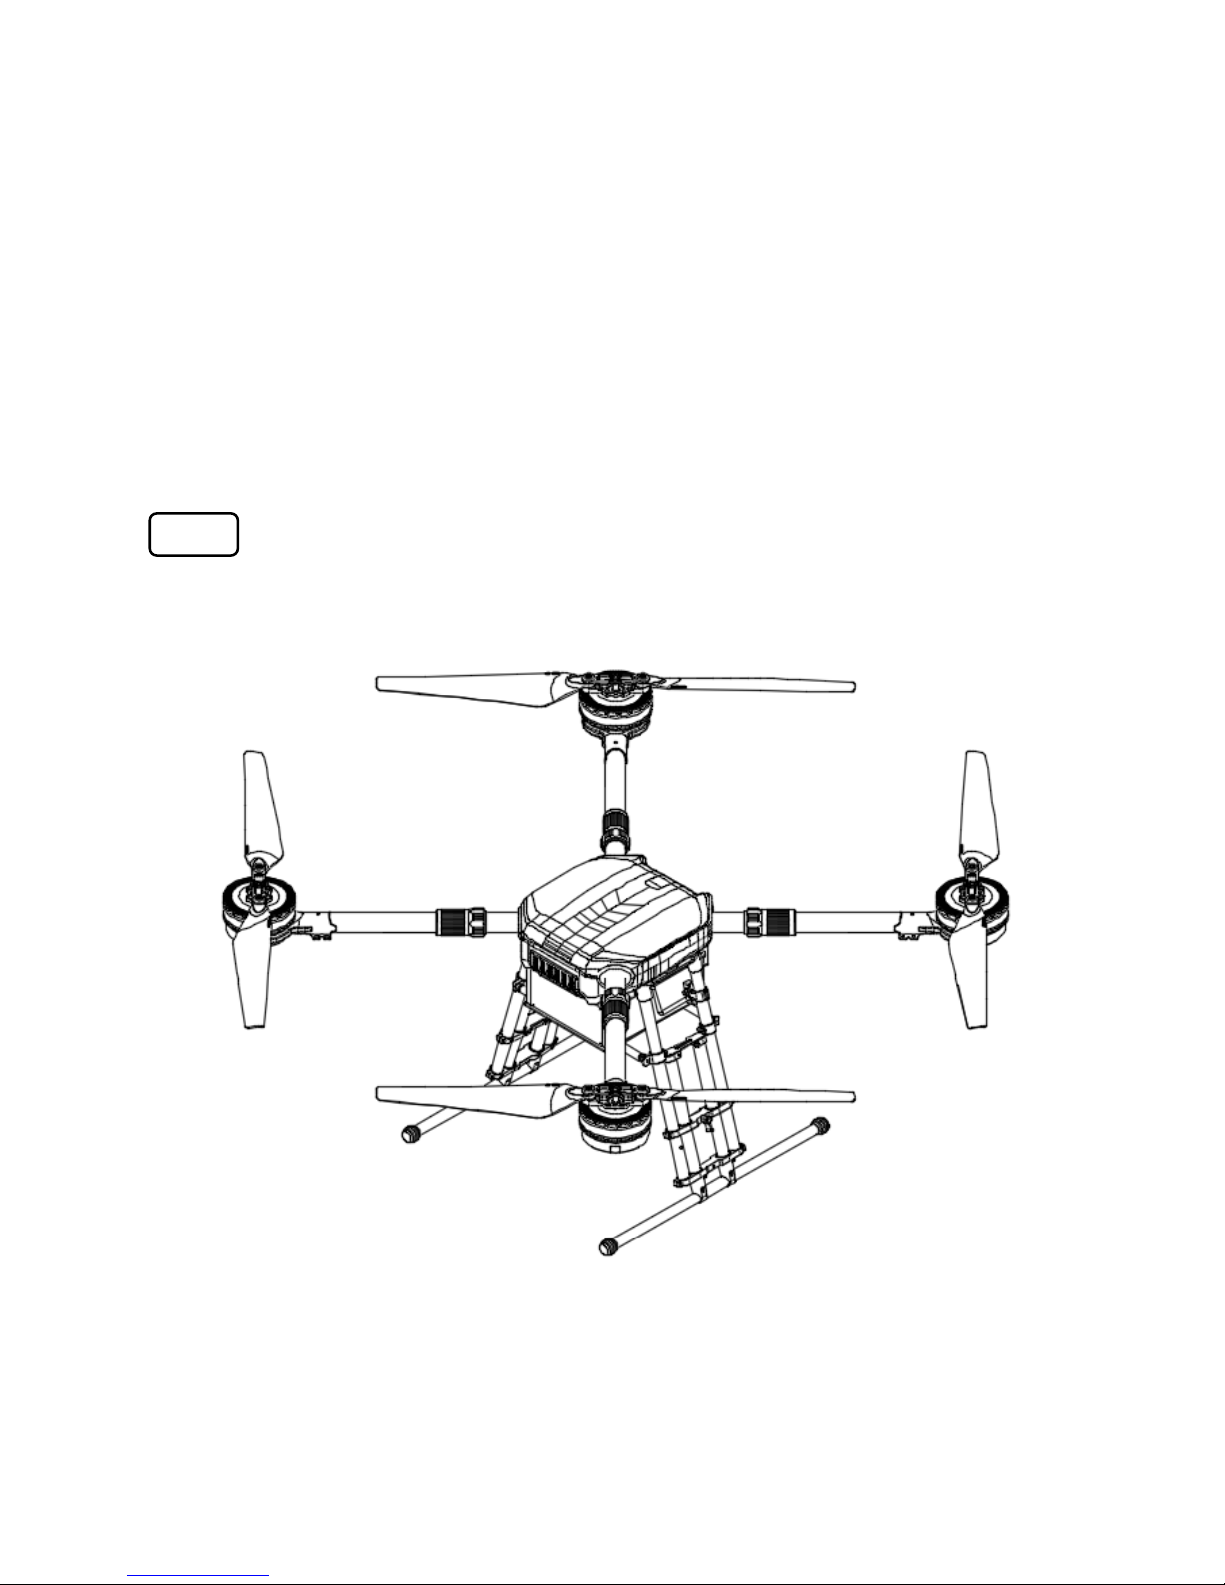
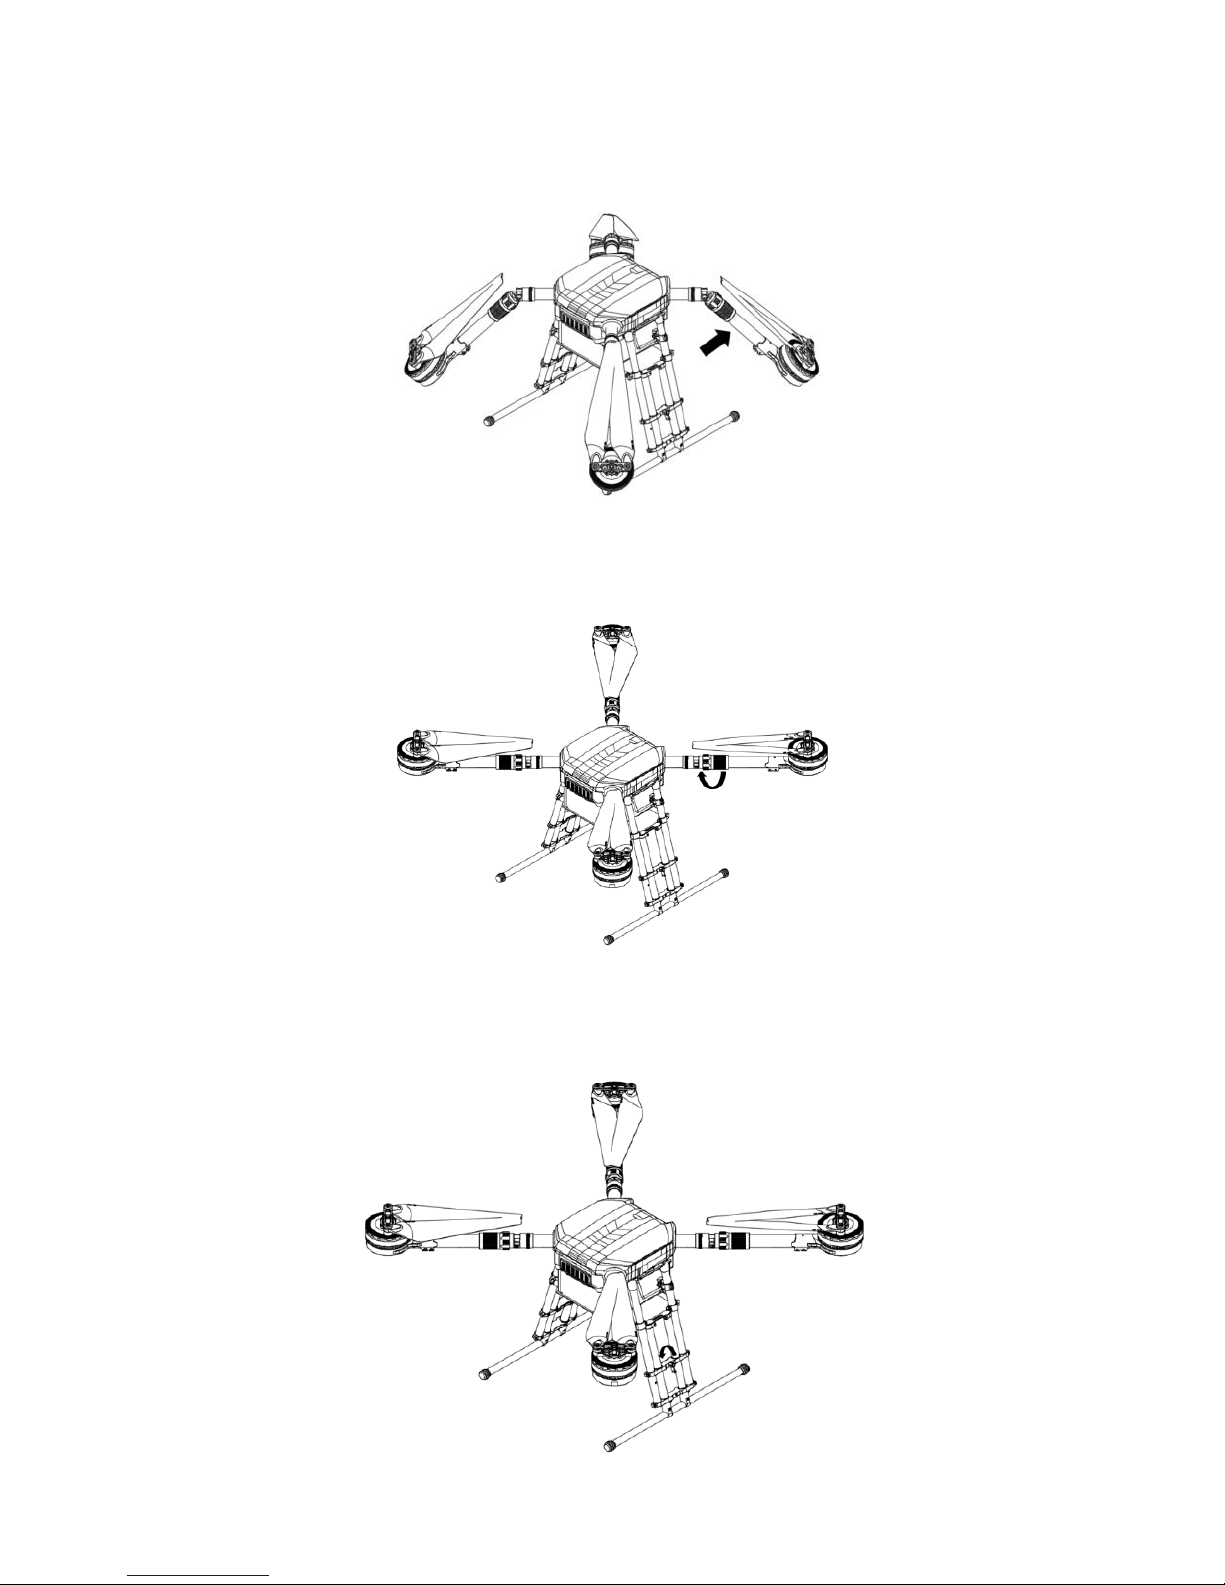
Product Profile.................................................................................................................................... 6
Introduction............................................................................................................................................................................6
Quick Installation...................................................................................................................................................................7
Intelligent Flight Battery ..................................................................................................................10
Profile ................................................................................................................................................................................... 10
Intelligent Flight Battery Functions ................................................................................................................................. 10
Using the Battery................................................................................................................................................................ 11
Remote Controller............................................................................................................................14
Remote Controller Profile................................................................................................................................................. 14
Preparing the Remote Controller .................................................................................................................................... 14
Remote Controller.............................................................................................................................................................. 15
Remote Controller Operations......................................................................................................................................... 16
Remote Controller Status LED.......................................................................................................................................... 22
Linking the Remote Controller With the Aircraft.......................................................................................................... 23
Remote Controller Compliance Version......................................................................................................................... 24
Flight..................................................................................................................................................29
Operation Environment Requirements .......................................................................................................................... 29
Flight Limits and No Fly Zones.......................................................................................................................................... 29
Maximum Height and Radius Limits ............................................................................................................................... 30
Preflight Checklist............................................................................................................................................................... 26
Flight Status Indicator........................................................................................................................................................ 26
Calibrating the Compass ................................................................................................................................................... 27

4
Starting and Stopping the Motors................................................................................................................................... 30
Flight Test............................................................................................................................................................................. 30
Appendix...........................................................................................................................................30
Specifications ...................................................................................................................................................................... 30

5
Product Profile
Introduction
The WIND-4 is a professional flying platform. It is equipped with DJI’s industry-leading flight controller system, E5000
propulsion system, and Lightbridge 2 transmission system. The WIND-4 is fully compatible with supply box,
megaphone etc., allowing developers to optimize the flying platform for specific applications.
Aircraft

6
Quick Installation
Unfold the frame arms one by one, as shown in the figure below.
Gently hold the motors from their bottoms with hands, rotate the arm sleeves clockwise, and ensure that they are
tightened firmly.
If necessary, lengthen the landing gears by operating the following steps:
1. Loosen the screws on the landing gears counterclockwise.

7
2. Stretch the landing gears to the required positions.
3. Tighten the screws on the landing gears counterclockwise.

8
Installing the Intelligent Flight Battery
Insert the Intelligent Flight Batteries into the battery compartments.
Connecting the Power Connectors
Connect the right connector and then the left connector at one time.
Ensure that the two connectors are disconnected before inserting the battery in to or removing it from the
WIND-4. DO NOT insert or remove the battery when powered on.
Left Right
右

9
Intelligent Flight Battery
Profile
The Intelligent Flight Battery has a capacity of 12000 mAh, a voltage of 44.4 V, and smart charge/discharge
functionality. It includes brand new battery cells and an advanced battery management system. It should only be
charged using a DJI approved charger.
Ensure that the Intelligent Flight Battery does not have cosmetic damage or is not swollen before use. It
must be fully charged before use.
Intelligent Flight Battery Functions
DJI Intelligent Flight Battery’s functions are listed below:
1. Battery Level Display: LEDs display the current battery level.
2. Battery Life Display: LEDs display the current battery life.
3. Communication: The aircraft can obtain the real-time battery information such as voltage, charge, and
current via the power supply and communication port on the battery.
4. Auto Start: The battery will start when being connected with the aircraft.
Sleep Mode: The battery will enter sleep mode when it is powered on and not connected to the aircraft for
20 minutes to save power.
5. Battery Error History: Display the latest 31 battery errors, such as a battery short circuit, overcurrent during
discharging, etc.
A. Over Charge Protection: Charging automatically stops when the battery is fully charged.
B. Temperature Detection: The battery will only charge when the temperature falls between 5°C (41°F)
and 40°C (104°F).
C. Over Current Protection: Battery stops charging when high amperage (more than 25A) is detected.
D. Over Discharge Protection: Discharging automatically stops when the battery voltage reaches 38.4 V to
prevent over-discharge damage.

10
6. Auto-discharging: The battery automatically discharges to below 65% of total charge when it is idle for more
than 10 days to prevent swelling. It takes around 2 days to discharge the battery to 65%. It is normal to feel
moderate heat emitting from the battery during the discharge process. Discharge thresholds can be set in the
DJI GO app.
7. Balanced Charging: Automatically balances the voltage of each battery cell when charging.
8. Short Circuit Protection: Automatically cuts the power supply when a short circuit is detected.
9. Battery Cell Damage Protection: The DJI GO app shows a warning message when a damaged battery cell is
detected.
10. Battery Error History: Browse the battery error history from the DJI GO app.
Using the Battery
Powering On/Off
Powering On: Press the Power Button once, then press and hold it for 2 seconds to power on. The Power LED will
turn red and the Battery Level Indicators will display the current battery level.
Powering Off: Press the Power Button once, then press and hold it for 2 seconds to power off.
Low Temperature Notice
1. Using the Intelligent Flight Battery at core temperatures below -10°C (14°F) is not advised. Between -10°C
(14°F) and 5°C (41°F), the Intelligent Flight Battery should attain a voltage of 4.2 V, but it is recommended
applying the insulation sticker to the battery to avoid a rapid drop in temperature.
2. In cold environments (i.e. air temperature below 5°C (41°F)), the performance of the Intelligent Flight
Battery is reduced. Ensure the Intelligent Flight Battery is fully charged and attains a voltage of 4.35 V before
takeoff.
3. In very cold environments (e.g. air temperature of -20°C (-4°F), battery core temperature of 5°C (41°F)), the
Intelligent Flight Battery’s core temperature will drop rapidly even after pre-heating, and its performance is
significantly reduced. It is not recommended to fly under such conditions.
4. If the DJI GO app displays the Low Battery Level warning, stop flying and land the aircraft immediately. You
will still be able to control the aircraft’s movement when this warning is triggered.
5. To ensure the optimal performance, maintain the Intelligent Flight Battery’s core temperature above 20°C
(68°F) in use.
Ensure the temperature of the Intelligent Flight Battery exceeds 5°C (41°F) before takeoff.
To warm up the battery, power on the Intelligent Flight Battery inside the battery compartment for
approximately 1-2 minutes before takeoff. Begin flying by hovering the aircraft at a low altitude (for
approximately 1 minutes) to ensure an appropriate battery temperature is reached.

11
Checking the Battery Level
The Battery Level Indicators display how much remaining charge the battery has. When the battery is powered off,
press the Power Button once. The Battery Level Indicators will light up to display the current battery level.
The Battery Level Indicators will also show the current battery level during charging and discharging. The
indicators are defined below.
The LED is on. The LED is flashing. The LED is off.
Battery Life
The battery life indicates how many more times the battery can be discharged and recharged before it must be
replaced. When the battery is powered off, press and hold the Power Button for 5 seconds to check the battery
life. The Battery Level Indicators will light up and/or blink as described below for 2 seconds:
When the battery life is shown as 0%, it can no longer be used.

12
For more information about the battery, launch DJI GO and check the information under the battery tab.
Charging
1. It is recommended to charge a battery at 1C (12 A). (DO NOT charge a battery beyond 2C.) Never leave the battery
unattended during charging. Never drop the battery into water or let it come into contact with water.
2. Open the Protection Cap and connect the Intelligent Flight Battery to the Battery Charger. If the battery level is
above 95%, turn on the battery before charging.
3. Air-cool the Intelligent Flight Battery after each flight. Allow its temperature to drop to room temperature
before storing it for an extended period.
The charger can charge at most two sets of batteries at one time.
The charging temperature ranges from 0°C to +40°C (32°F to 104°F). The battery management system will
stop the battery from charging when the battery cell temperature is out of range.
Figure-1 Battery Connection
DJI does not take any responsibility for damage caused by third-party chargers.

13
Remote Controller
Remote Controller Profile
The remote controller operates at 2.4 GHz with a maximum signal transmission range of 3 km.
Compliance Version: The remote controller complies with both CE and FCC regulations (refer to FCC ID).
Operating Mode can be set to Mode 1, Mode 2 or a custom mode.
Mode 2: The left stick serves as the throttle.
Mode 1: The right stick serves as the throttle.
To prevent transmission interference, do not operate more than three aircraft in the same area.
Preparing the Remote Controller
Tilt the Mobile Device Holder to the desired position, adjust the antenna, and connect the
mobile device as shown.
1. Press the button on the side of the Mobile Device Holder to release the clamp.
2. Place your mobile device inside the clamp and adjust the clamp to secure your mobile device.
3. Connect your mobile device to the remote controller via a USB cable.

14
Remote Controller
[1] Antenna
Relays aircraft control and video signal.
[2] Mobile Device Holder
Securely mounts your mobile device to the
remote controller
[3] Control Stick
Controls the aircraft’s orientation.
[4] Return-to-Home (RTH) Button
Press and hold the button to initiate Return-to-
Home (RTH).
[5] RTH LED
A circular LED around the RTH button that
displays RTH status.
[6] Battery Level LEDs
Displays the battery level of the Remote
Controller.
[7] Status LED
Displays the Remote Controller’s system status.
[8] Power Button
Used to turn the Remote Controller on and off.
[9] Camera Settings Dial
Turn the dial to adjust camera settings. (Only
functions when the remote controller is
connected to a mobile device running the DJI GO
app.)
[10] Playback Button
Plays the captured images or videos again.
[11] Shutter Button
Press it to take a photo. In burst mode, a set
number of photos will be taken with one press.
[12] Flight Mode Switch
Used to switch between P-mode, A-mode and F-
mode.
[13] Video Recording Button
Press to start recording a video. Press again to
stop recording.
[14] Gimbal Dial
Use this dial to control the tilt or pan of the
gimbal.
[15] Mini-HDMI Mini HDMI Port

15
Connects to an HDMI monitor.
[16] Micro USB Port
Reserved
[17] CAN Port
Reserved
[18] USB Port
Connects to your mobile device to run the DJI
GO app.
[19] GPS Module
Used to pinpoint the location of the remote
controller.
[20] Button C1
[21] Power Port
Connects to a power source to charge the
remote controller’s internal battery.
[22] Button C2
Remote Controller Operations
Powering On and Off the Remote Controller
The Wind-4 remote controller is powered by a 2S rechargeable battery with a capacity of 6000 mAh. The battery
level is indicated by the Battery Level LEDs on the front panel. When the remote controller is turned off, press the
Power Button once and the Battery Level LEDs will display the current battery level. If the battery level is low,
charge the remote controller.
Follow the steps below to power on your remote controller:
1. Press and hold the Power Button for two seconds to power on the remote controller.
2. The remote controller will beep when it is turned on. The Status LED will rapidly flash green, indicating that
the remote controller is linking to the aircraft. The Status LED will be solid green when the linking is
complete.
3. Repeat step 1 to turn off the remote controller.

16
Charging the Remote Controller
Charge the remote controller using the included charger.
Controlling the Aircraft
This section explains how to control the orientation of the aircraft through the remote controller. The remote
controller is set to Mode 2 by default.
Stick Neutral/Mid-Point: Control sticks are in the center position.
Moving the Control Stick: The control stick is pushed away from the center position.
Remote Controller
Aircraft ( indicates the nose direction
Function

17
(Mode 2)
and indicates the tail direction.)
Moving the Left Stick up/down changes
the aircraft’s elevation. Push it up to
ascend and down to descend.
Use this stick to take off when the motors
are spinning at idle speed. The aircraft
will hover in place if the Left Stick is
released.
Moving the Left Stick left/right changes
the heading of the aircraft. Push it left to
rotate the aircraft counterclockwise, and
right to rotate the aircraft clockwise.
Moving the Right Stick up/down changes
the aircraft’s forward and backward
pitch. Push it up to fly forwardsand down
to fly backwards.
Push the Right Stick further for a larger
pitch angle and faster flight.
Moving the Right Stick left and right
changes the aircraft’s left and right pitch.
Push it left to fly left and right to fly right.
Push the Right Stick further for a larger
pitch angle and faster flight.
Always push the control sticks gently to prevent sudden and unexpected movements of the aircraft.
Flight Mode Switch

18
Toggle the Flight Mode Switch to select a flight mode, F-mode, A-mode or
P-mode. For the positions of the flight modes, see the pictures below.
Figure
Flight Mode
F
F-mode
A
A-mode
P
P-mode
P-mode (Positioning): The aircraft uses the GPS for positioning. In P-
mode, the aircraft will switch automatically between the two modes listed below based on the GPS signal
strength:
P-GPS: The GPS signal is strong and the aircraft is using the GPS for positioning.
P-ATTI: The GPS signal is weak and the aircraft is only using its barometer for positioning. Its altitude can still
be stabilized, but the aircraft will drift more than it will in P-GPS Mode.
A-mode (Attitude): When the GPS is unavailable, the aircraft will only use its barometer for positioning and
altitude control.
F-mode (Function): In F-mode, features like IOC and SDK can be used. The flight mode is set to P-mode by default.
If you want to use other flight modes, connect the remote controller to your mobile device, launch the DJI GO
app, enter the “Camera” screen, tap “Advanced Settings” and slide the slider next to “Enable Multiple Flight
Mode” to right. Then you can set the flight mode to the one you want.
Table of contents
Other dji Drone manuals

dji
dji MATRICE 600 User manual

dji
dji RM220 User manual

dji
dji Mavic 3 User manual

dji
dji AGRAS MG-1 User manual

dji
dji GOGGLES 2 MOTION COMBO User manual

dji
dji MATRICE 350 RTK User manual

dji
dji P4 MULTISPECTRAL User manual

dji
dji ROBOMASTER TT Swarm Combo User manual

dji
dji MATRICE 300 RTK User manual

dji
dji INSPIRE 3 User manual