Velbus –Legen Heirweg 33, BE-9890 Gavere, Belgium –tel. +32 9 384 36 11 –e-mail: [email protected] –www.velbus.eu VMBSIG-ed3
FRANÇAIS
Lisez et comprenez ce mode d'emploi et toutes les consignes de
sécurité avant d'utiliser l'appareil. Gardez ce mode d'emploi pour
toute référence ultérieure.
DESCRIPTION COURTE
Passerelle Signum IoT avec connexion directe Velbus. Pour les
fonctionnalités complètes, les spécifications et la documentation
supplémentaire, consultez la page produit VMBSIG sur
www.velbus.eu.
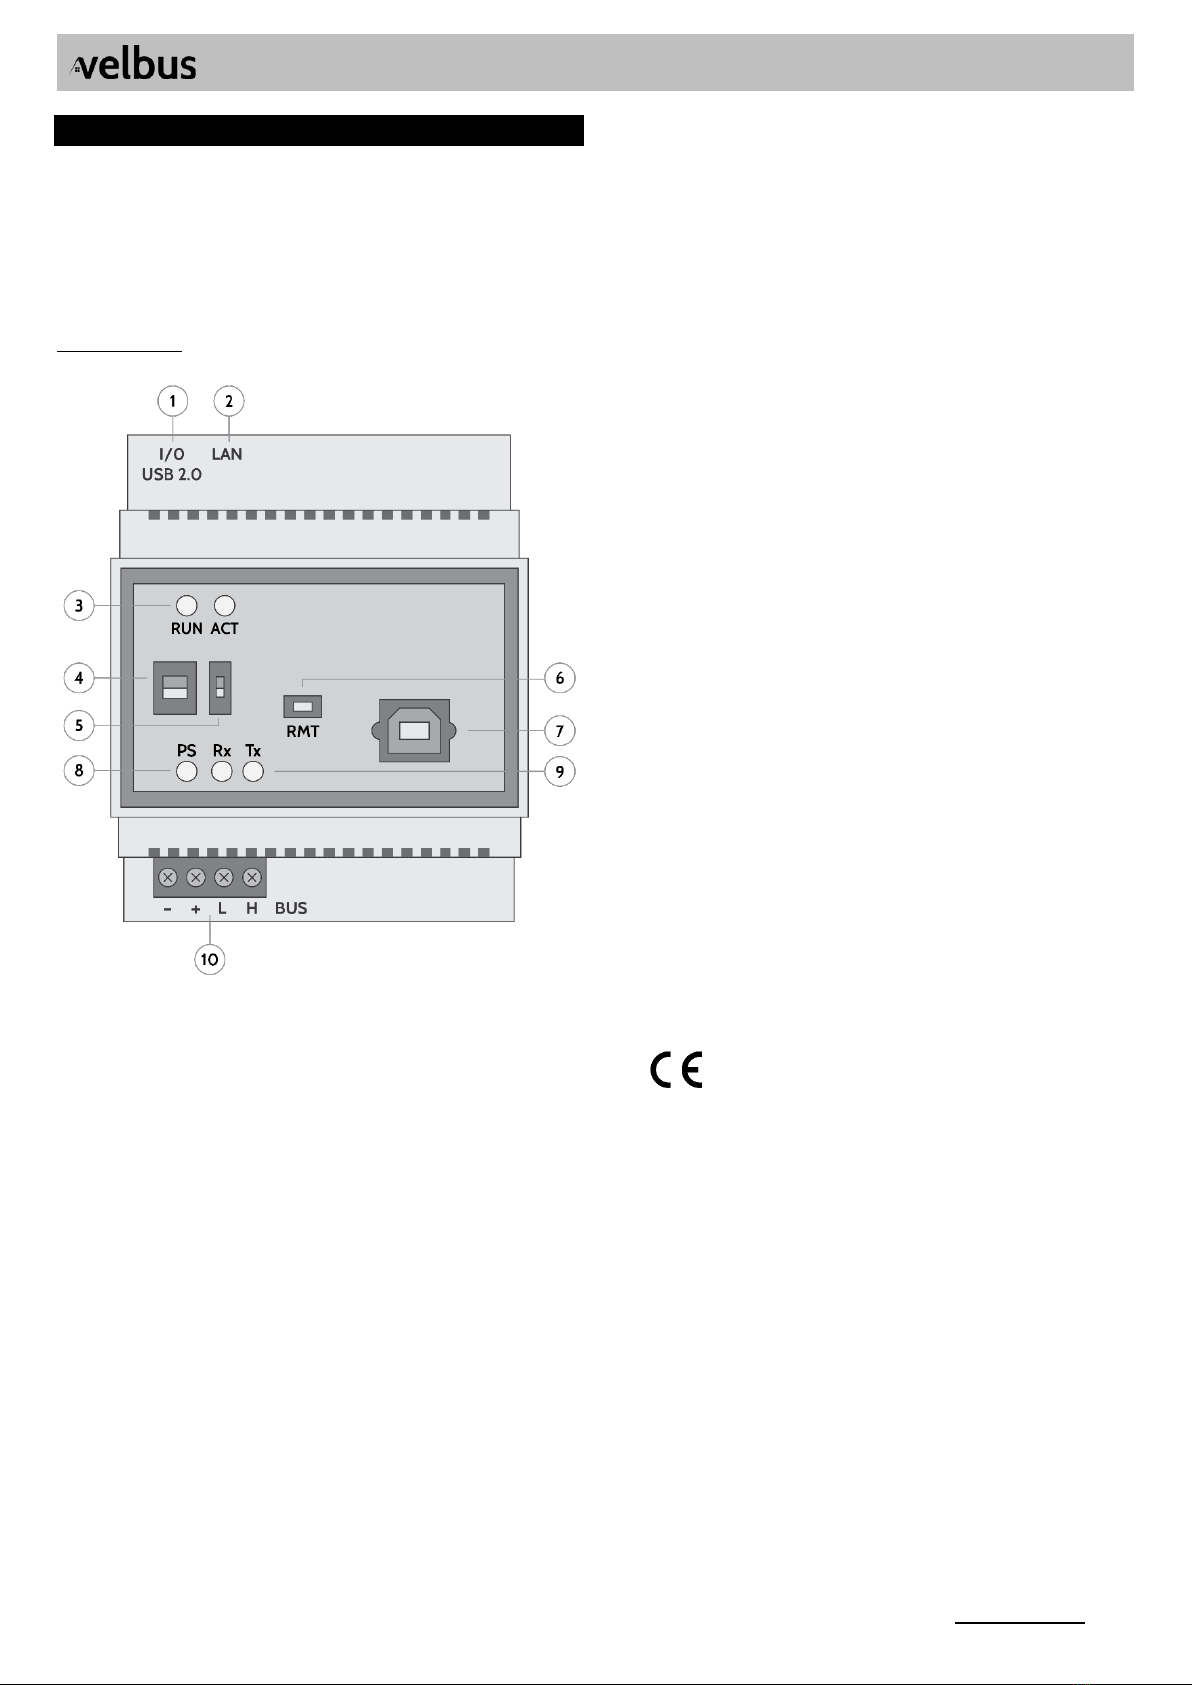
PARTIES DU MODULE
1. I/O USB 2.0: réservé aux extensions
2. LAN: connexion Ethernet
3. LED RUN et ACT: indication de l'état et des erreurs. En
fonctionnement normal, le voyant RUN est allumé en continu et
le voyant ACT affiche un battement de cœur (2 clignotements,
éteint, etc.)
4. Résistance de terminaison du bus CAN*
5. Bouton RESET (appelé DIS sur certains modèles): abaissé en
fonctionnement normal. Faites glisser vers le haut pour
déconnecter le module de l'alimentation (réinitialisation).
6. RMT (Remote): utilisé pour l'identification lors du démarrage
rapide et lors d'une réinitialisation du logiciel.
7. Port USB-B: pour établir une connexion USB entre un PC et le
VMBSIG, par exemple pour le logiciel de configuration
VelbusLink. (Non utilisé dans des circonstances normales, car
toutes les communications peuvent être effectuées via
Ethernet.)
8. PS LED: alimentation. Allumée en continu en fonctionnement
normal*
9. LED Rx et Tx: clignotent en cas de communication sur le bus*
10. Connecteur BUS: connexion avec le câble de bus Velbus (avec
alimentation 15V +/- 3V DC)
* Voir le manuel d'installation général de Velbus
CONNEXION
Connectez le Signum avec l’installation Velbus via le connecteur
BUS en bas, et au réseau local via le connecteur LAN. Pour les
réseaux gérés: assurez-vous que votre pare-feu accepte le trafic
sortant sur le port 123 (NTP). (Ce qui est le cas par défaut pour la
plupart des utilisateurs à domicile.)
Attendez que la LED RUN soit allumée en continu et que la LED
ACT affiche un battement de cœur (2 clignotements, éteint, etc.)
Cela peut prendre jusqu'à 3 minutes au démarrage.
Ouvrez VelbusLink et donnez au VMBSIG une adresse valide.
Vous pouvez connecter via un câble USB (utilisez le port USB-B à
l'avant), ou via LAN avec l'option «Connecter via Signum» dans
VelbusLink.
DÉMARRAGE RAPIDE
Configurez l'installation Velbus avant de démarrer le démarrage
rapide.
Sur les appareils mobiles: installez l'application Velbus Signum
via le Google Play Store ou l'App Store d'Apple.
Sur PC: surfez sur l'adresse IP du Signum dans un navigateur
(dernière version de Edge, Chrome, Firefox ou Safari). Vous
pouvez trouver l'adresse IP dans VelbusLink via le bouton
Connecter > «Se connecter avec Signum».
Suivez maintenant les instructions de l'application. Le Signum
analysera automatiquement l'installation Velbus et créera un
tableau de bord fonctionnel.
REDIRECTION DE PORT ET DDNS
Vous pouvez trouver toutes les informations nécessaires sur la
redirection de port et le DDNS dans l'application Signum >
Configuration > Settings > Network settings.
LED RUN
•OFF: le Signum est éteint ou en train de démarrer
•1 clignotement: aucune adresse IP attribuée
•2 clignotements: adresse IP attribuée mais le Signum ne peut
pas être découvert sur le réseau (le service de découverte ne
fonctionne pas)
•3 clignotements: le Signum peut être trouvé sur le réseau,
mais n'est pas accessible (le serveur web ne fonctionne pas)
•4 clignotements: le Signum est accessible dans le navigateur
et dans l'application, mais les états de retour de l'application
web peuvent être incorrects
•5 clignotements: avertissement non critique. Accédez à
Configuration > Status ou surfez sur VOTRE_IP/status pour plus
d'informations
•ON: fonctionnement normal