Venstar ACC-TSENWIFI User manual

model: ACC-TSENWIFI
Temperature Sensor with Wi-Fi
Installation Instructions
Before you begin the installation:
The Venstar Congurator App is needed to congure this sensor.
This App may be downloaded from your mobile device store.
Select a suitable location for the ACC-TSENWIFI sensor. Please note
that the sensor must have good Wi-Fi reception from the access point
it is intended to join. Do not mount in direct sun or direct rain.
Please have handy the Owner’s Manual for the thermostat that will
be paired with the sensor. Venstar thermostats have unique pairing
procedures.
OVERVIEW
This wireless temperature sensor may be used as a room remote temperature sensor, an outdoor temperature sensor, a return air
temperature sensor or a supply air temperature sensor.
The ACC-TSENWIFI is equipped with an onboard temperature sensor. An external sensor, such as the duct sensor included in the
ACC-TSENWIFI box, may be connected to the rear terminals of the ACC-TSENWIFI as an option. For accurate temperature sensing
the 10k thermistor must adhere to the table on page 3.
Venstar thermostats vary by model in the way they can use remote sensors. This includes averaging, control to, or monitoring features.
Please consult the Owner’s Manual of the thermostat that you are going to pair this sensor with to understand its capabilities and
pairing procedure.
This sensor is compatible with all Venstar Wi-Fi thermostats that contain the latest rmware. Please consult Venstar.com for a complete
listing of compatible thermostats.
Note:This sensor must be connected to the same local network as the thermostat(s) that will use the sensor data.
Congurator
app icon
g. 1
AC POWER IN
24VAC
REMOTE
SENSOR
Link
button
Unit ID
Sensor
type
Temperature
Sensor
g. 2
To Connect the Sensor to an Access Point:
1. Remove sensor cover.
2. Congure the Sensor. (use g. 2 as a guide)
ASet the Type:
1. Outdoor temperature is sampled and transmitted once every 5 minutes.
2. Return temperature is sampled and transmitted once every 20 seconds.
a. Must be connected to 24Vac for 20 second sample rate.
If battery powered; 1 minute sample rate.
3. Remote temperature is sampled and transmitted once every minute.
4. Supply temperature is sampled and transmitted once every 20 seconds.
a. Must be connected to 24Vac for the 20 second sample rate.
If battery powered; 1 minute sample rate.
BSet the Unit ID:
If more than one ACC-TSENWIFI is joined to an access point each sensor must
have a unique UNIT ID# to operate properly.
Up to 20 ACC-TSENWIFI sensors may be joined to 1 access point.
CSelect the Temperature Sensor:
i. Onboard will use the temperature sensor mounted on the circuit board
of the ACC-TSENWIFI.
ii. Remote will use the sensor connected to the remote sensor terminals on
the back of the ACC-TSENWIFI.
A
B
C

Pair to your Explorer thermostat:
1. After successfully connecting the sensor to the access
point, momentarily press and release the Link button
of the Wi-Fi sensor. The LED will stay on for up to 2
seconds, then turn off.
2. Open the ‘small, inside door’ of the Explorer
thermostat.
3. Press the Accessory Setup button.
4. Press the Mode button.
5. Upon successful pairing the thermostat display will
acknowledge the paired sensor, along with the
sensor’s ID.
To Unpair the Wi-Fi sensor from the
Explorer thermostat:
1. Open the ‘small, inside door’ of the Explorer
thermostat.
2. Press the Accessory Status button.
3. Press the Cooler (down arrow) button.
4. If you have more than 1 sensor press the Mode button
until the sensor you wish to unpair is displayed.
5. Simultaneously press the Warmer (up arrow) and
Cooler (down arrow) buttons.
6. The thermostat display will acknowledge the
sensor unpaired.
Pair to your ColorTouch thermostat:
1. After successfully connecting the sensor to the access
point, momentarily press and release the Link button
of the Wi-Fi sensor. The LED will stay on for up to 2
seconds, then turn off.
2. Press ‘Menu’ on the bottom right of the
ColorTouch display.
3. Select ‘Settings”. (you may need to scroll down
to Settings)
4. Select ‘Installation Settings’. (you may need to scroll
down to Installation Settings)
5. Select ‘Sensor Settings’.
6. Select ‘Wireless Sensors’.
7. Select ‘Add New Sensor’.
3. Install 4 AA batteries with the polarity as indicated on the ACC-TSENWIFI housing. (see g. 3)
(Disregard the battery installation when 24Vac is connected to the sensor).
a. Alkaline batteries are acceptable for operation in the temperature range
of 0˚F to 120˚F.
b. When operating between -20˚F to 130˚F it is recommended to use good quality
Lithium AA batteries.
4. Press and hold the Link button (see g. 2) until the Link LED starts to ash.
5. Use the Venstar Congurator App to setup the Wi-Fi connection.
a. Select the Wi-Fi Sensor Setup by swiping the top half of the Congurator App
to the left until the Wi-Fi Sensor appears.
b. Select “Setup WI-FI”
c. Follow the Wi-Fi setup instructions on the Congurator App.
Notes:
• TheLEDwillstaysolidwhileconnectingtotheaccesspoint.
• IftheconnectionissuccessfultheLEDwillturnoff.
• IftheconnectionisunsuccessfultheLEDwillash5times.
• If the App detects that the sensor rmware is not up to date, then the user will be prompted and
instructed how to update the sensor’s rmware.
(continuedfrompage1)
AC POWER IN
24VAC
REMOTE
SENSOR
g. 3
Atthetimeofpublicationofthismanual,Explorermodelswithrmwareversion10orgreaterandColorTouchmodelsT7850,T7900,T8850and
T8900withrmwareversion5orgreaterarecompatiblewiththissensor.
Toseethecurrentlistofcompatiblethermostatsalongwithpairingandunpairinginstructionsforeachthermostat,please
visit:http://www.venstar.com/thermostats/accessories/wi-temperature-sensor/

Rear Panel Connections
When the ACC-TSENWIFI type is congured to be a supply
or return air temperature sensor, the sample rate is once
every 20 seconds. External power (24Vac) is required to
support this sampling rate.
If 24Vac is not supplied to the rear terminals of the sensor
and 4 AA batteries are installed, the sampling rate of the
sensor will default to once a minute.
Specications
Operational Temperature
• with alkaline batteries: 0° F - 120° F
• with lithium batteries: -20° F - 130° F
Expected Battery Life
• Sample rate of 1 per minute: > 1 year
Sensor Type
• 10K Ohm thermistor, 2 wire pigtail
24Vac
Included
10K Ohm
Sensor
HVAC Duct
sensor
gasket
wall
g. 4
g. 5
Figure 4 illustrates the optional
use of an external sensor along
with external power.
AC POWER IN
24VAC
REMOTE
SENSOR
g. 5
When mounting outdoors:
· Install gasket as shown between wall and sensor
· Keep out of direct sunlight
· Keep out of direct rain
An ideal mounting location would be in a covered
outdoor patio or protected by an awning or eave
from the elements.
Use the included screw to secure the cover
to the sensor.

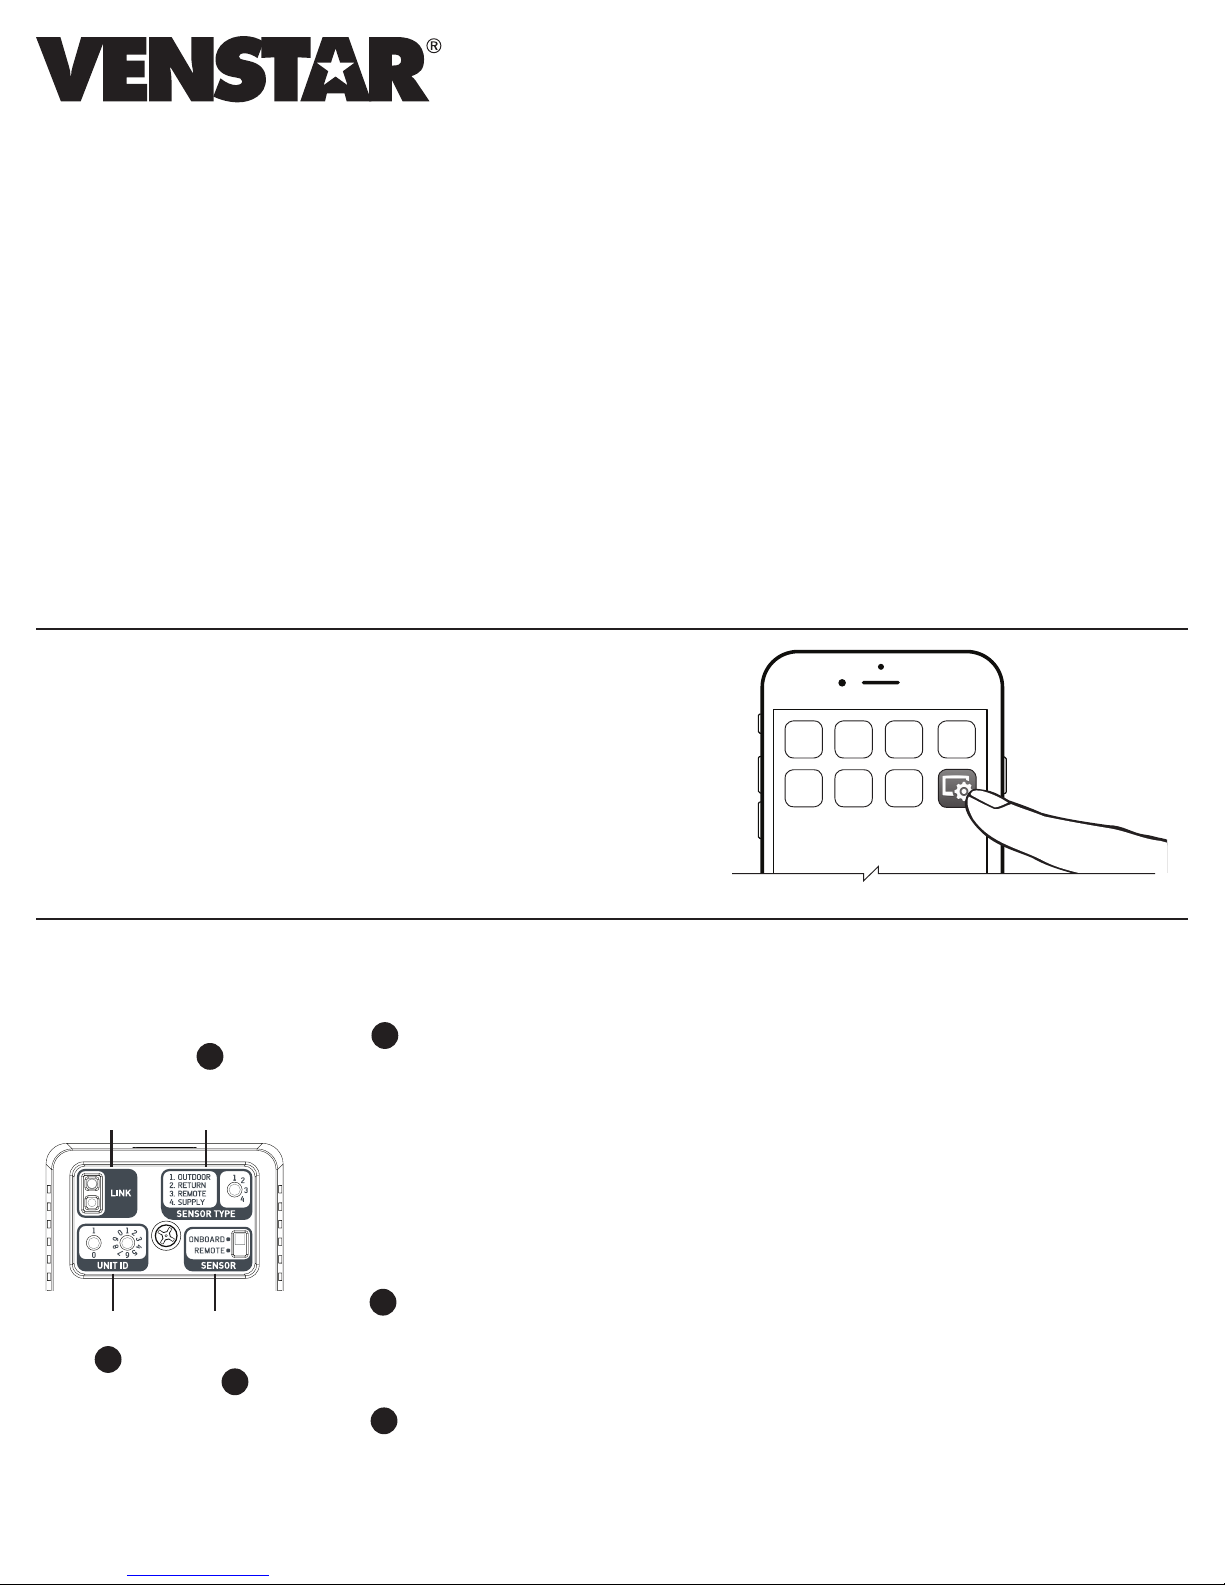
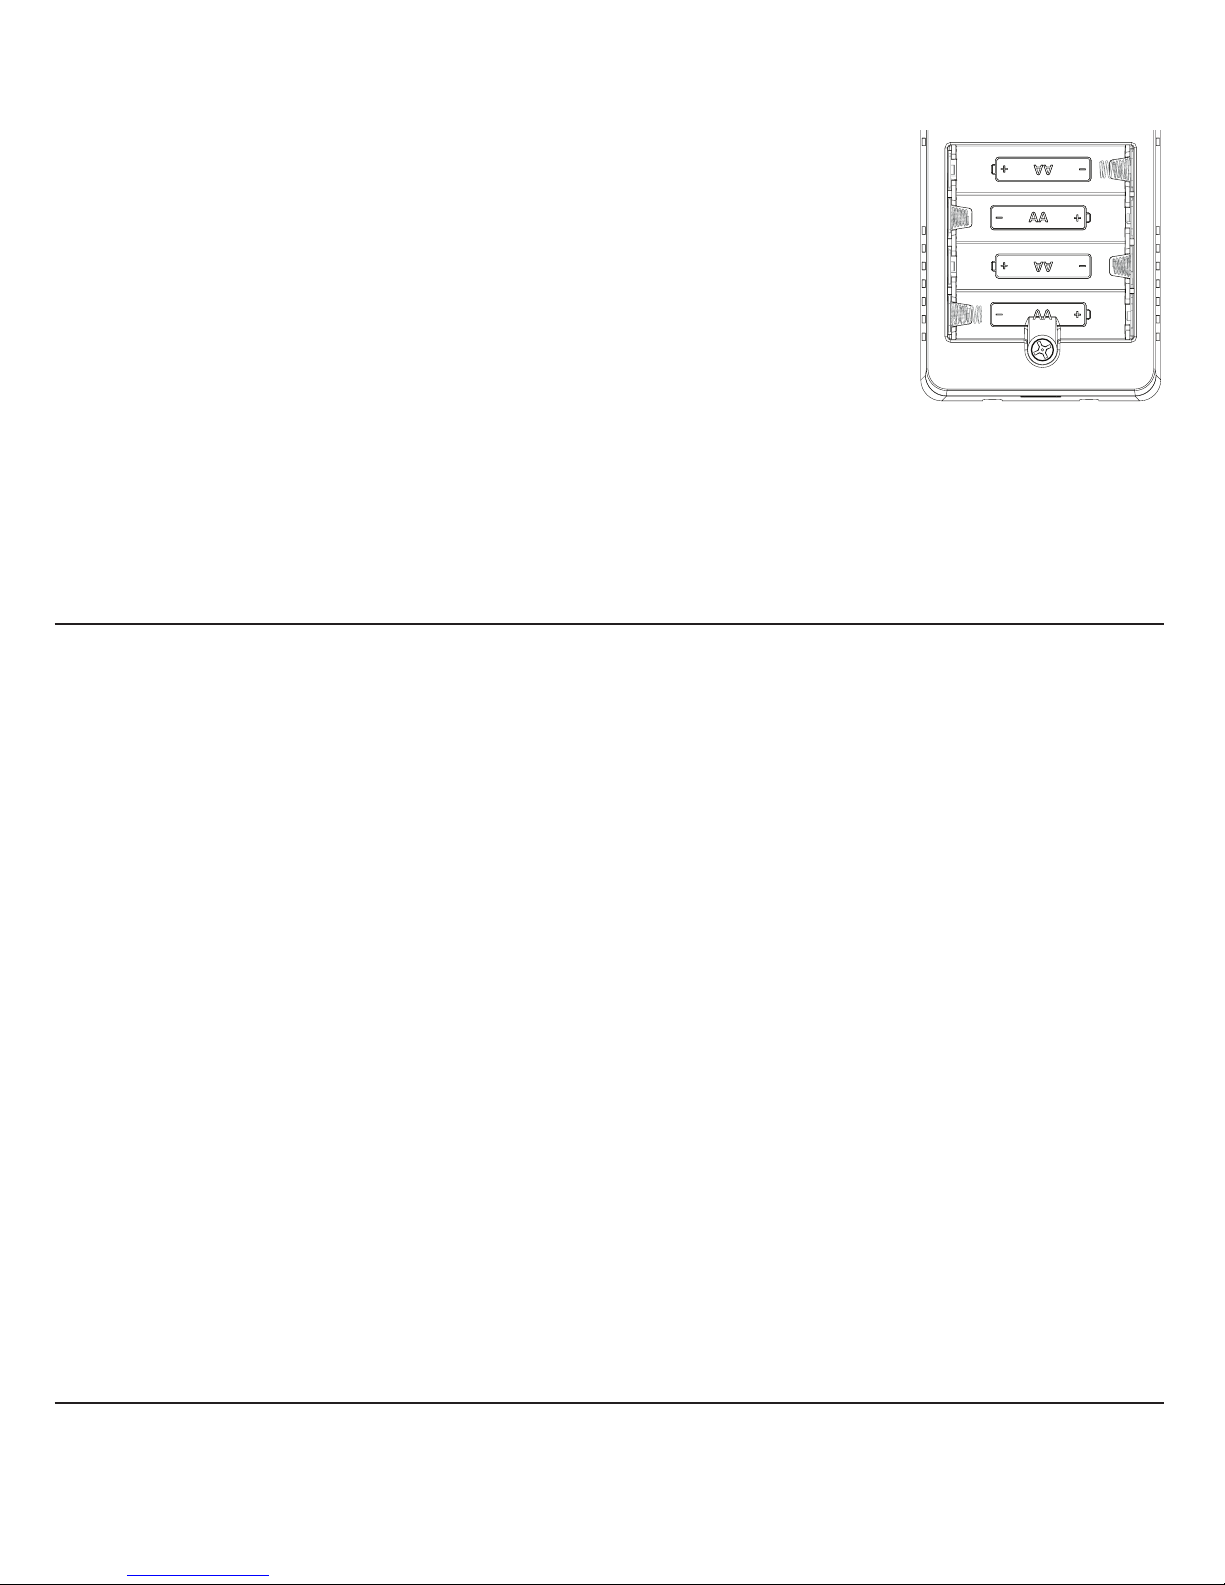
Venstar Inc. - Made in China - 08/17 - Patents Pending Temperature Sensor with WiFi P/N 88-1110 Rev. 4
FCC Compliance Statement
This equipment has been tested and found to comply with the limits for an intentional radiator, pursuant to Part 15, subpart C of the FCC rules. These limits are designed to provide
reasonable protection against harmful interference in a residential installation. This equipment generates, uses and can radiate radio frequency energy and, if not installed and used in
accordance with the instructions, may cause harmful interference in radio communications. However, there is no guarantee that the interference will not occur in a particular installation. If
this equipment does cause harmful interference to radio or television reception, which can be determined by turning the equipment off and on, the user is encouraged to try to correct the
interference by one or more of the following measures:
• Reorient or relocate the receiving antenna.
• Increase the separation between the equipment and receiver.
• Connect the equipment into an outlet on a circuit different from that of the receiver.
• Consult the dealer or an experienced radio or TV technician for help.
Notice: Only peripherals complying with FCC limits may be attached to this equipment. Operation with noncompliant peripherals or peripherals not recommended by Venstar, is likely to
result in interference to radio and TV reception. Changes or modications to the product, not expressly approved by Venstar could void the user’s authority to operate the equipment.
FCC - INDOOR Mobile Radio Information:
To comply with FCC/IC RF exposure limits for general population / uncontrolled exposure, the antenna(s) used for this transmitter must be installed to provide a separation distance of at
least 20 cm from all persons and must not be co-located or operating in conjunction with any other antenna or transmitter.
This Device complies with Industry Canada License-exempt RSS standard(s). Operation is subject to the following two conditions: 1) this device may not cause interference, and 2) this
device must accept any interference, including interference that may cause undesired operation of the device.
Under Industry Canada regulations, this radio transmitter may only operate using an antenna of a type and maximum (or lesser) gain approved for the transmitter by Industry Canada.
To reduce potential radio interference to other users, the antenna type and its gain should be so chosen that the equivalent isotropically radiated power (e.i.r.p.) is not more than that
necessary for successful communication.
Cet appareil est conforme avec Industrie Canada, exempts de licence standard RSS(s). Son fonctionnement est soumis aux deux conditions suivantes: 1) ce dispositif ne doit pas causer
d’interférences, et 2) ce dispositif doit accepter toute interférence, y compris les interférences qui peuvent causer un mauvais fonctionnement de l’appareil.
En vertu des règlements d’Industrie Canada, cet émetteur de radio ne peut fonctionner en utilisant une antenne d’un type et maximale (ou moins) Gain approuvé pour l’émetteur par
Industrie Canada. Pour réduire les interférences radio potentielles aux autres utilisateurs, le type d’antenne et son gain doivent être choisis an que la puissance isotrope rayonnée
équivalente (PIRE) ne est pas plus de ce qui est nécessaire pour une communication réussie.
We, Venstar, declare under our sole responsibility that the device to which this declaration relates: Complies with Part 15 of the FCC Rules. Operation is subject to the following two
conditions: (1) this device may not cause harmful interference, and (2) this device must accept any interference received, including interference that may cause undesired operation.
FCC ID: MUH-SEN6
IC: 12547A-SEN6
MUH-SEN6
Warranty
One-Year Warranty - This Product is warranted to be free from defects in material and workmanship. If it appears within one year from the date of original installation, whether or not actual use
begins on that date, that the product does not meet this warranty, a new or remanufactured part, at the manufacturer’s sole option to replace any defective part, will be provided without charge
for the part itself provided the defective part is returned to the distributor through a qualied servicing dealer.
THIS WARRANTY DOES NOT INCLUDE LABOR OR OTHER COSTS incurred for diagnosing, repairing, removing, installing, shipping, servicing or handling of either defective parts or
replacement parts. Such costs may be covered by a separate warranty provided by the installer.
THIS WARRANTY APPLIES ONLY TO PRODUCTS IN THEIR ORIGINAL INSTALLATION LOCATION AND BECOMES VOID UPON REINSTALLATION.
LIMITATIONS OF WARRANTIES – ALL IMPLIED WARRANTIES (INCLUDING IMPLIED WARRANTIES OF FITNESS FOR A PARTICULAR PURPOSE AND MERCHANTABILITY) ARE HEREBY
LIMITED IN DURATION TO THE PERIOD FOR WHICH THE LIMITED WARRANTY IS GIVEN. SOME STATES DO NOT ALLOW LIMITATIONS ON HOW LONG AN IMPLIED WARRANTY
LASTS, SO THE ABOVE MAY NOT APPLY TO YOU. THE EXPRESSED WARRANTIES MADE IN THIS WARRANTY ARE EXCLUSIVE AND MAY NOT BE ALTERED, ENLARGED, OR CHANGED
BY ANY DISTRIBUTOR, DEALER, OR OTHER PERSON WHATSOEVER.
ALL WORK UNDER THE TERMS OF THIS WARRANTY SHALL BE PERFORMED DURING NORMAL WORKING HOURS. ALL REPLACEMENT PARTS, WHETHER NEW OR
REMANUFACTURED, ASSUME AS THEIR WARRANTY PERIOD ONLY THE REMAINING TIME PERIOD OF THIS WARRANTY.
THE MANUFACTURER WILL NOT BE RESPONSIBLE FOR:
1. Normal maintenance as outlined in the installation and servicing instructions or owner’s manual, including lter cleaning and/or replacement and lubrication.
2. Damage or repairs required as a consequence of faulty installation, misapplication, abuse, improper servicing, unauthorized alteration or improper operation.
3. Failure to start due to voltage conditions, blown fuses, open circuit breakers or other damages due to the inadequacy or interruption of electrical service.
4. Damage as a result of oods, winds, res, lightning, accidents, corrosive environments or other conditions beyond the control of the Manufacturer.
5. Parts not supplied or designated by the Manufacturer, or damages resulting from their use.
6. Manufacturer products installed outside the continental U.S.A., Alaska, Hawaii, and Canada.
7. Electricity or fuel costs or increases in electricity or fuel costs for any reason whatsoever including additional or unusual use of supplemental electric heat.
8. ANY SPECIAL INDIRECT OR CONSEQUENTIAL PROPERTY OR COMMERCIAL DAMAGE OF ANY NATURE WHATSOEVER. Some states do not allow the exclusion of incidental or
consequential damages, so the above may not apply to you.
This warranty gives you specic legal rights and you may also have other rights which may vary from state to state.
Table of contents
Other Venstar Accessories manuals

Venstar
Venstar ACC-FP1xx User manual

Venstar
Venstar ACC-TSENWB User manual

Venstar
Venstar ACC0430 User manual

Venstar
Venstar ACC0410 User manual

Venstar
Venstar ACC0401 User manual

Venstar
Venstar ACC0435 User manual

Venstar
Venstar ACC-TSEN User manual

Venstar
Venstar ACC0400 User manual

Venstar
Venstar ACC0410 User manual

Venstar
Venstar ACC0620 User manual
Popular Accessories manuals by other brands

Rogers
Rogers SMCCO02-Z Setup guide

Bosch
Bosch LM2 Series Installation note

Technisonic Industries Limited
Technisonic Industries Limited TiL-91-DE/8.33 Installation and operating instructions

Maxcess
Maxcess CL Series instruction manual

Niko
Niko 170-65 01 Series Mounting manual

A.T.U
A.T.U 760989/A.T.U manual