Venstar ACC0430 User manual

Venstar Inc. 08/07
HUMIDITY MODULE
ACC0430
Module
Module
Humidity
Humidity
When installed, the thermostat may have* the ability to:
Control a compatible humidifier
Display the relative humidity level as measured at
the thermostat
Dehumidify (cool to dehumidify, reheat, control
a dehum terminal equipped furnace board)
Not all thermostat models support every feature listed above.
Compatible with thermostat models: T1800, T2700, T2800
T2900. Consult VENSTAR for a complete list.
*
OWNER’S
MANUAL
OWNER’S
MANUAL

View the ambient humidity at the thermostat
location
Control a humidifier with the HUM terminal on
the thermostat
Dehumidify using only the air conditioner
Dehumidify with Reheat using your HVAC’s
second stage electric strip heater
Dehumidify using the DEHUM terminal on your
furnace’s circuit board
Overview
Page 1
This unique accessory allows you to view and control
the humidity level using only your thermostat and
HVAC unit.
Depending on the model number of your thermostat
the humidification options are:
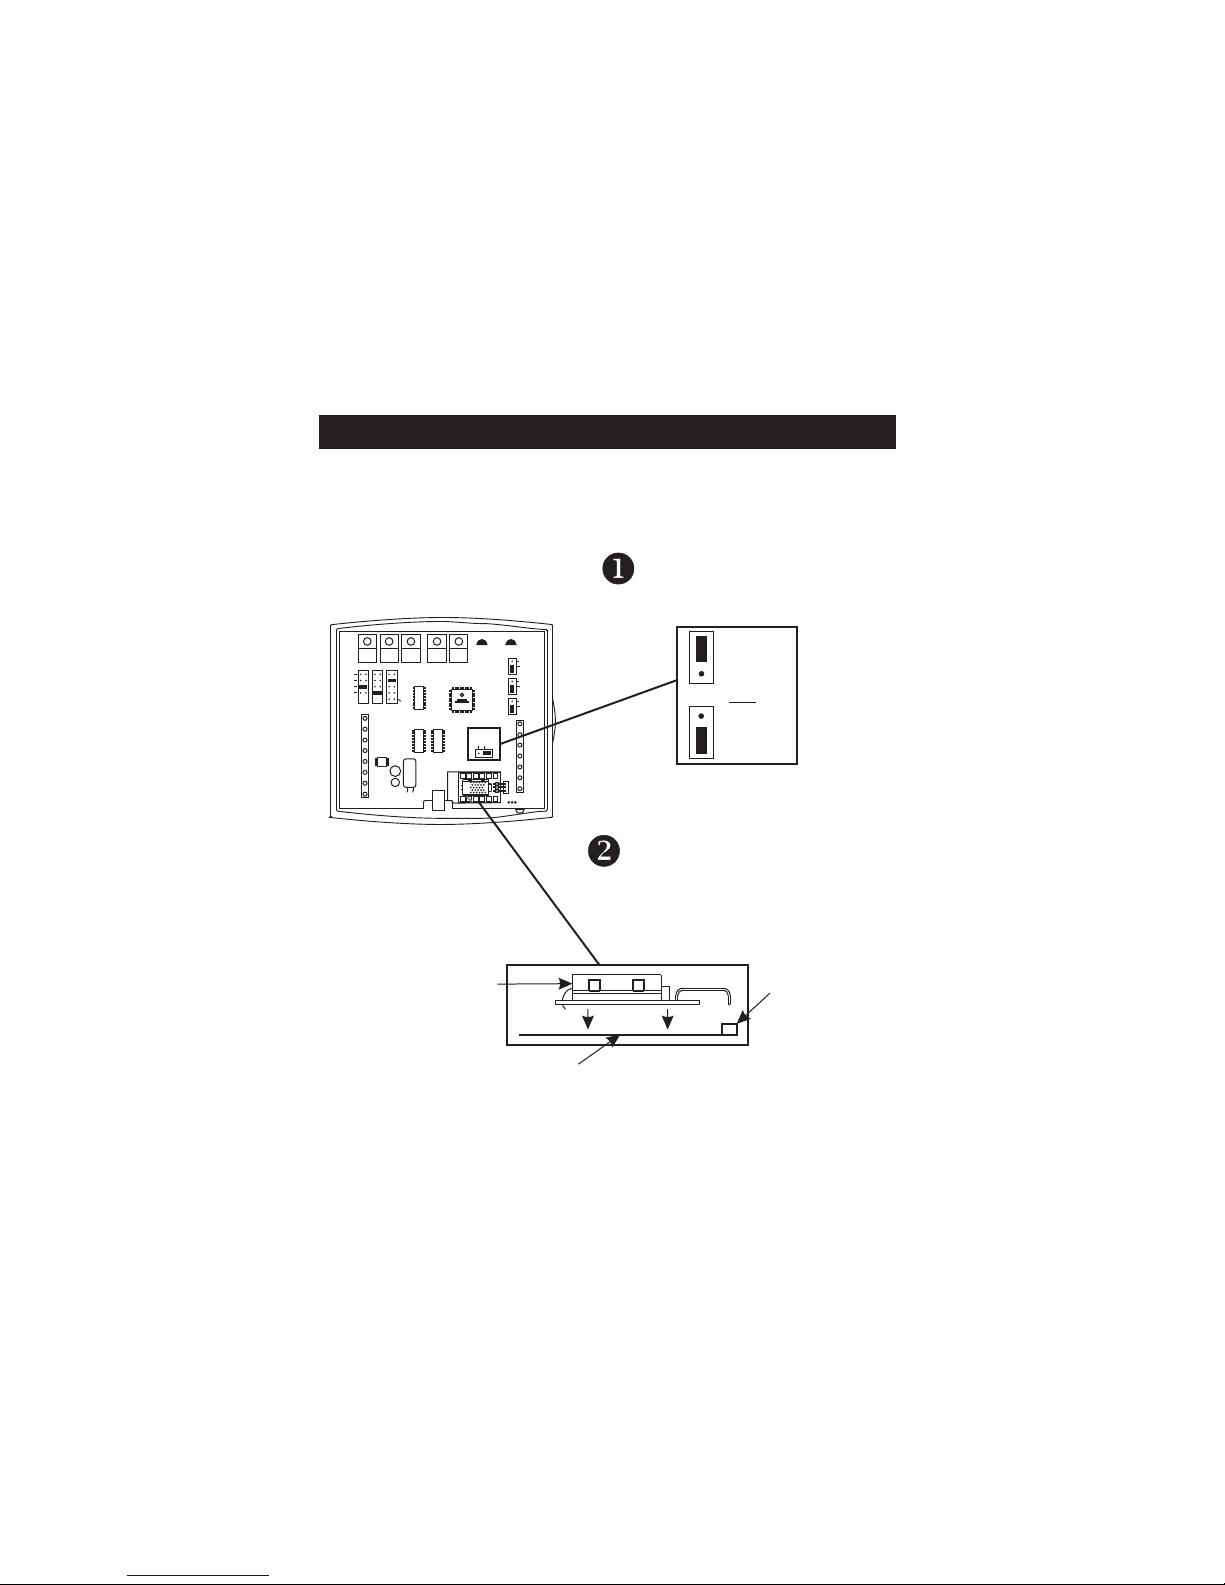
Installation
Thermostat
circuit board.
Humidity Module
plug located on
the thermostat
circuit board.
Humidity Module
Humidity Jumper
Set this jumper for
HUM.
HUM
NO HUM
OR
HP
GAS
B
ELEC
GAS
(FAN)
W1
Y1
G
R
C
MISC2
CK1
CKGND
O
W2
MISC1
RS2
RSGND
MISC3
RS+5
Rs1
W3
PROG
HUM
DEHUM
MISC3 MISC2 MISC1
Y2
(MISC1
ONLY)
INSTALL HUMIDITY
MODULE WITH SENSING
ELEMENT OUTWARD
1
2
4
6
8
X
Z
1
5
7
9
Y
3
HUM
NO HUM
Humidity Module
Model ACC0430
Plug the module into the appropriate
connection terminal on the circuit
board of the thermostat, as shown.
The humidity accessory is
humidity plug on the back of the thermostat
and the Humidity Jumper is set for HUM
operation.
inserted into the
Page 2

Humidity Operation
To control a MISC output for humidification, place
the MISC1, MISC2, or MISC3 jumper on the term-
inal labeled HUM. This will supply 24VAC to the
selected MISC terminal on the backplate of the
thermostat when the humidity in the home falls
below the setpoint you have chosen. The value for
this setpoint ranges from 0% to 60%. Only one of
the three outputs (MISC1, MISC2, or MISC3) is
required to have this jumper. For more information
regarding the MISC1, MISC2, and MISC3 outputs
and regarding the Humidity setpoint, please consult
your Owner’s Manual.
The Fan may also be programmed to automatically
energize any time there is a call for humidity. For
more information regarding energizing the Fan with
Humidification operation, please consult your
thermostat’s Owner’s Manual.
Page 3

Dehumidifying With The DEHUM Terminal*
Dehum Terminal: To control a MISC output for
dehumidification, place the MISC1, MISC2, or
MISC3 jumper on the terminal labeled DEHUM.
This will supply 24VAC to the selected MISC
terminal when the humidity in the home is above the
setpoint you have chosen. Only one of the three
outputs (MISC1, MISC2, or MISC3) is req-
uired to have a jumper. For more information
regarding the MISC1, MISC2, and MISC3 outputs,
please consult your thermostat Owner’s Manual.
When the indoor humidity falls below the setpoint
you have selected, the MISC terminal will be de-
energized. The value for this setpoint ranges from
25% to 99%. To utilize this feature your HVAC unit
must be equipped with a DEHUM terminal. For
more information regarding dehumidification using
the DEHUM terminal, please consult your
thermostat’s Owner’s Manual.
*Dehumidifying with the DEHUM terminal may not be available
with your thermostat model number. Please consult your
Owner’s Manual for details.
Page 4

Dehumidifying With Air Conditioning*
Cool to Dehumidify: If Cool to Dehumidify is on
and the Humidity Module is installed, the thermo-
stat has the ability to initiate a cooling cycle for
advanced dehumidification operation. When the
thermostat detects the humidity percentage is
above the setpoint for dehumidification, and heating
or cooling is not on, the thermostat will force the
compressor to run with the fan, thus reducing
moisture in the air. The green LED will blink once
every eight seconds to indicate this is taking place.
This feature will also allow you to adjust the cooling
overshoot of the setpoint, from 0 to 5 .
For Example: If the cooling overshoot is set for 3 F and
the cooling setpoint is set for 74 F, then as long as the
room temperature reads between 71 F and 74 F this
feature will energize the compressor and fan to
dehumidify the air.
When the indoor humidity falls below the setpoint
you have selected, the Cool to Dehumidify function
will be de-energized. The value for this setpoint
ranges from 25% to 99%. For more information
regarding dehumidification using the air conditioner,
please consult your Owner’s Manual.
° °
°
°
° °
*Cool to Dehumidify may not be available with your thermostat
model number. Please consult your Owner’s Manual for details.
Page 5

Reheat with Cool to Dehumidify*
Reheat: This feature allows the thermostat to turn
on Electric Heating (W2) during Cool to Dehumidify
(see previous page) to maintain room temperature
until the dehumidification setpoint is reached. The
cooling cycle will allow for the dehumidification of
the air to occur while the Electric Heating will allow
for a constant room temperature. If Reheat is
enabled, the Aux icon will appear on the display
during Cool to Dehumidify operation. For more
information regarding Reheat operation, please
consult your thermostat’s Owner’s Manual.
*Reheat with Cool to Dehumidify may not be available with your
thermostat model number. Please consult your Owner’s Manual
for details.
Page 6
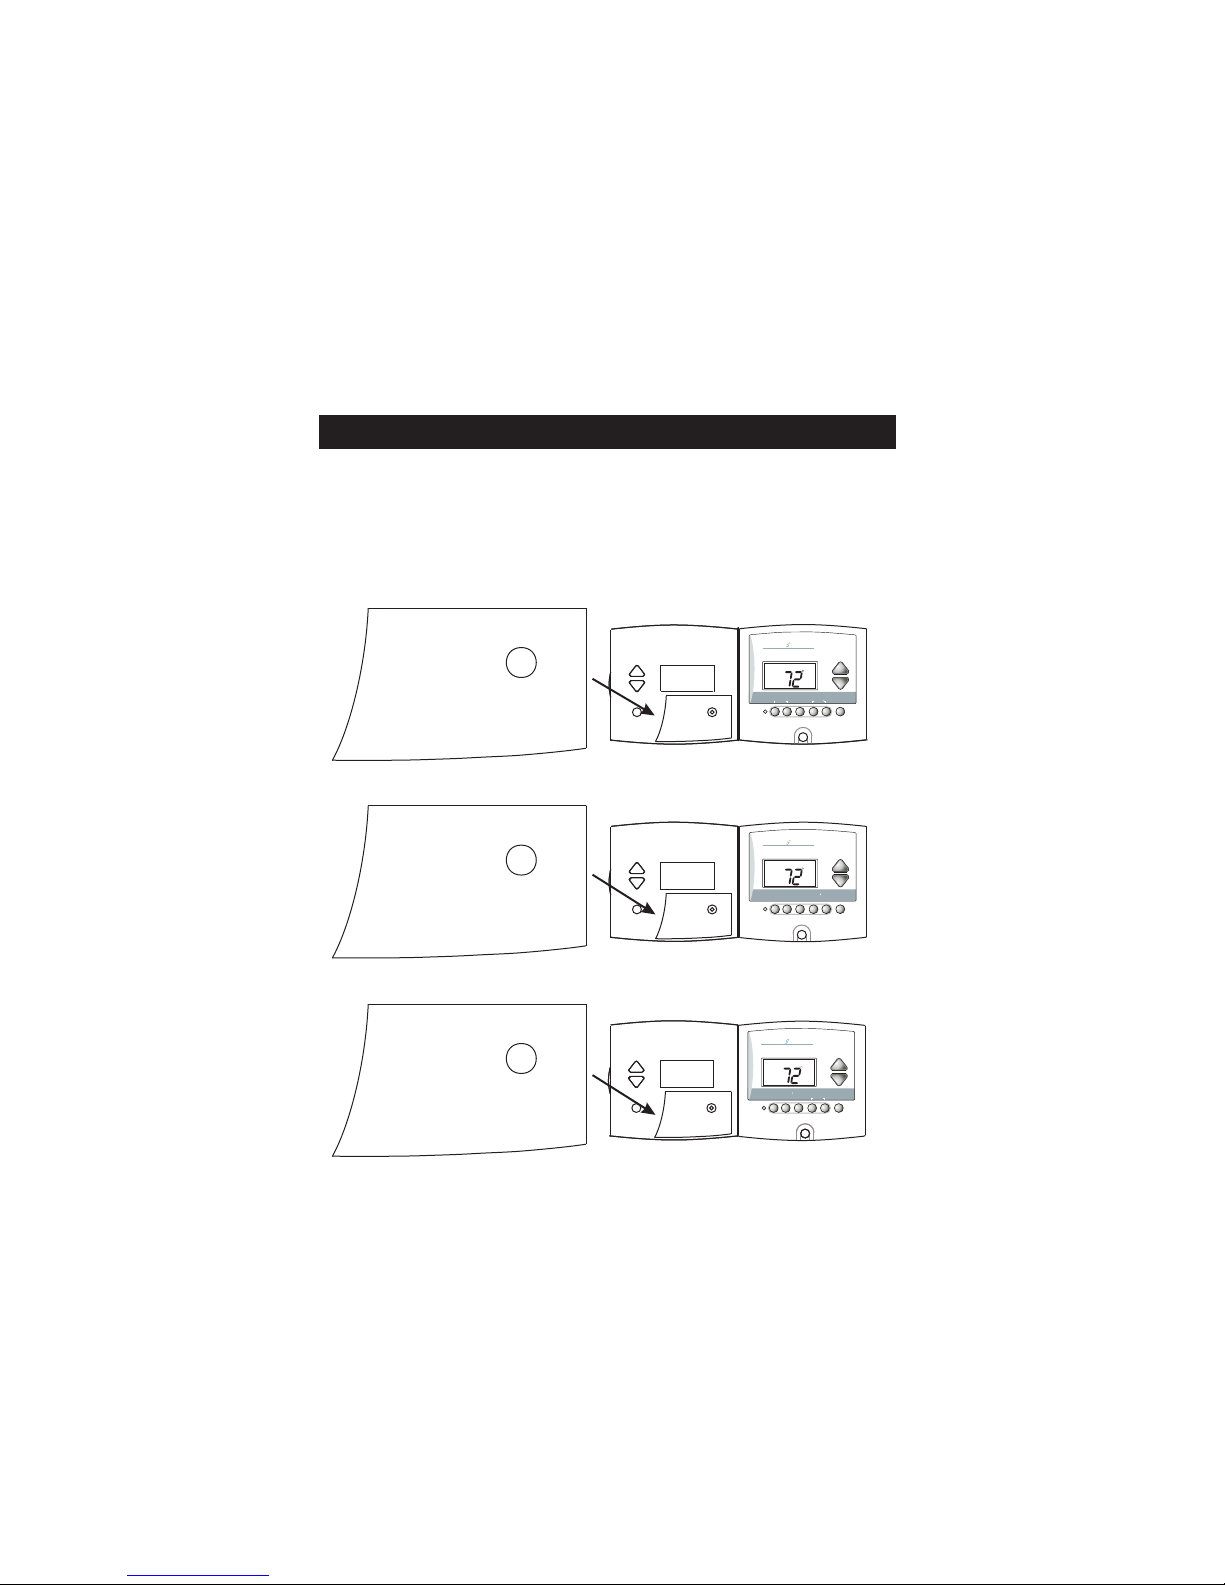
Label Selection and Placement
The Humidity Module package includes three door
labels. Depending on which model thermostat
you have purchased, choose the correct label and
affix it to the thermostat as shown in the diagrams
below. T2800 & T2900
T1800
Humidity - Press the Humidity
button to display the humidity
screens. The Up and Down
buttons alter the flashing icon.
The Mode button advances
the display to the next screen.
Unit #
www.venstar.com Rev. 1
T2700
Humidity - Press the humidity
button to display the humidity
screens. The Up and Down
buttons alter the flashing icon.
The mode button advances
the display to the next screen.
Unit #
www.venstar.com Rev. 1
Humidity - Press the humidity
button to display the humidity
screens. The Up and Down
buttons alter the flashing icon.
The Mode button advances
the display to the next screen.
Unit #
www.venstar.com Rev. 1
Time Period Programming -
Press the Program button. The Up and Down
buttons modify the flashing icon.
The Mode button is used to
advance to the next step.
Humidity - Press the humidity
button to display the humidity
screens. The Up and Down
buttons alter the flashing icon.
The mode button advances
the display to the next screen.
Unit #
www.venstar.com Rev. 1
Time Period Programming -
Press the Program button. The Up and Down
buttons modify the flashing icons.
The Mode button is used to
advance to the next step.
Humidity - Press the Humidity
button to display the humidity screens. The
Up and Down buttons alter the flashing icon.
The Mode button advances the display to the
next screen.
www.venstar.com Rev. 1
Time Period Programming -
Press the Program button. The Up and Down
buttons modify the flashing icon.
The Mode button is used to
advance to the next step.
Humidity - Press the humidity
button to display the humidity screens. The
Up and Down buttons alter the flashing icon.
The mode button advances the display to the
next screen.
www.venstar.com Rev. 1
Time Period Programming -
Press the Program button. The Up and Down
buttons modify the flashing icons.
The Mode button is used to
advance to the next step.
Page 7
COMMERCIAL PROGRAMMABLE THERMOSTAT
PLATINUM
AUTO
I2:00
Su
Pm
HEAT
COOL
72
74
HUMIDITY FAN RESET
FILTER
MODE OVERRIDE
OUTDOOR
eries
COMMERCIAL PROGRAMMABLE THERMOSTAT
HUMIDITY FAN PROGRAM HOLIDAY
MODE OVERRIDE
OUTDOOR
SETCLOCK
PLATINUM
AUTO
I2:00
Su
Pm
HEAT
COOL
72
74
eries
COMMERCIAL PROGRAMMABLE THERMOSTAT
HUMIDITY PROGRAM SET CLOCK
FAN MODE
VACATION
PLATINUM eries
AUTO
I2:00
Su
Pm
HEAT
COOL
72
74
OUTDOOR

Warranty
One-Year Warranty - This Product is warranted to be free from defects in material and workmanship. If it
appears within one year from the date of original installation, whether or not actual use begins on that
date, that the product does not meet this warranty, a new or remanufactured part, at the
manufacturer’s sole option to replace any defective part, will be provided without charge for the part
itself provided the defective part is returned to the distributor through a qualified servicing dealer.
THIS WARRANTY DOES NOT INCLUDE LABOR OR OTHER COSTS incurred for diagnosing, repairing,
removing, installing, shipping, servicing or handling of either defective parts or replacement parts. Such
costs may be covered by a separate warranty provided by the installer.
THIS WARRANTY APPLIES ONLY TO PRODUCTS IN THEIR ORIGINAL INSTALLATION LOCATION AND BECOMES
VOID UPON REINSTALLATION.
LIMITATIONS OF WARRANTIES – ALL IMPLIED WARRANTIES (INCLUDING IMPLIED WARRANTIES OF FITNESS FOR
A PARTICULAR PURPOSE AND MERCHANTABILITY) ARE HEREBY LIMITED IN DURATION TO THE PERIOD FOR
WHICH THE LIMITED WARRANTY IS GIVEN. SOME STATES DO NOT ALLOW LIMITATIONS ON HOW LONG AN
IMPLIED WARRANTY LASTS, SO THE ABOVE MAY NOT APPLY TO YOU. THE EXPRESSED WARRANTIES MADE IN
THIS WARRANTY ARE EXCLUSIVE AND MAY NOT BE ALTERED, ENLARGED, OR CHANGED BY ANY DISTRIBUTOR,
DEALER, OR OTHER PERSON WHATSOEVER.
ALL WORK UNDER THE TERMS OF THIS WARRANTY SHALL BE PERFORMED DURING NORMAL WORKING
HOURS. ALL REPLACEMENT PARTS, WHETHER NEW OR REMANUFACTURED, ASSUME AS THEIR WARRANTY
PERIOD ONLY THE REMAINING TIME PERIOD OF THIS WARRANTY.
THE MANUFACTURER WILL NOT BE RESPONSIBLE FOR:
1. Normal maintenance as outlined in the installation and servicing instructions or owner’s
manual, including filter cleaning and/or replacement and lubrication.
2. Damage or repairs required as a consequence of faulty installation, misapplication, abuse,
improper servicing, unauthorized alteration or improper operation.
3. Failure to start due to voltage conditions, blown fuses, open circuit breakers or other
damages due to the inadequacy or interruption of electrical service.
4. Damage as a result of floods, winds, fires, lightning, accidents, corrosive environments or
other conditions beyond the control of the Manufacturer.
5. Parts not supplied or designated by the Manufacturer, or damages resulting from their use.
6. Manufacturer products installed outside the continental U.S.A., Alaska, Hawaii, and
Canada.
7. Electricity or fuel costs or increases in electricity or fuel costs for any reason whatsoever
including additional or unusual use of supplemental electric heat.
8. ANY SPECIAL INDIRECT OR CONSEQUENTIAL PROPERTY OR COMMERCIAL
DAMAGE OF ANY NATURE WHATSOEVER. Some states do not allow the exclusion of
incidental or consequential damages, so the above may not apply to you.
This warranty gives you specific legal rights and you may also have other rights which may vary from
state to state.
P/N 88-628 Rev. 1 C
c
F
FOR HOME OR OFFICE USE
Tested to Comply
with FCC Standards
Humidity Module ACC0430
Page 8
Table of contents
Other Venstar Accessories manuals

Venstar
Venstar ACC-FP1xx User manual

Venstar
Venstar ACC0401 User manual

Venstar
Venstar ACC0620 User manual

Venstar
Venstar ACC0401 User manual

Venstar
Venstar ACC0400 User manual

Venstar
Venstar ACC0414REC Operating and safety instructions

Venstar
Venstar ACC0410 User manual

Venstar
Venstar VENnet ACC-VNTH1 User manual

Venstar
Venstar ACC0435 User manual

Venstar
Venstar ACC-TSEN User manual


Popular Accessories manuals by other brands


hager
hager 53600 quick start guide

Inepro
Inepro Multi Connectivity Box Technical manual

PEHA
PEHA enocean 4511 FU-EP ST Installation and operating instructions

Endress+Hauser
Endress+Hauser Levelflex FMP56 operating instructions

MicaSense
MicaSense DLS 2 Integration guide

Aclara
Aclara ZoneScan II Field installation instructions