Veridian 01-508 Series User manual

Automatic Digital
Wrist Blood Pressure Monitor
Model # 01-508 series
INSTRUCTION MANUAL • ENGLISH & ESPAÑOL
Please read this instruction manual
completely before operating this unit.
3-YEAR 2-YEAR
3-YEAR 2-YEAR
1-YEAR
1-YEAR

2 • ENGLISH
Digital Monitor 2 AAA Batteries Storage Case
Instruction Manual
Quick Start Guide
Blood Pressure Reading Tracking Log
FAQ Information Sheet
STOP!
PLEASE ENSURE YOU HAVE ALL OF THE
FOLLOWING COMPONENTS BEFORE USING
YOUR DIGITAL BLOOD PRESSURE MONITOR
IF YOU ARE MISSING ANY PARTS, INCLUDING INSERTS OR
INSTRUCTION MANUALS, DO NOT RETURN TO PLACE OF
PURCHASE. CONTACT CUSTOMER CARE AT 8663261313.

ENGLISH • 3
Care & Safety Information.....................................................................................4-5
Introduction & Indications for Use..........................................................................6
Digital Blood Pressure Monitor Features ...............................................................7
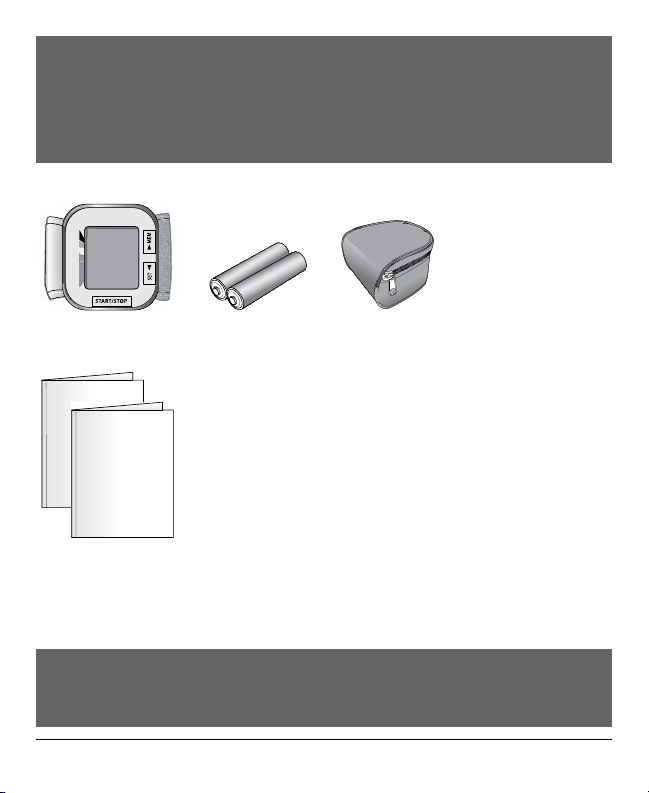
Getting Started ............................................................................................................8
Battery Installation .....................................................................................................9
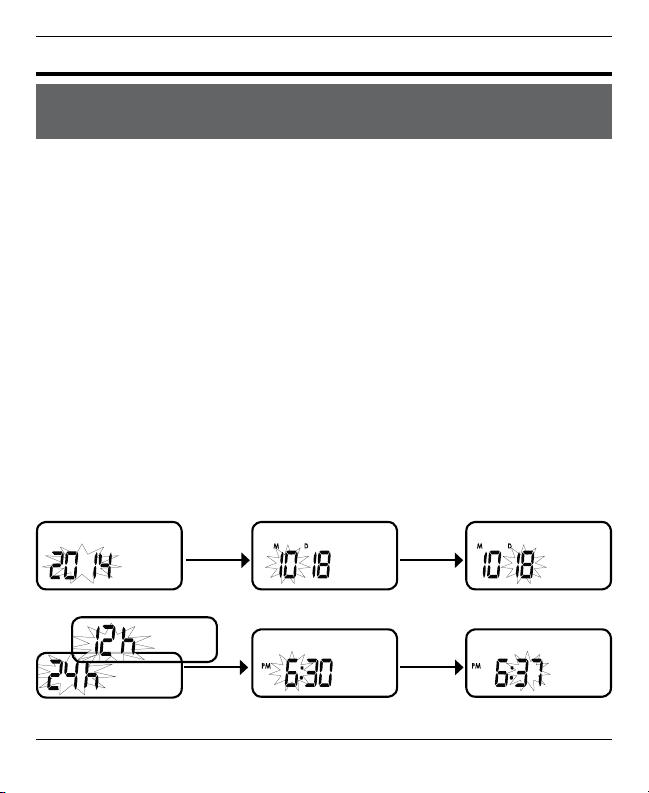
Setting Date and Time............................................................................................. 10
Applying Your Blood Pressure Cu.................................................................11-12
Taking Your Blood Pressure Reading .............................................................13-14
Interpreting your Results..................................................................................15-16
Memory Functions ............................................................................................17-18
Care and Maintenance ............................................................................................ 19
Device and Label Symbols ..................................................................................... 20
Description of Symbols........................................................................................... 21
Troubleshooting ....................................................................................................... 22
Error Codes................................................................................................................. 23
FCC Statement........................................................................................................... 24
Electromagnetic Compatibility.......................................................................25-28
Specications ............................................................................................................ 29
Complied Standards ................................................................................................ 30
Warranty ..................................................................................................................... 31
Instrucciones en Español.................................................................................. 33-60
INDEX
Manufactured for
Veridian Healthcare
1175 Lakeside Drive
Gurnee, IL 60031
Made in China
#93-1264 10/14
©2014 Veridian Healthcare, LLC
Toll-Free Customer Care Help Line: 1-866-326-1313
Monday – Friday 8:30 a.m. – 4:30 p.m. CST

4 • ENGLISH
CARE & SAFETY INFORMATION
NOTE: Read all instructions carefully before use. The following basic precautions are needed
when using an electrical product.
CAUTION: Failure to read and observe all precautions could result in personal injury or
equipment damage.
Improper care or use of your blood pressure monitor may result in injury, damage to the unit
or ineective treatment. Following these instructions will ensure the blood pressure monitor’s
ecacy and long life.
GENERAL CAUTIONS AND WARNINGS
•Measurement results should be discussed with your physician or healthcare
professional; never self-diagnose or attempt treatment as this may be dangerous
•Intended for adult use only; this device is not approved for infant or child use
•Keep out of reach of children
•Do not use the unit if it has any damaged parts (including power cord or plug and cu), if
it has been submersed in water or dropped
•If any abnormality occurs, discontinue use until the unit has been examined and repaired
•Only use included attachments and parts; do not use attachments from other brands or
models as these may not be properly calibrated for use with this device and may result in
measurement error
•Do not share the cu with an infected person.
•Do not disassemble the unit or attempt to repair it; substitution of a component dierent
from that supplied may result in measurement error and will void manufacturer warranty
•Always follow local regulations for proper disposal of the monitor, cu and batteries
OPERATING CAUTIONS AND WARNINGS
•Prolonged over-ination may cause congestion, swelling or bruising in some people
•Wait a minimum of 2 minutes between measurements (20-minutes is recommended);
excessive frequent measurements may restrict blood circulation

ENGLISH • 5
CARE & SAFETY INFORMATION
• Do not use this device while connected to any monitoring equipment on the same limb
• Consult with your healthcare professional for guidance for use if you have any of
the following: intravascular shunt; mastectomy on the arm corresponding to the
measurement side of the body
• Consult with your healthcare professional before using the device in pregnancy including
pre-eclampsia, or if diagnosed with arrhythmia or arteriosclerosis
•If you experience any discomfort or an abnormality occurs, stop using the device
immediately; to stop the device during operation, press the START/STOP button and the
cu will automatically deate
•Operation outside of stated operating temperature may result in measurement error or
device malfunction; operation environment temperature is: 41°F – 104°F (5°C – 40°C);
Humidity: ≤85%RH (non-condensing)
•Never use this unit while operating a vehicle or in the bathtub or shower
STORAGE CAUTIONS AND WARNINGS
•Storage outside of stated storage temperature may result in measurement error or device
malfunction; storage environment temperature is: -4°F – 140°F (-20°C – 60°C); Humidity:
10% to 93%RH (non-condensing)
•Keep the unit out of reach of small children
•Always keep the unit unplugged while not in use; remove the batteries if the unit will not
be used for an extended period of time
CLEANING CAUTIONS AND WARNINGS
•Never immerse the unit in water to clean as it may damage the unit
•Follow the‘Cleaning and Maintenance’portion of this manual for instruction on how to
clean and care for your monitor

6 • ENGLISH
INTRODUCTION & INDICATIONS FOR USE
It is recommended that you rst seek the advice and recommendation of your physician
or healthcare professional when using home diagnostic devices, including blood pressure
monitors.
Automatic digital blood pressure monitors use the oscillometric method to electronically
measure your blood pressure. The monitor detects your blood’s movement through the artery
in your arm and converts the movements into a digital reading. The oscillometric method
does not require a stethoscope, making the monitor ideal for home use.
Blood pressure readings determined with this device are equivalent to measurements
obtained by a trained healthcare professional using the cu/stethoscope auscultation
method, within the limits prescribed by the American National Standard for Electronic or
Automated Sphygmomanometers.
Thank you for purchasing a Veridian Automatic Digital Blood Pressure Monitor. With proper
care and use, your monitor will provide you with many years of reliable readings.
PLEASE READ THIS INSTRUCTION MANUAL
COMPLETELY BEFORE OPERATING THIS UNIT.

ENGLISH • 7
BLOOD PRESSURE MONITOR FEATURES
DETAILS OF THE DIGITAL DISPLAY SCREEN AND INTERPRETATION OF THE
SYMBOLS ARE INCLUDED THROUGHOUT THIS MANUAL.
Wrist Cu
Battery
Compartment
(underside)
Digital Display
MEMORY
Recall Button
SET
Button
START/STOP Button
(POWER)
Recall Button

8 • ENGLISH
GETTING STARTED
Before taking a measurement
1. Your readings should only be interpreted by your physician or healthcare professional
with access to your individual medical history. Regular use of a home blood pressure
monitor will allow you to track and record your readings for discussion with your
physician.
2. Conduct your measurement in a quiet place while seated in a relaxed position. Rest for
15 minutes before taking your reading. If an error occurs or you desire to take a second
reading, allow 15 minutes between readings for your blood vessels to return to normal.
3. Avoid smoking, eating, taking medication, alcohol, physical activity or any other stressful
activity for 30 minutes prior to taking a reading.
4. Always remove any jewelry or constrictive clothing that may interfere with the cu
placement.
5. Keep yourself and the monitor still during measuring; do not talk during the reading.
6. It is recommended that you take your readings as the same time each day to better
monitor any indications in your results.
7. Record your daily measurement on the included chart or some other written document
to share with your physician.

ENGLISH • 9
BATTERY INSTALLATION
This unit comes complete with 2 AAA batteries.
It is necessary to replace the batteries when the Low Battery symbol
appears on the display, Fig 1, or when the display does not turn on
after the START/STOP button is pressed.
The battery compartment is located on the underside of this monitor.
1. The cover is located on the bottom of the
monitor, under the START/STOP button.
Carefully release the cover to open the
battery compartment.
2. Insert or replace 2 AAA batteries into the
battery compartment, ensuring to match the
indicated polarity symbols, Fig 2. Always use
new batteries.
3. Replace the battery cover.
4. Dispose of batteries according to local
disposal and recycling regulations.
It is recommended to remove the batteries if the
unit will not be used for an extended period of
time.
Fig. 1
The‘Low Battery’
symbol will appear in
the upper left side of
the display.
+
Fig. 2

10 • ENGLISH
SETTING DATE/TIME
IT IS NECESSARY TO SET THE DATE AND TIME FOR THE UNIT EVERY TIME
BATTERIES ARE INITIALLY INSTALLED OR REPLACED.
The date/time feature is on the bottom left of the display screen. This unit stores the date
and time, including year; the clock function may be set for 12 hour or 24 hour (military time)
format.
1. When the batteries are rst installed, the device will automatically prompt you to set the
Date/Time feature as indicated by the ashing YEAR on the display.*
2. Press the MEM button to advance the display to the desired year, press SET to conrm
the year.
3. Next, the month will blink on the lower left of the display. Repeat step 2 to set the Month,
Date, 12/24 hour preference, Hours, then Minutes.
4. After setting the minutes, the unit will automatically exit out of the Date/Time setting
mode and briey scroll through the Date/Time before shutting o.
*NOTE: If the batteries have already been installed—when the unit is o (a blank
display screen), press and release the SET button to turn the unit on, the press and hold
the SET button to begin setting the Date/Time following the steps above.
Year Month Date
12/24 Hour Hour Minutes

ENGLISH • 11
FITTING AND APPLYING YOUR CUFF
PROPER CUFF FIT AND PLACEMENT IS CRITICAL IN OBTAINING
ACCURATE BLOOD PRESSURE MEASUREMENTS. PLEASE READ THESE
INSTRUCTIONS CAREFULLY AND CONSIDER CONSULTING WITH YOUR
PHYSICIAN FOR FURTHER DIRECTION.
Before applying your blood pressure cu, be sure your wrist is within the appropriate cu
range: Wrist Circumference Range Suitable for 5-1/2”– 8-1/4” (13.5 – 21.5 cm).
Reminder, it is important to avoid smoking, eating, taking medication, alcohol consumption or
physical activity 30 minutes prior to taking a reading.
If for any reason you are unable to or should not use your left wrist, please modify the
instructions for cu application to your right wrist.Your physician can help you identify which
wrist is best for you to take measurements from.
Applying Your Cu
1. Remove any constrictive clothing or jewelry
that may interfere with cu placement.
2. Be seated at a table or desk with your feet at
on the oor.
3. Hold your left arm in front of you with your
palm facing upward.

12 • ENGLISH
FITTING AND APPLYING YOUR CUFF
Fig. 1
Fig. 2
4. Apply the preformed cu to your left wrist so that the digital
display face is positioned on the inside area of your wrist
facing you, Fig. 1.
5. Adjust the cu 1/4”- 1/2”from the edge of the head of the
ulna bone, Fig. 2.
6. The cu should t comfortably, yet snugly around your
wrist.
If you are not comfortable with applying your cu, please seek
the assistance of another member of your household or work
with your physician to practice the cu application. Incorrectly
applied cus may result in inaccurate readings.

ENGLISH • 13
TAKING YOUR BLOOD PRESSURE READING
1. Rest your elbow on a solid surface with your palm facing
upward. Elevate your arm so that the cu is at the same level
as your heart, Fig 1. Be certain that cu is elevated to the
proper level; you may choose to support your hand with a
folded towel or book. Relax your left hand.
2. Press the START/STOP button to turn the unit on; the unit
will run a self test, Fig 2.
3. The cu will automatically inate to approximately
190mmhg or 40 mmhg higher than the last systolic pressure
reading stored in memory.
You will see the numbers increase on the screen and the
heart icon ashing during measurement.
Fig. 1
Please read the preceding portions of this manual prior to
taking your rst reading.
Reminder, it is important to avoid smoking, eating, taking
medication, alcohol consumption or physical activity 30
minutes prior to taking a reading.
Fig. 2
YOU CAN STOP THE INFLATION OR DEFLATION PROCESS AT ANY TIME BY
PRESSING THE START/STOP BUTTON.
Select the desired user, 1 or 2,
before measurement.The user icon
displayed represents the memory bank where
the measurement result will be stored. When
the monitor is OFF, press and release the SET
button to toggle between user 1 or 2.

14 • ENGLISH
TAKING YOUR BLOOD PRESSURE READING
4. When the measurement is complete, your blood
pressure measurement and pulse reading results will
show on the display screen at the same time, Fig 3.
5. The Hypertension Indicator will indicate your reading
range on the display, Fig 4. See page 16 for information
regarding interpreting the Hypertension Indicator
results.
6. If an irregular heartbeat was detected during the
reading, the Irregular Heartbeat Detector indicator will
appear on the display, Fig 4.
See page 15 for more information on the Irregular
Heartbeat Detector feature.
7. The reading will automatically be stored in memory, up
to 60 readings.
8. Select START/STOP to turn the unit o and conserve
energy and battery life. The unit will automatically shut-
o.
Fig. 3
Excessive Movement
This monitor detects excessive movement during measurement. This icon appears
when the monitor and wrist have moved or shaken during the reading. Though the
screen will still register and display the measurement results, the results may be
compromised and it is recommended that a new measurement be taken.
Fig. 4

ENGLISH • 15
Irregular Heartbeat Detector
An irregular heartbeat is dened as a heartbeat rhythm that is more than 25% slower or
25% faster than the average measurement detected while the monitor is conducting the
measurement. When this device detects an irregular rhythm two or more times during the
reading, the IHB symbol will appear on the display screen.
This monitor will operate if the icon appears, but the results may be compromised, especially
if this symbol appears often. Please consult with your physician or trained healthcare
professional for further information regarding an irregular heartbeat and if this symbol
appears frequently.
INTERPRETING YOUR BLOOD PRESSURE
READING
Pulse
Pulse
Irregular Heartbeat
Normal Heartbeat
Blood
Pressure
Blood
Pressure
Short
Beat
Long
Beat

16 • ENGLISH
INTERPRETING YOUR BLOOD PRESSURE
READING
Hypertension Indicator
This unit features our unique Hypertension Indicator.
The color bars on the left side of the monitor display
correspond with an icon on the digital display, indicating
where the measurement results fall within the American
Heart Association standards.
The American Heart Association has established globally
accepted standards for the assessment of high or low
blood pressure readings. The below chart should be
considered only as a guideline, always consult with
your physician or health care professional to interpret
your individual results. Never adjust your medication(s)
dosage, or severely alter your diet or exercise routine
without consulting with your physician.
Bar Color Category Systolic (mmHg) Diastolic (mmHg)
Green Normal <120 and <80
Green Prehypertension 120-139 or 80-89
Yellow High Blood Pressure, 140-159 or 90-99
Stage 1 Hypertension
Orange High Blood Pressure, 160 or higher or 100 or higher
Stage 2 Hypertension
Red Hypertensive Crisis >180 or >110

ENGLISH • 17
MEMORY FUNCTIONS
Recalling Measurements in Memory
Fig. 1
Select the desired user to review, 1 or 2.
The user icon displayed represents the memory bank
where the measurement result will be stored. When the
monitor is OFF, press and release the SET button to toggle
between user 1 or 2.
This monitor stores and recalls up to 60 readings in per user.
These measurements can be shared with your physician or
trained healthcare professional.
1. Press and release the MEM button. The unit will rst
display the average of the last three measurements, Fig 1.
2. Press the MEM button again to begin scrolling through the
saved measurements. Measurements will appear on the
display from most current to oldest; the memory number
will appear on the lower left corner.
3. All results for a given measurement will display, including
measurement results, pulse rate, Hypertension Indicator
and Irregular Heartbeat alert (if applicable). The date/time
stamp will cycle on the lower left—memory number, time,
date, repeat, Fig 2.
4. When the number of readings exceeds 60 , the oldest data
will be replaced with the new record.
5. Press START/STOP to turn the monitor o at any time
during review of the stored measurements. Fig. 2

18 • ENGLISH
MEMORY FUNCTIONS
Clearing Measurements From Memory
To delete all measurements from either memory bank, follow
these steps:
1. When the monitor is o, press and release the MEM
button to access the memory bank feature.
2. Press and hold the MEM button for 3–4 seconds; the
display will ash‘dEL ALL’, Fig 1.
3. Press SET to conrm; the display will briey ash ‘dEL
dONE’and turn o, Fig 2.
If you do not wish to delete the measurement records, press
the START/STOP button at any time to exit the ‘Clearing
Measurement’mode.
Fig. 1
Fig. 2

ENGLISH • 19
CARE AND MAINTENANCE
Proper care and maintenance of your blood pressure monitor will help ensure long life for the
product; improper use of the monitor may void the included warranty.
Monitor Care and Maintenance
•Do not use any liquids on the monitor; use a soft, dry cloth to clean the monitor as
needed
•Storage outside of stated storage temperature may result in measurement error or device
malfunction; storage environment temperature is: -4°F – 140°F (-20°C – 60°C); Humidity:
10% to 93%RH (non-condensing)
•Remove the batteries if the unit will not be used for an extended period of time
•Do not attempt to disassemble your monitor; disassembling your monitor may void the
manufacturers warranty
•Do not subject the monitor to strong shocks; take care not to drop the monitor
•No component of this device can be maintained by the user; the circuit diagrams,
component part lists, descriptions, calibration instruction or other information which
will assist the user’s appropriately qualied technical personnel to repair those parts of
equipment which are designated repairable can be supplied
Cu Care and Maintenance
•The cu should not be submerged or washed in a washing machine, but may be spot
cleaned with a mild-detergent as needed
•Never attempt to iron or dry the cu; if the cu becomes wet, allow the cu to air dry
completely before use or storage
•To disinfect the cu, wipe the inside (skin contact side) of the cu using a cloth lightly
moistened with 70% - 90% ethyl rubbing alcohol and allow to air dry; it is suggested to
disinfect the cu frequently when used in clinical sittings or if the cu is contaminated in
any way.

20 • ENGLISH
DEVICE & LABEL SYMBOLS
These symbols may appear on your device, instructions or packaging and may vary by make
and model.
Read This Manual—All included manuals should be read prior to rst use
Warning—Symbol indicates a warning, prohibition or mandatory action that
mitigates a risk that is not necessarily obvious to the device operator
Type B Applied Parts—Indicates that a part of this unit comes in contact with the
patient in order to carry out it’s intended function
Environment Protection—dispose of this product properly; consult with your local
recycling ordinances for proper recycling and disposal
Keep Dry—This device should be kept dry; never submerge the unit or cu.
Consult with the Care and Maintenance section of this manual for information on
cleaning your monitor
Symbol Meaning
2012
2012
Table of contents
Languages:
Other Veridian Blood Pressure Monitor manuals