Vermop JETVAC SD 12 User manual

JETVAC SD 12
Deutsch 5
English 8
Français 11
Italiano 14
Nederlands17
Español 20
Português 23
Dansk 26
Norsk29
Svenska32
Suomi35
Ελληνικά 38
Türkçe 41
Русский 44
Magyar 48
Čeština 51
Slovenščina 54
Polski 57
Româneşte 60
Slovenčina 63
Hrvatski 66
Srpski 69
Български 72
Eesti 75
Latviešu 78
Lietuviškai 81
Українська 84
1761200, 05/22

3
1
2
6
7
8
102
16
22
23
25
9
5
24
21
12
+
11
20
17
18
18
19
1314
15
4
A

1
3
2
5
4
6
1
2
“Click”
7
B

T20
1.
2.
C
T20
4.
3.
D

Deutsch 5
Inhalt
Allgemeine Hinweise
Lesen Sie vor der ersten Benutzung des
Geräts diese Originalbetriebsanleitung
und die beiliegenden Sicherheitshinwei-
se. Handeln Sie danach.
Bewahren Sie beide Hefte für späteren Gebrauch oder
für Nachbesitzer auf.
●Bei Nichtbeachtung der Betriebsanleitung und der
Sicherheitshinweise können Schäden am Gerät und
Gefahren für den Bediener und andere Personen
entstehen.
●Bei Transportschaden sofort Händler informieren.
●Prüfen Sie beim Auspacken den Packungsinhalt auf
fehlendes Zubehör oder Beschädigungen.
Umweltschutz
Die Verpackungsmaterialien sind recyclebar. Bit-
te Verpackungen umweltgerecht entsorgen.
Elektrische und elektronische Geräte enthalten
wertvolle recyclebare Materialien und oft Be-
standteile wie Batterien, Akkus oder Öl, die bei
falschem Umgang oder falscher Entsorgung eine
potentielle Gefahr für die menschliche Gesundheit und
die Umwelt darstellen können. Für den ordnungsgemä-
ßen Betrieb des Geräts sind diese Bestandteile jedoch
notwendig. Mit diesem Symbol gekennzeichnete Gerä-
te dürfen nicht mit dem Hausmüll entsorgt werden.
Bestimmungsgemäße Verwendung
몇WARNUNG
Gesundheitsgefahr
Einatmen von gesundheitsschädlichen Stäuben
Das Gerät nicht für die Absaugung gesundheitsschädli-
cher Stäube verwenden.
ACHTUNG
Beschädigung des Geräts
Kurzschluss durch hohe Luftfeuchtigkeit
Das Gerät nur in Innenräumen verwenden und lagern.
●Dieser Universalsauger ist zur Trockenreinigung
von Boden- und Wandflächen bestimmt.
●Dieses Gerät ist für den gewerblichen Gebrauch ge-
eignet, z. B. in Hotels, Schulen, Krankenhäusern,
Fabriken, Läden, Büros und Vermietergeschäften.
Gerätebeschreibung
Abbildung A
1Vliesfiltertüte
2Saugstutzen
3Saugschlauch
4Typenschild
5Kabelhaken
6Tragegriff
7Netzkabel
8Saugkopf
9Verriegelung des Saugkopfs
10 Lenkrolle
11 Schmutzbehälter
12 Hauptschalter
13 Umschalter Hartfläche/Teppichboden
14 Bodendüse
15 Verstellung Teleskopsaugrohr
16 Teleskopsaugrohr
17 Aufnahme für Bodendüse
18 Verriegelung der Abdeckung
19 Abdeckung
20 Filtergehäuse
21 Abluftfilter
22 Saugkraftregler (stufenlos)
23 Krümmer
24 Hauptfilterkorb
25 Motorschutzfilter
Farbkennzeichnung
●Bedienelemente für den Reinigungsprozess sind
gelb.
●Bedienelemente für die Wartung und den Service
sind hellgrau.
Vorbereitung
1. Gerät auspacken und Zubehör montieren.
Abbildung B
Inbetriebnahme
1. Kontrolle, ob Hauptfilterkorb im Gerät eingesetzt ist.
Betriebsarten
1 Betrieb mit Vliesfiltertüte oder Papierfiltertüte (Son-
derzubehör)
2 Betrieb ohne Filtertüte
Filtertüte einbauen
1. Saugkopf entriegeln und abnehmen.
2. Hauptfilterkorb entnehmen.
3. Vliesfiltertüte oder Papierfiltertüte (Sonderzubehör)
aufstecken.
4. Hauptfilterkorb einsetzen.
5. Saugkopf aufsetzen und verriegeln.
Allgemeine Hinweise ........................................... 5
Umweltschutz ...................................................... 5
Bestimmungsgemäße Verwendung .................... 5
Gerätebeschreibung............................................ 5
Vorbereitung ........................................................ 5
Inbetriebnahme ................................................... 5
Bedienung ........................................................... 6
Transport ............................................................. 6
Lagerung ............................................................. 6
Pflege und Wartung............................................. 6
Hilfe bei Störungen.............................................. 6
Garantie............................................................... 6
Zubehör und Ersatzteile ...................................... 7
EU-Konformitätserklärung ................................... 7
Technische Daten................................................ 7

6 Deutsch
Bedienung
Gerät einschalten
1. Netzstecker einstecken.
2. Gerät am Hauptschalter einschalten.
Saugkraft einstellen
1. Saugkraft am Saugkraftregler regulieren (stufenlos).
Reinigungsbetrieb
1. Umschalter der Bodendüse auf Hartfläche oder Tep-
pichboden stellen.
2. Reinigung durchführen.
Gerät ausschalten
1. Gerät am Hauptschalter ausschalten.
2. Netzstecker ziehen.
Nach jedem Betrieb
1. Behälter entleeren.
2. Gerät innen und außen durch Absaugen und Abwi-
schen mit einem feuchten Tuch reinigen.
Transport
몇VORSICHT
Nichtbeachtung des Gewichts
Verletzungs- und Beschädigungsgefahr
Beachten Sie beim Transport das Gewicht des Geräts.
1. Gerät beim Transport in Fahrzeugen nach den je-
weils geltenden Richtlinien gegen Rutschen und
Kippen sichern.
Lagerung
몇VORSICHT
Nichtbeachtung des Gewichts
Verletzungs- und Beschädigungsgefahr
Beachten Sie bei der Lagerung das Gewicht des Ge-
räts.
Das Gerät darf nur in Innenräumen gelagert werden.
Pflege und Wartung
GEFAHR
Gefahr eines Stromschlags
Verletzungen durch Berühren von stromführenden Tei-
len
Schalten Sie das Gerät aus.
Ziehen Sie den Netzstecker.
Hauptfilterkorb reinigen
ACHTUNG
Gefahr durch nassen Hauptfilterkorb
Beschädigungsgefahr des Geräts
Setzen Sie den Hauptfilterkorb nie nass ein.
1. Hauptfilterkorb (auswaschbar) bei Bedarf unter flie-
ßendem Wasser reinigen.
Abluftfilter austauschen
Abluftfilter: 1x jährlich wechseln
1. Abdeckung entriegeln und abnehmen.
2. Filtergehäuse herausnehmen.
3. Abluftfilter aus Filtergehäuse herausnehmen.
4. Neuen Abluftfilter in Filtergehäuse einsetzen.
5. Filtergehäuse einsetzen.
6. Abdeckung anbringen und verriegeln.
Motorschutzfilter austauschen
1. Saugkopf entriegeln und abnehmen.
2. Motorschutzfilter entnehmen.
3. Neuen Motorschutzfilter einsetzen.
4. Saugkopf aufsetzen und verriegeln.
Netzkabel austauschen
1. Netzkabel austauschen.
Abbildung C
Abbildung D
Hilfe bei Störungen
GEFAHR
Gefahr eines Stromschlags
Verletzungen durch Berühren von stromführenden Tei-
len
Schalten Sie das Gerät aus.
Ziehen Sie den Netzstecker.
Gerät schaltet während des Betriebs ab
Motor-Thermoprotektor hat angesprochen
1. Vliesfiltertüte oder Papierfiltertüte (Sonderzubehör)
wechseln.
2. Motorschutzfilter austauschen.
3. Abluftfilter austauschen.
4. Alle Teile auf Verstopfungen kontrollieren.
5. Motorturbine ca. 30-40 Minuten abkühlen lassen.
Gerät wieder einschalten.
Saugturbine läuft nicht
1. Steckdose und Sicherung der Stromversorgung prü-
fen.
2. Netzkabel und Netzstecker des Geräts prüfen.
3. Gerät einschalten.
Saugkraft lässt nach
1. Verstopfungen aus Saugdüse, Saugrohr oder Saug-
schlauch entfernen.
2. Vliesfiltertüte oder Papierfiltertüte (Sonderzubehör)
wechseln.
3. Hauptfilterkorb unter fließendem Wasser reinigen
und trocknen.
4. Saugkopf richtig aufsetzen/verriegeln.
5. Defekten Saugschlauch austauschen.
6. Motorschutzfilter austauschen.
Staubaustritt beim Saugen
1. Vliesfiltertüte oder Papierfiltertüte (Sonderzubehör)
wechseln.
2. Sitz der Vliesfiltertüte oder Papierfiltertüte (Sonder-
zubehör) kontrollieren.
3. Saugkopf richtig aufsetzen/verriegeln.
4. Unbeschädigten Hauptfilterkorb einsetzen.
5. Motorschutzfilter richtig einsetzen.
Kundendienst
Kann die Störung nicht behoben werden, muss das Ge-
rät vom Kundendienst überprüft werden.
Garantie
In jedem Land gelten die von unserer zuständigen Ver-
triebsgesellschaft herausgegebenen Garantiebedin-
gungen. Etwaige Störungen an Ihrem Gerät beseitigen
wir innerhalb der Garantiefrist kostenlos, sofern ein Ma-
terial- oder Herstellungsfehler die Ursache sein sollte.
Im Garantiefall wenden Sie sich bitte mit Kaufbeleg an
Ihren Händler oder die nächste autorisierte Kunden-
dienststelle.
(Adresse siehe Rückseite)

Deutsch 7
Zubehör und Ersatzteile
Nur Original-Zubehör und Original-Ersatzteile verwen-
den, sie bieten die Gewähr für einen sicheren und stö-
rungsfreien Betrieb des Geräts.
Informationen über Zubehör und Ersatzteile finden Sie
unter www.vermop.com.
EU-Konformitätserklärung
Hiermit erklären wir, dass die nachfolgend bezeichnete
Maschine aufgrund ihrer Konzipierung und Bauart so-
wie in der von uns in Verkehr gebrachten Ausführung
den einschlägigen grundlegenden Sicherheits- und Ge-
sundheitsanforderungen der EU-Richtlinien entspricht.
Bei einer nicht mit uns abgestimmten Änderung der Ma-
schine verliert diese Erklärung ihre Gültigkeit.
Produkt: Trockensauger
Typ: VERMOP JETVAC SD 12
Einschlägige EU-Richtlinien
2006/42/EG (+2009/127/EG)
2009/125/EG
2011/65/EU
2014/30/EU
Angewandte harmonisierte Normen
EN IEC 63000: 2018
EN 55014-1: 2017 + A11: 2020
EN 55014-2: 2015
EN 60312-1: 2017
EN 60335-1
EN 60335-2-69
EN 61000-3-2: 2014
EN 61000-3-3: 2013
EN 62233: 2008
Angewandte nationale Normen
-
Angewandte Verordnung(en)
666/2013
Die Unterzeichnenden handeln im Auftrag und mit Voll-
macht der Geschäftsführung.
VERMOP Salmon GmbH
Zeppelinstraße 24
D - 82205 Gilching
Gilching, 2022/02/01
Technische Daten
Technische Änderungen vorbehalten.
Robert Auer
Managing Director
Dr. Konstantin
Kernschmidt
Head of Research &
Development
JETVAC
SD 12
Elektrischer Anschluss
Netzspannung V 220-240
Phase ~ 1
Netzfrequenz Hz 50-60
Schutzklasse II
Nennleistungsaufnahme W 700
Leistungsdaten Gerät
Behälterinhalt l 12
Luftmenge (max.) l/s 43
Unterdruck (max.) kPa
(mbar)
22,0
(220)
Maße und Gewichte
Länge x Breite x Höhe mm 410 x
315 x
340
Typisches Betriebsgewicht kg 6,4
Durchmesser Saugschlauch mm 35
Umgebungsbedingungen
Umgebungstemperatur (max.) °C +40
Ermittelte Werte gemäß EN 60335-2-69
Schalldruckpegel LpA dB(A) 60
Unsicherheit KpA dB(A) 2
Schallleistungspegel LwA dB(A) 72
Hand-Arm-Vibrationswert m/s2<2,5
Unsicherheit K m/s20,2
Netzkabel
Typ Netzkabel mm2H05VV-
F 2x1,0
Teilenummer (EU) 176 12
76
Kabellänge m 12

8English
Contents
General notes
Read these original instructions and the
enclosed safety instructions before us-
ing the device for the first time. Act in ac-
cordance with them.
Keep both books for future reference or for future own-
ers.
●If the operating instructions and safety instructions
are not observed, the device can be damaged and
dangers could arise for users and other persons.
●Notify the dealer immediately in the case of shipping
damage.
●Check the package contents when unpacking for
missing accessories or for damage.
Environmental protection
The packing materials can be recycled. Please
dispose of packaging in accordance with the en-
vironmental regulations.
Electrical and electronic appliances contain valu-
able, recyclable materials and often components
such as batteries, rechargeable batteries or oil,
which - if handled or disposed of incorrectly - can
pose a potential threat to human health and the environ-
ment. However, these components are required for the
correct operation of the appliance. Appliances marked
by this symbol are not allowed to be disposed of togeth-
er with the household rubbish.
Intended use
몇WARNING
Health risk
Inhalation of dusts that are harmful to health
Do not use the device for vacuuming up dusts that are
harmful to health.
ATTENTION
Damage to the device
Short-circuit due to high levels of humidity
Only use and store the device indoors.
●This universal vacuum cleaner for carpets is intend-
ed for dry cleaning floor and wall surfaces.
●This device is suitable for commercial use, e.g. in
hotels, schools, hospitals, factories, shops, offices,
and rental companies.
Description of the device
Illustration A
1Fleece filter bag
2Suction hose port
3Suction hose
4Type plate
5Cable hooks
6Carrying handle
7Mains cable
8Suction head
9Suction head lock
10 Steering roller
11 Dirt receptacle
12 Main switch
13 Hard surface/carpet switch
14 Floor nozzle
15 Telescopic suction pipe adjustment
16 Telescopic suction pipe
17 Mount for floor nozzle
18 Cover lock
19 Cover
20 Filter casing
21 Exhaust filter
22 Suction control (variable)
23 Angle piece
24 Main filter basket
25 Motor protection filter
Colour coding
●Control elements for the cleaning process are yel-
low.
●Control elements for maintenance and servicing are
light grey.
Preparation
1. Unpack the device and install the accessories.
Illustration B
Initial startup
1. Check if the main filter basket is inserted in the de-
vice.
Operating modes
1 Operation with the fleece filter bag or paper filter bag
(special accessories)
2 Operation without the filter bag
Installing the filter bag
1. Unlock and remove the suction head.
2. Remove the main filter basket.
3. Connect the fleece filter bag or paper filter bag (spe-
cial accessories).
4. Insert the main filter basket.
5. Fit and lock the suction head.
General notes...................................................... 8
Environmental protection..................................... 8
Intended use........................................................ 8
Description of the device ..................................... 8
Preparation.......................................................... 8
Initial startup ........................................................ 8
Operation............................................................. 9
Transport ............................................................. 9
Storage................................................................ 9
Care and service ................................................. 9
Troubleshooting guide......................................... 9
Warranty .............................................................. 9
Accessories and spare parts ............................... 10
Declaration of Conformity.................................... 10
Technical data ..................................................... 11

English 9
Operation
Switching on the device
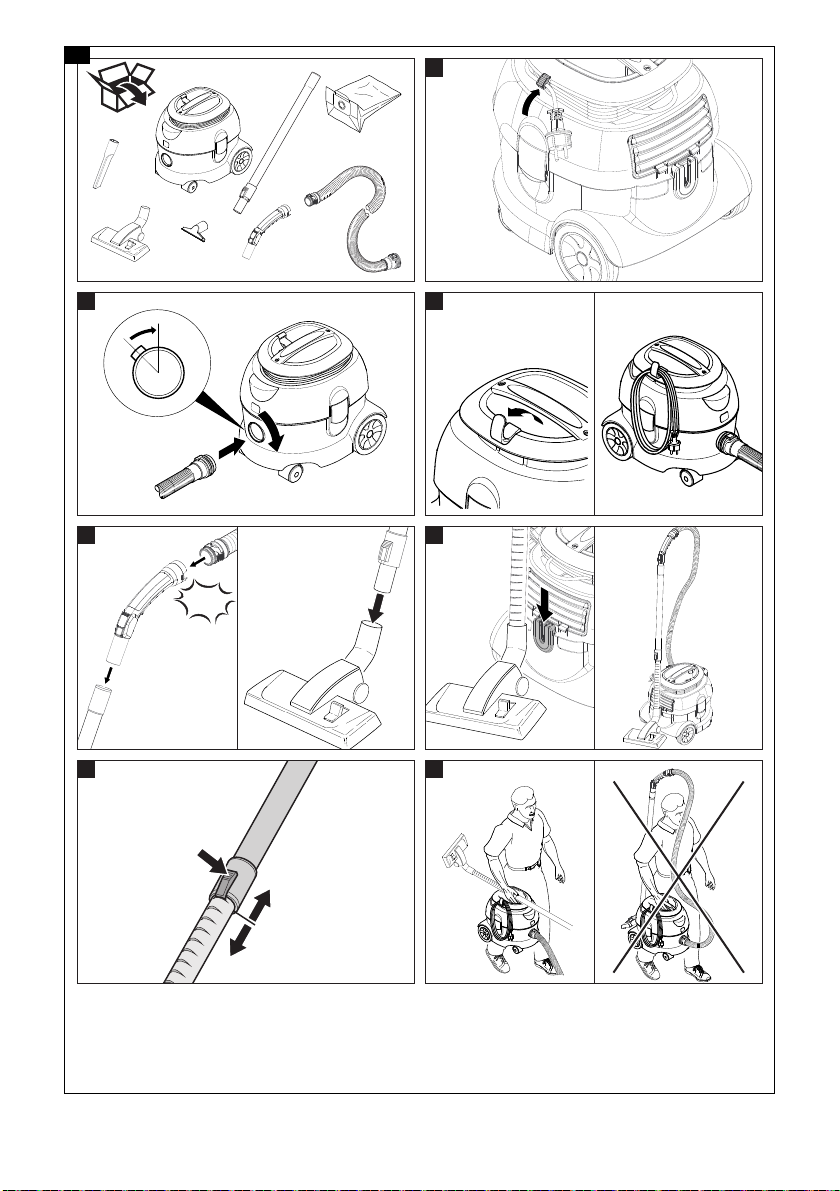
1. Connect the mains plug.
2. Switch on the device at the main switch.
Adjusting the suction power
1. Regulate the suction power on the suction control
(variable).
Cleaning mode
1. Set the floor nozzle switch to hard surface or carpet.
2. Perform cleaning.
Switching off the device
1. Switch off the device at the main switch.
2. Pull out the mains plug.
Each time after use
1. Empty the container.
2. Vacuum off the inside and outside of the device and
clean with a moist cloth.
Transport
몇CAUTION
Failure to observe the weight
Risk of injury and damage
Be aware of the weight of the device during transporta-
tion.
1. When transporting the device in vehicles, secure it
to prevent it from slipping or overturning in accord-
ance with the respective valid guidelines.
Storage
몇CAUTION
Failure to observe the weight
Risk of injury and damage
Be aware of the weight of the device during storage.
The device may only be operated indoors.
Care and service
DANGER
Danger of electric shock
Injuries due to touching live parts
Switch off the device.
Remove the mains plug.
Cleaning the main filter basket
ATTENTION
Danger from wet main filter basket
Risk of damage to the device
Never insert the main filter basket when wet.
1. If necessary, clean the main filter basket (washable)
under running water.
Replacing the exhaust filter
Exhaust filter: Change once a year
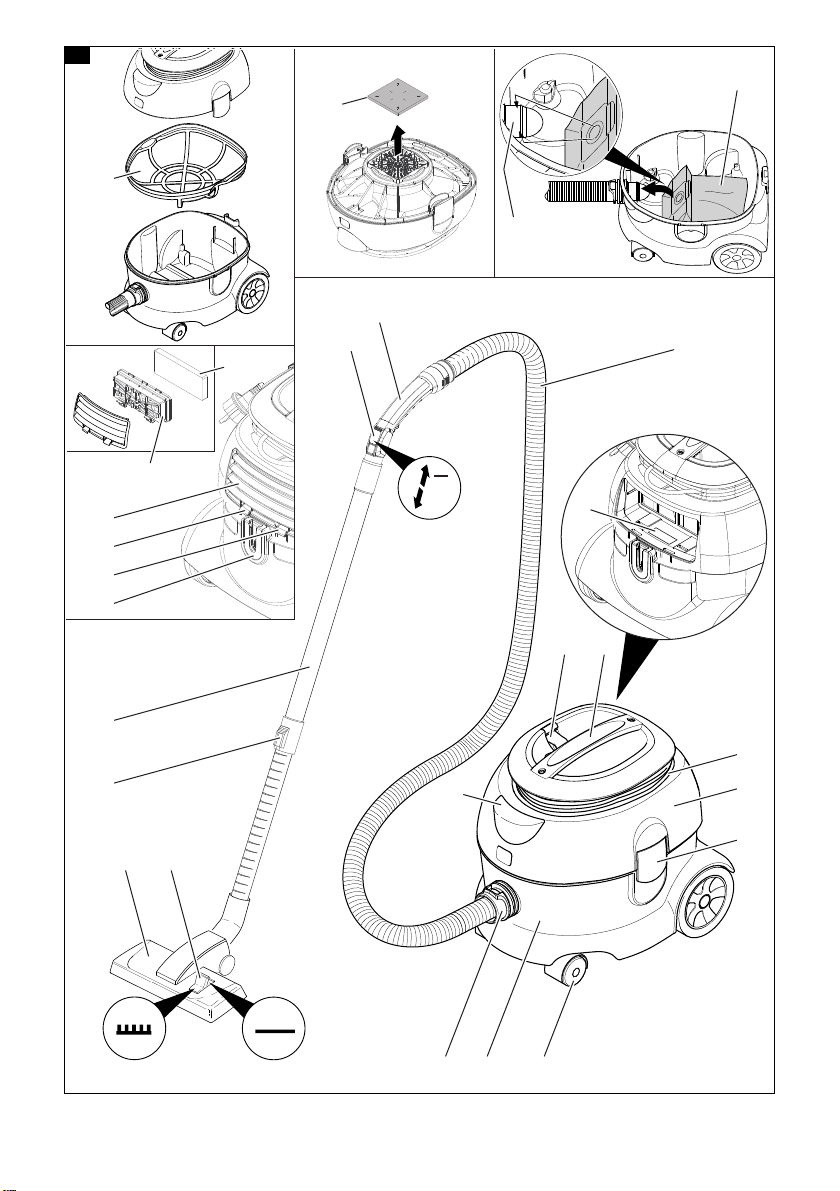
1. Unlock and remove the cover.
2. Remove the filter casing.
3. Remove the exhaust filter from the filter casing.
4. Insert a new exhaust filter in the filter casing.
5. Insert the filter casing.
6. Install and lock the cover.
Replacing the motor protection filter
1. Unlock and remove the suction head.
2. Remove the motor protection filter.
3. Fit the new motor protection filter.
4. Fit and lock the suction head.
Replacing the mains cable
1. Replace the mains cable.
Illustration C
Illustration D
Troubleshooting guide
DANGER
Danger of electric shock
Injuries due to touching live parts
Switch off the device.
Remove the mains plug.
The device stops during operation
The motor thermo-protector has triggered
1. Change the fleece filter bag or paper filter bag (spe-
cial accessories).
2. Replace the motor protection filter.
3. Replace the exhaust filter.
4. Check all parts for clogging.
5. Allow the engine turbine to cool for approx. 30-40
minutes. Switch on the device.
Suction turbine does not start up
1. Check the socket and the power supply fuse.
2. Check the mains cable and the mains plug of the de-
vice.
3. Switch on the device.
Suction power decreases
1. Remove any blockages from the suction nozzle,
suction pipe or suction hose.
2. Change the fleece filter bag or paper filter bag (spe-
cial accessories).
3. Clean the main filter basket under running water and
dry.
4. Position/lock the suction head correctly.
5. Replace the defective suction hose.
6. Replace the motor protection filter.
Escaping dust when vacuuming
1. Change the fleece filter bag or paper filter bag (spe-
cial accessories).
2. Check the fleece filter bag or paper filter bag (spe-
cial accessories) is fitted correctly.
3. Position/lock the suction head correctly.
4. Insert the undamaged main filter basket.
5. Insert the motor protection filter correctly.
Customer Service department
If the malfunction cannot be corrected, the device must
be checked by the Customer Service department.
Warranty
The warranty conditions issued by our relevant sales
company apply in all countries. We shall remedy possi-
ble malfunctions on your appliance within the warranty
period free of cost, provided that a material or manufac-
turing defect is the cause. In a warranty case, please
contact your dealer (with the purchase receipt) or the
next authorised customer service site.
(See overleaf for the address)

10 English
Accessories and spare parts
Only use original accessories and original spare parts.
They ensure that the appliance will run safely and fault-
free.
Information on accessories and spare parts can be
found at www.vermop.com.
Declaration of Conformity
We hereby declare that the machine described below
complies with the relevant basic safety and health re-
quirements in the EU Directives, both in its basic design
and construction as well as in the version placed in cir-
culation by us. This declaration is invalidated by any
changes made to the machine that are not approved by
us.
Product: Dry vacuum cleaner
Type: VERMOP JETVAC SD 12
Currently applicable EU Directives
2006/42/EC (+2009/127/EC)
2009/125/EC
2011/65/EU
2014/30/EU
Harmonised standards used
EN IEC 63000: 2018
EN 55014-1: 2017 + A11: 2020
EN 55014-2: 2015
EN 60312-1: 2017
EN 60335-1
EN 60335-2-69
EN 61000-3-2: 2014
EN 61000-3-3: 2013
EN 62233: 2008
National standards used
-
Commission Regulation(s)
666/2013
The signatories act on behalf of and with the authority of
the company management.
VERMOP Salmon GmbH
Zeppelinstraße 24
82205 Gilching, Germany
Gilching, 2022/02/01
We hereby declare that the product described below
complies with the relevant provisions of the following
UK Regulations, both in its basic design and construc-
tion as well as in the version put into circulation by us.
This declaration shall cease to be valid if the product is
modified without our prior approval.
Product: Dry vacuum cleaner
Type: VERMOP JETVAC SD 12
Currently applicable UK Regulations
S.I. 2008/1597 (as amended)
S.I. 2010/2617 (as amended)
S.I. 2012/3032 (as amended)
S.I. 2016/1091 (as amended)
Designated standards used
EN IEC 63000: 2018
EN 55014-1: 2017 + A11: 2020
EN 55014-2: 2015
EN 60312-1: 2017
EN 60335-1
EN 60335-2-69
EN 61000-3-2: 2014
EN 61000-3-3: 2013
EN 62233: 2008
National standards used
-
Commission Regulation(s)
(EU) No 666/2013
The signatories act on behalf of and with the authority of
the company management.
VERMOP Salmon GmbH
Zeppelinstraße 24
82205 Gilching, Germany
Gilching, 2022/02/01
EU Declaration of Conformity
Robert Auer
Managing Director
Dr Konstantin
Kernschmidt
Head of Research &
Development
Declaration of Conformity (UK)
Robert Auer
Managing Director
Dr Konstantin
Kernschmidt
Head of Research &
Development

Français 11
Technical data
Subject to technical modifications.
Contenu
Remarques générales
Veuillez lire le présent le manuel d'ins-
tructions original et les consignes de sé-
curité jointes avant la première
utilisation de l'appareil. Suivez ces instructions.
Conservez les deux manuels pour une utilisation ulté-
rieure ou pour le propriétaire suivant.
●Le non-respect du manuel d'utilisation et des
consignes de sécurité peut entraîner des dom-
mages sur l’appareil et des dangers pour l’opérateur
et d’autres personnes.
●Informer immédiatement le vendeur en cas de dom-
mage dû au transport.
●Vérifiez le contenu de l'emballage lors du déballage,
qu’il ne manque pas d’accessoires et qu’il n’y a pas
de dommage.
Protection de l'environnement
Les matériaux d'emballage sont recyclables.
Veuillez éliminer les emballages dans le respect
de l’environnement.
Les appareils électriques et électroniques
contiennent des matériaux précieux recyclables
et souvent des composants tels que des piles,
batteries ou de l’huile représentant un danger po-
tentiel pour la santé humaine et l'environnement, s'ils ne
sont pas manipulés ou éliminés correctement. Ces
composants sont cependant nécessaires pour le fonc-
tionnement correct de l'appareil. Les appareils marqués
par ce symbole ne doivent pas être jetés dans les or-
dures ménagères.
Utilisation conforme
몇AVERTISSEMENT
Risque pour la santé
Inhalation de poussières nocives
Ne pas utiliser l’appareil pour l’aspiration de poussières
nocives.
ATTENTION
Endommagement de l’appareil
Court-circuit dû à une humidité de l'air élevée
Utiliser et stocker l'appareil uniquement en intérieur.
●Cet aspirateur universel est conçu pour le nettoyage
à sec de surfaces de sols et murales.
●Cet appareil est adapté à une utilisation profession-
nelle, p. ex. dans les hôtels, écoles, hôpitaux,
usines, magasins, bureaux et loueurs.
JETVAC
SD 12
Electrical connection
Mains voltage V 220-240
Phase ~ 1
Power frequency Hz 50-60
Protection class II
Rated power input W 700
Device performance data
Tank content l 12
Air quantity (max.) l/s 43
Vacuum (max.) kPa
(mbar)
22,0
(220)
Dimensions and weights
Length x width x height mm 410 x
315 x
340
Typical operating weight kg 6,4
Diameter of the suction hose mm 35
Ambient conditions
Ambient temperature (max.) °C +40
Determined values in acc. with EN 60335-2-69
Sound pressure level LpA dB(A) 60
Uncertainty KpA dB(A) 2
Sound power level LwA dB(A) 72
Hand-arm vibration value m/s2<2,5
Uncertainty K m/s20,2
Mains cable
Power cord type mm2H05VV-
F 2x1,0
Part number (EU) 176 12
76
Cable length m 12
Remarques générales......................................... 11
Protection de l'environnement............................. 11
Utilisation conforme............................................. 11
Description de l'appareil...................................... 12
Préparation.......................................................... 12
Mise en service ................................................... 12
Commande.......................................................... 12
Transport ............................................................. 12
Stockage ............................................................. 12
Entretien et maintenance .................................... 12
Dépannage en cas de défaut.............................. 13
Garantie .............................................................. 13
Accessoires et pièces de rechange .................... 13
Déclaration de conformité UE ............................. 13
Caractéristiques techniques................................ 14

12 Français
Description de l'appareil
Illustration A
1Sac du filtre en feutre
2Tubulure d'aspiration
3Tuyau d'aspiration
4Plaque signalétique
5Crochet de câble
6Poignée de transport
7Câble secteur
8Tête d’aspiration
9Verrouillage de la tête d'aspiration
10 Roue directionnelle
11 Collecteur d'impuretés
12 Interrupteur principal
13 Commutateur Surface dure/Moquette
14 Buse pour sol
15 Réglage du tube d’aspiration télescopique
16 Tube télescopique d’aspiration
17 Logement pour buse de sol
18 Verrouiller la couverture
19 Cache
20 Corps de filtre
21 Filtre pour l'air vicié
22 Régulateur d'aspiration (stepless)
23 Coude
24 Panier de filtre principal
25 Filtre de protection moteur
Code couleur
●Les éléments de commande pour le processus de
nettoyage sont jaunes.
●Les éléments de commande pour la maintenance et
le service sont gris clair.
Préparation
1. Déballez l'appareil et assemblez les accessoires.
Illustration B
Mise en service
1. Vérifiez si le panier de filtre principal est inséré dans
l'appareil.
Modes
1 Fonctionnement avec sac filtrant en non tissé ou
sac filtrant en papier (accessoires spéciaux)
2 Opération sans sac filtrant
Monter le sac aspirateur
1. Déverrouiller et retirer la tête d'aspiration.
2. Retirez le panier de filtre principal.
3. Fixez un sac filtrant non tissé ou un sac filtrant en
papier (facultatif).
4. Insérer le panier de filtre principal.
5. Monter et verrouiller la tête d'aspiration.
Commande
Démarrer l'appareil
1. Brancher la fiche secteur.
2. Mettre l’appareil en marche à l’interrupteur principal.
Ajuster la puissance d'aspiration
1. Régler la force d'aspiration sur le régulateur d'aspi-
ration (variable à l'infini).
Opération de nettoyage
1. Réglez l’interrupteur de la buse de sol sur une sur-
face dure ou un tapis.
2. Réaliser le nettoyage.
Mise hors tension de l'appareil
1. Eteindre l'appareil à l'interrupteur principal.
2. Débrancher la fiche secteur.
Après chaque fonctionnement
1. Vider le réservoir.
2. Aspirer l'appareil, à l'intérieur et à l'extérieur, et le
nettoyer à l'aide d'un chiffon humide.
Transport
몇PRÉCAUTION
Non-observation du poids
Risque de blessure et d'endommagement
Observer le poids de l’appareil pour le transport.
1. En cas de transport de l’appareil dans des véhi-
cules, le bloquer contre le glissement et le bascule-
ment suivant les normes en vigueur.
Stockage
몇PRÉCAUTION
Non-observation du poids
Risque de blessure et d'endommagement
Tenir compte du poids de l’appareil pour le stockage.
L'appareil ne peut être exploité qu'en espace intérieur.
Entretien et maintenance
DANGER
Risque d'électrocution
Blessures dues au contact avec des pièces sous ten-
sion
Mettre l’appareil hors tension.
Débrancher la fiche secteur.
Nettoyer le panier principal
ATTENTION
Danger dû au panier de filtre principal humide
Risque d'endommager l'appareil
Ne jamais mouiller le panier de filtre principal.
1. Si nécessaire, nettoyez le panier-filtre principal (la-
vable) à l'eau courante.
Remplacement du filtre pour l'air vicié
Filtre pour l'air vicié: Changer 1x par an
1. Déverrouiller et retirer le cache.
2. Retirez le boîtier du filtre.
3. Sortir le filtre pour l'air vicié du corps de filtre.
4. Insérer le nouveau filtre pour l'air vicié dans le corps
de filtre.
5. Insérer le boîtier du filtre.
6. Installer le couvercle et verrouiller.

Français 13
Remplacement du filtre de protection moteur
1. Déverrouiller et retirer la tête d'aspiration.
2. Retirez le filtre de protection du moteur.
3. Mettre un filtre de protection du moteur neuf en
place.
4. Monter et verrouiller la tête d'aspiration.
Remplacez le cordon d'alimentation
1. Remplacez le cordon d'alimentation.
Illustration C
Illustration D
Dépannage en cas de défaut
DANGER
Risque d'électrocution
Blessures dues au contact avec des pièces sous ten-
sion
Mettre l’appareil hors tension.
Débrancher la fiche secteur.
L'appareil s'arrête pendant le fonctionnement
Le thermoprotecteur moteur a répondu
1. Changer le sac filtrant en tissu non tissé ou le sac fil-
trant en papier (accessoire spécial).
2. Remplacer le filtre de protection moteur.
3. Remplacer le filtre pour l'air vicié.
4. Contrôler l'absence de colmatage sur toutes les
pièces.
5. Laissez la turbine du moteur refroidir pendant envi-
ron 30-40 minutes. Remettre l'appareil sous tension.
La turbine d'aspiration ne fonctionne pas
1. Contrôler la prise de courant et le fusible de l'alimen-
tation électrique.
2. Contrôler le câble d’alimentation électrique et la
fiche secteur de l'appareil.
3. Mettre l'appareil sous tension.
La puissance d'aspiration diminue
1. Enlever les obstructions de la buse d'aspiration, du
tube d'aspiration ou du tuyau d'aspiration.
2. Changer le sac filtrant en tissu non tissé ou le sac fil-
trant en papier (accessoire spécial).
3. Nettoyer le panier-filtre principal sous l'eau courante
et le sécher.
4. Placer/verrouiller la tête d'aspiration correctement.
5. Remplacez le flexible d'aspiration défectueux.
6. Remplacer le filtre de protection moteur.
Sortie de poussière lors de l’aspiration
1. Changer le sac filtrant en tissu non tissé ou le sac fil-
trant en papier (accessoire spécial).
2. Contrôler l'installation du sac filtrant en papier ou du
sac filtrant non tissé (accessoires spéciaux).
3. Placer/verrouiller la tête d'aspiration correctement.
4. Insérer le panier de filtre principal non endommagé.
5. Insérez le filtre de protection du moteur correcte-
ment.
Service après-vente
Si le défaut ne peut pas être éliminé, l’appareil doit être
contrôlé par le service après-vente.
Garantie
Les conditions de garantie publiées par notre société
commerciale compétente s'appliquent dans chaque
pays. Nous remédions gratuitement aux défauts pos-
sibles sur votre appareil dans la durée de garantie dans
la mesure où la cause du défaut est un vice de matériau
ou de fabrication. En cas de garantie, veuillez vous
adresser à votre distributeur ou au point de service
après-vente autorisé le plus proche avec la facture
d'achat.
(Voir l'adresse au dos)
Accessoires et pièces de rechange
Utilisez exclusivement des accessoires et pièces de re-
change d'origine. Ceux-ci garantissent le fonctionne-
ment sûr et sans défaut de votre appareil.
Des informations sur les accessoires et pièces de re-
change sont disponibles sur le site www.vermop.com.
Déclaration de conformité UE
Nous déclarons par la présente que la machine dési-
gnée ci-après ainsi que la version que nous avons mise
en circulation, est conforme, de par sa conception et
son type, aux exigences fondamentales de sécurité et
de santé en vigueur des normes UE. Toute modification
de la machine sans notre accord annule cette déclara-
tion.
Produit : Aspirateur de poussières
Type : VERMOP JETVAC SD 12
Normes UE en vigueur
2006/42/CE (+2009/127/CE)
2009/125/CE
2011/65/EU
2014/30/UE
Normes harmonisées appliquées
EN IEC 63000: 2018
EN 55014-1: 2017 + A11: 2020
EN 55014-2: 2015
EN 60312-1: 2017
EN 60335-1
EN 60335-2-69
EN 61000-3-2: 2014
EN 61000-3-3: 2013
EN 62233: 2008
Normes nationales appliquées
-
Ordonnance(s) appliquée(s)
666/2013
Les signataires agissent sous ordre et avec le pouvoir
de la direction de l'entreprise.
VERMOP Salmon GmbH
Zeppelinstraße 24
D - 82205 Gilching
Gilching, 2022/02/01
Robert Auer
Directeur général
Dr. Konstantin
Kernschmidt
Responsable de la Re-
cherche et
Développement

14 Italiano
Caractéristiques techniques
Sous réserve de modifications techniques.
Indice
Avvertenze generali
Prima di utilizzare l’apparecchio per la
prima volta, leggere le presenti istruzioni
per l’uso originali e le allegate avverten-
ze di sicurezza. Agire secondo quanto indicato nelle
istruzioni.
conservare entrambi i libretti per un uso futuro o per un
successivo proprietario.
●In caso di mancata osservanza del manuale d’uso e
delle avvertenze di sicurezza possono derivare dan-
ni all’apparecchio e pericoli per l’operatore e per al-
tre persone.
●Eventuali danni da trasporto vanno comunicati im-
mediatamente al rivenditore.
●Disimballare il contenuto della confezione e control-
lare l’eventuale mancanza di accessori o danni.
Tutela dell'ambiente
I materiali di imballaggio sono riciclabili. Smaltire
gli imballaggi nel rispetto dell’ambiente.
Gli apparecchi elettrici ed elettronici contengono
materiali riciclabili preziosi e, spesso, componenti
come batterie, accumulatori oppure olio che, se
usati o smaltiti non correttamente, possono costi-
tuire un potenziale pericolo per la salute umana e per
l'ambiente. Questi componenti sono tuttavia necessari
per un corretto funzionamento dell'apparecchio. Gli ap-
parecchi contrassegnati con questo simbolo non devo-
no essere smaltiti con i rifiuti domestici.
Impiego conforme alla destinazione
몇AVVERTIMENTO
Pericolo per la salute
Inalazione di polveri nocive
Non utilizzare l’apparecchio per l’aspirazione di polveri
dannose per la salute.
ATTENZIONE
Danneggiamento dell’apparecchio
In presenza di umidità d'aria elevata può verificarsi un
cortocircuito
Utilizzare e conservare l’apparecchio solo in ambienti
chiusi.
●Questo apparecchio universale è destinato alla pu-
lizia a secco di superfici a pavimento e a parete.
●Questo apparecchio è adatto all’utilizzo professio-
nale, ad esempio in hotel, scuole, ospedali, fabbri-
che, negozi, uffici e nel settore della locazione.
JETVAC
SD 12
Raccordement électrique
Tension du secteur V 220-240
Phase ~ 1
Fréquence du secteur Hz 50-60
Classe de protection II
Puissance nominale absorbée W 700
Caractéristiques de puissance de l’appareil
Contenu du réservoir l 12
Débit d’air (max.) l/s 43
Dépression (max.) kPa
(mbar)
22,0
(220)
Dimensions et poids
Longueur x largeur x hauteur mm 410 x
315 x
340
Poids opérationnel typique kg 6,4
Diamètre du tuyau d'aspiration mm 35
Conditions ambiantes
Température ambiante (max.) °C +40
Valeurs déterminées selon EN 60335-2-69
Niveau de pression acoustique
LpA
dB(A) 60
Incertitude KpA dB(A) 2
Niveau de puissance acoustique
LwA
dB(A) 72
Valeur de vibrations main-bras m/s2<2,5
Incertitude K m/s20,2
Câble d'alimentation
Type de câble secteur mm2H05VV-
F 2x1,0
Référence de pièce (EU) 176 12
76
Longueur de câble m 12
Avvertenze generali ............................................ 14
Tutela dell'ambiente ............................................ 14
Impiego conforme alla destinazione.................... 14
Descrizione dell’apparecchio .............................. 15
Preparazione....................................................... 15
Messa in funzione ............................................... 15
Uso...................................................................... 15
Trasporto ............................................................. 15
Stoccaggio .......................................................... 15
Cura e manutenzione.......................................... 15
Guida alla risoluzione dei guasti ......................... 16
Garanzia.............................................................. 16
Accessori e ricambi............................................. 16
Dichiarazione di conformità UE........................... 16
Dati tecnici........................................................... 17

Italiano 15
Descrizione dell’apparecchio
Figura A
1Sacchetto filtro in vello
2Raccordo di aspirazione
3Tubo flessibile di aspirazione
4Targhetta
5Gancio del cavo
6Maniglia di trasporto
7Cavo di alimentazione
8Testina aspirante
9Bloccaggio della testina aspirante
10 Ruota pivotante
11 Vano raccolta sporco
12 Interruttore principale
13 Commutatore superficie dura / moquette
14 Bocchetta per pavimenti
15 Regolazione tubo aspirante telescopico
16 Tubo aspirante telescopico
17 Alloggiamento per bocchetta per pavimenti
18 Bloccaggio della copertura
19 Copertura
20 Scatola del filtro
21 Filtro aria di scarico
22 Regolatore di potenza aspirazione (continuo)
23 Tubo curvo
24 Cesto del filtro principale
25 Filtro di protezione motore
Contrassegno colore
●Gli elementi di comando per il processo di pulizia
sono gialli.
●Gli elementi di comando per la manutenzione ed il
service sono grigio chiaro.
Preparazione
1. Disimballare l’apparecchio e montare gli accessori.
Figura B
Messa in funzione
1. Controllare che il cesto del filtro principale sia inse-
rito nell’apparecchio.
Modi operativi
1 Esercizio con filtro in vello o filtro di carta (accessori
speciali)
2 Esercizio senza sacchetto filtro
Montare il sacchetto filtro
1. Sbloccare e rimuovere la testina aspirante.
2. Rimuovere il cesto del filtro principale.
3. Inserire il filtro in vello o il filtro di carta (accessori
speciali).
4. Inserire il cesto del filtro principale.
5. Applicare la testina aspirante e bloccare.
Uso
Accensione dell’apparecchio
1. Inserire la spina.
2. Accendere l’apparecchio con l’interruttore principa-
le.
Impostazione della forza aspirante
1. Regolare la forza aspirante sul regolatore di aspira-
zione (continuo).
Operazione di pulizia
1. Posizionare il commutatore della bocchetta per pa-
vimenti su una superficie dura o una moquette.
2. Effettuare la pulizia.
Spegnimento dell’apparecchio
1. Spegnere l'apparecchio tramite l'interruttore princi-
pale.
2. Togliere la spina.
Dopo ogni utilizzo
1. Svuotare il serbatoio.
2. Pulire l'apparecchio all'interno e all'esterno attraver-
so l'aspirazione e con un panno umido.
Trasporto
몇PRUDENZA
Mancata osservanza del peso
Pericolo di lesioni e di danneggiamento
Nel trasporto osservare il peso dell'apparecchio.
1. Per il trasporto in veicoli, assicurare l’apparecchio
secondo le direttive in vigore affinché non possa sci-
volare e ribaltarsi.
Stoccaggio
몇PRUDENZA
Mancata osservanza del peso
Pericolo di lesioni e di danneggiamento
Nello stoccaggio, osservare il peso dell'apparecchio.
Utilizzare l’apparecchio solo all’interno.
Cura e manutenzione
PERICOLO
Pericolo di scossa elettrica
Pericolo di lesioni in caso di contatto con parti sotto ten-
sione
Spegnere l'apparecchio.
Staccare la spina.
Pulizia del cesto del filtro principale
ATTENZIONE
Pericolo a causa del cesto del filtro principale ba-
gnato
Pericolo di danneggiamento all’apparecchio
Non bagnare mai il cesto del filtro principale.
1. Se necessario, pulire il cesto del filtro principale (la-
vabile) sotto acqua corrente.
Sostituire il filtro aria di scarico
Filtro aria di scarico: cambiarlo 1 volta all'anno
1. Sbloccare e rimuovere la copertura.
2. Rimuovere il contenitore filtro.
3. Estrarre il filtro aria di scarico dal contenitore filtro.
4. Inserire i nuovi filtri aria di scarico nel contenitore fil-
tro.
5. Inserire il contenitore filtro.
6. Montare la copertura e bloccarla.

16 Italiano
Sostituire il filtro di protezione motore
1. Sbloccare e rimuovere la testina aspirante.
2. Rimuovere il filtro di protezione motore.
3. Inserire il nuovo filtro di protezione motore.
4. Applicare la testina aspirante e bloccare.
Sostituzione del cavo di rete
1. Sostituire il cavo di rete.
Figura C
Figura D
Guida alla risoluzione dei guasti
PERICOLO
Pericolo di scossa elettrica
Pericolo di lesioni in caso di contatto con parti sotto ten-
sione
Spegnere l'apparecchio.
Staccare la spina.
L’apparecchio si spegne durante l’esercizio
È scattato il termoprotettore del motore
1. Sostituire il filtro in vello o il filtro di carta (accessori
speciali).
2. Sostituire il filtro di protezione motore.
3. Sostituire il filtro aria di scarico.
4. Controllare la presenza di eventuali ostruzioni all’in-
terno di tutti i componenti.
5. Lasciare raffreddare la turbina del motore per circa
30-40 minuti. Accendere di nuovo l’apparecchio.
La turbina di aspirazione non funziona
1. Controllare la presa e il fusibile dell’alimentazione di
corrente.
2. Controllare il cavo di alimentazione e la spina
dell’apparecchio.
3. Accendere l’apparecchio.
La capacità di aspirazione diminuisce
1. Rimuovere le ostruzioni dall'ugello di aspirazione,
dal tubo di aspirazione, dal tubo flessibile di aspira-
zione.
2. Sostituire il filtro in vello o il filtro di carta (accessori
speciali).
3. Pulire il cesto del filtro principale sotto acqua corren-
te e asciugarlo.
4. Applicare/bloccare correttamente la testina aspiran-
te.
5. Sostituire il tubo flessibile di aspirazione difettoso.
6. Sostituire il filtro di protezione motore.
Emissione di polvere all'aspirazione
1. Sostituire il filtro in vello o il filtro di carta (accessori
speciali).
2. Controllare la posizione del filtro in vello del filtro di
carta (accessori speciali).
3. Applicare/bloccare correttamente la testina aspiran-
te.
4. Inserire il cesto del filtro principale non danneggiato.
5. Inserire correttamente il filtro di protezione motore.
Servizio clienti
Se non è possibile riparare il guasto occorre far control-
lare l’apparecchio dal servizio clienti.
Garanzia
Le condizioni di garanzia valgono nel rispettivo paese di
pubblicazione da parte della nostra società di vendita
competente. Entro il termine di garanzia eliminiamo gra-
tuitamente eventuali guasti all’apparecchio, se causati
da difetto di materiale o di produzione. Nei casi previsti
dalla garanzia si prega di rivolgersi al proprio rivendito-
re, oppure al più vicino centro di assistenza autorizzato,
esibendo lo scontrino di acquisto.
(Indirizzo vedi retro)
Accessori e ricambi
Utilizzando solamente accessori e ricambi originali, si
garantisce un funzionamento sicuro e privo di disturbi
dell'apparecchio.
Si possono trovare informazioni riguardo ad accessori e
ricambi su www.vermop.com.
Dichiarazione di conformità UE
Con la presente dichiariamo che la macchina di seguito
definita, in conseguenza della sua progettazione e co-
struzione nonché nello stato in cui è stata immessa sul
mercato, è conforme ai requisiti essenziali di sicurezza
e salute pertinenti delle direttive UE. In caso di modifi-
che apportate alla macchina senza il nostro consenso,
la presente dichiarazione perde ogni validità.
Prodotto: Aspiratore a secco
Tipo: VERMOP JETVAC SD 12
Direttive UE pertinenti
2006/42/CE (+2009/127/EG)
2009/125/CE
2011/65/UE
2014/30/UE
Norme armonizzate applicate
EN IEC 63000: 2018
EN 55014-1: 2017 + A11: 2020
EN 55014-2: 2015
EN 60312-1: 2017
EN 60335-1
EN 60335-2-69
EN 61000-3-2: 2014
EN 61000-3-3: 2013
EN 62233: 2008
Norme nazionali applicate
-
Regolamento applicato (en)
666/2013
I firmatari agiscono per incarico e con delega della dire-
zione.
VERMOP Salmon GmbH
Zeppelinstraße 24
D - 82205 Gilching
Gilching, 2022/02/01
Robert Auer
Managing Director
Dr. Konstantin
Kernschmidt
Head of Research &
Development

Nederlands 17
Dati tecnici
Con riserva di modifiche tecniche.
Inhoud
Algemene instructies
Voordat u het apparaat voor het eerst
gebruikt, dient u deze originele ge-
bruiksaanwijzing en de meegeleverde
veiligheidsinstructies door te lezen Houd u hieraan.
Bewaar beide documenten voor later gebruik of volgen-
de eigenaars.
●Wanneer de gebruiksaanwijzing en de veiligheidsin-
structies niet worden opgevolgd, kan dit schade aan
het toestel en gevaar voor de bediener en andere
personen tot gevolg hebben.
●Bij transportschade de dealer onmiddellijk op de
hoogte brengen.
●Controleer bij het uitpakken of de verpakkingsin-
houd compleet is en niet beschadigd is.
Milieubescherming
De verpakkingsmaterialen zijn herbruikbaar. Ver-
wijder verpakkingen op een milieuvriendelijke
manier.
Elektrische en elektronische apparaten bevatten
waardevolle recyclebare materialen en vaak be-
standdelen zoals batterijen, accu's of olie, die bij
onjuiste omgang of verkeerd afvalverwijdering
een mogelijk gevaar voor de gezondheid en het milieu
kunnen vormen. Voor een correct werking van het ap-
paraat zijn deze bestanddelen echter noodzakelijk. Ver-
wijder apparaten, voorzien van dit symbool, niet samen
met huishoudelijk afval.
Reglementair gebruik
몇WAARSCHUWING
Gezondheidsrisico
Inademen van gezondheidsgevaarlijke stoffen
Het apparaat niet voor de afzuiging van gezondheids-
schadelijke stoffen gebruiken.
LET OP
Beschadiging van het apparaat
Kortsluiting door hoge luchtvochtigheid
Het apparaat alleen in binnenruimtes gebruiken en op-
slaan.
●Deze universele zuiger is geschikt voor de droge
reiniging van bodem- en wandoppervlakken.
●Dit apparaat is geschikt voor commercieel gebruik,
bijvoorbeeld in hotels, scholen, ziekenhuizen, fa-
brieken, winkels, kantoren en verhuurbedrijven.
JETVAC
SD 12
Collegamento elettrico
Tensione di rete V 220-240
Fase ~ 1
Frequenza di rete Hz 50-60
Classe di protezione II
Assorbimento di potenza nomina-
le
W700
Dati sulle prestazioni dell’apparecchio
Contenuto del serbatoio l 12
Portata d'aria (max.) l/s 43
Depressione (max.) kPa
(mbar)
22,0
(220)
Dimensioni e pesi
Lunghezza x larghezza x altezza mm 410 x
315 x
340
Tipico peso d’esercizio kg 6,4
Diametro tubo flessibile di aspira-
zione
mm 35
Condizioni ambientali
Temperatura ambiente (max) °C +40
Valori rilevati secondo norma EN 60335-2-69
Livello di pressione acustica LpA dB(A) 60
Incertezza KpA dB(A) 2
Livello di potenza acustica LWA dB(A) 72
Valore di vibrazione mano-braccio m/s2<2,5
Incertezza K m/s20,2
Cavo di rete
Modello cavo di rete mm2H05VV-
F 2x1,0
Numero componenti (EU) 176 12
76
Lunghezza cavo m 12
Algemene instructies........................................... 17
Milieubescherming .............................................. 17
Reglementair gebruik .......................................... 17
Beschrijving apparaat.......................................... 18
Voorbereiding ...................................................... 18
Inbedrijfstelling .................................................... 18
Bediening ............................................................ 18
Vervoer................................................................ 18
Opslag................................................................. 18
Verzorging en onderhoud.................................... 18
Hulp bij storingen ................................................ 19
Garantie .............................................................. 19
Toebehoren en reserveonderdelen ..................... 19
EU-conformiteitsverklaring .................................. 19
Technische gegevens.......................................... 20

18 Nederlands
Beschrijving apparaat
Afbeelding A
1Vliesfilterzak
2Zuigopening
3Zuigslang
4Typeplaatje
5Kabelhaak
6Handgreep
7Netsnoer
8Zuigkop
9Vergrendeling van de zuigkop
10 Zwenkwiel
11 Vuilreservoir
12 Hoofdschakelaar
13 Omschakelaar hard oppervlak/tapijtvloeren
14 Vloersproeier
15 Afstelling telescoopzuigbuis
16 Telescoopzuigbuis
17 Opname voor vloersproeier
18 Vergrendeling van de afdekking
19 Afdekking
20 Filteromhulsel
21 Afvoerluchtfilter
22 Zuigkrachtregelaar (traploos)
23 Bocht
24 Hoofdfiltermand
25 Motorbeveiligingsfilter
Kleurmarkering
●Bedieningselementen voor het reinigingsproces zijn
geel.
●Bedieningselementen voor onderhoud en service
zijn lichtgrijs.
Voorbereiding
1. Apparaat uitpakken en toebehoren monteren.
Afbeelding B
Inbedrijfstelling
1. Controleer of de hoofdfiltermand in het apparaat is
geplaatst.
Bedrijfsmodi
1 Gebruik met vliesfilterzak of papieren filterzak (bij-
zondere toebehoren)
2 Gebruik zonder filterzak
Filterzak inbouwen
1. Zuigkop ontgrendelen en verwijderen.
2. Verwijder de hoofdfiltermand.
3. Bevestig vliesfilterzak of papieren filterzak (bijzon-
dere toebehoren).
4. Plaats de hoofdfiltermand.
5. Zuigkop plaatsen en vergrendelen.
Bediening
Apparaat inschakelen
1. Netstekker aansluiten.
2. Apparaat met de hoofdschakelaar inschakelen.
Pas de zuigkracht aan
1. Regel de zuigkracht op de zuigkrachtregelaar
(traploos).
Reiniging
1. Zet de schakelaar van het vloermondstuk op een
hard oppervlak of tapijt.
2. Reiniging uitvoeren.
Apparaat uitschakelen
1. Apparaat aan de hoofdschakelaar uitschakelen.
2. Netstekker loskoppelen.
Na elk gebruik
1. Reservoir legen.
2. Apparaat van binnen en van buiten reinigen door af-
zuigen en afvegen met een vochtige doek.
Vervoer
몇VOORZICHTIG
Niet in acht nemen van het gewicht
Gevaar voor letsel en beschadiging
Houd bij het vervoer rekening met het gewicht van het
apparaat.
1. Apparaat bij het transport in voertuigen conform de
richtlijnen tegen wegglijden en omvallen beveiligen.
Opslag
몇VOORZICHTIG
Niet in acht nemen van het gewicht
Gevaar voor letsel en beschadiging
Houd bij de opslag rekening met het gewicht van het ap-
paraat.
Het apparaat mat alleen in binnenruimtes worden opge-
slagen.
Verzorging en onderhoud
GEVAAR
Gevaar voor elektrische schokken
Letsel door aanraken van stroomvoerende onderdelen
Schakel het apparaat uit.
Trek de netstekker eruit.
Reinig de hoofdfiltermand
LET OP
Gevaar door natte hoofdfiltermand
Gevaar voor beschadiging van het apparaat
Zet de hoofdfiltermand nooit nat.
1. Reinig indien nodig de hoofdfiltermand (wasbaar)
onder stromend water.
Afvoerluchtfilter vervangen
Afvoerluchtfilter: 1X per jaar vervangen
1. Afdekking ontgrendelen en verwijderen.
2. Filterbehuizing verwijderen.
3. Afvoerluchtfilter uit de filterbehuizing verwijderen.
4. Nieuw afzuigfilter in filterbehuizing plaatsen.
5. Filterbehuizing plaatsen.
6. Afdekking plaatsen en vergrendelen.

Nederlands 19
Motorbeveiligingsfilter vervangen
1. Zuigkop ontgrendelen en verwijderen.
2. Motorbeschermingsfilter verwijderen.
3. Nieuw motorbeschermingsfilter plaatsen.
4. Zuigkop plaatsen en vergrendelen.
Vervang het netsnoer
1. Vervang het netsnoer.
Afbeelding C
Afbeelding D
Hulp bij storingen
GEVAAR
Gevaar voor elektrische schokken
Letsel door aanraken van stroomvoerende onderdelen
Schakel het apparaat uit.
Trek de netstekker eruit.
Apparaat schakelt tijdens het bedrijf uit
Motor-thermoprotector is geactiveerd
1. Vervang de vliesfilterzak of papieren filterzak (bij-
zondere toebehoren).
2. Motorbeveiligingsfilter vervangen.
3. Afvoerluchtfilter vervangen.
4. Alle onderdelen op verstoppingen controleren.
5. Laat de motorturbine ongeveer 30-40 minuten af-
koelen. Apparaat opnieuw inschakelen.
Zuigturbine start niet
1. Stopcontact en de zekering van de stroomvoorzie-
ning controleren.
2. Netsnoer en de netstekker van het apparaat contro-
leren.
3. Apparaat inschakelen.
Zuigkracht neemt af
1. Verstoppingen uit zuigmond, zuigbuis, zuigslang of
patronenfilter verwijderen.
2. Vervang de vliesfilterzak of papieren filterzak (bij-
zondere toebehoren).
3. Reinig de hoofdfiltermand onder stromend water en
droog hem af.
4. Zuigkop correct plaatsen/vergrendelen.
5. Defecte zuigslang vervangen.
6. Motorbeveiligingsfilter vervangen.
Uittreden van stof tijdens het zuigen
1. Vervang de vliesfilterzak of papieren filterzak (bij-
zondere toebehoren).
2. Controleer de positie van de vliesfilterzak of papie-
ren filterzak (bijzondere toebehoren).
3. Zuigkop correct plaatsen/vergrendelen.
4. Onbeschadigde hoofdfiltermand plaatsen.
5. Motorbeschermingsfilter correct plaatsen.
Klantenservice
Als de storing niet kan worden verholpen, moet het ap-
paraat door de klantenservice worden gecontroleerd.
Garantie
In elk land gelden de garantievoorwaarden die door on-
ze verantwoordelijke verkoopmaatschappij zijn uitgege-
ven. Mogelijke storingen aan uw apparaat verhelpen we
binnen de garantieperiode gratis, voor zover een mate-
riaal- of fabricagefout de oorzaak is. Als u gebruik wilt
maken van de garantie, neemt u met uw aankoopbon
contact op met uw distributeur of de dichtstbijzijnde ge-
autoriseerde klantenservice.
(adres zie achterzijde)
Toebehoren en reserveonderdelen
Gebruik alleen origineel toebehoren en originele reser-
veonderdelen. Deze garanderen een veilige en sto-
ringsvrije werking van het apparaat.
Informatie over toebehoren en reserveonderdelen vindt
u onder www.vermop.com.
EU-conformiteitsverklaring
Hiermee verklaren wij dat de hierna vermelde machine
op basis van het ontwerp en type en in de door ons op
de markt gebrachte uitvoering voldoet aan de relevante
veiligheids- en gezondheidsvereisten van de EU-richtlij-
nen. Bij een niet door ons goedgekeurde wijziging van
de machine verliest deze verklaring zijn geldigheid.
Product: Droogzuiger
Type: VERMOP JETVAC SD 12
Relevante EU-richtlijnen
2006/42/EG (+2009/127/EG)
2009/125/EG
2011/65/EU
2014/30/EU
Toegepaste geharmoniseerde normen
EN IEC 63000: 2018
EN 55014-1: 2017 + A11: 2020
EN 55014-2: 2015
EN 60312-1: 2017
EN 60335-1
EN 60335-2-69
EN 61000-3-2: 2014
EN 61000-3-3: 2013
EN 62233: 2008
Toegepaste nationale normen
-
Toegepaste bepaling(en)
666/2013
De ondergetekenden handelen in opdracht en met vol-
macht van de directie.
VERMOP Salmon GmbH
Zeppelinstraße 24
D - 82205 Gilching
Gilching, 2022/02/01
Robert Auer
Managing Director
Dr. Konstantin
Kernschmidt
Head of Research &
Development

20 Español
Technische gegevens
Technische wijzigingen voorbehouden.
Índice de contenidos
Avisos generales
Antes de poner en marcha por primera
vez el equipo, lea este manual de ins-
trucciones y las instrucciones de seguri-
dad adjuntas. Actúe conforme a estos documentos.
Conserve estos dos manuales para su uso posterior o
para propietarios ulteriores.
●En caso de no respetar el manual de instrucciones
o las instrucciones de seguridad, se pueden causar
daños al equipo y crear peligros para el operario y
otras personas.
●Informe inmediatamente a su distribuidor si se han
producido daños durante el transporte.
●Compruebe si faltan accesorios en el contenido del
paquete o si existen daños.
Protección del medioambiente
Los materiales del embalaje son reciclables. Eli-
mine los embalajes de forma respetuosa con el
medioambiente.
Los equipos eléctricos y electrónicos contienen
materiales reciclables y, a menudo, componen-
tes, como baterías, acumuladores o aceite, que
suponen un riesgo potencial para la salud de las
personas o el medioambiente en caso de manipularse
o eliminarse de forma inadecuada. Sin embargo, dichos
componentes son necesarios para un servicio adecua-
do del equipo. Los equipos identificados con este sím-
bolo no pueden eliminarse con la basura doméstica.
Uso previsto
몇ADVERTENCIA
Riesgos para la salud
Aspiración de polvos perjudiciales para la salud
No usar el equipo para la aspiración de polvos perjudi-
ciales para la salud.
CUIDADO
Daño del equipo
Cortocircuito debido a la elevada humedad del aire
Usar y almacenar el equipo solamente en interiores.
●Esta aspiradora universal para alfombras está dise-
ñada para la limpieza en seco de las superficies del
suelo y de las paredes.
●Este equipo es apto para el uso industrial, p. ej. en
hoteles, escuelas, hospitales, fábricas, tiendas, ofi-
cinas y negocios de alquiler.
JETVAC
SD 12
Elektrische aansluiting
Netspanning V 220-240
Fase ~ 1
Netfrequentie Hz 50-60
Beschermingsklasse II
Nominaal opgenomen vermogen W 700
Gegevens capaciteit apparaat
Inhoud reservoir l 12
Luchthoeveelheid (max.) l/s 43
Onderdruk (max.) kPa
(mbar)
22,0
(220)
Afmetingen en gewichten
Lengte x breedte x hoogte mm 410 x
315 x
340
Typisch bedrijfsgewicht kg 6,4
Diameter zuigslang mm 35
Omgevingsvoorwaarden
Omgevingstemperatuur (max.) °C +40
Berekende waarden conform EN 60335-2-69
Geluidsdrukniveau LpA dB(A) 60
Onzekerheid KpA dB(A) 2
Geluidsvermogensniveau LWA dB(A) 72
Hand-arm-vibratiewaarde m/s2<2,5
Onzekerheid K m/s20,2
Netkabel
Type netsnoer mm2H05VV-
F 2x1,0
Onderdeelnummer (EU) 176 12
76
Kabellengte m 12
Avisos generales................................................. 20
Protección del medioambiente............................ 20
Uso previsto ........................................................ 20
Descripción del equipo........................................ 21
Preparación......................................................... 21
Puesta en funcionamiento................................... 21
Manejo ................................................................ 21
Transporte ........................................................... 21
Almacenamiento ................................................. 21
Conservación y mantenimiento........................... 21
Ayuda en caso de fallos ...................................... 22
Garantía .............................................................. 22
Accesorios y recambios ...................................... 22
Declaración de conformidad UE ......................... 22
Datos técnicos..................................................... 23
This manual suits for next models
1
Table of contents
Languages:
Other Vermop Vacuum Cleaner manuals