Vertysystem Apolix User manual

1
2
3
4
5
6
7
810
9
11
12
13
14
15 18
17
19
16
Apolix
Electronic and automatic polymerizer
Rev. 10/2019
Instruction for use
a.gree srl
Via Retrone 14, Altavilla Vicentina 36077 (VI) Italy
+39 0444 960 991 info@vertysystem.com
1/7
vertysystem.com
1. DESCRIPTION
This instrument is used to polymerize acrylic material. It was engineered for work in the dental laboratory.
1. Front panel
2. ON/OFF switch
3. Manometer
4. Lid
5. Handle for closing/opening
6. Nozzle for water
7. Nozzle for air
8. Socket
9. Power cord
10. Fusibles
11. Pressure adapter
12. Latch for closing/opening
13. Filter
14. Temperature button
15. Timer button
16. Water release button
17. RUN/STOP button
18. Selection arrows
19. Display
2. INSTALLATION AND FIRST USE
OPENING
• Carefully remove the machine from the wrapping
• Make sure the electric tension is 230 V
• Set the machine so that the plug is accessible
SET UP
Connect the main air to the terminal labelled INPUT AIR on the back panel. The input hole has a 6 ø. Pressure must not
exceed 6 bars.
Connect the 8 ø hose to the OUT output and unwind it to a water drain or a water collecting container. This hole is on the
left side of the side lid.
IMPORTANT
Do not soak this hose into any liquid as to not damage the unit. The safety valve is on the back panel.
Put the instrument in such a position as to not damage anything if the valve is activated. Do not direct it towards
combustibles.
3. MODE OF USE AND CHARACTERISTICS
• APOLIX has a total of ten programs, four of which are pre-set for VERTYSYSTEM® acrylic
• materials
• A work cycle consists of the necessary time and temperature settings
• Use the selection arrows (e) to set timing and temperatures
• After using the selection arrows, you will see the current setting flashing on the display (f)
• When the setting is flashing, you can change its value by using the selection arrows (e)
• To save the setting, you must once again push the corresponding selection button
• You will then exit the parameter setup mode

Apolix
Electronic and automatic polymerizer
Rev. 10/2019
Instruction for use
a.gree srl
Via Retrone 14, Altavilla Vicentina 36077 (VI) Italy
+39 0444 960 991 info@vertysystem.com
2/7
vertysystem.com
3. MODE OF USE AND CHARACTERISTICS
• Put the Furbo Alu Big/Small flask in the machine. Pour the necessary water in the tank (leaving at least a 2-cm gap to
the top)
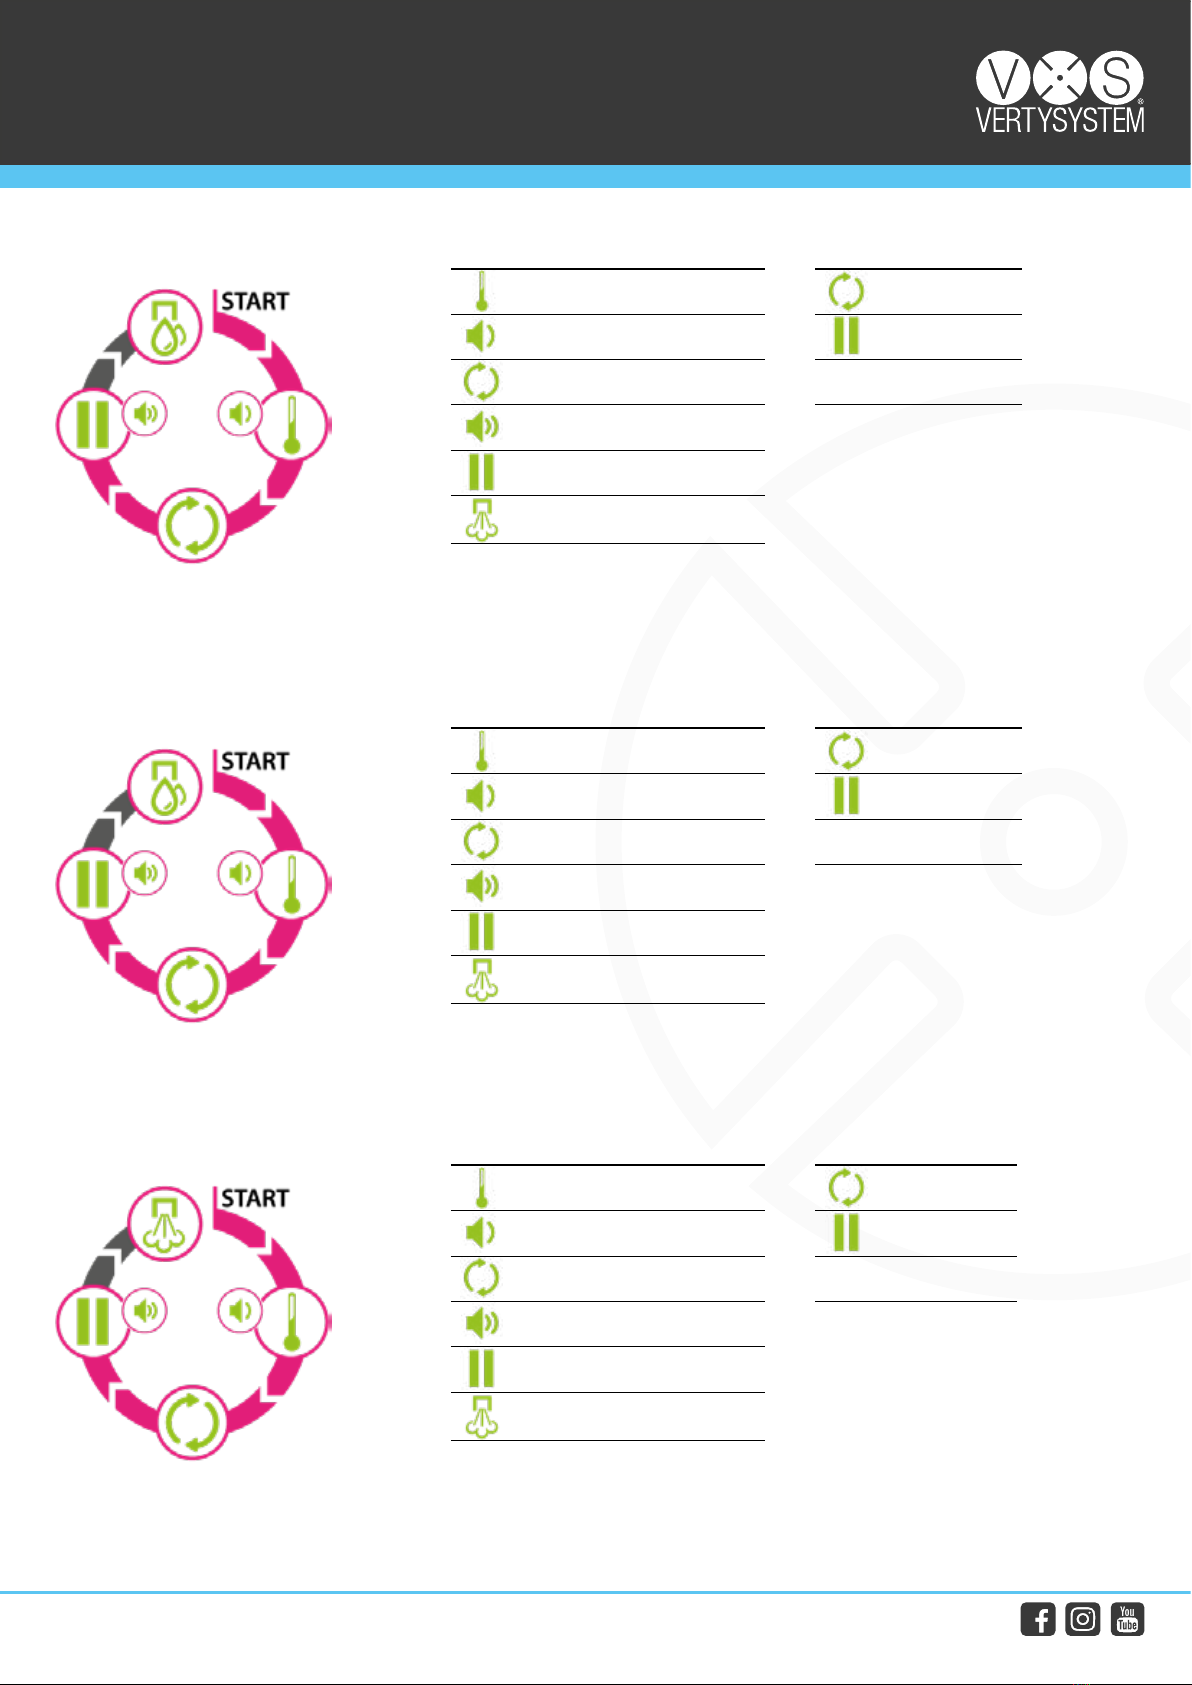
• Close the lid until it latches. Start the process using the RUN/STOP button (17)
• The process can be stopped at any time using the RUN/STOP button (17)
• Once the process is started, it’s necessary to push the water release button (16). The LED will flash, and water and air
will be automatically released at the end of the process.
• In case of need, you can manually release the water by pushing and holding the water release button (16) for 5 se-
conds. The machine will automatically release the water.
• In case of extreme need, you can manually drain the water using the nozzle for water (6). This can only be done while
the machine isn’t running a program. Before emptying the water, push the RUN/STOP button (17).
• Once the machine has been emptied, you must press on the nozzle (6) again to close the electromagnetic valve.
IMPORTANT NOTES
• Before the first use of the day, it’s necessary to wet the orange gasket with a little water before closing the lid, to pro-
tect it from accidental damage.
• Once the pressure setting is memorized, it will stay so for all other programs as well
• Do not set the pressure at values exceeding 6 bars
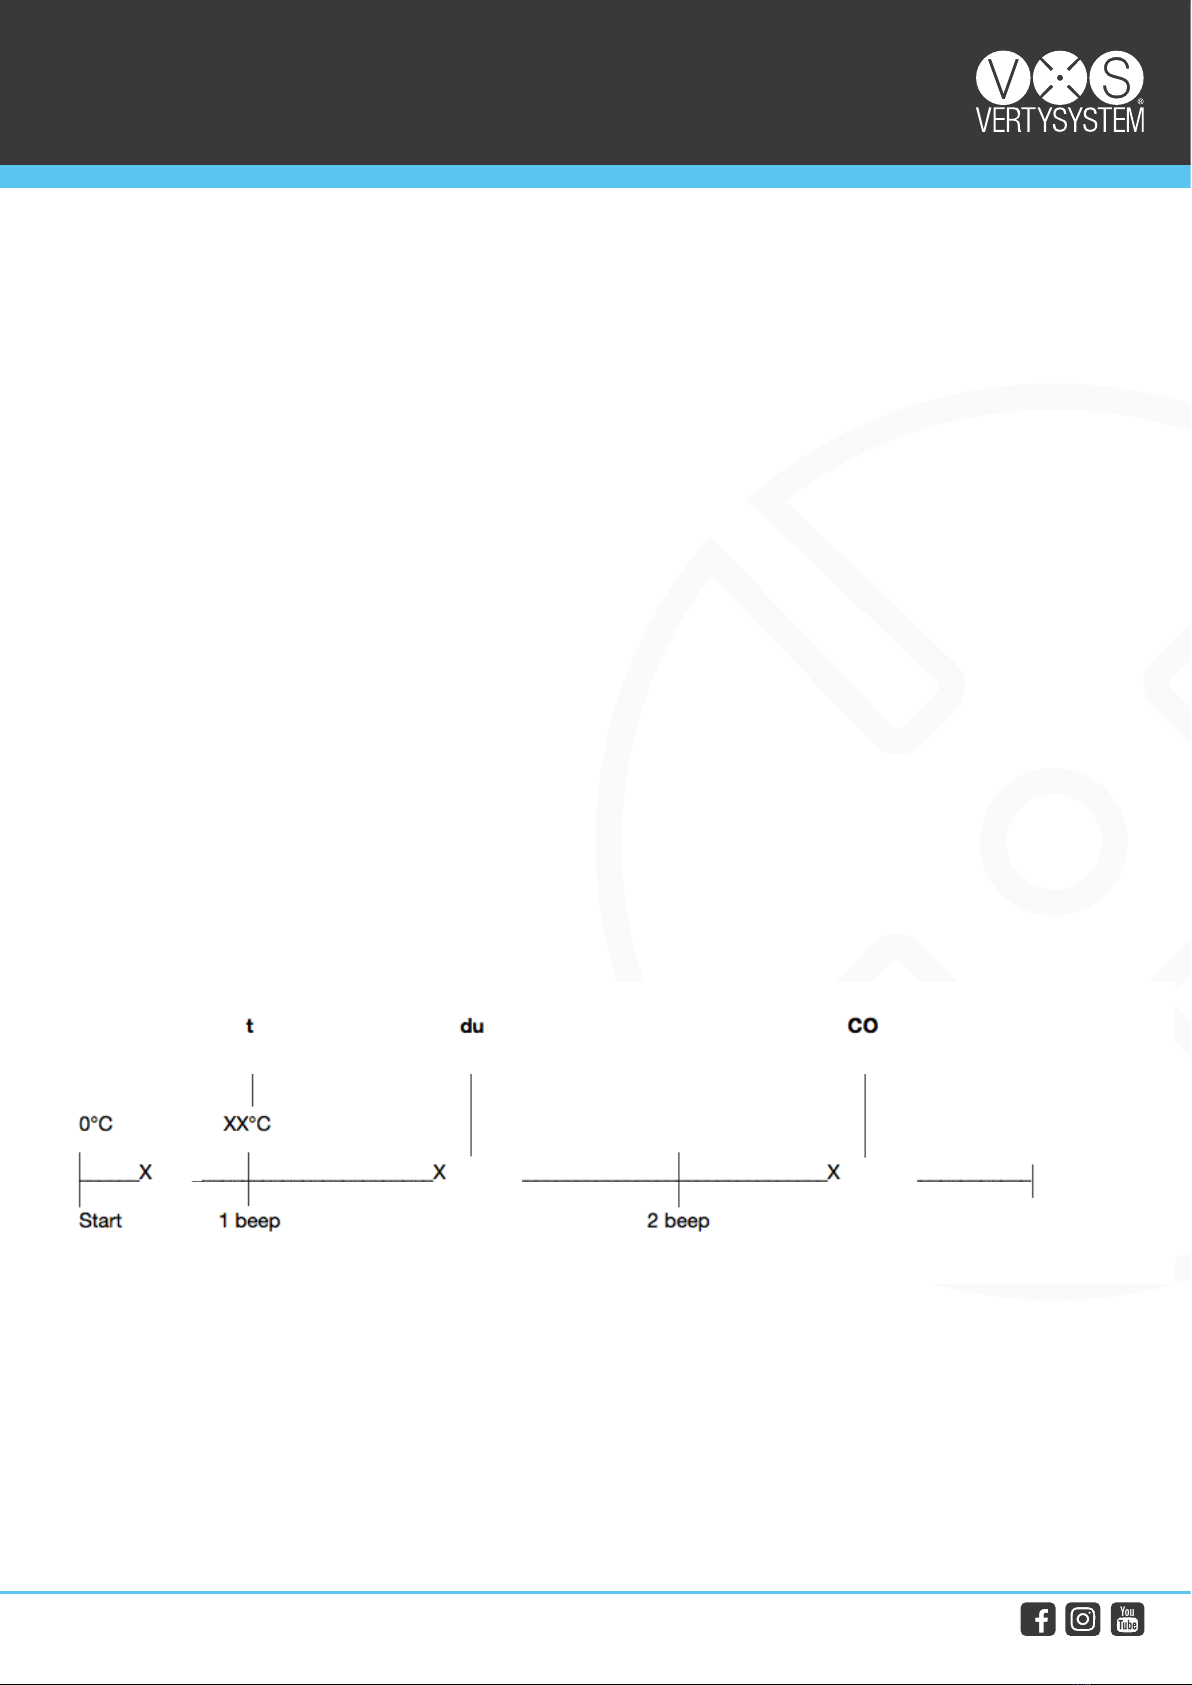
• If the dierence between the set temperature and the actual chamber temperature is below 10° C, it’s necessary to
hold the RUN/STOP button (2) for a few seconds to start a new cycle. The new cycle will start after an acoustic signal.
• Pressure will stay active until you manually release it. Do not open the machine lid until the temperature has gone be-
low 100°C, as to not risk burns with boiling water.
• The machine is engineered for use in places up to 2000 m above sea level
• Maximum air humidity has to be below 80% for temperatures up to 31°, and goes down to 50% for temperatures from
40° C.
• If the machine is used with accessories that were not provided by the manufacturer, safety is compromised.
4. SAFETY RULES
• The following precautions must be observed to avoid damages to personnel or to the machine:
• The machine musn’t be used by an operator who hasn’t read the instructions
• Before plugging the machine in, make sure that the grid tension is the same as the work tension. In case of dicrepancy,
consult a specialist
• Under no circumstance tamper with and/or modify the machine
• The stickers and warnings must be kept in legible conditions and must not be removed
• In case of damages the machine must not be activated, in order to protect the user or bystanders.
• Keep the power cord away from sources of heat, oils or damaging objects
• When moving the machine, do not hold it by the cord
• Do not use spare parts that don’t come from the manufacturer
• Prevent the machine from falling or receiving hits
• To function correctly, the machine has to be heated. Be mindful of the possible explosion hazard, or toxic/combustible
gas emission hazard that derive from heating
This symbol warns you that there is dangerously high tension
This symbols guarantees that the machine conforms to the Low Tension and
Electromagnetic Compatibility Directive, and related norms

Apolix
Electronic and automatic polymerizer
Rev. 10/2019
Instruction for use
a.gree srl
Via Retrone 14, Altavilla Vicentina 36077 (VI) Italy
+39 0444 960 991 info@vertysystem.com
3/7
vertysystem.com
5. MAINTENANCE
• Avoid placing the machine next to sources of heat
• Don’t place objects on the machine
• Clean with a dampened cloth
• Change the safety fuses using only the following values: 6,3 A/250 V Class T
• Have only manufacturer authorized technicians perform any maintenance operation
• Lifting and transport of the machine must be done by picking it up manually
• Load or transport exclusively with the machine set vertically
6. THERMAL SAFETY
This machine has a thermal safety. If the temperature in the tank goes above 150° C a special component will stop any hea-
ting processes.
To reset to normal function one must:
1. Unplug the machine
2. Remove the left lateral lid
3. Push the red button on the thermal safety
4. Replace the lid and resume the work
7. TECHNICAL DATA
1. Power supply: 230 V, ±10%, 50Hz
2. Energy consumption: 1220 W
3. Tension category: II
4. Actual chamber volume: 1, 5 l
5. Inside dimensions: ø 140 – h 145 mm
6. Maximum pressure: 6 bars
7. Working temperature limits: 40° C – 120° C
8. Temperature and functioning areas: 2
9. Time limits: 1 min – 99 mins
10. Weight: 9,3 kg
11. Working temperature: 0° C – 40° C
12. Pollution level: 2
13. Outside dimensions: Depth: 300 mm
Width: 330 mm
Height: 240 mm
8. CONTENT
1. APOLIX polymerizer 1 pc
2. Flexible water release hose 1 pc
3. Spare fuses T 6,3 A/250 V 2 pcs
4. Instruction manual 1 pc
9. WARRANTY
a.gree srl guarantees to the customer the correct functioning of all the components and materials of this product for 12
months after the date of purchase. During this lapse of time a.gree srl or authorized personnel will repair any defect or
malfunction of the machine.
Any damage caused during transport, storing or handling of the product, or due to malfunction of the electric grid are the
user’s responsibility. This warranty is voided if any unauthorized personnel tries to make any repair or modification to the
machine.
Thank you for purchasing APOLIX!
This machine has been designed according to the latest industrial standards.
We wish you a pleasant working experience using APOLIX!

Apolix
Electronic and automatic polymerizer
Rev. 10/2019
Instruction for use
a.gree srl
Via Retrone 14, Altavilla Vicentina 36077 (VI) Italy
+39 0444 960 991 info@vertysystem.com
4/7
vertysystem.com
HOW TO USE APOLIX
I. SINGLE CYCLE - STEPS TO SET UP ANY PROGRAM (FROM 4 TO 9)
1. Turn on the machine using the green ON/OFF switch (2)
2. Set up a program using the selection arrows (e) other than the pre-set ones (1 to 3)
3. Open the lid (5) using the latch (12)
4. Insert the FURBO flask
5. Fill the chamber with water up to 2 cm from the top
6. Close the lid (5) making sure that the opening/closing latch (12) will keep it closed
7. Regulate pressure:
a. Push the RUN/STOP button
b. Remove the pressure adapter on the back of the machine (11) until you hear a click
c. Unscrew/Screw the pressure adapter (11) until you reach the desired pressure
d. Push the pressure adapter (11) toward the machine to confirm
e. Record the pressure by holding the two selection arrows (e) at the same time for 3 seconds
f. Push the RUN/STOP button to confirm
8. Regulate temperature (t):
a. Hold the temperature button (a) and set the desired temperature using the arrows (e)
b. Push the temperature button (a) again to confirm
9. Regulate duration time (du):
a. Hold the timer button (b) and set the desired time using the arrows (e)
b. Push the timer button (b) again to confirm
10. Regulate cooling time (co):
a. Hold the water release button (c) for 3 seconds and set cooling time using the arrows (e)
To set automatic water release you have to exceed 100 minutes. If you do, a red light will appear on
the button (c). The timer will re-set and you will be able to set the desired cooling time.
b. Push the water release button (c) again to confirm
11. Run the program pushing the RUN/STOP button
12. Automatic water release:
a. After starting the program, before the cycle ends, push the water release button (c)
Esempio di programma a piacimento (dal n°4 al n° 9) Ciclo Singolo:
(temperature) (duration)
(end cicle)
(cooldown time)
prolunged beep
water and air
release**
bars minutes minutes
t= first polymerization temperature
du= first polymerization duration
co= cooling time

Apolix
Electronic and automatic polymerizer
Rev. 10/2019
Instruction for use
a.gree srl
Via Retrone 14, Altavilla Vicentina 36077 (VI) Italy
+39 0444 960 991 info@vertysystem.com
5/7
vertysystem.com
II. DOUBLE CYCLE - STEPS TO SET UP ANY PROGRAM (FROM 4 TO 9)
1. Turn on the machine using the green ON/OFF switch (2)
2. Set up a program using the selection arrows (e) other than the pre-set ones (1 to 3)
3. Open the lid (5) using the latch (12)
4. Insert the FURBO flask
5. Fill the chamber with water up to 2 cm from the top
6. Close the lid (5) making sure that the opening/closing latch (12) will keep it closed
7. Regulate pressure:
a. Push the RUN/STOP button
b. Remove the pressure adapter on the back of the machine (11) until you hear a click
c. Unscrew/Screw the pressure adapter (11) until you reach the desired pressure
d. Push the pressure adapter (11) toward the machine to confirm
e. Record the pressure by holding the two selection arrows (e) at the same time for 3 seconds
f. Push the RUN/STOP button to confirm
8. Regulate temperature (t):
a. Hold the temperature button (a) and set the desired temperature using the arrows (e)
b. Push the temperature button (a) again to confirm
9. Regulate temperature (t1)
a. Hold the temperature button (a) and set the second desired temperature using the arrows (e)
b. Push the temperature button (a) again to confirm
10. Regulate duration time (du):
a. Hold the timer button (b) and set the desired time using the arrows (e)
b. Push the timer button (b) again to confirm
11. Regulate duration time (du1):
a. Hold the timer button (b) and set the second desired time using the arrows (e)
b. Push the timer button (b) again to confirm
12. Regulate cooling time (co):
a. Hold the water release button (c) for 3 seconds and set cooling time using the arrows (e)
To set automatic water release you have to exceed 100 minutes. If you do, a
red light will appear on the button (c). The timer will re-set and you will be able to set the desired
cooling time.
b. Push the water release button (c) again to confirm
13. Run the program pushing the RUN/STOP button
14. Automatic water release:
a. After starting the program, before the cycle ends, push the water release button (c)
X Bars X minutes X minutes X minutes
Prolonged
beep
Water and air
release
co
(Cooldown time)
End
cycle
2 beep1 beep 1 beep
1st temperature 2nd temperature
1st time 2nd time
Start
t 1 XX°C
(temperature)
t 2 XX°C
(temperature)
du 1
(duration)
du 2
(duration)
APOLIX can set two temperatures (t 1 and t 2) and two times (du 1 and du 2)
t1= first polymerization temperature
t2= second polymerization temperature (must always be at least 1° lower than t)
du1= first polymerization time
du2= second polymerization time

Apolix
Electronic and automatic polymerizer
Rev. 10/2019
Instruction for use
a.gree srl
Via Retrone 14, Altavilla Vicentina 36077 (VI) Italy
+39 0444 960 991 info@vertysystem.com
6/7
vertysystem.com
LEGEND
TEMPERATURE (45°C)
SINGLE BEEP
POLYMERIZATION
DOUBLE BEEP
END OF THE CYCLE
AUTOMATIC AIR
DISCHARGE COMPLETED
DURATION
30 min.
10 min.
TOT. 40 min.
P.0 | VERTYS PROTHESIS EXCEL
Ideal programme for cold curing resin
for full denture resin, charged with
composite micro-pearls. For a very
high quality polymerization set the
pressure to 2 Bar and fill the chamber
with at least 3/4 of water.
III. ONLY PRESSURE SETTING
1. Turn on the machine using the ON/OFF switch (2)
2. Hold the two arrows (e) at the same time for 3 seconds. The display (f) will say “AIR”
3. The pressure will be the same as the last used program
4. Release the air pushing the RUN/STOP button
(temperature) (duration) (2ª temperature)
(End cycle)
(2ª duration) (cooldown time)
prolonged
beep
air/water
release**
bars minutes
As explained in the example with APOLIX you can set 2 temperatures (t and t1) and 2 polymerization times (du and du1):
t= first polymerization temperature
t1= second polymerization temperature (must always be at least 1° lower than t)
du= first polymerization time
du1= second polymerization time
CO= cooling time
SETTING OF THE PRESSURE
1. Turn on the machine using the ON/OFF switch (2)
2. Hold the two arrows (18) at the same time for 3 seconds (18). The display will say “AIR” (19)
3. The pressure will be the same as the last used program.
4. Release the air pushing the RUN/STOP button (17)
minutes
minutes

Apolix
Electronic and automatic polymerizer
Rev. 10/2019
Instruction for use
a.gree srl
Via Retrone 14, Altavilla Vicentina 36077 (VI) Italy
+39 0444 960 991 info@vertysystem.com
7/ 7
vertysystem.com
LEGEND
TEMPERATURE (45°C)
SINGLE BEEP
POLYMERIZATION
DOUBLE BEEP
END OF THE CYCLE
AUTOMATIC AIR
DISCHARGE COMPLETED
LEGEND
TEMPERATURE (85°C)
SINGLE BEEP
POLYMERIZATION
DOUBLE BEEP
END OF THE CYCLE
AUTOMATIC AIR
DISCHARGE COMPLETED
DURATION
45 min.
15 min.
TOT. 60 min.
DURATION
20 min.
10 min.
TOT. 30 min.
P.1 | VERTYS PROTHESIS HOT
P.2 | VERTYS TEMPLUS
Ideal programme for heat curing full
denture resins, charged with composite
micro-pearls. For a very high quality
polymerization set the pressure to 2 Bar
and fill the chamber with at least 3/4 of
water.
Ideal programme for cold curing
temporary resins charged with
composite micro-pearls. For a very
high quality polymerization set the
pressure to 2 Bar and fill the chamber
with at least 3/4 of water.
LEGEND
TEMPERATURE (38°C)
SINGLE BEEP
POLYMERIZATION
DOUBLE BEEP
END OF THE CYCLE
AUTOMATIC AIR
DISCHARGE COMPLETED
DURATION
30 min.
10 min.
TOT. 40 min.
P.3 | VERTYS SURGICAL
Ideale programme for bite splints and
surgical/radiological stents. For a very
high quality polymerization set the
pressure to 2 Bar and fill the chamber
with at least 3/4 of water.
Table of contents
Popular Industrial Equipment manuals by other brands

Bosch
Bosch Rexroth ABZSS operating instructions

LSLIDAR
LSLIDAR LS30MVA user manual

Emerson
Emerson CASH VALVES Installation, operation and maintenance instructions

Rodix
Rodix FC-42-DC Plus quick start guide

Pfannenberg
Pfannenberg PWS 6502 T 230V operating manual

Vogt
Vogt Tube-Ice HFO-10-SYS450 Service manual

Miki Pulley
Miki Pulley COUPLINGS manual

Acoustic Signature
Acoustic Signature TA-9000 Neo instruction manual

schmalenberger
schmalenberger fluvo CG700 rondo operating instructions

ABB
ABB HT573061 Operation manual

riverhawk
riverhawk IM-255 instruction manual

Chentronics
Chentronics SureSparc BD-5 Installation and operation manual