manuals.online logo
Brands
  1. Home
  2. •
  3. Brands
  4. •
  5. James Walker
  6. •
  7. Industrial Equipment
  8. •
  9. James Walker KlickFix User manual

James Walker KlickFix User manual

Installation Guide for
James Walker KlickFix®
Deployment Sleeve Flange
Positioning Clip
Position Control Pin
Set Screw
Shaft Sleeve
Radial Slot
Gasket
for deployment
Rear
Centralising
Bush
Your James Walker KlickFix is
factory-assembled ready for
installation.
Note: there are four options for the pump
shaft sleeve that must be taken into
sequence.
1a.
or sleeve of pump.
1b.New shaft sleeve supplied to replace
existing shaft sleeve.
1c .Existing shaft sleeve supplied with
new coating applied by James Walker.
1d.No shaft sleeve supplied with KlickFix;
either because existing sleeve on pump
shaft meets James Walker criteria, or
customer has manufactured own sleeve.
KlickFix is factory assembled.
KlickFix ist werkseitig montiert.
.
KlickFix viene assemblato in
fabbrica..
KlickFix wordt geheel.
geassembleerd geleverd.
KlickFix viene montado de fábrica..
Le KlickFix est assemblé en usine..
EN
DE
IT
NL
ES
F
Shaft sleeve supplied with the
Gland
Installation Guide for
accordance with manufacturer’s
instructions to expose shaft end.
Inspect and clean the pump shaft; remove
all burrs, debris and sharp corners.
Ensure there is a slight chamfer on end of
shaft to facilitate seal installation.
Shut down & dismantle pump.
Clean pump shaft.
Fermare & smontare la pompa.
Pulire l'albero della pompa.
Stel de pomp buiten werking en
demonteer deze. Maak de pompas
schoon en controleer deze.
Parar y desmontar la bomba.
Limpiar el eje de la bomba.
Arrêter et démonter la pompe;
nettoyer l'arbre de la pompe.
Abschalten und Abbauen Sie die
Pumpe. Reinigen Sie die
Pumpenwelle.
James Walker KlickFix®
Inspect and clean the face of the seal
chamber/gland housing. Remove old
gasket material.
Ensure the machined face is in good
condition and is perpendicular to shaft. If
face is damaged or out of true, it must be
re-machined.
Clean & check housing flange.
Pulire & controllare la flangia della
sede.
Maak de lagerstoelflens schoon en
controleer deze.
Limpiar y revisar la brida del
alojamiento.
Nettoyer et vérifier le logement.
Reinigen und überprüfen Sie den
Gehäuseflansch.
EN
DE
IT
NL
ES
EN
DE
IT
NL
ES
F
F
Lubricate ‘O’ ring on ID Shaft Sleeve with
silicone grease or non-abrasive soap.
Lubricate 'O' ring in Shaft Sleeve.
Lubrificare l' 'O' ring nel manicotto
dell'albero.
Smeer de O'ring van de asbus.
Lubricar la tórica del casquillo del eje.
Lubrifier le torique de la douille.
Schmieren Sie 'O' Ring in der
Wellenschutzhülse.
EN
DE
IT
NL
ES
F
Check pump shaft with dial guage for run-
out or misalignment. Maximum
recommended TIR (total indicated
reading) is 0.1mm.
Excess run-out or misalignment of
shaft will cause premature seal
failure.
Check pump shaft alignment.
Controllare l'allineamento
dell'albero della pompa.
Controleer of de pompas uitgelijnd
is ten opzichte van het huis.
Comprobar la alineación del eje de
la bomba.
Vérifier l'alignement de l'arbre de la
pompe.
Prüfen Sie die Ausrichtung der
Pumpenwelle.
EN
DE
IT
NL
ES
F
Slide the complete KlickFix
Cartridge on to the pump shaft
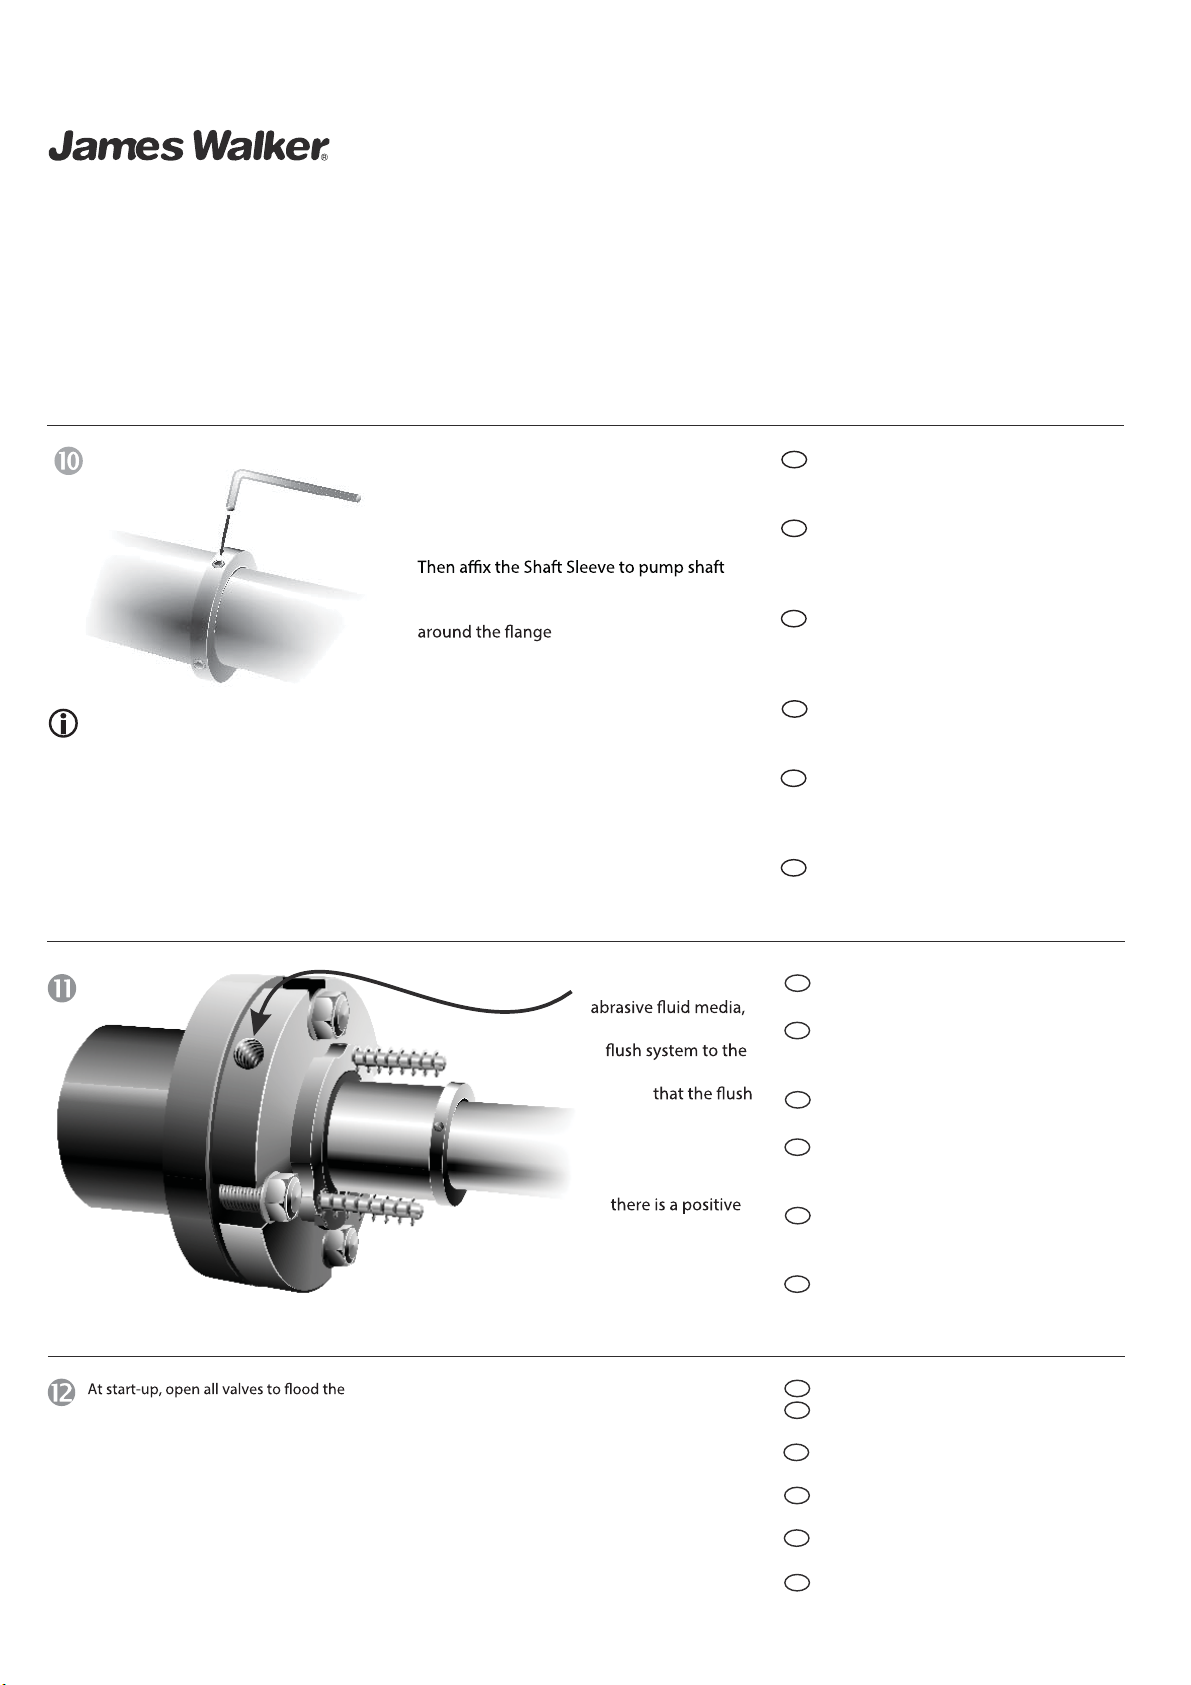
Rotate cartridge so that
Position Control Pins,
and radial slots in
Deployment Sleeve,
are accessible for
future deployment of
more sealing lips.
Fit Cartridge on shaft. Allow access
to Positioning Clips and Radial Slots.
Montare la cartuccia sull'albero.
Lasciare accesso al posizionamento
delle clips ed alle scanalature radiali.
Encajar el cartucho en el eje. Permitir el
acceso a los clips de posicionamiento
y las ranuras radiales.
Installer le cartouche KlickFix sur
l'arbre. Libérer l'espace d'accès aux
clips et aux encoches radiales.
Bringen Sie die Kassette auf der
Welle an. Erlauben Sie den Eingang
der Positionier-Klammer und des
Radial-Slots.
Wees er zeker van dat er voldoende
ruimte beschikbaar is ten opzichte
van de eerste obstructie.
Re-assemble pump
Rimontare la pompa.
Wieder zusammenbauen der Pumpe.
Re-assemble the pump.
Do NOT force
the KlickFix
Cartridge into position
using hammer or sharp
tools
Installation Guide for
James Walker KlickFix®
This operation is necessary only when a shaft sleeve
is being used.
If necessary, insert Shaft Sleeve (1).
Inserire, se necessario, il manicotto
dell'albero (1).
Indien nodig, plaats de asbus (1).
Si es necesario, inserte el casquillo
del eje (1).
Si nécessaire insérer le manchon
d'arbre.
Falls nötig, legen Sie die
Wellenschutzhülse ein (1).
Slide Shaft Sleeve into the KlickFix
Cartridge from its outboard end, until
the bevelled end protrudes through the
end of the KlickFix cartridge.
EN
DE
IT
NL
ES
EN
DE
IT
NL
ES
EN
DE
IT
NL
ES
Zet de pomp weer in elkaar.
IVolver a montar la bomba.
Assembler à nouveau la pompe
F
F
F
placing the gland gasket
over the seal housing and
against the gland plate.
Slide Cartridge to housing flange.
Affix housing bolts.
Far scorrere la cartuccia fino alla
flangia della sede. Fissare i bulloni
della sede.
Schuif de Klickflix naar de sealkamer.
Monteer de bevestigingsbouten.
Deslizar el cartucho hasta la brida
del alojamiento. Apretar lso
tornillos del alojamiento.casquillo.
Glisser le cartouche KlickFix dans
le corps de pompe. Positionner,
puis serrer les boulons de fixation
Schieben Sie die Kassette in den
Gehäuseflansch. Befestigen Sie die
Gehäuseschrauben.
Slide the KlickFix Cartridge to the
machined face of the seal chamber
/gland housing. Ensure that the
Assemble the holding
only. Then tighten the
nuts/bolts using good
engineering practice.
EN
DE
IT
NL
ES
Gland bolts must be tightened equally to
prevent seal misalignment. Ensure that the
shaft turns freely. F
Collegare, se necessario, il sistema
di flussaggio. Avviare il Flussaggio.
Indien nodig, verbind de
spoelleiding en activeer de
spoeling.
Si es necesario, conectar el
sistema de flujo. Poner en marcha
el flujo
Si nécessaire, connecter le circuit
de flush. Mettre en pression le
circuit
Wenn nötig, legen Sie das
If needed, connect flush system.
Start flush
Spülungs-System an. Starten Sie
das Spülungs-System.
Vent pump chamber at start-up.
Lüften Sie die Pumpenkammer
beim Start-up.
All'avviamento far sfogare l'aria
dalla camera della pompa.
Ontlucht de sealkamer bij de
ingebruikname.
Purgar la cámara de la bomba en el
arranque.
Faire sortir l'air dans la chambre de
la pompe au démarrage.
For applications with
connect a suitable
gland port. Ensure
pressure is at least
35kPa (5psi) above
the maximum
pressure in the gland
pump seal chamber. If possible, vent any
air that may be trapped in chamber.
Installation Guide for
James Walker KlickFix®
EN
DE
IT
NL
ES
EN
DE
IT
NL
ES
F
F
and
ow of ush water into
the system. Apply ush
water to cartridge and
maintain at all times.
When using sleeve option 1a, slide the
Shaft Sleeve along the pump shaft so the
edge of the coated area is in line with the
edge of the Rear Centralising Bush.
by evenly
at outboard end of the
shaft sleeve). Now tighten the set screws
until the points are embedded in the shaft
surface.
tightening each set screw until it
just touches the shaft (these screws are
Align Shaft Sleeve coating with
Rear Bush. Tighten Set Screws to
affix to shaft.
Allineare il rivestimento del
manicotto dell'albero con la
bussola posteriore. Serrare la serie
di viti per il fissaggio all'albero.
Centreer de asbus met de
centreerbussen. Draai de Set Screws
aan om zo de as vast te zetten.
Alinear el recubrimiento del
casquillo del eje con el cojinete
trasero. Apretar los tornillos de
posicionamiento para fijarlo al eje.
Aligner la douille revêtue sur l'arbre
de la pompe. Serrer les vis-
pointeau de la douille.
Richten Sie die Wellenschutzhülse-
Beschichtung mit hinteren Hülse.
Ziehen Sie die Schrauben an, auf
der Welle anzubringen.
DO NOT use anti-seize or thread-
lock compound
EN
DE
IT
NL
ES
F
Installation Guide for
James Walker KlickFix ®
When leakage appears deploy new
seal lip.
Quando appare la perdita inserire il
nuovo labbro della guarnizione.
Indien lekkage optreedt een nieuwe
lip-afdichting in bedrijf stellen.
Cuando aparezcan fugas libere un
nuevo labio de sellado.
Lorsqu' une fuite apparait, une
nouvelle lèvre devra être déployée.
Wenn Sie Leckage sehen, wenden
Sie neue Dichtlippe an.
A new sealing lip should be
deployed when leakage from the
cartridge is visible.
Examine seal periodically for
visual signs of leakage
Shut down pump.
Fermare la pompa.
Stel de pomp buiten werking.
Parar la bomba.
Arrêter la pompe.
Schalten Sie die Pumpe ab.
For Health & Safety reasons, shut down
the pump motor before working on your
James Walker KlickFix Cartridge.
Seal Lip Deployment Guide
EN
DE
IT
NL
ES
EN
DE
IT
NL
ES
EN
DE
IT
NL
ES
Remove first Positioning Clip.
Rimuovere la prima clip di
posizionamento.
Verwijder de eerste
positioneringsclip.
Quitar el primer clip de
posicionamiento.
Enlever le premier clip.
Entfernen Sie die Positionier-
Klammer.
Clip (E-Clip) from each
Position Control Pin.
F
F
F
Seal Lip Deployment Guide for
Insert a small pry bar into each of the two
radial slots in the Deployment Sleeve, near
the gland plate.
Re-start the pump and check operation of
pump and seal.
Push the pry bars
simultaneously to move
the Deployment Sleeve
reaches the next
Positioning Clip (E-Clip).
The new sealing lip is now
deployed.
Move Deployment Sleeve to next
Clip.
Schieben sie Einsatz Hülse zur
nächsten Klammer.
Spostare il pattino fino alla messa
in funzione della clip successiva.
Beweeg de verstelbare stationaire
asbus naar de volgende clip.
Deslizar el cartucho hasta la brida
del alojamiento. Fijar los tornillos
del alojamiento.
Reculer le manchon de maintien
des lèvres jusqu'au clip suivant.
Restart pump & check for leaks.
Far ripartire la pompa & controllare
le perdite.
Herstart de pomp en controleer
deze op lekkage.
Arrancar la bomba y chequear si
hay fugas.
Redémarrer la pompe et vérifier les
fuites.
Anschalten Sie die Pumpe wieder
und Prüfen für die Leckage.
Repeat sequences 13 - 17 for deployment of each new sealing lip when
leakage becomes visible.
Repeat 13-17 when leak appears.
Wiederholen Sie 13-17 wenn
Leckage erscheint.
In caso di perdita ripetere da 13 a
17.
Herhaal vanaf 13 tot en met17
indien lekkage optreedt.
Repetir 13 al 17 cuando aparezcan
fugas.
Répéter de 13 à 17 en cas de fuites.
James Walker KlickFix ®
Safety Data Sheets are available on request
Health warning
e should be taken to avoid contaminating tobacco with particles of
Information in this publication and otherwise supplied to users is based on our general experience and is given in good faith,
the use of products, no warranty is given or is to be implied with respect to such information. Unless governed by type approva
of operating limits quoted in this publication are not an indication that these values can be applied simultaneously.
ebsite: www.jameswalker.biz.
EN
DE
IT
NL
ES
EN
EN
DE
DE
IT
IT
NL
NL
ES
ES
F
F
F
James Walker & Co Ltd, Gote Brow, Cockermouth, Cumbria, CA13 0NH, United Kingdom
Tel:+44 (0)1900 823555 Fax:+44 (0)1900 898354 Email: cockermouth@jameswalker.biz
Issue 1
JW4665/0918

Other James Walker Industrial Equipment manuals

James Walker KlickFix User manual

James Walker

James Walker KlickFix User manual

James Walker Teesele Assembly instructions

James Walker

James Walker Teesele Assembly instructions

Popular Industrial Equipment manuals by other brands

AUMA GS 50.3 manual

AUMA

AUMA GS 50.3 manual

Dungs GasMultiBloc MB-D B01 Operation and assembly instructions

Dungs

Dungs GasMultiBloc MB-D B01 Operation and assembly instructions

NEUGART HLAE Series instruction manual

NEUGART

NEUGART HLAE Series instruction manual

Jireh PREAMP CXA032 manual

Jireh

Jireh PREAMP CXA032 manual

INVT Goodrive800 Pro Series Hardware manual

INVT

INVT Goodrive800 Pro Series Hardware manual

ABB A130-M67 Operation manual

ABB

ABB A130-M67 Operation manual

Reer SAFEGATE TRX Installation, use and maintenance

Reer

Reer SAFEGATE TRX Installation, use and maintenance

Bosch FDP 0001 A installation guide

Bosch

Bosch FDP 0001 A installation guide

PMC EL-51A-4 quick start guide

PMC

PMC EL-51A-4 quick start guide

ASO Safety Solutions SENTIR mat instruction manual

ASO Safety Solutions

ASO Safety Solutions SENTIR mat instruction manual

Festo CPX-AP-I-4IOL-M12 manual

Festo

Festo CPX-AP-I-4IOL-M12 manual

Fein Grit GX75 Series manual

Fein

Fein Grit GX75 Series manual

ABB XAC23710 Operation manual

ABB

ABB XAC23710 Operation manual

Ametek ASCEND Series Operation manual

Ametek

Ametek ASCEND Series Operation manual

ABB Decento 3559K-C Series installation manual

ABB

ABB Decento 3559K-C Series installation manual

Tyco KANTECH KTES-FBOX INSTALLATION PROCEDURE

Tyco

Tyco KANTECH KTES-FBOX INSTALLATION PROCEDURE

Geovent 25 instruction manual

Geovent

Geovent 25 instruction manual

Siemens SIMATIC ET 200M operating instructions

Siemens

Siemens SIMATIC ET 200M operating instructions

manuals.online logo
manuals.online logoBrands
  • About & Mission
  • Contact us
  • Privacy Policy
  • Terms and Conditions

Copyright 2025 Manuals.Online. All Rights Reserved.