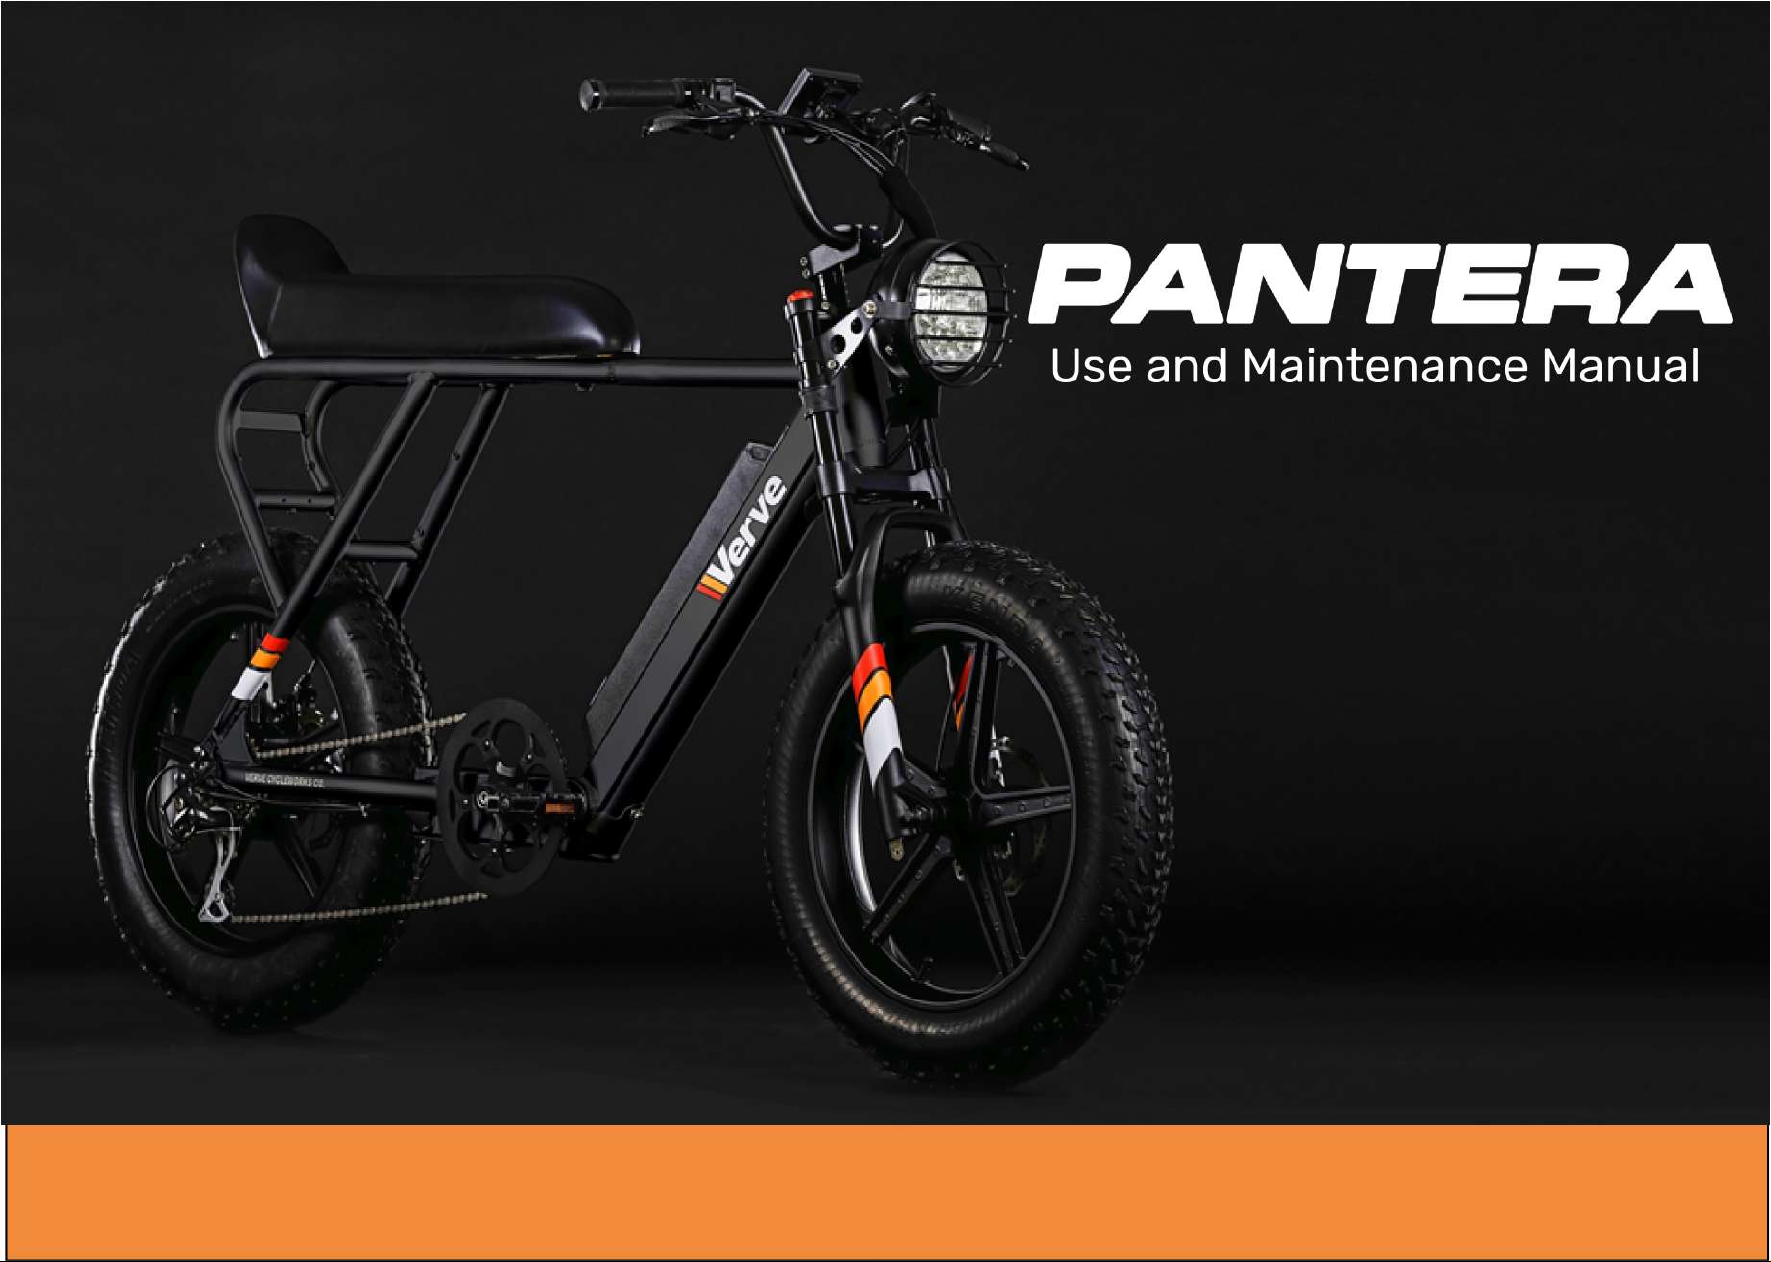
Verve PANTERA User manual


This manual has been specially designed to guide you through the functions and features of your e-bike.
Before using your Pantera e-bike, please read carefully the entire manual in order to become thoroughly familiar with its
features, peculiarities and capabilities. This guide also includes safety instructions to ensure a safe and proper use of your
vehicle.
Join our Community and meet Verve bikers from all over the world!
Facebook
Instagram
Share your experience and stay tuned on the latest VERVE news!
Thank you for choosing Pantera!
THE E-BIKE DESIGNED TO BE IN THE SPOTLIGHT
Easy to ride and to handle in any condition, Pantera conjugates an attractive, vintage Italian design and the most
advanced technological solutions.
1

2

1. 6
2. 7
3. 8
3.1. 8
3.2. 9
4. 10
5. 11
6. 12
6.1. 13
6.2. 15
6.3. 16
6.4. 17
6.5. 20
6.6. 21
6.7. 22
6.8. 23
7. 25
8. 26
8.1. 26
8.2. 27
8.2.1. 28
8.3. 29
8.3.1. 31
8.4. 32
8.4.1. 32
8.5. 34
TABLE OF CONTENTS
E-BIKE COMPONENTS & PARTS
OPERATING THE E-BIKE
ASSEMBLY INSTRUCTIONS
GENERAL INFORMATION
Braking system
Installing the front wheel
Installing the saddle
Inflating the tyres
Installing the3 pedals
Installing the front headlight
Intended purpose
GENERAL DISCLAIMER
Battery and battery charger
Duration of the battery
Display and switches
Lighting System
Suspension setup
Front fork
Pedal assistance setup (Cadence sensor – Torque sensor)
UNPACKAGING
PARTS IDENTIFICATION DIAGRAM
LEGAL REQUIREMENTS
Compliance and rules for the use of the e-bikes
Opening the box and removing the e-bike and its parts from the box
Removing the battery
Installing the handlebar
3

9. 34
9.1. 35
9.2. 37
9.3. 38
9.3.1. 38
9.3.2. 38
9.4. 40
9.5. 40
9.6. 42
10. 43
11. 44
11.1. 44
11.2. 46
11.3. 47
12. 48
12.1. 48
12.2. 49
12.3. 49
12.4. 50
12.5. 51
12.6. 52
12.7. 52
Owner’s responsibility
Warranty period
Warranty conditions
Exclusion of warranty
Additional warranty conditions
Intervention request
Storing the e-bike
Cleaning the e-bike
Lights maintenance
MAINTENANCE
Chain lubrication
Checking the chain conditions
Battery and charger safety instructions
E-bike riding safety instructions
Wheels and tyres maintenance
Braking system maintenance
WARRANTY TERMS AND CONDITIONS
Chain, cassette and derailleur maintenance
SAFETY
Pre-ride safety checks
MAINTENANCE SCHEDULE
Warranty activation
4

GENERAL INFORMATION
SYMBOLS KEYS:
TOOLS
Points out the required tools to carry out peculiar interventions on the e-bike
1.
Provides suggestions, tips and additional information.
Highlights essential information.
INFORMATION
CAUTION!
DANGER!
Warns about a potential, serious danger. Neglecting this information might lead to severe
injuries or death.
5

2. GENERAL DISCLAIMER
2.
Like any other activity, riding a bike involve some risks. Objects along the way, conditions/unevenness of the
terrain, collisions with pedestrians, animals, cars or other cyclists may result in a fall. Furthermore, such
weather conditions as snow, ice or rain can considerably increase the risk of falling; this case is therefore
necessary to ride with utmost caution and to avoid harsh brakings. We recommend you pay close attention to
pavements (sidewalks) and to tram and trail tracks, which may be slippery in case of rain or have your e-bike
wheel stuck (the use of Fat tyres reduces the danger of getting stuck into a track).
Every cyclist assumes all the potential risks involved with the use of the e-bike. While riding it is essential to always be very
careful, wear appropriate clothing and turn the lights on at dusk.
Pantera has been designed for riding on private as well as on public streets, so it is everyone’s responsibility to know and
respect their own country or region legislation about the use of an e-bike.
The use of radio-telephones or headphones while riding might seriously endanger your safety and/or someone
else’s and might be sanctioned by local authorities.
We recommend you diligently carry out the pre-ride safety checks and to respect the maintenance schedule
specified in this manual.
Riding a bike is a pleasant activity within everyone’s reach. It allows to move around the town easily or have a day trip in an
eco-friendly way. Riding a bike brings benefit both to the body and the mind. As a matter of fact, a regular cycling helps to
keep in shape, has positive effects on the heart and is good for your back and your joints. Furthermore, to practice this
outdoor activity has positive effects on your mood and helps reducing the stress level.
6

In some European States, riding on public roads is expressly forbidden to e-bikes mounting over 250W engines. It is allowed
in private areas not open to the public. It is the responsibility of the buyer to use the e-bike according to the specific country
regulations. The responsibility of any penalty or damage resulting from non-compliance with such regulations lies with the e-
bike buyer/user.
3.1.1
Rules for spare parts and accessories
The different member States of the European Union have different rules concerning e-bike accessories or parts. Installing
some accessories or spare parts may result in limitations to the use of the e-bike on public roads. The use is allowed in
private areas not open to the public. When riding on public roads, it is the responsibility of the buyer/user to install only
accessories or spare parts complying with the specific country regulations. The responsibility of any penalty or damage
resulting from non-compliance with such regulations lies with the e-bike buyer/user.
Pantera e-bike is certified to be in compliance with EN15194 standard. Any use of the e-bike beyond the provisions of
standard EN15194 is considered improper.
3. LEGAL REQUIREMENTS
Before riding your e-bike, we recommend you check your country or regional regulations on electric bikes. Different
geographical areas might lay down different rules in terms of / different age limits, speed, motor wattage, street legality etc.
Within the EU, biking rules are the same for non-motorized bicycles and e-bikes with assisted speed up to 25 km/h.
However, we invite you to check if different regulations apply in your country.
3.1.
Compliance and rules for the use of the e-bikes
3.
7

3.2.
Intended purpose
Misuse can damage the e-bike and may result in accidents, serious injuries or death to the user and/or those
around them.
Pantera e-bike is designed for use on paved paths. So it should never be used to perform such dangerous manoeuvres as
wheeling or jumping nor to ride down or up the stairs etc.
Pantera e-bike is not designed for off road trails nor for participation in sports competitions.
Its technical features, operation parameters and maintenance guidelines have been developed for road use only. Maximum
allowed load is 150kg (including the e-bike).
No warranty or liability damage claim shall be accepted in case of misuse of the e-bike.
Verve CW Srl is relieved of any liability for damages caused by a misuse of Pantera e-bike.
Any modification or alteration of the electrical system (Tuning) voids all warranty claims.
8

1
2
3
4
5
6
7
8
9
10
11
12
13
14
15
16
17
18
19
20
21
22
23
24
FRAME
REAR BRAKE CALIPER
LEFT BRAKE LEVER
RIGHT BRAKE LEVER
GRIP
DISPLAY
REAR WHEEL
FRONT WHEEL
FRONT FORKS
BATTERY
REAR LIGHT LED
HEADLIGHT BRACKETS
REAR DISC BRAKE
CRANKSET
CHAIN
REAR DERAILLEUR
HANDLEBAR
PARTS IDENTIFICATION DIAGRAM
HEADLIGHT LED
FRONT DISC BRAKE
FRONT BRAKE CALIPER
PEDAL
SADDLE
TYRE
CONTROL BOX
4.
9

* Rags
* Scissors
* Cutter
* Loctite glue – medium strength
1x Battery charger 2A
2x Headlight brackets
5x Tools: 2x 15mm wrench key - 1x 10/8mm wrench key
Pantera is shipped to you packed in a box. Both the box and the wrapping material were conceived to prevent any damage
during transportation. Some parts are not installed and require proper assembly.
UNPACKAGING
Box content:
2x Pedals
1x Front wheel
2x Battery Keys
Should the packaging be noticeably damaged at the time of delivery, we ask you not to accept the delivery or
to accept it under reserve and contact us right after.
Should you detect any damage to one or more parts of the e-bike, while unpackaging, please contact us as
soon as possible. Our technical support team can provide you all the necessary information to solve the
problem or carry out a repair.
1x Saddle
1x Pantera e-bike
You might need such additional tools as:
1x Front headlight
1x 8mm Allen key - 1x 10mm Allen key
5.
10

Discover the latest news and stay up-to-date with our technical upgrades on our website and social media pages -
https://www.vervebikes.com.
Before operating on your Pantera e-bike, turn off the power switch and remove the battery.
Riding a not properly assembled e-bike may endanger your safety as well as other people’s. In case of doubt or
problems we recommend you see a professional bicycle service.
If you reckon you cannot properly assembly your e-bike, please see a professional bicycle service.
ASSEMBLY INSTRUCTIONS
Should you run into difficulties, please contact us or see your trusted bike mechanic.
We recommend you read carefully the assembly instructions and/or watch the tutorial before starting to assembly your e-
bike.
All the components must be properly assembled, otherwise your e-bike cannot be used.
To watch the assembly VIDEO TUTORIAL:
Scan the QR code with your smartphone camera
Go:
https://www.youtube.com/watch?v=QG2VdJfYdbs&ab_channel=VerveMoto
6.
11

6.1
6.2
6.3
6.4
6.5
6.6
6.7
6.8
6.1.
Installing the pedals
Installing the front wheel
ASSEMBLY OPERATION INDEX
Installing the handlebar
Removing the battery
Opening the box and removing the e-bike and its parts from the box
In order to protect the e-bike from possible damages, all the parts have been covered with polyurethan foam.
Opening the box and removing the e-bike and its parts from the box
Use a staple remover to open the top box. Before removing the bike, use a wire cutter or a pair of scissors to
cut the cable tie connecting the front wheel and the frame.
Pantera e-bike weighs about 30kg. So we recommend you carry out this task with the help of another person.
First of all, make sure the box is placed on the right side. You can easily check the orientation arrows printed on the box
sides.
Remove carefully the front wheel from the box. Pay attention not to damage the disc brake or any other part of the e-bike. A
damaged disc may hinder the assembly and provoke serious safety issues.
You can now lift your e-bike out of the box with the same care.
Installing the front headlight
Installing the saddle
Inflating the tyres
12

1x Saddle (including screws)
As soon as the e-bike has been removed from the box, lay it carefully on the ground. The front wheel is not installed yet so
to avoid any possible damage place the lower part of the front fork on a soft surface.
1x Box containing 2 side reflectors, 1 battery charger, 2 keys
1x Box containing tools (see section 5 in this manual)
1x Box containing 1 front headlight and 2 headlight brackets
We recommend you store the box and the packaging material. In case of return you will be asked to accurately
pack the e-bike in order to safely ship it. An improper packaging might provoke serious damages to the e-bike
during the transportation.
After removing the e-bike, inside the box you can find the following parts:
You can now remove all the polyurethane foam covering the different parts of the e-bike. Use a wire cutter to
cut the cable ties. These ties are quite hard to cut so it is not advisable to use such tools as scissors or knives,
which might hurt you or those around you.
We recommend you perform the assembly operations on a clean and dry surface. The whole setup requires around 30
minutes.
13

1.
2.
3.
6.2.
Insert one of the included keys in the latch on the left side of the e-bike.
In order to remove the battery please follow these simple instructions:
We recommend you remove the battery from your e-bike, before starting the assembly operations.
Removing the battery
Turn the key clockwise and pull the battery towards yourself, use the special stick to help you.
After removing the battery, put it carefully on a clean and dry surface.
14

1.
2.
6.3.
4.
The handlebar setup is quite easy an operation although it requires the habitual care. An improperly tightened
retaining screw might in fact compromise your safety. So make sure all the screws are tightly closed before
starting to drive.
Use the 5mm Allen key to loosen the bolts of the handlebar clamp (Fig. 1)
Cross tighten the bolts of the handlebar clamp. Make sure the clamp is tight and correctly placed on the handlebar
(Fig. 4)
Place back the upper clamp and slightly tighten the bolts with the 5mm Allen key. You can now adjust the angle of the
handlebar so as to enjoy a maximum riding comfort (Fig. 3)
3.
After removing the clamp, insert the handlebar in the specific slot (Fig. 2)
Please follow these steps:
Installing the handlebar
15

1.
6.4.
1. Pull out the nut and the retaining washer from both sides of the wheel while keeping the spacer in place.
Installing the front wheel
First of all, remove the plastic clip between the brake pads inside the brake caliper. Use the provided tools to loosen
and remove both M6 Allen screws from the caliper mount. Memorize the right position of the parts you are removing
from the caliper mount, taking specific care about the emplacement of washers, of the spacer on the retaining screws
and of the caliper mount.
Follow the steps below:
To ensure a perfect installation of the front wheel, we recommend you flip the e-bike. We also suggest you place soft
protectors under points A and B to protect your e-bike from bumps and/or scratches, as shown in the picture.
2.
16

4.
5.
6.
4. Place the washer and the sealing nut on both sides of the front wheel axle (Fig. 4)
Take care not to scratch the fork paint while performing this operation.
Required tools to perform these operations: 1 5mm Allen key and 2 15mm wrench keys
3.
Retrace all the instructions step by step to verify you haven’t missed any key passage. Finally check you have
firmly tightened the front wheel.
5. Use the provided 2x 15mm wrench key to tighten the front wheel nuts (Fig. 5)
6. Go back to step 2 and perform the reverse procedure in order to reinstall the brake caliper.
3. Slide the wheel inside the fork. The front wheel has 2 washers, 2 spacers and 2 nuts. Keep the nut and slide it in the
axle, placing 1 spacer on each side (Fig. 3)
17

After following all the steps above, check the functioning of the braking system. Shouldn’t the braking be effective or in
case you perceive an annoying rubbing, verify the wheel dishing. Check that all parts are correctly set and the screws are
firmly tightened. Spin the wheel: if it comes and goes from the brake pad, it is necessary to install it again until when the
alignment is perfect.
If you reckon you cannot correctly perform these operations, please see a professional bicycle service.
18

6.5.
Pantera e-bike feature Schrader valves (also called American valves). In this kind of valve the main stem is externally
wrapped in a threaded pipe. To press the central core, you need such a thin tool as a pen cap or a fingernail.
Unscrew the rubber cap on the top of the valve (protection) and lay it caring not to lose it.
Inflating the tyres
The tyres pressure affects the bike manoeuvrability and saddle comfort. A higher pressure lowers rolling
resistance and perfectly conforms to smooth and dry surfaces. A lower pressure, on the contrary, allows a
smooth driving and increases grip, so it conforms to bumpy roads or to rough and slippery surfaces.
For transport purposes, your e-bike tyres are only partially inflated.
To release the regulator, lift the stick and quickly screw the cap on the valve.
The recommended pressure value is 20-25 PSI (1,3-1,7 bar). Monitor the pressure gauge while inflating the tyre. The
ideal tyre pressure depends on the rider weight and on the type of terrain.
After installing the front wheel, proceed to inflate the tyres. First of all, place the e-bike on the wheels.
Connect the pump to the valve. In case there is a stick close to the regulator, check it is open (parallel to the nozzle).
Close the stick by snapping it downwards (so that it is perpendicular to the nozzle).
To deflate an air chamber Schrader valve you can simply press the inner stem with a fingernail or a thin tool to let all
the air out.
Never inflate the tyres above 35 PSI (2,4 bar). The air chamber might burst in case of overpressure.
A correct tyre pressure preserves the rims, the air chambers and the tyre themselves from possible damages.
Furthermore, a perfectly inflated tyre extends the life and duration of the battery.
19
Other manuals for PANTERA
1
Table of contents
Other Verve Bicycle manuals