Vestergaard LifeStraw User manual

User Manual
LIFESTRAW MAX

HIGH-FLOW WATER
PURIFICATION
LifeStraw Max:
• Meets US EPA & NSF P231
drinking water standards for
the removal of virus, bacteria,
and parasites
• Meets NSF 42 standards for
chlorine reduction
• Meets NSF 53 standards for
reduction of lead
PRODUCT SPECIFICATIONS
LifeStraw Membrane Ultralter Set:
• Removes 99.99% viruses (Rotavirus,
etc.), 99.999999% bacteria (E.coli,
Salmonella, etc.), 99.999% parasites
(Giardia, Cryptosporidium, etc.),
99.999% microplastics
• Pore size: 0.02 micron
• Filters up to 26,500 gallons (100,000
liters)
LifeStraw Advanced Carbon Filter:
• Reduces lead, chlorine, organic
chemical matter and odors for
improved taste
• Filters up to 4,000 gallons (15,000
liters)
Dimensions:
506 x 403 x 337 mm
20 x 15.9 x 13.3 in
Weight:
7.3 kg | 16.2 lbs
Filtration rate:
2.5 L / min.
LIFESTRAW MAX

Table of contents
ENGLISH
FRANÇAIS
ESPAÑOL
REQUIREMENTS FOR USE 4
KNOW YOUR FILTER 5
SETUP | CARBON FILTER INSTALLATION 6
FIRST TIME USE 8
EVERYDAY USE 9
CLEANING | BACKWASH PROCEDURE 10
CLEANING | PRE-FILTER 11
STORAGE 12
TROUBLESHOOTING 14
DISCLAIMER 15
EXIGENCES D'UTILISATION 18
CONNAÎTRE SON FILTRE 19
CONFIGURATION | INSTALLATION DUFILTREÀCHARBON 20
PREMIÈRE UTILISATION 22
USAGE QUOTIDIEN 23
PROCÉDURE DE NETTOYAGE | DE LAVAGE
ÀCONTRE-COURANT 24
NETTOYAGE | PRÉFILTRE 25
STOCKAGE 26
DÉPANNAGE 28
CLAUSE DE NON-RESPONSABILITÉ 29
REQUISITOS DE USO 32
CONOZCA SU FILTRO 33
CONFIGURACIÓN | INSTALACIÓN DEL FILTRO DE CARBÓN 34
PRIMER USO 36
USO COTIDIANO 37
LIMPIEZA | PROCEDIMIENTO DE LAVADO
A CONTRACORRIENTE 38
LIMPIEZA | FILTRO PREVIO 39
ALMACENAMIENTO 40
SOLUCIÓN DE PROBLEMAS 42
DESCARGO DE RESPONSABILIDAD 43

4
REQUIREMENTS FOR USE
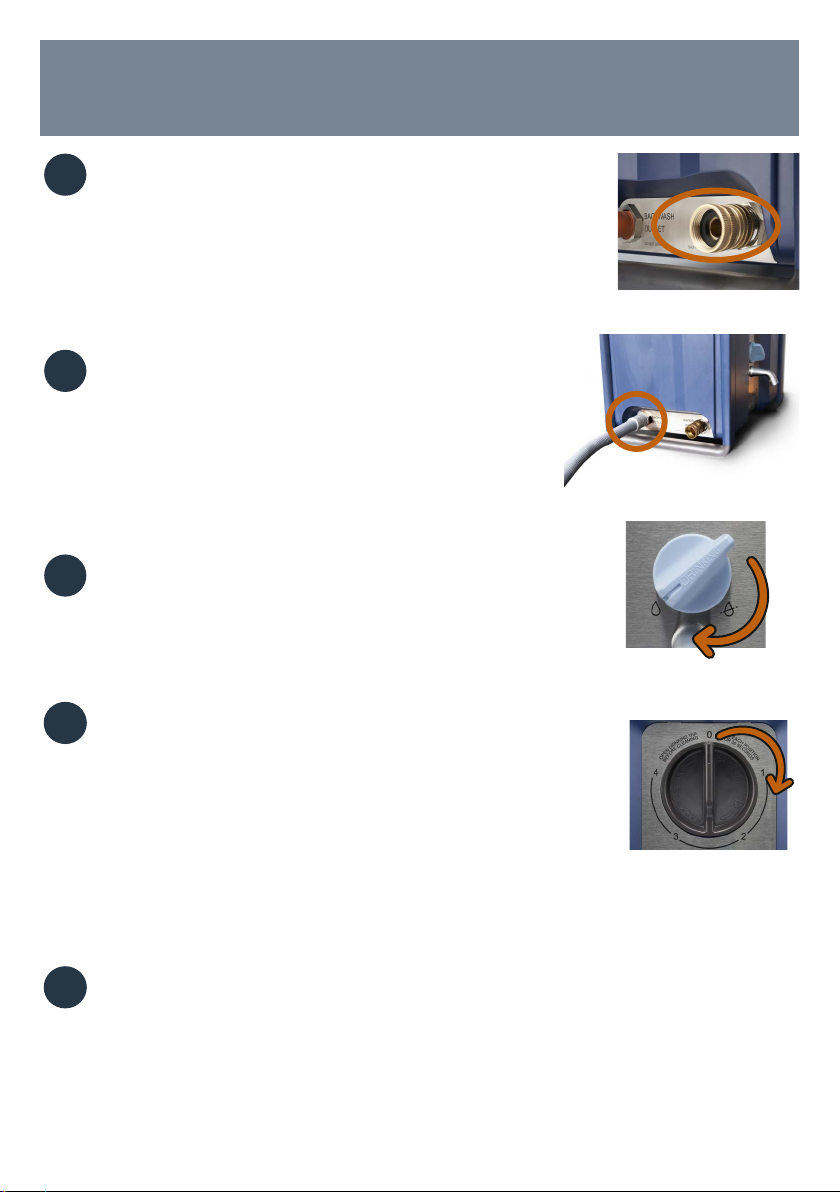
WATER PRESSURE REQUIREMENTS:
LifeStraw Max is powered by water pressure from existing piped water
systems. The minimum recommended pressure is 1 bar / 14.5 PSI. Below
this pressure, the ow rate will be aected.
Maximum pressure: 6 Bar / 87 PSI
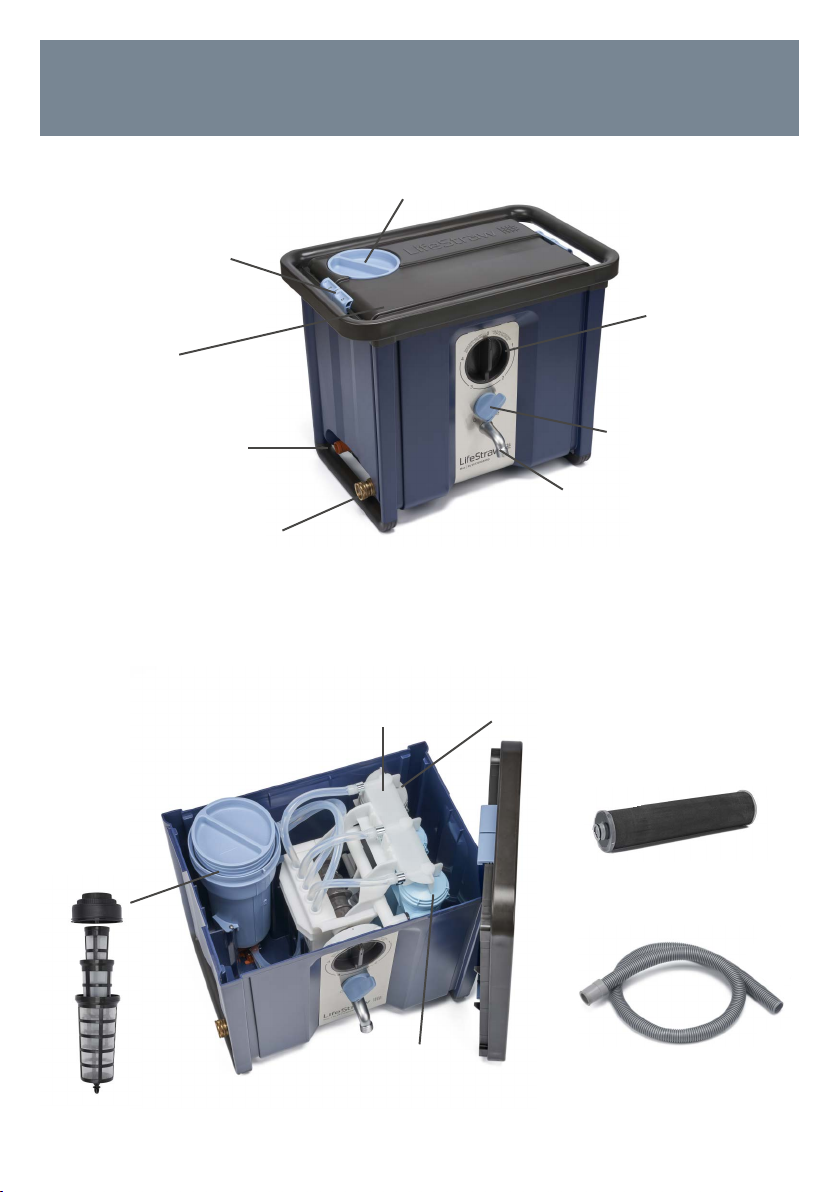
HOSE ADAPTER:
The LifeStraw Max includes a
pre-installed hose adapter at the
water inlet for use with standard
U.S. hoses (3/4” MGHT). If
using with a hose of dierent
threading, please remove the
pre-installed hose adapter.
The inlet will become 3/4” BSP
compatible.
CARBON FILTER:
In order to preserve the longevity
of the lter, do not remove
LifeStraw Max advanced carbon
lter from sealed packaging until
ready to use. When removing the
LifeStraw Max advanced carbon
lter from its separate packaging,
please handle carefully to avoid
any damage. Top lid must be in
place when using LifeStraw Max.
For more resources on how to use, videos, lab
results and further instructions, please visit
our website: www.lifestraw.com/max
lifestraw.com/max
CAUTION!
LifeStraw Max can be used with a maximum pressure of 6 Bar
/ 87 PSI, as certied by ....... Any water above this pressure will
cause damage to the LifeStraw Max product.

KNOW YOUR FILTER
Advanced
Carbon Filter
Housing (Gray)
Membrane
Ultralter Cartridges
(Light Blue)
Filter Housing
Bridge (White)
Lid Locks
Pre-Filter Lid
Top Lid
Backwash Dial
Safe Water Tap
Drinking Dial
Water Inlet (for source water)
with pre-installed adapter
Backwash Outlet
(for discarded water
and connecting the
backwash hose)
Carbon Filter
Pre-lter
(inside)
Backwash hose

6
REMOVE TOP LID
DISCONNECT WHITE FILTER HOUSING BRIDGE
UNSCREW AND OPEN THE TOP OF THE ADVANCED
CARBON FILTER HOUSING (GRAY)
Push the two rectangular tabs
toward the center of box Pull the white housing bridge
upwards until it is disconnected
SETUP | CARBON FILTER INSTALLATION
1
2
3
Slide the LifeStraw Max lid locks towards the
middle of the unit to unlock. Lift the lid o of
the Max and set to the side. Lid locks do not
need to be held together while lifting the lid.
Disconnect the top lter housing bridge (white) from the lter
cartridges by pushing the two tabs toward the center of the box
while pulling the white housing bridge upwards.
Unscrew the top cap of the gray
carbon lter housing. Locate the
carbon lter block and remove from
wrapping.
NOTE: If you are having diculty opening the carbon
lter housing, we recommend pulling the full gray
carbon cartridge out of the Max to unscrew the top and
install the carbon lter block.

7
SETUP | CARBON FILTER INSTALLATION
REASSEMBLE CARBON FILTER HOUSING
CLOSE TOP LID
Place the top lid back onto the top of box, sliding the lid locks
toward the corners to secure.
INSERT CARBON BLOCK WITH BLACK
O-RING ON TOP
4
5
6
Place the carbon lter, with the black silicone
ring facing outward, into the gray carbon lter
housing. Screw the gray carbon cartridge lid on
tightly.
Make sure that the bottom of the gray carbon lter housing is
in place by pressing rmly into the tting. Double check that
the side cartridge connectors are rmly in place with the black
seal ush against the inside.
NOTE: If you removed the carbon lter housing from the Max to insert the carbon block,
reinsert by tting the bottom of the cartridge into the plug tting located in the bottom of
the Max. Ensure the two side connectors are lined up to their matching pieces and press
rmly to make sure they are in place.
RECONNECT WHITE FILTER HOUSING
BRIDGE
Reconnect the top lter housing bridge
by lining up the tabs with their associated
slots and pressing down until it clicks into
place, indicating it is fully locked.
7
NOTE: When replacing your carbon lter, follow these instructions. Remember to perform
the backwash procedure after any lter replacement.

8
FIRST TIME USE
CONNECT SOURCE WATER HOSE
Connect the source water hose (3/4” MGHT) to the
water inlet by screwing BOTH sides of the inlet adapter
tightly.
1
2
3
Blue drinking water dial
in open position
Switch the dark gray backwash dial to position 1 and wait
30 seconds. Then turn it to position 2, wait 30 seconds,
and continue to do so until reaching position 0. Let the
water run for up to 2 minutes while in position 0; Discard
the rst batch of water.
Note: if water is extremely muddy, cycle through backwash procedure
a second time. If you notice a “sweet” taste after performing the
backwash procedure, cycle through again.
LIFESTRAW MAX IS NOW READY TO USE
With the backwash dial in “0” position and the drinking water dial on,
the LifeStraw Max is ready to use. Simply turn the drinking water dial to
the “close” position when done using. The system does have a pressure
regulator, but it is advisable to turn o water source when not in use for a
longer period of time.
4RUN BACKWASH TO REMOVE AIR FROM FILTER
Dark gray backwash dial
5
Note: If using a dierent hose, unscrew the included adapter to
connect the source water hose (3/4” BSP).
CONNECT BACKWASH HOSE
Connect the included light gray backwash hose to the
orange backwash outlet and route to an area where
dirty water can be discarded.
CAUTION: DO NOT DRINK WATER FROM THE
BACKWASH HOSE
TURN ON WATER
Turn on the water source. Make sure the preassure is
greater than 1 bar, then rotate the blue drinking water
dial to the open position.

9
Ensure all hose connections, lter cartridges, and pre-lter lid are in place,
as any loose parts may cause leaking. Make sure the dark gray backwash
dial is in position 0.
EVERYDAY USE
Water will start to ow from tap once the
blue drinking water dial is rotated to “open”.
1MAKE SURE PRODUCT IS READY FOR USE
2TURN ON WATER SOURCE (HOSE)
3ROTATE BLUE DRINKING WATER
DIAL TO OPEN POSITION
4TURN OFF WATER SOURCE (HOSE) WHEN FINISHED
SWITCH BLUE DRINKING WATER DIAL TO CLOSE POSITION
Once nished and water source is shut o, switch blue drinking dial to the
“close” position.
NOTE: Once the dial is CLOSED, it may take a few seconds for water to stop owing. Make sure
the internal hoses are emptied of water as much as possible.
5
Do not remove the lid if the system is
on and the hose is connected to the
inlet. Opening the lid while the system
is under pressure could result in
damage to the product or injury.
The lid can ONLY be removed when the
system is o and the source water hose
is disconnected from the water inlet.
CAUTION!

10
Tip: Refer to Backwash Procedure when you see a reduction in ow rate
during use.
CLEANING | BACKWASH PROCEDURE
TURN ON WATER SOURCE (HOSE) AND TURN BLUE DIAL TO OPEN
POSITION (Water should be owing from the tap)
Let the water run for up to 2 minutes while in position 0. Discard the
water until completed.
Note: if water is extremely muddy, cycle through backwash procedure a second time.
NOW READY TO RESUME USE Turn o water source when nished.
WHEN TO BACKWASH
• Once a day or when you see a reduction in ow rate
• After pre-lter cleaning
• After any cartridge or lter replacement
• After long periods of non-use
1
2
Switch the dark gray backwash dial to
position 1 and wait 30 seconds. Then turn it to
position 2, wait 30 seconds, and continue to
do so until reaching position 0.
ROTATE GRAY BACKWASH DIAL TO EACH POSITION FOR 30
SECONDS
3LET WATER FLOW FROM TAP FOR UP TO 2 MINS AND DISCARD
Regular backwashing ushes out contaminants from the lter cartridges and
helps to maintain ow rate.
4
NOTE: Once you begin the backwash process, water will stop ow-
ing from the tap. This is normal. During dierent rotations, water
will ow out of the backwash hose. Once the dial is returned to
position 0, water will resume owing from the tap.
WARNING: Never consume water from the backwash outlet. It is
not safe to drink.
Dark gray backwash dial

11
Twist o blue pre-lter lid and take
out the pre-lter inside by pulling up
vertically.
NOTE: If is not required to remove the top lid in order
to pull out the pre-lter. However, If you have diculty
removing the pre-lter while the top lid is closed,
slide the lid locks inward to remove the top lid before
twisting o the blue pre-lter lid.
CLEANING | PRE-FILTER
If your water is clear, we recommend cleaning the pre-lter weekly with regular
use. If your water is cloudy, you may need to clean the pre-lter more frequently.
1
2
3
4
MAKE SURE WATER SOURCE IS TURNED OFF.
SET DIALS. Close drinking water dial to “close”, then turn dark
gray backwash dial to position 1
REMOVE PRE-FILTER LID AND PULL OUT PRE-FILTER
Unscrew the black pre-lter cap
to access the 3 internal mesh pre-
lters that are stacked inside of one
another.
DISASSEMBLE PRE-FILTER
Internal pre-lter
containing 3 stacked
mesh lters
CLEAN PRE-FILTER
Using a soft plastic bristle brush, clean all parts with water. DO NOT USE
SOAP, as this could clog the pre-lter.
REASSEMBLE PRE-FILTER
Reassemble the 3 mesh pre-lters by placing all of the lters inside one
another and screwing back on the black cap. Insert it back into the blue
pre-lter housing by pushing downward until the bottom is in place and
tightly screwing on the light blue pre-lter lid.
PERFORM BACKWASH PROCEDURE
Refer to page 11 for backwash instructions.
5
6
7

12
STORAGE
Make sure water source is turned o and the blue drinking dial is in
“close” position. Disconnect source water hose.
Clear any debris from pre-lter using pre-lter cleaning instructions.
REMOVE CARBON BLOCK FROM LIGHT GRAY FILTER HOUSING
FOR DRYING
Using the same technique as when replacing the advanced carbon
lter, disconnect the white lter housing bridge. Unscrew the light
gray carbon lter housing cap and remove the carbon block inside.
Set aside to dry.
PLACE CARBON BLOCK IN SEALED BAG
Once the carbon block is dry, place in a sealed bag for storage to
preserve the longevity of the lter. The light gray lter housing
should remain inside the Max with the cap reattached.
REMOVE LIGHT BLUE MEMBRANE ULTRAFILTER SET FROM
MAX AND STORE IN COOL, DRY PLACE
Using the same steps as when replacing the membrane ultralter
set, disconnect the white lter housing bridge. Then disconnect each
cartridge, pulling away from the bottom connector, followed by the
top connector. Store in a cool, dry location.
1
2
3
4
BEFORE STORAGE
DURING STORAGE
LifeStraw Max and all lters must be stored in normal conditions while not
in use. Keep away from direct sunlight and high or freezing temperatures for
extended periods.

13
REASSEMBLE CARBON FILTER BY INSERTING CARBON BLOCK
WITH BLACK O-RING ON TOP
Remove carbon block from sealed bag, and insert into lter housing with
the black silicone ring facing upward vertically. Screw the gray carbon
cartridge lid on tightly.
REASSEMBLE MEMBRANE ULTRAFILTER SET BY INSERTING
EACH CARTRIDGE.
Insert each cartridge by connecting the bottom connectors into their
respective ttings. Make sure the side connectors on each are connected
before use.
PERFORM BACKWASH PROCEDURE
Connect the source water hose to the water inlet by tightly screwing
BOTH sides of the inlet adapter tightly. In some areas outside of the
United States, a 1/2” hose with male coupling connector might be
needed.
STORAGE
1
2
AFTER STORAGE
3
Turn on water and replace the lid if not already done. Turn on the water
source (hose).
Rotate the blue drinking water dial to the open position.
Switch the dark gray backwash dial to position 1 and wait 30 seconds.
Then turn it to position 2, wait 30 seconds, and continue to do so until
reaching position 0.
Let the water run for up to 2 minutes while in position 0; water will start
owing. Discard the water until completed.
Note: if water is extremely muddy, cycle through backwash procedure a second time.

14
TROUBLESHOOTING
LEAKING
Follow the below checklist if you experience leaking with your Max.
• Ensure all hoses are tightly connected and there are no holes in
each hose
• Ensure the white lter housing bridge is fully connected with push
tabs clicked in place
• Ensure gray cap of carbon lter housing is tightly screwed on
• Ensure carbon lter block is properly installed with black silicone seal
facing the top
• Ensure all three lter cartridges are properly installed into both top
and bottom connectors
If you continue to experience leaking, please contact LifeStraw at info@
lifestraw.com.
LOW FLOW RATE/CLOGGING
If you experience low ow rate or clogging, follow the below procedures.
• Open the lid and ensure none of the hoses are kinked
• Perform backwash procedure. If water is extremely muddly, run
through cycle twice
• Using instructions provided, clean pre-lter.
If you continue to experience little to no ow-rate, it may be time to
replace your membrane ultralter set. Water will stop owing through
once the membrane ultralter set has reached the end of its lifecycle.

15
WARNING: If the membrane ultralters freeze after use, ithey must be
replaced.
Never use LifeStraw Max to lter water contaminated with industrial
chemicals, brackish water or sea water. Do not mount or hang product unless
using with LifeStraw products designed for this use. Limit UV exposure where
possible to prevent discoloration.
The quality of the ltered water is not guaranteed if the product is submitted
to conditions other than those encountered during its normal use. To prevent
breakage, do not drop or hit LifeStraw Max.
Your use of LifeStraw Max implies that you accept and agree to these terms,
conditions, and disclaimer.
REMINDERS
Vestergaard Frandsen Inc. and its aliated entities and related companies
shall be neither liable for any damages arising out of or as a result of the use
of LifeStraw Max for any purpose other than for which it is clearly intended,
nor for any malfunction resulting from the failure of the user of LifeStraw
Max to strictly abide by the usage and safety information contained in this
manual. Stated microbiological, chemical and heavy metal and longevity
performance of LifeStraw Max is conducted under standard laboratory test
conditions; more information regarding test results and conditions can be
found on www.lifestraw.com. The eectiveness of LifeStraw Max may be
limited by environmental or hygienic conditions that could contribute to the
recontamination of water after it has passed though the product’s internal lter.
These conditions include but are not limited to:
1. Handling the inside of the LifeStraw Max or the spout with dirty hands.
2. Failure to maintain a clean lter with proper maintenance.
3. Using the Max if cracked, broken, or otherwise compromised.
4. Failure to replace the lters per manufacturer’s recommendations.
5. Use in or exposure to extreme heat (higher temperature than 140° F/60°C)
or freezing temperatures (below 32° F/0°C).
DISCLAIMER

16
LIFESTRAW MAX
Manuel d’utilisation

17
PURIFICATION D'EAU
ÀHAUTDÉBIT
LifeStraw Max:
• Conforme aux normes de
l'US EPA et de la NSF P231
sur l'eau potable pour
l'élimination des virus, des
bactéries et des parasites
• Conforme aux normes NSF 42
pour la réduction du chlore
• Conforme aux normes NSF 53
pour la réduction du plomb
CARACTERISTIQUES
DUPRODUIT
Dimensions:
506 x 403 x 337 mm
20 x 15,9 x 13,3 pouces
Poids:
7,3 kg | 16,2 lb
Taux de ltration:
2,5 l / min.
LIFESTRAW MAX
Ensemble d'ultraltres à membrane
LifeStraw:
• Élimine 99,99 % des virus
(Rotavirus, etc.), 99,999999 % des
bactéries (E.coli, Salmonella, etc.),
99,999 % des parasites (Giardia,
Cryptosporidium, etc.), 99,999 %
desmicroplastiques
• Taille de pore: 0,02 micron
• Filtre jusqu'à 26 500 gallons
(100000 litres)
Filtre à charbon avancé LifeStraw:
• Réduit le plomb, le chlore, les produits
chimiques organiques et les odeurs
pour un meilleur goût
• Filtre jusqu'à 4 000 gallons
(15000litres)

18
EXIGENCES D'UTILISATION
EXIGENCES DE PRESSION D'EAU:
Le ltre LifeStraw Max est alimenté par la pression de l'eau des
systèmes d'eau courante existants. La pression minimale recommandée
est de 1 bar / 14,5 PSI. En dessous de cette pression, le débit sera aecté.
Pression maximale: 6 bars / 87 PSI
ADAPTATEUR DE TUYAU:
Le LifeStraw Max comprend un
adaptateur de tuyau préinstallé
àl'entrée d'eau pour une
utilisation avec des tuyaux
standard américains (3/4 po
MGHT). Si vous utilisez un tuyau
avec un letage diérent, veuillez
retirer l'adaptateur de tuyau
préinstallé. L'entrée deviendra
compatible aux tuyaux 3/4 po BSP.
FILTRE À CHARBON
An de préserver la longévité
du ltre, ne retirez pas le ltre
àcharbon avancé LifeStraw Max de
l'emballage scellé jusqu'à ce qu'il
soit prêt à être utilisé. Lorsque vous
retirez le ltre à charbon avancé
LifeStraw Max de son emballage
séparé, veuillez le manipuler
avec précaution pour éviter tout
dommage. Le couvercle supérieur
doit être en place lors de l'utilisation
du LifeStraw Max.
Pour plus de ressources sur la méthode
d'utilisation, plus de vidéos, des résultats de
laboratoire et d'autres instructions, veuillez
visiter notre site Web: www.lifestraw.com/max
lifestraw.com/max
MISE EN GARDE!
Le ltre LifeStraw Max peut être utilisé avec une pression
maximale de 6 bars / 87 PSI, tel que certié par ....... Toute eau
se trouvant au-dessus de cette pression causera des dommages
au produit LifeStraw Max.

19
CONNAÎTRE SON FILTRE
Boîtier de ltre à
charbon avancé (gris)
Cartouches d'ultraltre
àmembrane (bleu clair)
Lien de boîtier
de ltre (blanc)
Verrous du
couvercle
Couvercle du préltre
Couvercle
supérieur
Cadran de lavage
à contre-courant
Robinet d'eau potable
Cadran d'eau potable
Entrée d'eau (pour l'eau de source)
avec adaptateur préinstallé
Sortie de lavage
à contre-courant
(pour l'eau rejetée
et le raccordement
du tuyau de lavage
à contre-courant)
Filtre à charbon
Pré-ltre
(à l'intérieur)
Tuyau de lavage
àcontre-courant

20
SUPPRIMEZ LE COUVERCLE SUPÉRIEUR
DÉCONNECTEZ LE LIEN DU BOÎTIER DU FILTRE BLANC
DÉVISSEZ ET OUVREZ LE HAUT DU BOÎTIER DU FILTRE
À CHARBON AVANCÉ (GRIS)
vers le centre de la boîte
Appuyez sur les deux
languettes rectangulaires
Tirez le lien blanc du boîtier
vers le haut jusqu'à ce qu'il
soitdéconnecté
CONFIGURATION | INSTALLATION
DUFILTREÀCHARBON
1
2
3
Faites glisser le couvercle LifeStraw Max vers
le centre de l'appareil pour le déverrouiller.
Soulevez le couvercle du Max et réglez-le sur le
côté. Les verrous du couvercle n'ont pas besoin
d'être maintenus ensemble lors du levage du
couvercle.
Débranchez le lien supérieur du boîtier du ltre (blanc) des cartouches
ltrantes en poussant les deux languettes vers le centre de la boîte tout
en tirant le lien blanc du boîtier vers le haut.
Dévissez le capuchon supérieur
du boîtier du ltre à charbon gris.
Localisez le bloc ltre à charbon
etretirez-le de l'emballage.
REMARQUE: Si vous avez des dicultés à ouvrir le
boîtier du ltre à charbon, nous vous recommandons
de retirer la cartouche de charbon gris du Max pour
dévisser le dessus et installer le bloc ltre à charbon.
Other manuals for LifeStraw
2
Table of contents
Languages:
Popular Dispenser manuals by other brands

Curtis
Curtis TCC2N instructions

Piusi
Piusi CUBE B.SMART Installation, use and maintenance

FROST
FROST 06.2010 quick start guide

Silvercrest
Silvercrest 301634 Operation and safety notes

Silvercrest
Silvercrest 304340 Operation and safety notes

Ice-O-Matic
Ice-O-Matic Counter Top Dispenser IOD16022 Service & parts manual