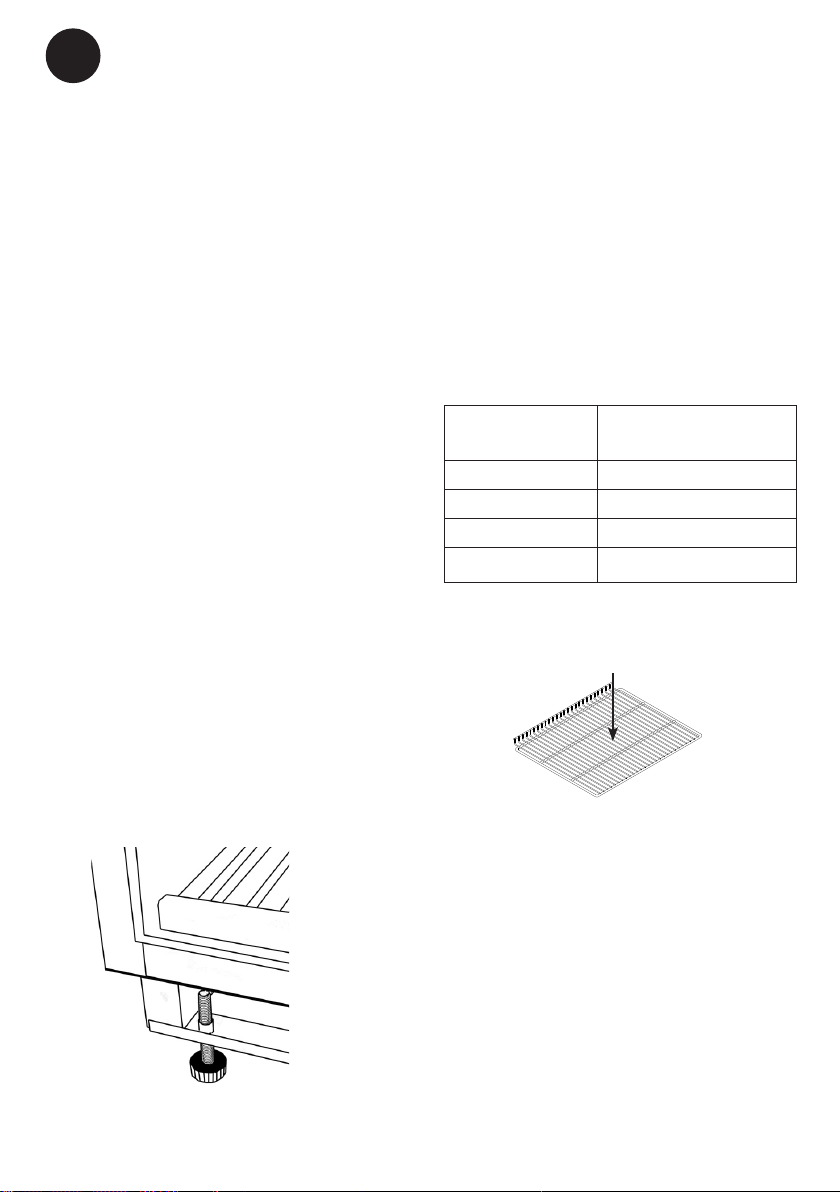
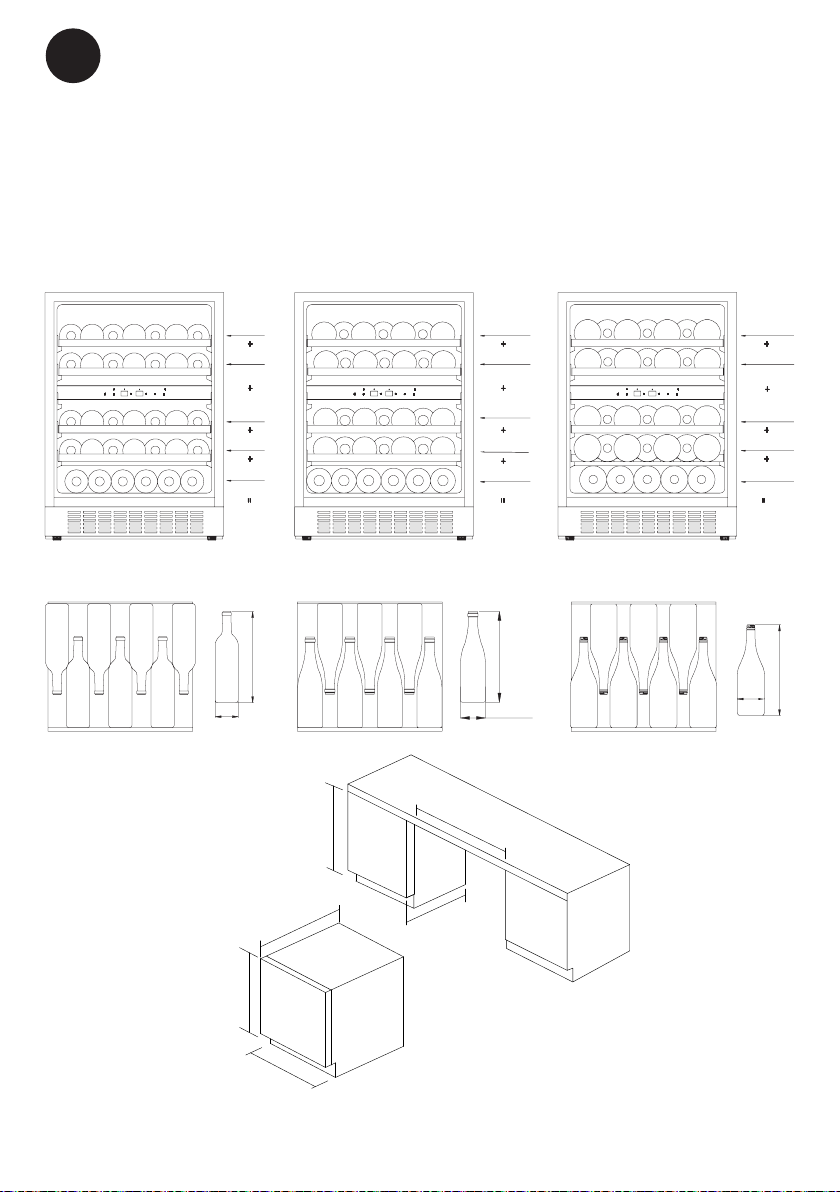
Vestfrost WFG48 User manual

Cabinet WFG48 - WFG49
GB Instructions for use
DK Brugsanvisning
NO Bruksanvisning
SE Brugsanvisning
FI Käyttöohjeet
DE Bedienungsanleitung
FR Mode d’emploi

2
GB
WARNING:
Keep ventilation openings in
the appliance’s cabinet or in the
built-in structure clear of obstruc-
tion.
WARNING:
Do not use other mechanical
devices or other means to ac-
celerate the defrosting process
than those recommended by the
manufacturer.
WARNING:
Do not damage the refrigerant
circuit.
WARNING:
Do not use electrical applian-
ces inside the storage compart-
ment, unless they are of a type
recommended by the manufac-
turer.
WARNING:
Danger: Risk of re or explosion
if ammable refrigerant is used.
To be repaired only by trained
personnel.
WARNING:
When positioning the appliance,
ensure the power cord is not
trapped or damaged.
WARNING:
Do not locate multiple portable
socket-outlets or portable power
supplies at the rear of the appli-
ance.
●Always keep the keys in a separate
place and out of reach of children.
●Children should be supervised to
ensure that they do not play with the
appliance.
●This appliance is not intended for use
by persons (including children) with
reduced physical, sensory or mental
capabilities, or lack of experience
and knowledge, unless they have
been given supervision or instruction
concerning use of the appliance by a
person responsible for their safety.
●Before servicing or cleaning the ap-
pliance, unplug the appliance from
the mains or disconnect the electrical
power supply.
●If the supply cord is damaged, it must
be replaced by the manufacturer, its
service agent, or similarly qualied
persons in order to avoid a hazard.
Warning

3
GB
●Frost formation on the interior
evaporator wall and upper parts is a
natural phenomenon. Therefore, the
appliance should be defrosted during
normal cleaning or maintenance.
●Please note that changes to the ap-
pliance construction will cancel all
warranty and product liability.
●This appliance is intended to be used
exclusively for the storage of bottles
or cans.
●This appliance is intended to be used
in household and similar applications.
●Do not store explosives, such as
aerosol cans with ammable propel-
lants in the unit.
CLASS 1 LED PRODUCT
The instructions shall include the substance
of the following:
This appliance is intended to be used in
household and similar applications such as
• sta kitchen areas in shops, oces and
other working environments;
• farm houses and by clients in hotels,
motels and other residential type en-
vironments;
• bed and breakfast type environments;
• catering and similar retail and non-retail
applications.
Contents
Warning ......................................................2
Before use ..................................................4
Technical data.............................................4
Get to know your cooler..............................5
Installation and start-up ..............................6
Savings in energy consumption in the use.6
Operation and function ...............................7
Change of hinge side .................................9
Defrosting, cleaning, and maintenance ....12
Fault nding..............................................13
Warranty, spare parts and service............14
Disposal....................................................15
CE Declaration of conformity............. Page A

4
GB
Wiring and connections in power supply
systems must been all applicable (local and
national) electrical codes. Consult these
codes lengths and sizes prior to cabinet
installation.
This device complies with relevant EU
directives including Low Voltage Directive
2014/35/EU and Electromagnetic Compat-
ibility Directive 2014/30/EU
The socket should be freely accessible.
Connect the appliance only to 220/240 V
/ 50Hz alternating current via a correctly
installed earthed socket.
The socket must be fused with a 10-13 A
fuse.
If the appliance is to be operated in a non-
European country, check on the rating plate
whether the indicated voltage and current
type correspond to the values of your mains
supply.
Information regarding voltage, current or
power are given on the rating plate
The power cord may be replaced by a
technician only.
The rating plate provides various techni-
cal information as well as type and serial
number.
Before operating your new appliance,
please read the following instructions care-
fully as they contain important information
on safety, installation, operation and main-
tenance. Keep the instructions for future
reference. On receipt, check to ensure that
the appliance has not been damaged dur-
ing transport. Transport damage should be
reported to the local distributor before the
beverage cooler is put into use.
Remove the packaging. Clean the inside of
the cabinet using warm water with a mild
detergent. Rinse with clean water and dry
thoroughly (see cleaning instructions). Use
a soft cloth. If the appliance has been laid
down during transport, or if it has been
stored in cold surroundings (colder than
+5°C), it must stabilise in an upright position
for at least one hour before being switched
on.
Before use Technical data
g. 1
LED
LED
Replaceable
light source by a
professional
Replaceable
control gear by a
professional

5
GB
Get to know your cooler
Rating plate (on the back)
Lighting
Control panel
Shelf
Kick plate
Adjustable feet
g. 2

6
GB
g. 4
Installation and start-up
Placement
For safety and operational reasons, the ap-
pliance must not be installed outdoors.
The appliance should be placed on a level
surface in a dry, well ventilated room (max.
75% relative air humidity). Never place the
appliance close to sources of heat such as
cookers or radiators, and avoid placing it in
direct sunlight.
Installation
The surface on which the appliance is to be
placed must be level. Do not use a frame
or similar. It is important that the appliance
be absolutely level. It can be levelled by
screwing the adjustable feet at the front of
the appliance up or down (g. 2).
Use a spirit level to check that the appliance
is absolutely level sideways.
Along with your new cabinet is a replace-
able kick plate which can be xed with the
two screws. These two screws are located
in the accessories.Hinge side requires a 5
mm space.
NOTE: The kick plate should not be
installed if the unit installed behind a
kitchen shelf.
Room temperature
The climate class is stated on the rating
plate (see page 11).
Note: The appliance operates best at room
temperatures from 10°C to 32°C.
The climate class is shared on the name-
plate. This species the optimum room
temperature.
g. 2
g. 3
The energy consumption reduces ..
1)..the lower the ambient temperature is.
2)..the warmer thermostat set point is.
3)..the lower the number and the shorter
the length of the door openings is.
Savings in energy con-
sumption in the use
Max. 19 kg
Climate class Optimum room
temperature
SN +10 ºC to +32 ºC
N +16 ºC to +32 ºC
ST +16 ºC to +38 ºC
T +16 ºC to +43 ºC

7
GB
Climate class Optimum room
temperature
SN +10 ºC to +32 ºC
N +16 ºC to +32 ºC
ST +16 ºC to +38 ºC
T +16 ºC to +43 ºC
Operation and function
g. 5
1. Power ON/OFF button (beep
sound)
Press this button to turn on the appli-
ance. Press and hold this button for
3 seconds. The left display shows a
countdown from 3 to 1, then the appli-
ance turns o.
2. Indicator light
Displays compressor in operation.
3. Light mode button (beep sound)
There are three light mode types (L1/
L2/L3). The default setting is L1 mode.
L1: Door open: light on. Door closed:
light o.
L2: The light will stay constantly il-
luminated whether the door is open
or closed. Door open with 100% light
brightness. Door closed with 75% light
brightness.
L3: Door open: light on. Door closed:
light will tune o automatically after 10
minutes.
4. Left display
Shows the set temperature of the upper
chamber.
5. Button to adjust upper zone tempe-
rature (beep sound
Each pressure on this button decrea-
ses the temperature by one-degree
increments. When the setting reaches
the lower limit value of 5ºC, it will revert
to the upper limit value of 10ºC. After
selecting your desired set temperature,
the set value will ash for 5 seconds,
after which the display will show the set
temperature.
6. Right display
Shows the set temperature of the lower
chamber.
7. Button to adjust lower zone tempera-
ture (beep sound)
Each pressure on this button decreases
the temperature by one-degree incre-
ments. When the setting reaches the
lower limit value of 10ºC, it will revert
to the upper limit value of 18ºC. After
selecting your desired set temperature,
the set value will ash for 5 seconds,
after which the display will show the set
temperature.
+
-
+
-

8
GB
Shelves
In order, not to damage the gasket on the
door, it is very important to open the door
completely before pulling out the shelves.
Shelves should be tilted slightly before
being removed or inserted, as shown at the
right.
For easy access to the stored content, pull
the shelves approximately 1/3 out of the
compartment. The wooden shelves are
designed with concave grooves, so that tall
wine bottles can be stored crossways.
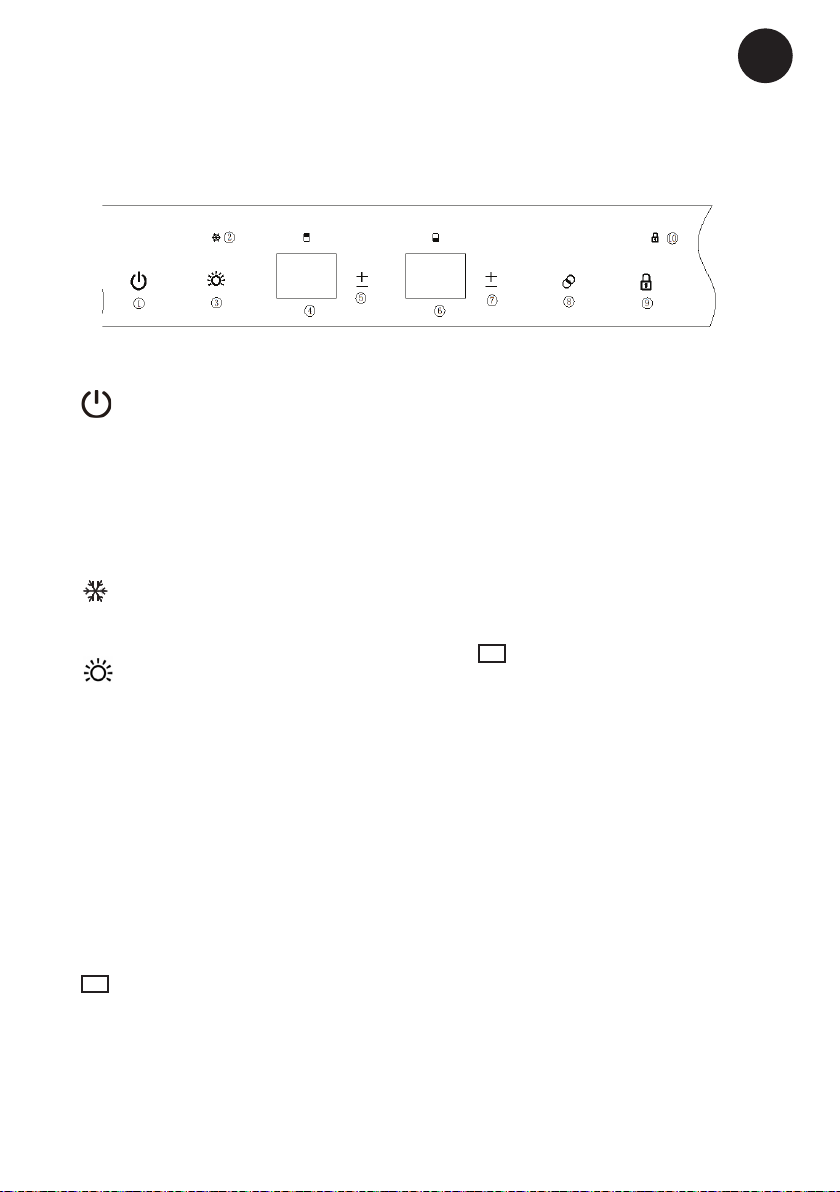
8. Light colour button(beep sound)
Press this button to alternate the light
colour. The default setting is white
light. Each pressure alternates the light
colour between White - Blue - Orange.
The button background colour also
changes at the same time.
9. Child Lock button (beep sound)
The default setting is unlocked. Press
and hold this button for 3 seconds
to lock or unlock the appliance. The
indicator lamp is on when in locked
condition.
10. Indicator lamp
The indicator lamp is on when the ap-
pliance is in locked condition.
NOTE
To switch between ºC and ºF, press and
hold the 5 or 7 temperature adjust button
for 3 seconds. The display will show the
desired setting.
Temperature Alarm
If the inside temperature is higher than 23
ºC, the display will show “HI”, and after one
hour the alarm / buzzer will sound. This
indicates that the inside temperature is too
high. If the inside temperature is lower than
0 ºC, the display will show “LO”, and at the
same time the alarm malfunction indicator is
also active (beep sound).
Open door Alarm
When you forget to close the door, or the
door is not closed completely, the alarm
/ buzzer sounds after 5 minutes. Please
close the door completely to avoid loss of
the cold air.
Temperature memory function
In the event of a power failure, the wine
cooler can remember the previous tem-
perature settings, and when the power is
recovered, the temperature will revert to
the same temperature setting as before the
power failure.

9
GB
g. 7.2
The door can be changed from right-hinged to left-hinged and vice versa as follows:
Change of hinge side
1. Lower hinge (right) 2. Screws 3. Door hinge 4. Door 5. Top hinge (right)
6. Plastic cover 7. Hinge screws 8. Top hinge (left) 9. Hole cover
10. Lower hinge (left) 11. Door tting 12. Screws
1. Open the door to a 90 degrees angle, take out the 2 screws (2) from lower door hing (3),
remove the door (4), Remove the door hing (3) from the door, (Fig. 7.1).
2. Unscrew the screws (12) from the door ttings (11), and relocate it at the opposite side of the
door (g. 7.1)
3. Remove plastic cover (6) (g. 7.2).
4. Unscrew the 3 hinge screws (7) from the top hinge (5) and remove it (g. 7.3).
5. Remove hole covers (9) and mount the spare top hinge (8) at the opposite side of the cabinet
with the 3 screws (g. 7.4).
6. Mount the spare lower hinge (10) (g. 7.5).
7. Mount and align the door.
8. Insert the hole covers to cover the holes (9).
g. 7.1
g. 7.4
g. 7.3
g. 7.5
Ensure that the cabinet is not
connected to the mains and
place the cabinet on the back.
SUPPORT THE DOOR !

10
GB
g. 9
g. 8
Bottle loading proposal1#1
Shelf:full shelf (4)
Bottle loading proposal1#2
Shelf design is same ad proposal 1#1
Bottle loading proposal1#3
Shelf design is same ad proposal 1#1
full shelf (4) full shelf (4) full shelf (4)
ø 77
301
300
300
ø 82,4
ø 90
(ø77) x7
(ø77) x7
(ø77) x7
(ø77) x7
(ø77) x6
(ø77) x34
Total :34 Total :34 Total :33
(ø82.4) x34
(ø82.4) x6 (ø90) x5
(ø90) x7
(ø90) x7
(ø90) x7
(ø90) x7
(ø90) x33
Champagne
Bugendi
Bordeaux
(ø82.4) x7
(ø82.4) x7
(ø82.4) x7
(ø82.4) x7
Automatic door opening function
After the door is closed, press 2-3 seconds on the lower left of the door, after which the
push rod starts and sticks out, and the door opens automatically, and then the push rod
automatically retracts. After two seconds, the door can be closed manually.
min 577mm
562mm
min 850mm
min600mm
835-875mm
595mm
including door

11
GB
1. The door gasket may be aected by hot expansion which results in less sensitivity.
Please follow the instructions to adjust the knob when pushing the door without response
2. When the space between the push-to-open sensor and knob is more than 0.5 mm: Turn
the knob to the left, and the knob will extend from door frame. It will extend 0.75 mm
when rotated 1 turn.
3. When the space between the push-to-open sensor and knob is less than 0.5 mm: Turn
the knob to the right, and the knob will retract to the door frame. It will retract 0.75 mm
when rotated 1 turn.
g. 10
Door switch
Sensor
Knob
Knob
Sensor

12
GB
Automatic defrosting
The beverage cooler is defrosted automati-
cally. Defrost water runs through a pipe and
is collected in a tray above the compressor
where the heat generated by the compres-
sor causes it to evaporate.
Cleaning
Before cleaning the appliance, unplug it
from the main supply. The cabinet is best
cleaned using warm water (max. 65°C) with
a little mild detergent. Never use cleaning
agents that scour. Use a soft cloth. Rinse
with clean water and dry thoroughly. Never
use sharp or pointed implements. Cleaning
agents may discolour the shelves.
The sealing strip around the door must be
cleaned regularly to prevent discolouration
and prolong service life. Use clean water.
After cleaning the sealing strip, check that it
continues to provide a tight seal.
Dust collecting on the condenser under-
neath the cabinet, on the compressor and
in the compressor compartment is best
removed using a vacuum cleaner.
Defrosting, cleaning, and maintenance
Replacing the lighting
Light-emitting diodes designed to last the
entire service life of the appliance are
used. If it, however, becomes necessary
to replace the light source, please call for
service.

13
GB
Fault nding
Fault Possible cause Remedy
The appliance is not
running
The appliance is switched o.
Power failure; the fuse is blown;
the appliance is not plugged in
correctly.
Press the on/o switch.
Check that power is connected.
Reset the fuse.
Water collects in
the bottom of the
cabinet.
The defrost water pipe is
blocked.
Clean the defrost water channel
and the drain hole on the rear
wall of the cabinet.
Vibration or
bothersome noise.
The appliance is not level.
The appliance is resting against
other kitchen elements.
Containers or bottles inside the
cabinet are rattling against one
another.
Level the appliance using a spirit
level.
Move the appliance away from
the kitchen elements or appli-
ances it is in contact with.
Move containers and/or bottles
apart.
Compressor runs
continuously.
High room temperature. Ensure adequate ventilation.
Beverage cooler is
not cold enough
Check the temperature setting.
The door is opened too often.
The door is not completely
closed.
The door gasket does not seal
properly
Set the desired temperature.
Keep the door closed for an
extended period of time.
Close the door.
Align the door.

14
GB
Warranty, spare parts and service
Warranty disclaimer
Faults and damage caused directly or
indirectly by incorrect operation, misuse,
insucient maintenance, incorrect building,
installation or mains connection. Fire, ac-
cident, lightening, voltage variation or other
electrical interference, including defective
fuses or faults in mains installations are not
covered by the warranty.
Repairs performed by others than approved
service centres and any other faults and
damage that the manufacturer can sub-
stantiate are caused by reasons other than
manufacturing or material faults are not
covered by the warranty.
Please note that changes to the construc-
tion of the appliance or changes to the
component equipment of the appliance will
invalidate warranty and product liability, and
the appliance cannot be used lawfully. The
approval stated on rating plate will also be
invalidated.
Transport damage discovered by the buyer
is primarily a matter to be settled between
the buyer and the distributor, i.e. the dis-
tributor must ensure that such complaints
are resolved to the buyer’s satisfaction.
Before calling for technical assistance,
please check whether you are able to rectify
the fault yourself. (see the fault nding list)
If your request for assistance is unwar-
ranted, e.g. if the appliance has failed as a
result of a blown fuse or incorrect operation,
you will be charged the costs incurred by
your call for technical assistance.
Spare parts
When ordering spare parts, please state
the model and production numbers of your
appliance. This information is given on the
rating plate. The rating plate contains vari-
ous technical information, including type
and serial numbers.
Note: Always use approved service centres
when your appliance is to be repaired or
replaced!
g. 11

15
GB
Disposal
Information for Users on Collection
and Disposal of Old Equipment and
used Batteries
These symbols on the products,
packaging, and/or accompanying
documents mean that used electri-
cal and electronic products and
batteries should not be mixed with
general household waste. For proper
treatment, recovery and recycling
of old products and used batteries,
please take them to applicable collec-
tion points, in accordance with your
national legislation and the Directives
2012/19/EU and 2006/66/EC.
By disposing of these products and
batteries correctly, you will help to
save valuable resources and prevent
any potential negative eects on
human health and the environment
which could otherwise arise from
inappropriate waste handling.
For more information about collec-
tion and recycling of old products and
batteries, please contact your local
municipality, your waste disposal
service or the point of sale where you
purchased the items.
Penalties may be applicable for incor-
rect disposal of this waste, in accord-
ance with national legislation.
For business users in the Euro-
pean Union.
If you wish to discard electrical and
electronic equipment, please contact
your dealer or supplier for further
information.
Information on Disposal in other
Countries outside the European
Union
These symbols are only valid in the
European Union. If you wish to dis-
card this product, please contact your
local authorities or dealer and ask for
the correct method of disposal.
Note for the battery symbol:
This symbol might be used in combi-
nation with a chemical symbol. In this
case it complies with the requirement
set by the Directive for the chemical
involved.

2
DK
Advarsel
ADVARSEL:
Lad ventilationsåbninger, i ap-
paratets kabinet og i eventuelt
indbygningsmodul, være util-
dækkede.
ADVARSEL:
Anvend ikke mekaniske appara-
ter eller andre hjælpemidler til at
fremskynde afrimningsproces-
sen, udover dem som er anbefa-
let af fabrikanten.
ADVARSEL:
Undgå at beskadige kølemiddel-
systemet.
ADVARSEL:
Anvend ikke elektriske apparater
inde i apparatet, medmindre de
er af en type som er anbefalet af
fabrikanten.
ADVARSEL:
Fare og risiko for brand eller
eksplosion, da kølemidlet er
brændbart. Apparatet må kun re-
pareres af uddannet personale.
ADVARSEL:
Når apparatet sættes i positio-
nering, sørg for at netledningen
ikke er fastklemt eller beskadi-
get.
ADVARSEL:
Placer ikke forbindelsesbokse,
forlængerledninger eller andre
strømforsyninger på bagsiden af
enheden.
●Opbevar altid nøgler et separat sted
utilgængeligt for børn.
●Børn skal være under opsyn for at sikre,
at de ikke leger med apparatet.
●Dette apparat er ikke beregnet til at
blive brugt af personer (inklusive børn)
med nedsatte fysiske, sensoriske eller
mentale evner eller manglende erfaring
og viden, medmindre de har fået opsyn
eller instruktion i brugen af apparatet af
en person, der er ansvarlig for deres sik-
kerhed.
●Træk stikket ud af stikkontakten før repa-
ration eller rengøring af apparatet.
●Hvis netledningen er beskadiget, skal den
udskiftes af producenten, producentens
serviceagent eller anden fagmand for at
undgå fare.
●Dannelse af rim på den indvendige
fordamperplade og de øverste dele er
normalt. Apparatet skal derfor afrimes
i forbindelse med almindelig rengøring
eller vedligeholdelse.
●Vær opmærksom på at ændringer i ap-
paratets konstruktion vil medføre, at al
garanti og produktansvar bortfalder.

3
DK
●Apparatet er udelukkende beregnet til
opbevaring af af asker eller dåser.
●Dette apparat er beregnet til at blive brugt
i husholdninger og lignende applikationer.
● Opbevar ikke eksplosive stoer såsom
spraydåser med en brændbar drivgas i
dette apparat.
KLASSE 1 LED PRODUKT
Dette apparat er beregnet til at blive brugt
i husholdninger og lignende applikationer
som f.eks
●køkken personale i butikker, kontorer
og andre arbejdsmiljøer;
●gårde og af kunder i hoteller, moteller
og andre boligtyper;
●bed and breakfast;
●catering og lignende detail- og ikke-
detailapplikationer.
Indhold
Advarsel......................................................2
Inden brug ..................................................4
Tekniske data..............................................4
Lær Display Cooleren at kende..................5
Ibrugtagning og installation.........................6
Energispare forslag ....................................6
Betjening og funktion..................................7
Omhængsling af dør ..................................9
Afrimning, rengøring og vedligeholdelse ..12
Fejlndningsliste.......................................13
Reklamation, reservedele og service .......14
Bortskaelse.............................................15
CE Overensstemmelseserklæring.............A

4
DK
Tekniske data
Ledninger og forbindelser til strømforsy-
ningssystemer skal været i overensstem-
melse med gældende lokale og nationale
standarder og love.
Denne enhed overholder de relevante EU-
direktiver, herunder Lavspændingsdirektivet
2014/35/EU - Elektromagnetisk kompatibi-
litet direktiv 2014/30/EU
Stikket skal være frit tilgængelig.
Tilslut kun apparatet til 220/240 V / 50Hz
vekselstrøm via en korrekt installeret stik-
kontakt med jordforbindelse.
Stikkontakten skal være sikret med en 10A
- 13 A sikring
Hvis apparatet skal betjenes i et ikke-euro-
pæisk land, tjek på typeskiltet, om anført
spænding og strøm svarer til værdierne i
din netspænding.
Oplysninger om spænding og eekt /
strøm er angivet på typeskiltet.
Netledningen må kun udskiftes af en auto-
riseret.
Typeskiltet indeholder forskellige tekniske
oplysninger, samt type og serienummer.
Inden du anvender dit nye apparat bør du
læse brugsanvisningen grundigt. Brugsan-
visningen indeholder vigtige informationer
vedrørende sikkerhed, intallation, drift og
vedligeholdelse. Gem brugsanvisningen.
Du kan få brug for den på et senere tids-
punkt.
Kontroller at skabet ikke er beskadiget ved
modtagelsen. Transportskader skal anmel-
des til forhandleren inden køleskabet tages
i brug.
Fjern emballagen. Rengør skabet indven-
digt med lunken vand tilsat et mildt opva-
skemiddel. Afvask med rent vand og tør
grundigt af (se rengøring). Brug en blød
klud.
Hvis skabet har ligget ned under transport
eller det er blevet opbevaret i kolde omgi-
velser (koldere end +5 ºC) skal apparatet
stå op i minimum en time inden ibrugtag-
ning.
Inden brug
LED
LED
Lyskilden udskiftes
af en professionel
Kontroludstyr
udskiftes af en
professionel
g. 1

5
DK
Typeskilt (på bagside)
Belysning
Betjeningspanel
Hylde
Fodspark
Justerbare fødder
Lær Display Cooleren at kende

6
DK
g. 2
g. 2
Ibrugtagning og installation
Placering
Af sikkerhedsmæssige og driftsmæssige
grunde må apparatet ikke placeres uden-
dørs.
Stil skabet på et plant underlag i et tørt
og godt ventileret rum (max. 75% relativ
luftfugtighed). Anbring ikke skabet tæt på
varmekilder såsom komfur eller radiator og
undgå at det udsættes for direkte sollys el-
ler varme fra anden varmkilde.
Installation
Underlaget hvorpå skabet opstilles skal
være plant. Brug ikke en ramme eller
lignende.
Det er vigtigt, at skabet står helt lige. Man
kan justere skabet ved at dreje de juster-
bare fødder i fronten op eller ned (se gur
2). Kontroller med et vaterpas, at skabet
står lige.
Indbygning
Skabene kan bygges ind i et køkkenele-
ment eller stå frit (gur 4). Ved indbygning
af skabet skal det sikres, at der er tilstræk-
kelig luftgennemgang i køkkensoklen foran
apparatet.
Hængselside kræver 5 mm luft.
Det medfølgende fodspark kan monteres
med de to medfølgende skruer som ligger
løse i plastposen.
OBS: Fodsparket skal ikke monteres, hvis
apparatet indbygges bag en køkkensokkel.
Rumtemperaturen
Klimaklassen står på typeskiltet (se side
11). Den angiver indenfor hvilke rumtempe-
raturer kølekabet kører optimalt.
Klimaklassen står på typeskiltet.
Energiforbruget reduceres ..
1) .. jo lavere den omgivende temperatur er.
2) .. jo varmere termostat indstillingen er.
3) .. jo færre antal gange, døren bliver åbnet
og jo kortere tid, døren står åben
Energispare forslag
Max. 19 kg
g. 5
Klimaklasse Tilladte temperatur
SN +10 ºC til +32 ºC
N +16 ºC til +32 ºC
ST +16 ºC til +38 ºC
T +16 ºC til +43 ºC
This manual suits for next models
1
Table of contents
Languages:
Other Vestfrost Wine Cooler manuals

Vestfrost
Vestfrost FUNCTION User manual

Vestfrost
Vestfrost Tecfrigo 32 Quick start guide

Vestfrost
Vestfrost FZ W Series User manual

Vestfrost
Vestfrost WFG 185 User manual

Vestfrost
Vestfrost WFG 185 User manual

Vestfrost
Vestfrost WFG46 User manual

Vestfrost
Vestfrost FZ375W User manual

Vestfrost
Vestfrost WFG 22 User manual

Vestfrost
Vestfrost W155 User manual

Vestfrost
Vestfrost WFG 18 User manual