ViaAqua Acro-Cal User manual

1
AC-30
WARNING!
Buyer/user assumes all responsibility for
safety and proper use not in accordance
with the directions and safety labels.

1 2
Drip
Loop
GFCI
ONLY
• Built-inwaterpumpandbleedvalve
• Built-incompressionttingforpHsensor
• Useinsumporhangingpump
ViaAqua®Acro-CalTMCalciumReactoroffersasimpleandconvenientsolutionfor
maintainingcalciumandalkalinityinyourreeftank.Aftertheinitialsetup,thecalciumreactor
requiresminimalmaintenance.Acalciumreactorisalmostanecessityfortanksheavily
stockedwithstonycoral,wherecalciumandalkalinitydemandsarehighandwillpromote
corallinealgaegrowth.Acro-CalTMCalciumReactorprovidesasteadysupplyofcalciumby
usingCO2todissolvemediainthereactorand,thus,releasingcalciumintoyourwater.The
efuentreleasedalsoactsasabuffertostabilizekH.
WARNING AND SAFEGUARDS:
This product may contain chemicals known to the state of California
to cause cancer and or birth defects or other reproductive harm.
Wash your hand after handling this product.
It is your sole responsibilities to verify that the plug and the
receptacle are clean and free of moisture and salt build up at
all times. The receptacle must be free of water, salt, calcium,
magnesium and dust. Failure to do so can cause fire, damage to
property, permanent damage to the product and personal injury not
limited to loss of life.
Do not plug into extension cord/power strip.
A drip loop must be used when plugging all electrical aquarium
devices. A drip loop is that part of the cord hanging below
the receptacle.
The national code requires that a GFCI (Ground fault circuit
interrupter) be used in the branch circuit supplying all power
to water pumps and electrical aquarium equipment. If you
do not have a GFCI, have an electrician install one prior to
operating any aquarium component.
• ReadandfollowallinstructionsbeforeusingtheAcro-CalTMReactortoensureproperuse
andapplication.
• Usethisproductforitsintendeduseonly.
• DonotoperateViaAqua®Acro-CalTMReactorwithoutwater.Doingsocancausepermanent
damagetothepump.
• Priortomaintenanceonanyelectricalaquariumapplianceoraquarium,youmustdisconnect
allelectricalaquariumdevices.
• Routinemaintenanceisrequiredtoensurethemaximumperformanceandthelongevityof
theViaAqua®Acro-CalTMReactor.Seemaintenanceguidelines.
• Theuseofasurgesuppressorisstronglyrecommended.
ItemsRequiredforInstallation(notincluded):
• CO2Source
• CO2Regulator
• CO2CheckValve
• SiliconeTubing
• Oceanpure™CalciumReactorMedia
• pHController(recommended)
• Lidsecuredwithlatches
• Bubblecounterincluded
• For50to200gallonsaquariums
PART LIST
1. Latch
2. Hanger
3. Supportgrid
4. Sponge
5. Standpipe
6. Suctioncupbracket
7. Base
8. Bubblecounter

3 4
INSTALLATION:
1. Removethetopofthecalciumreactor.Rinsecalciumreactormedia.Placeaspongeover
thebottomsupportgrid.Addapproximately10inofmediatothereactor.Whenadding
mediaverifythatmediadoesnotgodownthestandpipe.Placeanotherspongeoverthetop
supportgripabovethemedia.Latchlidbackontothecalciumreactorandverifythatthe
outputisconnectedtothestandpipe.
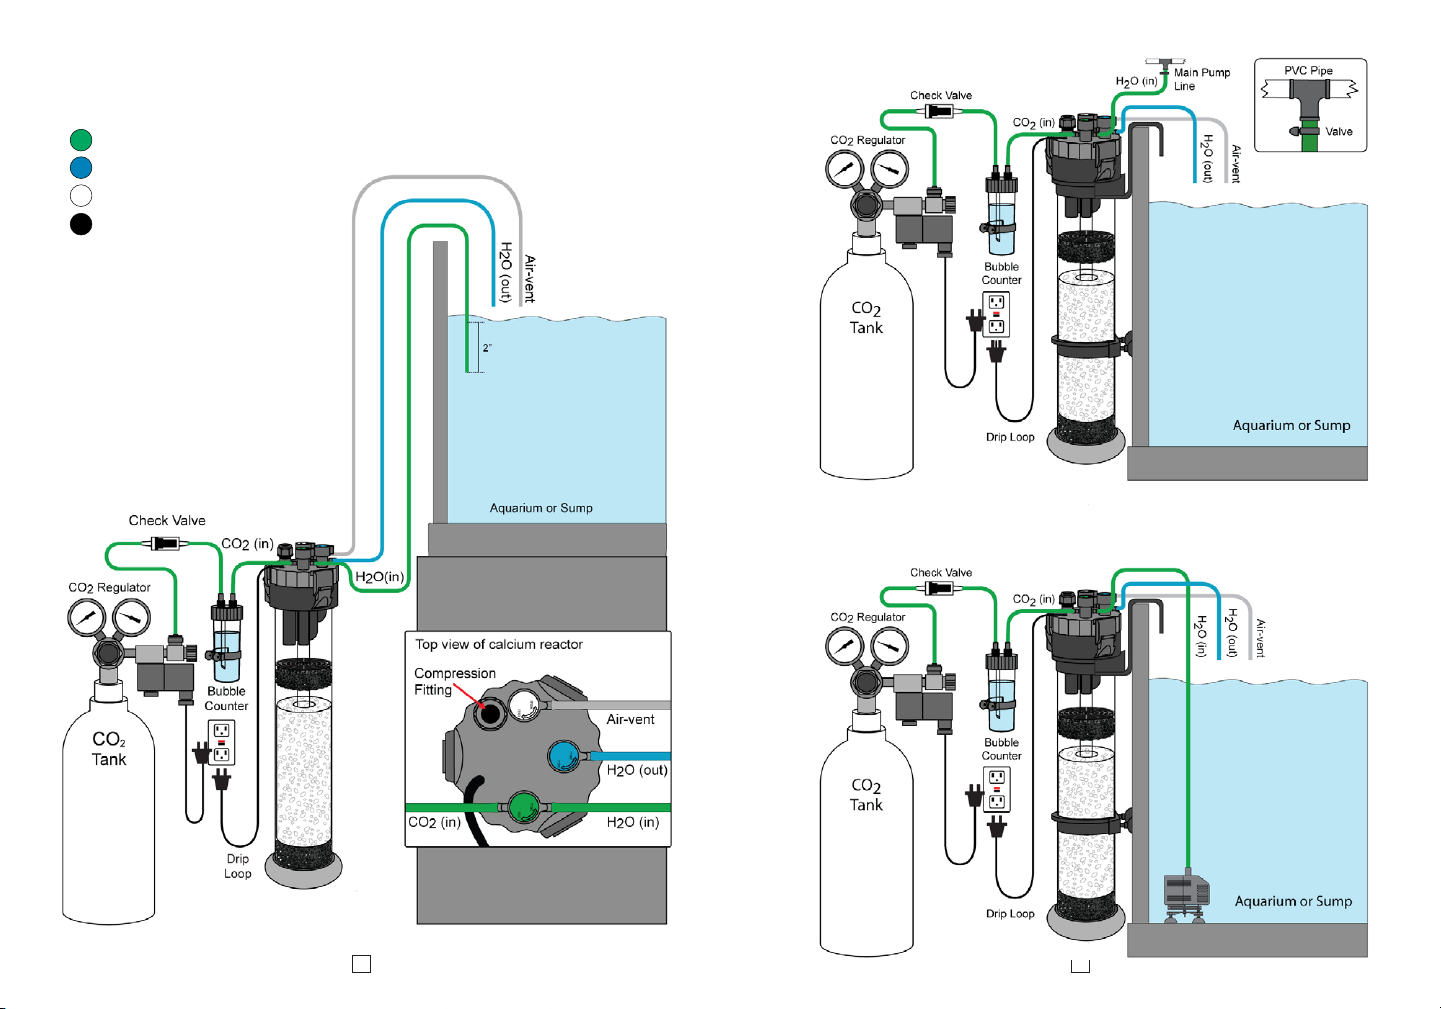
2. Chooseoneofthefollowingwatersource(in):
a)Gravity(unitinstalledbelowaquarium):Connectapieceofsiliconetubingtothegreen
waterintakevalve,insertthelineinsidetheaquarium2inbelowthewatersurface.
Thetubecanbesecureddirectlytotheoverowboxusingaziptie.
b)Pressure:Chooseanexistingpressureline.Cutthelineandplumbinatee.Thebleedline
willsupplywatertothecalciumreactor.Thebleedlinemusthaveavalveandreduced
to3/16inbarb.Withthevalveclosedconnectsthesiliconetubingfromthebleedline
directlytothegreenwaterintakevalve.
c)Supplypump:Useaseparatelowowpump.Reducetheoutputofthepumpto3/16in
barb.Connectsiliconetubingdirectlytothegreenwaterintakevalve.Dependingonthe
sizeofthepump,ableedlineisneededtokeepwaterowingthroughthepump
atalltimes.
3. Efuentwater(out):Connectsiliconetubingtotheblueefuentwatervalve.Securetheline
tothebackoftheaquariumor
sump.Thesiliconetubingmust
bepositionedabovewaterlevel
sothatyoucanseedropletsof
waterowingfromthetube.
4. Fillbubblecounterthree
quartersfullwithfreshwater.
5. CO2/Waterintake(in):Attach
thesiliconetubingfromthe
CO2regulatortoacheckvalve
tothebubblecounterandtothe
CO2greenwaterintakevalve.
Seediagram.
6. Air-vent-bleed:Attachsilicone
tubingtothewhiteair-vent-
bleedvalve.Securesilicone
tubingtotheaquariumorsump.ThishelppreventsairandCO2frombuildingupatthetop
ofthecalciumreactor.
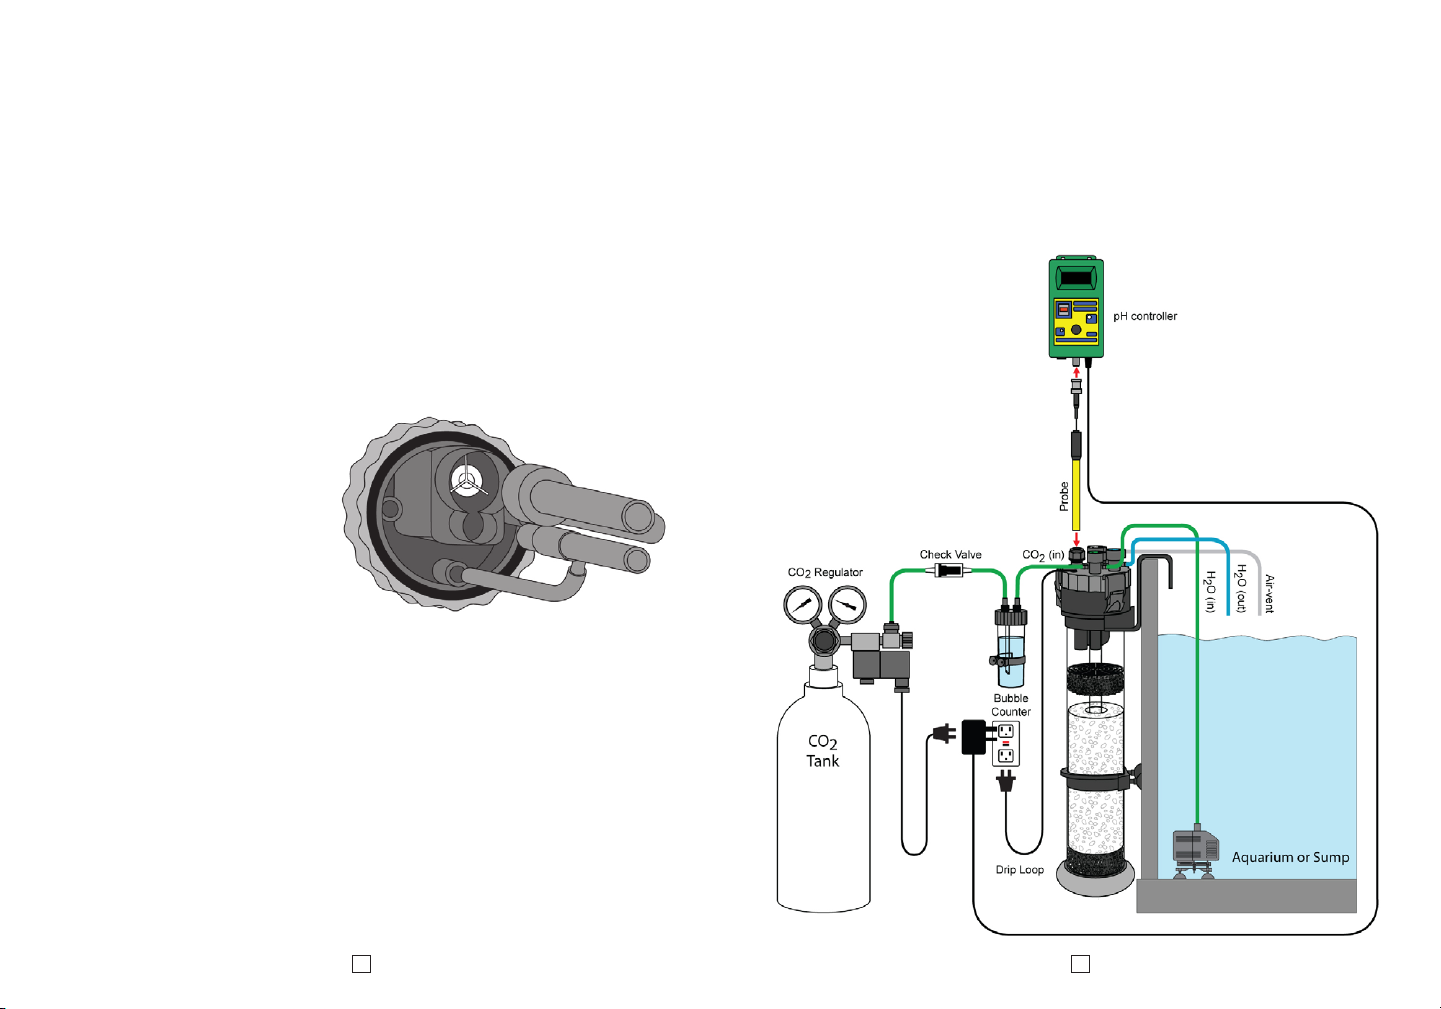
7. WhenusingapHcontrollerandprobe,twistoffthecapofthecompressiontting.Remove
therubberplug.Slideonthecompressionttingoverthesensorprobe.Insertprobeintothe
compressionttingandhandtightennuttoseal.SeeinstructionsforpHcontrollerandprobe
(page7)
8. PrimingCalciumReactor:
a)Gravity:Openthegreenwaterintakevalve.Disconnectthetubingfromthegreenwater
intakevalve,applysuctiontostartasiphonandreattachitbacktothegreenwaterintake
valve.Keepthewhiteair-vent-bleedvalveopenuntilthecalciumreactorisfullofwater.
b)Pressure:Openthegreenwaterintakevalve,thenthewhiteair-vent-bleedvalve(this
valvemaynothavetobeopenedalltheway).Whenastrongpumpisused,thewhite
air-vent-bleedvalveonlyneedstobeopenaquarterturn.Closethewhiteair-vent-bleed
valvecompletelywhenthecalciumreactorisfullofwater.
c)Supplypump:Openthegreenwaterintakevalve.PlugthepumpintoaGFCIoutlet.
Openthewhiteair-vent-bleedvalveuntilthecalciumreactorisfullofwater.
9. Oncethecalciumreactorisprimed,closewhiteair-vent-bleedvalve.Ifairisaccumulated
inthecalciumreactor,openwhiteair-vent-bleedvalveandleavethegreenwaterintake
valveopen.
10. Turnonthepumpandwaituntilthewaterclears.Opentheblueefuentwatervalve.
Adjustthevalvesothereisabrokenstreamofwaterdischargingfromthetube.Setthe
valveasslowaspossiblewithoutbeingabletocountanydroplets.
11. TurnontheCO2controlvalve.AdjusttheCO2regulatortoproduce60bubblespermin.
inthebubblecounterchamber.TheCO2inputisdirectlyrelatedtowaterowrate:
• ToraisepHinefuentwaterincreasewaterowordecreaseCO2
• TolowerpHinefuentwaterdecreasewateroworincreaseCO2
12. ApHmeter/controllerisrecommendedtomaintainaproperlevelofpHintheaquarium.
CollectasmallamountofefuentwaterandtestitwithapHmeter.Initiallyadjustthe
CO2atpH7.5.MonitorthepHintheaquariumandverifythatit’snotdroppingfast.If
pHdropsrapidly,decreaseCO2immediately.Atalltimes,thepHoftheaquariumshould
beover8.0.TheidealpHoftheefuentwatershouldbe6.5to7.5.Ittakesapproximately
twoweekstostabilizethepHoftheefuentwatertotheideallevel.Continueincreasing
ordecreasingtheCO2orefuentwateramountasneededtoachieveoptimumpHlevel.
13. After24hours,measurethecarbonatehardnessoftheefuentwater.Thehardnesslevel
shouldbearound12-16dKH.Calciumlevelswillincreasebuttherateitincreasesdepend
onthetypeofmediaused.OceanpureTMCalciumReactorMediaisrecommended.
14. ContinueaddingthecalciumuntiltheCalciumReactorstartstowork.

5 6
SETUP DIAGRAM
A) GRAVITY
GreenWater&CO2IntakeValve:CO2/H2OIn
BlueEfuentWaterValve:H2OOut
Air-Vent-BleedValve
Compressiontting
C) SUPPLY PUMP
B) PRESSURE

7 8
INSTALLATION:
• SecurethecontainertothepHprobe.
• PlugtheelectronicsolenoidintothepHcontroller.
• FollowpHcontrollermanufactureinstructionsforproperunitsetting.
IfyoustillhavequestionsabouthowtoinstallormaintaintheAcro-CalTMReactor,consult
yourlocalshstore.Continuemonitoringthewaterquality(calcium,alkalinity,efuentpH)to
ensureaproperlyworkingCalciumReactor.
MAINTENANCE
1. Routinemanteinanceisrequiredtoensurethemaximumperformanceandthelongevityof
theViaAqua®Acro-CalTMCalciumReactor.
2. ForproperoperationoftheCalciumReactor,cleantheimpelleronceamonth.
a)Removethetopofthecalciumreactor.
b)Removetheimpellercover.
c)Removetheimpellerandshaft.Withasmallbrushcleantheinsideoftheimpellerand
impellercover.
d)Iftheimpellerdoesnotspineasilyontheshaft,soaktheunitwith3:1vinegarsolution.
Removeallcalciumresiduebetweentheshaftandrotor.
e)Reassemble.
3. Replacecalciummediaevery3to6monthsdependingontheusage.
4. CleantheViaAqua®Acro-CalTMCalciumReactorevery3to6monthsalongwiththewater
pump.
5. Makesureallpartsarefreeofdebrisandcalciumbuild-up.
INSTRUCTIONS WHEN USING A
PH CONTROLLER AND PROBE:
a. Removetherubberplug.Slidethe
compressionttingoverthesensor
probe.Insertprobeintothecompres-
sionttingandhandtightennutto
seal.
b. TwotypesofpHcontroller:
1. pHmonitor:Mountthecontrol
boxsothattheLCDscreenis
visible.Thereadoutshould
haveapHof6.5-7.5ideally.
pHshouldbemaintainedbetween6.5-6.8.IfpHistoohigh,decreasewaterowand/
orincreaseCO2.
2. pHcontroller:UnitrequireaCO2regulatorthathasanelectronicsolennoid.Plugthe
solenoidintothepHcontroller.TurnonCO2toabubbleforasecond.SetdesiredpH
between6.5-7.5onthecontroller,thesolenoidandcontrollerwillnowmonitorCO2
byaddingCO2whenneeded.
PH CONTROLLER (RECOMMENDED)
ThepHControllerisusedtokeeptheefuentwateratapresetlevel.
Itemsneeded:
• pHcontroller
• CO2regulatorwithsolenoid
• Containerfortheefuentwater(musttpHprobe)

Replacement Parts UPC 0069037
Motorhousing 30242
Mediasponges-2pack 30228
Impeller 30266
Oceanpure™CalciumReactorMedia TBA
LIMITED WARRANTY
CommodityAxis,Inc.®warrantsthattheViaAqua®Acro-CalTMCalciumReactorisfreefromdefectsforaperiodofoneyear
fromtheinitialdateofpurchaseshownontheoriginalcashregisterreceipt.CommodityAxis,Inc.®disclaimallotherwarran-
ties,expressorimplied,includingbutnotlimitedtoanyimpliedwarrantiesofmerchantabilityand/ortnessforaparticular
purpose.Althoughthislimitedwarrantygivesyouspecicrights,youmayhaveotherrightswhichvaryfromstatetostate.
Thiswarrantyisvoidifthefailureisduetomisuse,tampering,negligence,abuse,accidentand/orsubmersion,afailureto
properlyinstall,maintain,clean,prelter,reassemble,and/orusetheViaAqua®Acro-CalTMCalciumReactorwithaGround
FaultCircuitInterrupter(GFCI).
CONSUMER REMEDIES
CommodityAxis,Inc.’sentireliabilityandyoursoleandexclusiveremedyshallbeeitherrepairorreplacementoftheVi-
aAqua®Acro-CalTMCalciumReactoronlyifyoureturnthedefectiveunitdirectlytoCommodityAxis,Inc.®withtheoriginal
receiptinitsoriginalboxalongwithtwentydollars($20.00)forshippingandhandling.DonotsendtheViaAqua®
Acro-CalTMCalciumReactorbyinsuredmail.YoumaysendyourreturnsorreplacementsbyUPSifrequiringasignatureupon
arrival.Anyreplacedunitwillbewarrantedfortheremainingtimeoftheoriginalwarrantyperiod.Innoeventshallanyship-
pingchargesbereimbursed.InnoeventwillCommodityAxis,Inc.®beliableforanyconsequentialorincidentaldamages,
includingbutnotlimitedtolostsealife,personalinjury,propertydamage,damageequipment,lostprots,lostwages,lost
savings,lostincome,etc.,arisingoutoftheuseoftheViaAqua®Acro-CalTMCalciumReactor.Somestatesdonotallowfor
thelimitationorexclusionofliabilityforincidentalorconsequentialdamages,sotheaboveexclusionmaynotapplytoyou.
RETURNS: Pleasecontactourservicecenterat(888)838-3882orfaxto(888)989-0878toarrangerepairand/orreplace-
ment.Pleaseallow4-6weeksforallreturns.CommodityAxis,Inc.®cannotshipnorrespondtoaP.O.Boxaddress.
Assemble or Use Problems: Ifyouhaveanyproblemsassemblingorusingthisunit DO NOT RETURN ViaAqua®Acro-
CalTMReactortothestore.
Call our Technical Service Department: MondaytoFriday9am-5pmPST.(805)383-3566ext.102
e-mail:[email protected]
WARRANTY CARD
*Afx a copy of your original purchase receipt here.Please mail warranty card and proof of purchase
within 15 days of purchase to:
Commodity Axis® Inc., 300 South Lewis Rd. Unit J. Camarillo CA 93012
IMPORTANT: Please make a copy of this warranty card and retain it for your records. Warranty policy is
subject to change without notice.
Name Date
Address
City State Zip Code
Country Phone
Date of Purchase Seller (Retail Name)
Seller’s Location Phone
Commodity Axis® Inc., 300 South Lewis Rd. Unit J. Camarillo CA 93012

Commodity Axis, Inc.®is also a manufacture of
ViaAqua®Acro-Cal™ Reactor, ViaAqua®Poly Reactor™,
ViaAqua®Oceanpure™Salt, ViaAqua®Glass Heater, ViaAqua®Titanium Heater,
ViaAqua®MillionAir™Air Pump, ViaAqua®Water Pumps, ViaAqua®Glass Aquariums
and Helios®Lighting Systems.
© 2009 Commodity Axis, Inc.®
Specifications are subject to change without notice
Bringing Products to Life
www.CommodityAxis.com
www.ViaAquaOceanpure.com
This manual suits for next models
1
Table of contents
Other ViaAqua Water Filtration System manuals
Popular Water Filtration System manuals by other brands

Judo
Judo LongLife JUKO-LF-A 3/4 Addition to the installation and operating instructions

PureEffect
PureEffect ULTRA-UC-DISINFECT manual

Brita
Brita Redi-Twist USS-301 installation instructions

Zip
Zip HydroTap G4 user guide

Eaton
Eaton HCU2 installation manual

Mitsubishi Electric
Mitsubishi Electric PZ-15RFP2-E operating instructions

Hayward
Hayward Pro Logic PL-P-4-CUL installation manual

Drinking Fountain Doctor
Drinking Fountain Doctor EFHA8 1E Installation use and care manual

Beko
Beko BEKOMAT 14i manual

Pulsotronic
Pulsotronic MESEP VA digital 50 manual

Grunbeck
Grunbeck clearliQ safe+ Operation manual

Pool Pro
Pool Pro MINERALX Installation & operating guide