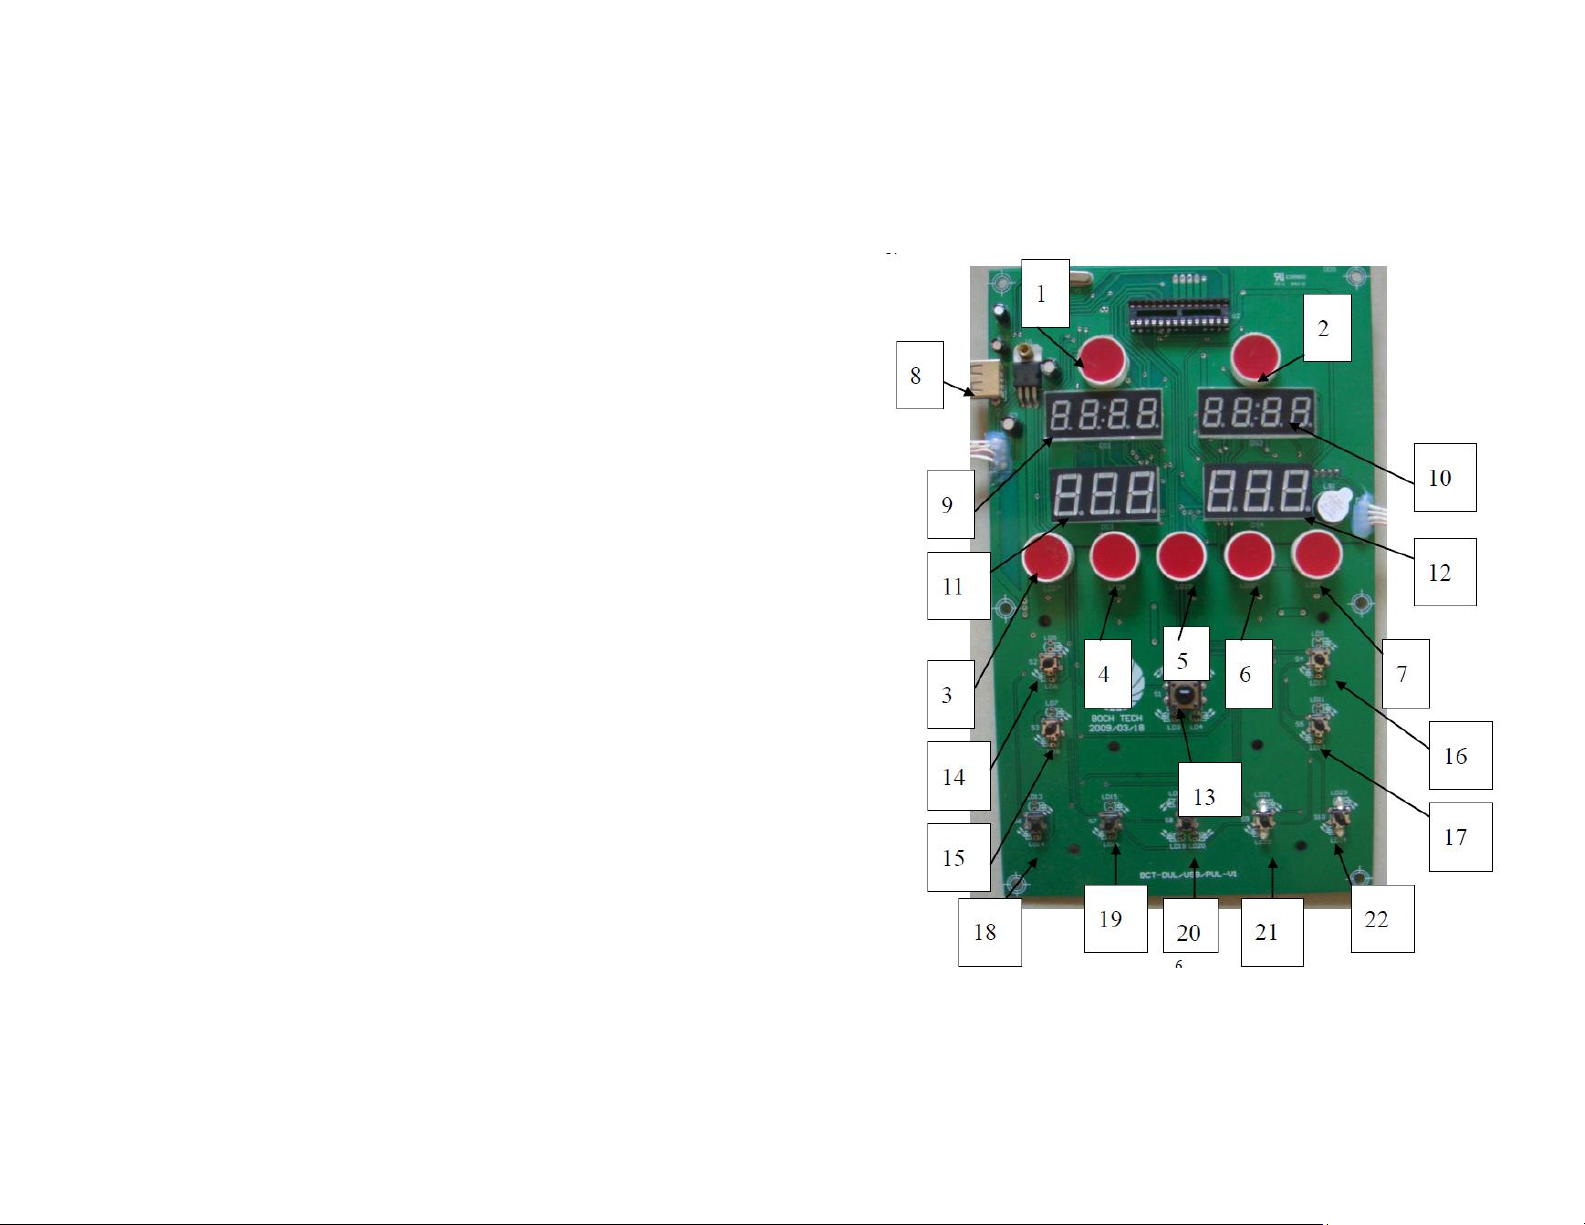
VIBABODY SLIMMER VBS4000 User manual

Contact Us:
200 W 88th Street #4
Bloomington, MN 55420
Phone: 952-884-0326
Web:vibabodyslimmer.com
200 W 88th Street #4
Bloomington, MN 55420
VIBABODY SLIMMER USER GUIDE –
VBS4000

Table of Contents
Introduction .....................................................................................3
Structural Illustration...........................................................................
Name of Vibration Plate Part.........................................................3
Name of Display & Buttons ...........................................................4
Installation (Assembly & Disassembly) .............................................5
Operation Instruction .......................................................................6
Features & Effectiveness .............................................................. 10
Exercise Illustration ..............................................................11-15
Safety & Maintenance .......................................................... 15-17
LOWER BACK RELAXATION
Sit on the floor facing away from the vibration plate with your legs
Apart. Place the mat between your body and the vibration plate and
hold the edges for support, and relax.
FEET & LEG RELAXATION
Put a chair close to the vibration plate. Sit down and put your leg in the
center of the base plate. This exercise improves circulation in your legs
and feet.
SAFETY CAUTIONS
1. Use the vibration plate for its intended use as described in this user guide.
2. Do not reduce or use force to relocate the product to prevent damage.
3. Do not use 30 minutes before and after eating a meal.
4. Only one person at a time.
5. Hold safety handle before you exercise. It helps to keep your balance.
6. Check the exercise speed level before you operate to ensure that it is at a safe
and comfortable level.
7. Keep a sufficient gap between your feet in the initial stages. Recommended
gap should be around 30cm.
8. Do not use this machine for any other purposed besides exercise.
9. Do not operate with wet hands, as this could cause an electrical shock.
10. Do not use any kind of sharp tools, such as a knife, on the vibration plate.
11. Please stop using if you have any discomforts and consult a physician.
12. When not in use please turn off power and unplug the power cord.
13. Do not exercise for more than 10 minutes using the same pose, you may
experience muscle cramps.
14. Do not store vibration plate near heat or open flame, under direct sunlight or
high temperature for long periods of time, or in humidity.
15. When not in use protect the vibration plate from dust.
16. Do not coil the power cords, as it may cause malfunction to the machine.
17. Before cleaning make sure the machine is off and the power cord is
unplugged.
18. Do not use in wet areas, such as the bathroom.
19. Using corrosive cleaner is prohibited. Do not use benzene or thinner to clean
or spray insecticide on the machine.
2
15

UPPER ARM MASSAGE
Lie sideways facing the vibration plate, with legs slightly bent. Ensure the
frontal mat extends slightly over the edge. Rest one arm on the vibration
plate and relax.
ADDUCTOR MASSAGE
Lie on your side facing the vibration plate. Slightly bend one leg
and rest it on the vibration plate. Making sure your body does not
touch the plate. Now repeat the massage with the other leg.
FRONT TIGHT MASSAGE
Position yourself with the front of your thighs on the vibration plate. Lean
your feet slightly against the console, and relax
BUTTOCKS MASSAGE
Lie down and put your lower legs and lower half of your buttocks on the
vibration plate. Put your calf close to the stand post. This will provide a
pleasant loosing on your legs and lower buttocks.
SHOULDER & NECK RELAXATION
Kneel down in front of the vibration plate with your arms stretched out.
Keep your back and neck straight. Now pull your upper body back while
resting your arms on the plate.
UPPER BODY RELAXATION
Sit facing away from the vibration plate with your legs bent. Using your
elbows for balance, raise your upper body off the plate. Keeping your neck
and back straight, pull your shoulders back. This will relax your upper
body.
BACK RELAXATION
Sit in the center of the vibration plate with your legs apart. Allow your
upper body to relax. You should feel a pleasant vibration relaxing your
back, hips, and thigh area.
INTRODUCTION & STRUCTURAL ILLUSTRATION
Thank you for purchasing the Vibabody Slimmer! Please read the user
manual entirely before you begin operating the machine. This user manual
should be kept available for future reference.
The VBS4000 provides two kinds of vibration. One is a triangular oscillation
vibration, the other is spiral vibration. Triangular oscillation vibration
contracts muscle fibers and provides many therapeutic health benefits.
Spiral vibration provides therapeutic health benefits. The two modes
together meet the needs of professional or home use.
NAME OF VIBRATION PLATE PARTS
1. Screw (M5X8)
2. Display Board
3. Signal Line Connector
(Upper)
4. Decoration Cover
5. Handrail
6. Stand Post
7. Screw (M8X55)
8. Screw (M8X20)
9. Gasket
10. Signal Line Connector
(Lower)
11. Stepping Board
12. Base Cover
14
3

NAME OF DISPLAY & BUTTONS
1. Heartbeat Indicator 14. Time/Vibration Mode Display
2. Heartbeat/Mode Display 15. Time Indicator
3. Spiral Speed Display
4. Function Indicator
5. Spiral Vibration Speed/Time Adjust Button
6. Start/Stop Button
7. Time Button
8. Vibration Mode Button
9. Time & Vibration Mode Change Button
10. Time ( --) Button
11. Time ( + ) Button
12. Seesaw Vibration Speed/Time Adjust Button
13. Seesaw Speed Display
ABDOMINAL CRUNCH
Place a pillow under your back, raise your legs and place your hands
Under your head. Crunch your upper body towards your legs and feel
the tension in the abdominals. Ensure your buttocks and lower back do
not lose contact with the mat.
QUADRICEPS STRETCH
Place one shin on the vibration plate ensuring the foot remains off the
plate. Keeping the upper body and back straight, tense you stomach.
By pushing your pelvis forward you will be stretching your quadriceps.
CALF STRETCH
Stand sideways on the vibration plate. With one leg in front of the
other and toes facing forward. The front leg should be slightly bent, the
rear leg is straight. Push the heel of the rear leg down and you should
feel tension in your calves.
ADDUCTOR STRETCH
Stand sideways on the vibration plate with your feet near the support
column. Place the outside foot on the floor close to the plate so legs
are apart. Bend the outside leg while keeping the other leg straight.
Keeping the upper body straight, lower your buttocks to the floor. You
will feel tension on the inside of your thighs.
PECTORAL STRETCH
Sit with your back to the vibration plate. Now hold the vibration plate
behind your back so that your fingers grip the edges. By pushing your
shoulders down you will stretch your check and shoulders.
SHOULDER STRETCH
Stand backwards to the vibration plate. Remove a band behind your
back and hold one of the bands at seat height. Raise the other hand
up and put it on the back of your head. By dragging the band, you will
stretch your shoulder and neck muscles.
CALF MASSAGE
Lie in front of the vibration plate with both calves on the vibration
plate, toes pointing toward the ceiling. The rest is easy, simply relax
and enjoy an invigorating calf massage.
4
13

BACK
Keeping a broad shoulder stand and bend the knees slightly.
Your upper body should protrude slightly forward. Keep the
shoulders back and pull the band as close to your waist as
possible. You should feel the tension in your entire back and
shoulders.
SHOULDER
Hold the bands lightly and drag them upwards. You should feel
tension in your shoulders. Change the lengths of the
bands according to your height.
SHOULDER PRESS
Position the body in a horizontal line parallel with the plate.
Hands should be shoulder width apart, legs and back straight,
head raised. Using slow and controlled movement push your
arms toward the vibration plate, then return to the starting
position.
LOWER ABDOMINALS
Brace yourself on your elbows and hold onto the front edge of the
Vibration plate. With your back straight, pull your buttocks up slowly
As if you wanted to pull the plate to your feet. You should feel tension
In your abdominal region.
STANDING ABDOMINALS
Stand in the center of the vibration plate, feet shoulder width apart.
Holding the railing at chest height. Keeping the back straight and legs
slightly bent, push your upper torso down. You will feel tension in
Your abdominal muscles.
LATERAL ABDOMINALS
With one foot directly behind the other, place one elbow on the
Vibration plate and lean sideways. Keeping your head, torso and legs
Straight, push your shoulder down and tighten your torso
Simultaneously. You will feel tension in the lateral abdomen.
PUSH UPS
Kneel in front of the vibration plate, placing hands on the plate
shoulder width apart. With a straight back and strong abdomen, push
off the vibration plate platform. This will strengthen chest, shoulder
muscles and triceps.
ASSEMBLY & DISASSEMBLY
1. Place the base plate on a flat surface. Please have two people take
the base plate out of the packaging, as the base plate is heavy.
2. Connect the signal lines (upper & lower) in the base plate and stand
post.
3. Please be careful when connecting the two signal lines, and have
one person hold the stand post firmly and the other person connect
the connector.
4. Attach the base plate and stand post together. When you attach the
stand post to the base plate please be careful that the signal cable
does not get jammed, which would cause the cable to not work.
5. Lock the stand post and base plate together tightly with
screws.
6. Install the handrail on the stand post with screws.
7. Adjust the horizontal cushion to set the machine steady.
8. Connect the power plug.
9. Turn on the power switch located on the backside.
10. Press the start button.
12
5

OPERATION INSTRUCTIONS
1. Insert power plug into power socket on the vibration plate,
check the voltage then switch on.
2. Choose your desired posture on the vibration plate.
3. Press the start button to begin the program. When using the
automatic program modes, the speed cannot be adjusted
manually. The machine will alternate the vibration speed at
the below preset intervals.
4. It is advised to drink 20oz of water after each use in order to
eliminate toxins.
5. DO NOT USE MACHINE MORE THAN 10 MINUTES PER
SESSION, 20 MINUTES PER DAY.
6. Please take at least 15-20 minute breaks before starting the
next session. To experience the greatest benefit complete
one session in the morning and one session in the evening.
SQUAT
Stand on the vibration plate with feet shoulder width apart. Keeping
the back straight and knees slightly bent. Gently squeeze leg muscles.
You should feel tension in your quadriceps, buttocks, and back.
DEEP SQUART
Stand on the vibration plate with feet flat and shoulder width apart.
Keeping the knees directly above the feet at a 100 degree angle,
gently bend the legs and squeeze the leg muscle. Keeping the back
straight, bend the upper body forward.
WIDE STANCE SQUAT
Stand on the vibration plate with legs wide apart and toes turned
outward. Keeping knees directly above the feet at a 100 degree angle,
gently bend legs. You should feel tension in the back, buttocks,
quadriceps & inner thighs.
LUNGE
Place one foot in the middle of the vibration plate and step back with
the other. Keeping the back straight and knees directly above the
toes, squeeze the leg muscle. You should feel tension in the
hamstrings, quadriceps & buttocks.
CALVES
Standing in the center of the vibration plate, rise up onto the balls of
your feet. Keeping your back straight and abdomen tight, you should
begin to feel tension in your calf muscles. To add vibration try bending
your knees to 90 degrees.
TRICEPS DIP
Facing away from the vibration plate, grip the edge and push upwards.
Now bend the arms slightly and lower the hips towards the plate,
Squeezing the shoulder blade together. You should feel tension in your
Upper arms and shoulders.
PECTORALS
Facing to and keeping a proper distance from the vibration plate. Hold
the bands in your hands in front of your chest and backwards. You
should feel tension in your pectorals and back. For vibration, repeat the
exercise.
6
11

5. After you amend the data, you will see the RUNNING COLUM change. The height
of the column indicates the speed, the width of the column indicates the time.
6. Function buttons access the data files. Load Factory button will give access to
factory data. Load default button loads the data that you set. Save Default button
will save the data and will be active. After you insert the UBS flash disk, the machine
will work according to the data you just set. Save button will only save the data.
Load Button will load the data that you saved. The Save Default Button will complete
the reset of the users program.
PULSIMETER
Hold onto the metal sheet on the handrail when the machine is stopped. The
pulse light will flicker according to the pulse of your body and will display ECG-
P085. The last three letters are the pulse of the user’s body. If the pulse light
does not flicker, please check if the metal sheet is clean and dry.
FEATURES & EFFECTIVENESS
A. FEATURES
Choose from 7 preset programs, each stimulating different terrain
profiles with different levels.
P1: Cardiovascular Exercise
P2: Detoxify Program
P3: Body Perfection Program
50 Variants of speed range, two vibration modes and strong
massage vibration that reduce un-wanted body fats effectively
Ergonomic construction with fashionable streamline design
Easy to operate control panel and window display screens
LCD Display screen that you can customize your workouts
and preset your training goals.
Durable steel tube insert stand post and covered with car grade
front operation counter foam.
B. EFFECTIVENESS & TRAINING GUIDE
1. Improve blood circulation
2. Intestinal improvement
3. Perfect thigh function
4. Bump firming function
5. Waist & abdomen shaping function
6. Shoulder shaping function
CONTROL PANEL
10
7

1. Time indicator.
2. Pulse light: The light will flicker when the machine detects your pulse.
3. Manual Mode Light: The light will shine when manual mode is working.
4. USB Program Light: The light will shine when USB Program Mode is working.
5. Auto Program P1 Light: The light will shine when Program P1 is working.
6. Auto Program P2 Light: The light will shine when Program P2 is working.
7. Auto Program P3 Light: The light will shine when Program P3 is working.
8. USB Interface: User can insert USB flash disk which will allow users to preset
programs.
9. Mode/Spiral Vibration Time Display Window: Display’s Spiral Vibration Time, or
display’s mode with “10” together. Preset time is from 0 to 20 minutes.
10. Mode/Seesaw Vibration Time Display Window: Display’s Seesaw Vibration Time,
or display’s mode with “9” together. Present time is from 0 to 20 minutes.
11. Spiral Vibration Speed Display Window: Display’s from H00 to H60. When it
display’s H00, the Spiral Vibration mode will not work. H60 is the highest speed.
12. Seesaw Vibration Speed Display Window: Display’s from L00 to L60. When it
display’s L00 the Seesaw Vibration Mode will not work. L60 is the highest speed.
13. On/Off Button: Press button, the displaying mode will be working. Press again and
the working mode will be stopped.
14. Spiral Vibration Mode Time/Speed “+” button: increase Spiral Vibration time when
displaying time mode. Increase spiral vibration speed when on manual program.
15. Spiral Vibration Mode Time/Speed “-“button: Decrease Spiral Vibration time when
displaying time mode. Decrease spiral vibration speed when on manual program.
16. Seesaw Vibration Mode Time/Speed “+” button: Increase Seesaw Vibration time
when displaying time mode. Increase seesaw vibration speed when on manual
program.
17. Seesaw Vibration Mode Time/Speed “-“ button: Decrease Seesaw Vibration time
when displaying time mode. Decrease seesaw vibration speed when on manual
program.
18. Time/Speed “+” button: Increase two Vibration time when display time mode.
Increase two vibration speed when display speed mode.
19. Time/Speed “-” button: Decrease two Vibration time when display time mode.
Decrease two vibration speed when display speed mode.
20. Mode/Time Change button: Press this button, windows “9” and “10” will display
mode. Press again, windows “9” and “10” will display time.
21. Program Button: Press this button to change programs –Auto Program (P1, P2,
P3) and manual program without USB flask disk insert. Press this button to
change user’s program (U1, U2, U3, U4, U5, U6) With USB flash disk insert.
22. Time button: Adjust vibration time when the machine is not working on manual
mode.
Manual Mode
There are 3 preset manual programs. Each program goes for 10 minutes.
P1: Spiral Vibration: 30, 34…54, 58, 54…6, 2, 6…22, 26
Seesaw Vibration: 30, 26…6, 2, 6…54, 58, 54…38, 34
Two vibration modes work together, the speed changed one time every five
second.
P2: Spiral Vibration: 2, 40…40, 2, 40
Seesaw Vibration: 40, 2…2, 40, 2
Two vibration modes work together, the speed changed one time every five
second.
P3: Spiral Vibration: (Seesaw Vibration does not work): 5, 10, 15…50, 55,
60…10, 5
Seesaw Vibration: (Spiral Vibration does not work): 5, 10, 15…50, 55, 60…10, 5
The speed changes one time every two seconds.
USER PROGRAMS
Users can define the program in a USB flash disk which works with the machine.
1. Open the reset interface by double clicking BOCH-USB-DUL under BOCH-USB in
USB Flask Disk.
2. You can choose U1-U6 by clicking User’s Define Program.
3. Fill in the data. Speed Range: 0-60 seconds.
4. When you choose “ONCE” button after you reset the 12 sets of data, the vibration
mode will only be running once. (The whole vibration time is the amount of the
12 sets of data). When you choose “LOOP” button and fill in running time (1-12
minutes). It will run for several times of the 12 sets of data. The running time is
running time which you filled by the amount of 12 sets of data.
8
9

The 'H' vibration is the side to side vibration (triangular oscillation vibration),
this vibration is better for muscular contraction. This vibration is the vibration
that gives you a workout.
The 'L' vibration is the more subtle (spiral) vibration, this vibration is more
therapeutic. It's better for increasing circulation, draining toxins from the
lymphatic system, reducing inflammation, muscle recovery, etc...
Different users will use the machine at different speeds. For instance, an
elderly person would use the machine at lower speeds, as an elite athlete
would use higher speeds. (Similar to that of a treadmill or exercise
bike). Start out at speeds below 30 for the first few weeks of use. After that,
listen to your body and feel free to take the speeds up as high as you'd like.
Varying speeds is good to do as well. Different speeds affect your body
differently. This is where the preset programs (P1, P2, P3) come in hand. The
preset programs change the speed automatically and frequently. Giving your
body a different stimulus than just maintaining a consistent speed. It's
recommended using the machine twice daily, use the machine in the morning
once maintaining a consistent speed and in the evening use the machine
frequently changing the speed (either using a program or manually changing
the speed).
When you use the machine maintaining a consistent speed, hold different
positions on the machine (see attached sheet). Pick 5 positions and hold each
position for 1-2 minutes.
When using the machine when the speeds vary, stand with legs straight and
alternate with straight legs and bent knees.
Give your body at least one day of rest per week. Also starting out as a new
user to the machine, you might want to only use once a day, or only do 2 - 5
minute sessions. (Be careful not to 'over-do' it in the beginning). This a
common mistake that people often forget.
In a nutshell, the H vibration is more for muscular contraction and L vibration
is more for therapeutic benefits. Using them both at the same times intensifies
the benefit of each vibration. There really isn't a 'magic' way to use the
machine. The important thing is that you use the machine consistently, that's
how you'll get the most out of it.
16
17

Table of contents
Popular Fitness Equipment manuals by other brands

Hoist Fitness
Hoist Fitness CL-3301 owner's manual

Keys Fitness
Keys Fitness NEOPRENE DUMBBELL RACK STDFR/B owner's manual

Tko Sports Group
Tko Sports Group 6350 Assembly instructions

First Degree Fitness
First Degree Fitness E685 FLUID EXERCISE user guide

Taurus
Taurus TF-PU1207HT operating instructions

BioEnergiser
BioEnergiser circulation maxx reviver instruction manual