Coating thickness gauge
User Manual
1. Brief Introduction
This handheld electronic thickness gauge is a highly intelligent and precise instrument
used to quickly and accurately measure thickness of coating or plating on almost all
kinds of metal surface. It not only indicates thickness of coating or plating but also
automatically identifies the base material (Fe means magnetic metals such as iron &
steel; NFe means non-magnetic metals, such as aluminum, alloy & non-magnetic
stainless steel). It is applicable to measure various coating or plating, including non-
magnetic painting, ceramic, enamel, plastic, rubber coating on magnetic base
materials such as iron and steel, non-ferrous metal plating such as nickel & chromium,
anticorrosive coating in chemical and petroleum industry, non-conductive painting,
plastic coating and anodic oxide film on non-magnetic conductive devices, such as on
aircraft or spacecraft, vehicle, home appliances, al-alloy door & window as well as other
aluminum ware, and conductive coating or plating as long as the conductivity of coating
or plating is at least 3 times less than that of base materials (such as copper with
chromium plating).
2. Operation
2-1. Start-Up
The instrument is automatically turned on when the probe is pressed down to take a
measurement, and it is automatically turned off when no operation is taken within 90
seconds (refer to Shutdown).
Important note:
a.The instrument needs to warm up for a few minutes, in order that the probe reaches
environment temperature. Please disregard the first several readings if you’re not
sure whether the probe is stable under current environment temperature.
b.Calibration may be carried out for accurate measurement when the instrument is
taken to a new place with quite different temperature.
2-2. Measurement
Hold the instrument steadily and press the probe vertically against the coating or plating
to take a measurement, the instrument will beep once and display the thickness value
on the screen when reading is acquired.
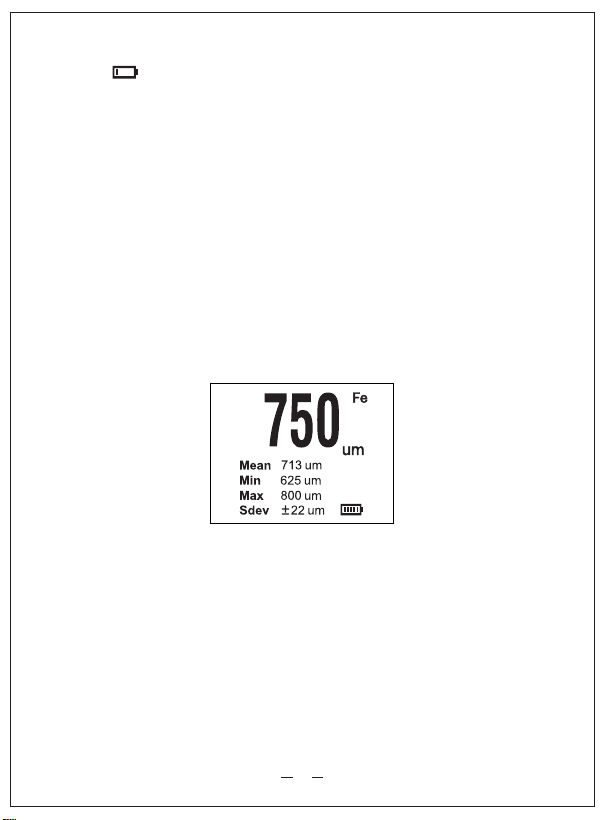
Below figure shows the typical display on screen:
750μm: the current measured value (the main reading)
(in blue color in up-right area of the main reading): measurement count there’re 5
previous measurement values saved in memories, not including current measurement
Mean 713μm: the average of current & previously saved values
Min 625μm: the minimum of current & previously saved values
Max 800μm: the maximum of current & previously saved values
Sdev ±22μm: standard deviation of current measurement (3%+2μm)
NFe: non-magnetic base material (Fe: magnetic base material)
5
Important note:
a.Be sure not to slide along the coating or plating surface to avoid scratch on the
surface and damage to the probe.
b.For continuous usage, before taking a new measurement, the probe needs to be
moved away from the coating or plating surface of last measurement for at least 2
seconds.
Please refer to below figure:
Icon means the thickness is beyond Measuring Range or the instrument fails to
measure. There may be some circumstances the instrument failed to get reading, such
as:
1. On non-metal base material
2. On strong magnetic material
3. Base material is too thin
4. Surface area is too small
5. Hardware error, probe broken or dust /dirt on the probe
2-4. Battery Indicator
The instrument adopts two AAA batteries for power supply.
Icon in green color means full battery; after using for a period of time, the green bar
becomes shorter indicating the current capacity of the batteries;
when icon appears in red and blinks, the batteries are low. Please recharge or
replace the batteries in this case, otherwise it may affect measurement accuracy.
2-5. Unit of Measurement
Press button “μm/mil” (same as “+”) to select the unit of measurement between μm and
mil.
2-6. Display Flip
In order to take measurement and read the display in a reverse direction, please press
the button “-” for a 180-degree rotation of the display; press “-” again to flip back.
This is a great feature when it’s needed to measure on the bottom side.
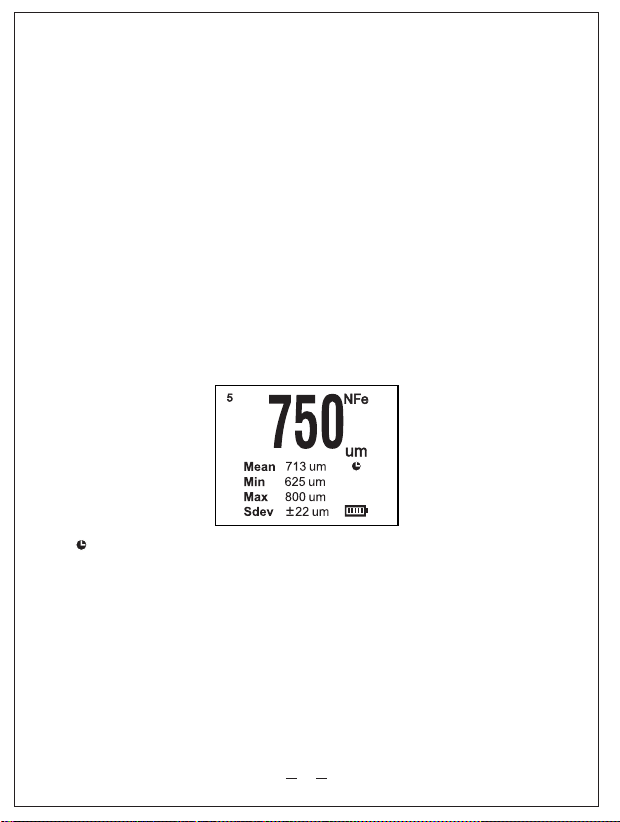
2-7. View Last 99 Measures
Press button “M” to enter the memories for last 99 measurement values, “0” (in white
color) will appear in upper-right area of the main reading (main reading still shows the
current measured value), press “+” or “-” to browse the saved values one by one, “1”
indicates the latest value previous to current measured value, “2” is the second latest,
and so on.
Please refer to below figure:
“5” (in white color in up-right area of the main reading) means it is the 5th latest
measured value.
After viewing the values, press “M” to exit.
When the instrument is turned off (automatically or manually) or initialization is carried
out, the saved values are cleared, the measurement counter returns to zero.
2.8. SI and CO measurement mode
This instrument works in single measurement mode as default after starting up, and “SI”
appears on LCD screen; Press “+”&”-” at the same time to enter continuous
measurement mode and “CO” will appear on LCD screen. In such mode, the probe
keeps moving on measured surface. During one cycle of continuous measurement, 10
times of data acquisition will be completed, and measured data will be automatically
saved; press “+”&”-” again to exit.
* Continuous measurement may cause damage to the probe and measured surface.
Please use it with caution!
3. Standard Plastic Films & Calibration
The instrument is provided with standard plastic films which can be used to check the
measurement accuracy, and also used to cover rough or hot surface during
measurement to protect the sensor of instrument from possible damage.
3-1. Accuracy Checking
The user may check the accuracy of instrument according to given reference standards,
using the standard plastic films and substrate blocks supplied in the package.
The measured value should be within the accuracy range specified in the user’s manual.
For example, if the accuracy is specified as ±(3%+2μm) , the reading should be 46~54μ
m when it’s used to measure the standard plastic film with 50μm thickness. Otherwise,
the instrument should be calibrated.
3-2. Calibration
The instrument has been carefully calibrated in factory and the built-in self-check
functions every time before measurement. Therefore in most cases, the only thing
needed to do is to check whether the reading is zero when taking a measurement on
metal with no coating or plating. If not, zero-in procedure is suggested.
Zero-In: press “+” and hold for 2 seconds, “000” will blink on screen, then take a normal
measurement on uncoated metal substrates, the reading is calibrated to zero
automatically.
After Zero-In, usually the instrument can be used to accurately measure thickness.
However, due to abnormal base material or severe environment, accumulated error may
occur, in this case, you can use standard plastic films for further calibration of the
instrument.
Calibration with Standard Plastic Film: use the instrument to measure a standard
plastic film on a substrate block, in case the measured value is beyond the accuracy
Please refer to below figure:
range as specified in user’s manual, press and hold “M” button for 2 seconds to enter
calibration procedure, the measured value on main display will blink and buzzer will
sound at the same time. Press “+” or “-” (or long press “+” or “-” for fast adjustment) to
adjust the value to the actual thickness, Press “M” again to exit the calibration.
Two standard plastic films can be used for better calibration, i.e., to do calibration with
a thin film and a thick film alternatively. In case the coatings or plating to be measured
are relatively close to each other in thickness, it is enough to use only one standard
plastic film with similar thickness to do the calibration.
3-3. Initialization
In case zero-in or calibration with standard plastic films does not work, please re-
initialize the instrument: press and hold “-” button for 2 seconds, “0”,“00”, “000” will
blink in sequence indicating initialization is completed. To ensure high measurement
accuracy, it is suggested to do Zero-In after initialization. All previously saved values
and settings will be cleared after initialization, the instrument is reset to factory default
setting.
4. Shutdown
To save battery power, Shutdown interface will appear in case of no operation within
90 seconds. Please refer to below figure:
Icon means the device will be powered off in 3 seconds.
5. General Specifications
Measuring Range: 0~1,250μm (0~50mils)
Resolution: 1μm / 0.1mils
Accuracy: ±(3%+2μm) or ±(3%+0.1mils)
Operation Temperature: 0~50 C (+32~+120 F)
Dimensions: 100*52*29mm
Weight: 68g (not including batteries)
Packaging list:
Thickness meter x1pc Calibration film set x1
Substrate blocks (Fe & NFe each 1pc) User’s manual x1pc
Plastic tool case
P
1
32
54
OO
SI
99
5
SI CO
2-3. Measuring Range
The instrument is used to measure thickness of coating or plating from 0 µm to 1,250µm.
In case of thickness beyond this range, “---” will appear on the screen.
VR-852A
이 자료는 저작권법에 따라 보호받는 저작물이므로 무단배포 및 무단복제를 금하며, 내용의 전부 또는 일부를
이용하려면 반드시 한국 VictorRuoshui 社 의 서면 동의를 받아야 합니다.