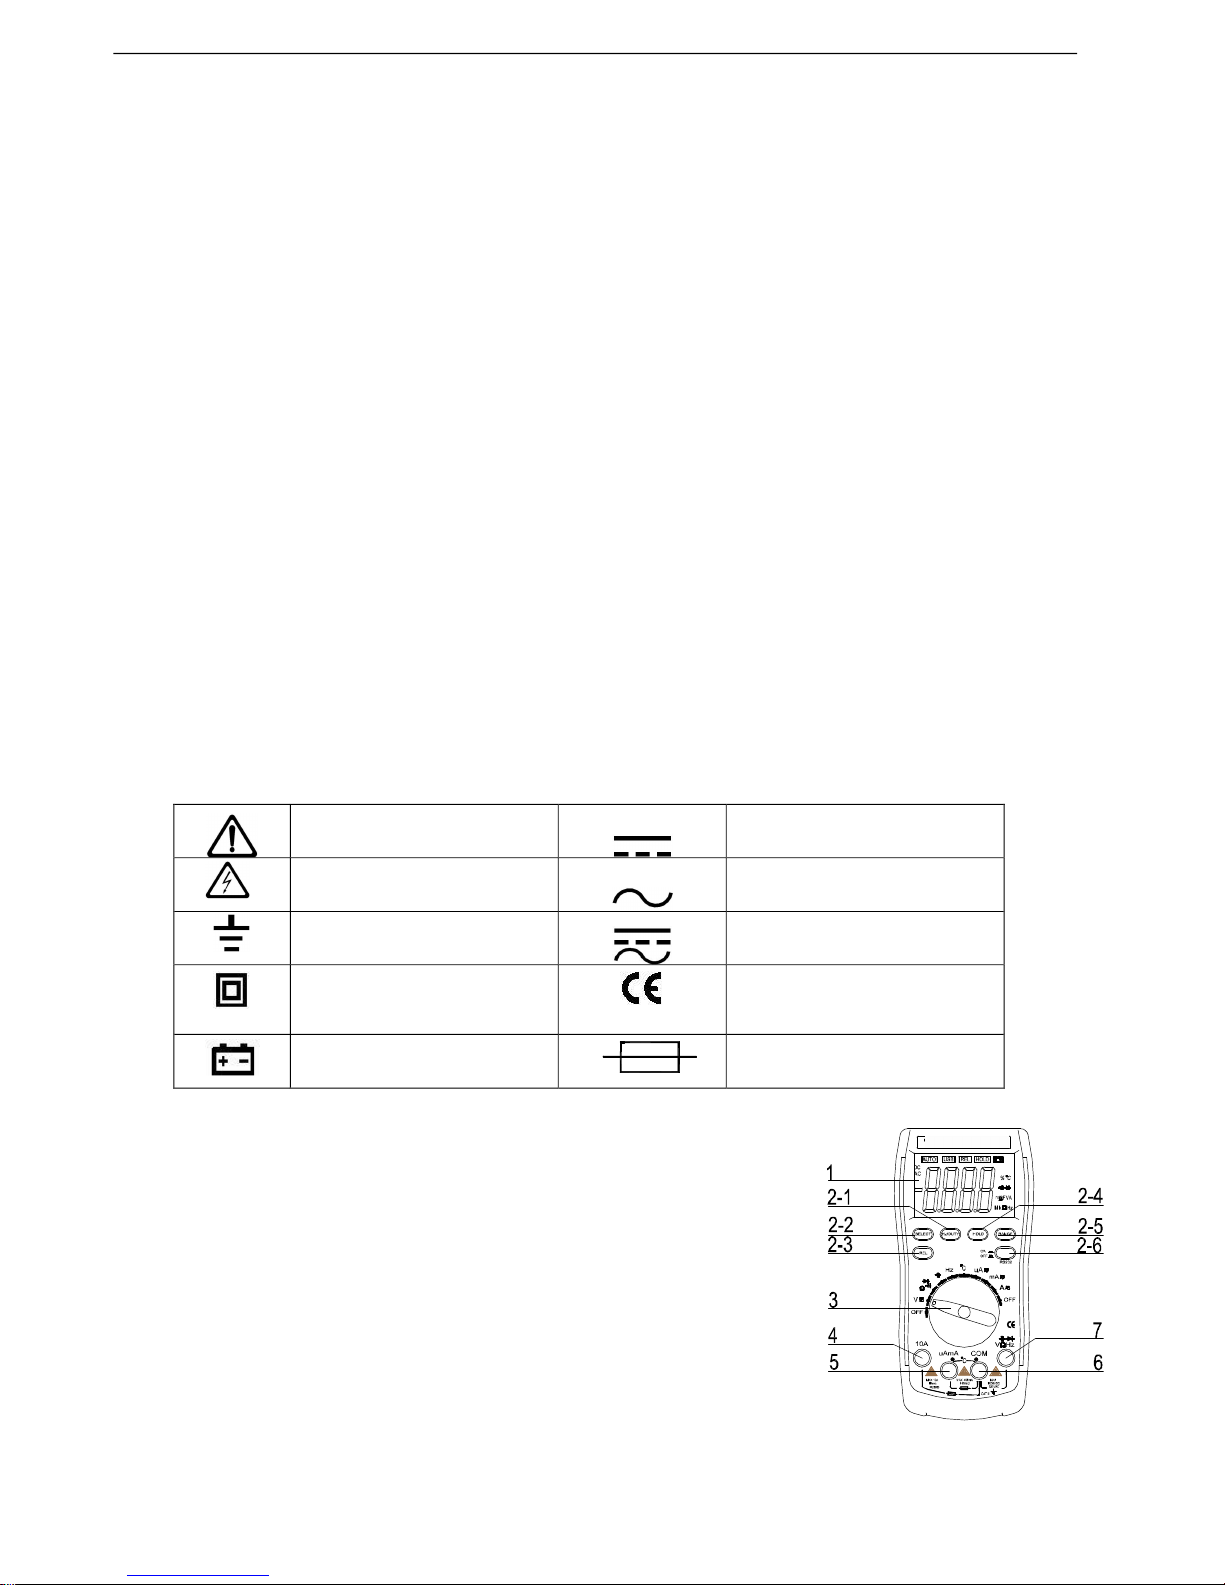
manuals.online logo
Brands
  1. Home
  2. •
  3. Brands
  4. •
  5. Victor
  6. •
  7. Measuring Instrument
  8. •
  9. Victor 86B User manual

Victor 86B User manual

1
Index
1、 General……………………………………………………………………………………………
2、 Safety Note………………………………………………………………………………………
3、 Safety Symbol Description…………………………………………………………………
4、 Front Panel Description………………………………………………………………………
5、 Button Function Description…………………………………………………………………
6、 Other Function……………………………………………………………………………………
7、 Measurement Operation…………………………………………………………………………
(1)、ACV/DCV Measurement……………………………………………………………………
(2)、ACA/DCA Measurement……………………………………………………………………
(3)、Resistance Measurement ………………………………………………………………
(4)、Diode Measurement………………………………………………………………………
(5)、Continuity Measurement………………………………………………………………
(6)、Capacitance Measurement………………………………………………………………
(7)、Frequency/Duty Circle Measurement…………………………………………………
(8)、Temperature Measurement………………………………………………………………
8、 Property…………………………………………………………………………………………
9、 Instrument Maintenance………………………………………………………………………
10、 Defect Elimination………………………………………………………………………
一、General
ItisagoodperformanceandAutoRange33/4digitalinstrumentwithUSBinterface,drivenbybattery.
ItadoptstheLCDwith42mmhighfiguretomakethereadingveryclearanditpossessestheDataHold
andAutoPowerOfffunctiontomaketheusemoreconvenient.
Thisinstrument hasthefunctionofmeasuringACV,DCV,ACA,DCA,Resistance,Capacitance,Temperature,
2
Diode,Continuity,Frequency,andDutyCircle,etc.IttakesthedualintegralA/DConverterascore,
andpossessestheAutoRangeandManualRangeselectionfunction.Itisanexcellenttoolandmost
suitableforlab,factory,maintenanceandrepairusers.
二、 Safety Note
Theinstrumentmeetsthe standard ofIEC1010(safetystandardpromulgatedbythe
InternationalElectricianCommittee).Pleasereadthesafetynotescarefullybefore
operation.
1.Whenmeasuringeachrange,donotinputthevalueovertherangelimit.
2.Itisprerequisitetomakesurethetestleadconnectsreliably,linksupcorrectly,
insulatesproperlytoavoidtheelectricshockwhenmeasuringthevoltagehigherthan
36VDCand25VAC.Thevoltagelessthan36Vissafetyvoltage.
3.Besuretokeepthetestleadsoffthetestedpointwhenconvertingthefunctionand
range.
4. Selectthecorrectfunctionandrangetoavoidfaultoperation.Eventhoughtthis
instrumenthasthefullfunctionprotection, pleasepayyourcloseattention when measuring
foryoursafety.
5.Donotusethisinstrumenttomeasurebeforefixingthebatteryandtighteningthe
bottomcase.
6.DonotinputthevoltageattheCapacitanceandCurrentRange.
7. Besuretokeepthetestleadsoffthetestedpointandturnoffthepowerbeforereplacing
thebatteryorfuse.
三、Safety Symbol Description
Warning DCA
High Voltage! Dangerous! ACA
GND DCA & ACA
Dual Insulation Meets the direction of
European IEC
Low Battery Fuse
四、Front PanelDescription
1. LCDDisplay.
2. FunctionButton:Selecteachmeasuringfunction。
21Frequency、DutyCircleselectionbutton
22Functionswitchbutton
23RelativeValuemeasuringButton
24DataHoldbutton
25ManualRangeselectionbutton
26RS232interfaceswitchbutton
3.Function/rangeselectionknob:select
themeasuringfunctionandrange
4. 10Acurrentinputterminal:MeasuringAC/DC10Apositiveinputterminal,insertthe
redtestlead.
3
5. uA/mAandTemperatureinputterminal:MeasuringAC/DCuA/mAandTemperaturepositive
inputterminal,inserttheredtestlead.
6. COMinputterminal:negativeinputterminal,inserttheblacktestlead.
7. VΩHzinputterminal:measureVoltage,Frequency/DutyCircle,Resistance,Capacitance,
DiodeandContinuitypositiveinputterminal,inserttheredtestlead.
五、Button function description
(1)SELECT:Whentherearetwoormoremeasuringfunctionscompoundatonerange,press
thebuttontoswitchthemeasuringfunction.
(2)RANGE:AutoRange/ManualRangeswitch,thedefaultissetasAutoRangemodewhen
turningon.PressthebuttonandswitchtoManualRange.Pressthebuttononce,the
rangeisswitchedtothehigheroneatthemode,pressthebuttonagaintoswitch
therangetothelowestonewhenmeasuringthehighestrange,thecycleisinproper
orderfromlowtohigh.Keeppressingthebuttonmorethan2seconds,returntoAuto
Rangemode.ThereisnoAutoRangemodeatFrequencyandCapacitancerange.
(3) REL:RelativeValuemeasuringbutton.
(4)HZ/DUTY:Frequency/DutyCircleselectionbutton,pressthebuttontoswitchbetween
theFrequencyandDutyCirclemodeatFrequencyRange;Pressthebuttontoswitch
toVoltage/Frequency/DutyCircleorCurrent/Frequency/DutyCirclemodelatAC/DC
VoltageorAC/DCCurrentRange.
(5)HOLD:DateHoldbutton,pressthebutton,thevalueisheldonLCD;Pressthebutton
again,exittheholdmodeandgetintothenormalmeasuringstatus.
(6)RS232:serialoutputcontrolbutton,workedatthelockedmode.Whenthebuttonis
close,RS232symbolisdisplayedonLCD,itindicatestheinstrumentisgettinginto
thestatusofdatatransmission,andcantransmitthedatatooutside;Whenthebutton
isopen,existthismode,anddatatransmissionisstopped.
六、Other Function
(1)AutoPowerOfffunction:nomatteritisfunctionbuttonorrangeknob,theinstrument
willbe“AutoPowerOff”whenthereisnoactionabout30secondsduringmeasurement.
InthemodeofAutoPowerOff,pressthefunctionbuttonorswitchtherangeknob,
theinstrumentwill“Autopoweron”,getintothemeasuringmode.Presstheselect
buttonwhenturningon,theAutoPowerOfffunctioniscancelled.TheAutoPowerOff
iscancelledatRS232workmode.
NOTE:“AutoPowerOff”isakindofsleepingmode,itstillconsumestheslightcurrent
(lessthan5μ A),iftheinstrumentisn’tusedforlongtime,itisbettertocutthe
power.
(2)BUZZER:Pressanybutton,thebuzzerissound(about0.25~1second).Thebuzzeris
soundwhentheresistanceislessthan(70±30)Ω atContinuityTest.
(3) Datatransmissionfunction:Installthesoftware,accessoryoftheinstrument.Connect
theinstrumenttoPCbyUSBCable,andthencantransmitthemeasuringdatatoPC,
itisconvenienttorecord,analyze,processandprintthemeasuringresults,etc.
七、Measurement Operation
1. ACV/DCV Measurement
4
A)Turnthefunction/rangeselectionknobto ,thedefaultissetasDCVmeasurement,
ifmeasuringACV,pressSELECTbuttontomakeitatthestatusofACVmeasurement,displayed
asthefollowingpictures.
B)InserttheredandblacktestleadseparatelytoVΩ HzandCOMinputterminal.
C) Connectthetestleadtothetestedcircuitorpowerinparallel,thepolarityofthe
redtestleadandthetestedvoltagevaluewillbedisplayedonLCDsimultaneously.
D) AttheManualRangemode,if“OL”isdisplayedonLCD,itindicatesthetestedvoltage
valuehasexceededthepresentrangelimit,pleaseselectthehigherrangetocomplete
themeasurement.
E) ReadthepresenttestresultfromLCD.
Note:
l DonotmeasurethevoltagehigherthanDC1000VorAC750V.
* Whenmeasuringthehighvoltage,cautiontoavoidelectricshock.Cuttheconnection
betweenthetestleadandtestedcircuitatonceaftermeasurement.
2. ACA/DCA Measurement
A) Turnthefunction/rangeselectionknobtouA、mAorArange,thedefaultissetasDCA
measurement,ifmeasuringACA,pressSELECTbuttontomakeitatthestatusofACA
measurementdisplayedasthefollowingpicture.
B) InserttheredandblacktestleadseparatelytouAmAandCOMinputterminal.
5
C) Connectthetestleadtothetestedcircuitorpowerinseries,thepolarityofthe
redtestleadandthetestedcurrentvaluewillbedisplayedonLCDsimultaneously.
D) AttheManualRangemode,if“OL”isdisplayedonLCD,itindicatesthetestcurrent
valuehasexceededthepresentrangelimit,pleaseselectthehigherrangetocomplete
themeasurement.
E) ReadthepresenttestresultfromLCD.
Note:
l Donotmeasurethecurrenthigherthan10AatRange10Aandhigherthan400mAatuA
andmARange,otherwisethefusewillbeburntoutortheinstrumentwillbedamaged.
lWhenmeasuringthehighcurrent,thetimeofeachmeasurementcan’tbeover10seconds,
andtheintervalofeachmeasurementshouldbelongerthan15seconds.
lCuttheconnectionbetweenthetestleadandtestedcircuitatonceaftermeasurement.
1. Resistance Measurement
A) Turnthefunction/rangeselectionknobto Ω,displayedasthefollowingpicture.
B) InserttheredandblacktestleadseparatelytoVΩ HzandCOMinputterminal.
C) Connectthetestleadtothetestedresistanceinparallel,thetestedresistancevalue
willbedisplayedonLCD.
D) AttheManualRangemode,if“OL”isdisplayedonLCD,itindicatesthetestedresistance
valuehasexceededthepresentrangelimit,pleaseselectthehigherrangetocomplete
themeasurement.
E) ReadthepresenttestresultfromLCD.
Note:
l Whenmeasuringtheincircuitresistance,besurethepowerofthecircuithasbeen
turnedoffandallcapacitorsarefullydischarged.
l Whenthetestedresistanceisnotconnected,i.e.atopencircuit,oritsvalueexceeds
therangelimit,“OL”willbedisplayedonLCD.
l Whenmeasuringtheresistancelargerthan1MΩ,thereadingmaytakeafewseconds
tobestable,itisnormalforthehighvalueresistancemeasurement.
l Donotinputthevoltagewhenmeasuringtheresistance.Otherwiseitwillcausethe
readingincorrect.Ifthevoltageexceeds250V,overrangeprotectionvoltage,it
ispossibletodamagetheinstrumentandendangerthesafetyoftheusers.
lCuttheconnectionbetweenthetestleadandtestedcircuitatonceaftermeasurement.
4. Diode Measurement
6
A) Turnthefunction/rangeselectionknobto Ω.
B) InserttheredandblacktestleadseparatelytoVΩ HzandCOMinputterminal.
C) PresstheSELECTbuttontochoosethediodemeasurementfunction,displayedasthe
followingpictures.
D)ConnecttheREDtestleadtothepositivepoleofthetesteddiode,BLACKtestlead
tothenegativepole.
E) ReadthepresenttestresultfromLCD.
Note:
l Ifthediodeisopencircuitorthepolarityisconnectedcounter,“OL”willbedisplayed
onLCD.
l Whenmeasuringtheincircuitdiode,makesurethepowerofcircuithasbeenturned
offandallcapacitorsarefullydischarged.
lCuttheconnectionbetweenthetestleadandtestedcircuitatonceaftermeasurement.
5. Continuity Measurement
A) Turnthefunction/rangeselectionknobto Ω.
B) InserttheredandblacktestleadseparatelytoVΩ HzandCOMinputterminal.
C) PresstheSELECTbuttontochoosethecontinuitymeasurementfunction,displayedas
thefollowingpictures.
D) Connectthetestleadtothetwoendsoftestedcircuitinparallel.
E) Ifthevalueofresistancebetweenthetwoendsofthetestedcircuitislessthan
(70±30)Ω ,buzzerinsidesounds.
Note:
l Ifthetestedcircuitisopen,“OL”willbedisplayedonLCD.
7
l Whendetectingthecontinuityofthecircuit,makesurethepowerofcircuithasbeen
turnedoffandallcapacitorsarefullydischarged.
lCuttheconnectionbetweenthetestleadandtestedcircuitatonceaftermeasurement.
5. Capacitance Measurement
A) Turnthefunction/rangeselectionknobtoCapacitanceRange,displayedasthefollowing
picture.
B) Inserttheredandblacktestlead
separatelytoVΩ HzandCOMinput
terminal.
C) Connectthetestleadtothetested
capacitorinparallel,thetested
capacitorvaluewillbedisplayedonLCD.
D) AttheManualRangemode,if“OL”isdisplayed
onLCD,itindicatesthetestcapacitorvalue
hasexceededthepresentrangelimitorthecapacitor
isshortcircuit,pleaseselectthehigherrangetocompletethemeasurement.
E) ReadthepresenttestresultfromLCD.
Note:
l Whenmeasuringtheincircuitcapacitor,makesurethepowerofcircuithasbeenturned
offandallcapacitorsarefullydischarged.
l Itrequireslongertestingtimewhenmeasuringthelargecapacitor,ittakesabout
15secondsatRange100uF.
lCuttheconnectionbetweenthetestleadandtestedcircuitatonceaftermeasurement.
6. Frequency/ Duty Circle measurement.
A) Turnthefunction/rangeselectionknobtoHzRange,displayedasthefollowingpicture.
B) Inserttheredandblacktestleadseparately
toVΩ HzandCOMinputterminal.
C)Connectthetestleadtothetestedsignalsource
inparallel.
D) WhenmeasuringFrequency,presstheHz/DUTYbuttononcetogetintothemodeofDUTY
Circlemeasurement,andpresstheHz/DUTYbuttonagaintoreturntothemodeofFrequency
measurement.
E) Whenmeasuringthecurrentorvoltage,presstheHz/DUTYbuttontogetintothemode
ofFrequencymeasurement,andpresstheHz/DUTYbuttonagaintogetintothemodeof
Hz/DUTYmeasurement,andpressthebuttonthirdtoreturntothemodeofcurrentorvoltage
measurement.
F) ReadthepresenttestresultfromLCD.
Note:
l Donotinputthesignalmorethan60V.
Otherwiseitispossibletodamagethe
instrumentandendangerthesafetyof
8
theusers.
lCuttheconnectionbetweenthetestlead
andtestedcircuitatonceaftermeasurement.
7. Temperature Measurement
A) Turnthefunction/rangeselectionknobtoTemperatureRange,displayedasthefollowing
picture.
B)InserttheredandblacktemperaturesensorseparatelytouAmAandCOMinputterminal.
C) Connectthesensorofthetemperaturecabletothesurfaceorinsideofthetested
object.
D) ReadthepresenttestresultfromLCD.
Note:
l Withoutthesignalinput,LCDautomaticallydisplaystheinsidetemperatureofthe
instrument.
* Donotinputanyothersignal,cautiontoavoiddamagingtheinstrumentorendangering
thesafetyoftheusers.
八、Property
1. General Feature
1-1 Display:LCD
1-2 MaxDisplay:3999(33/4)countsautomaticpolaritydisplayandunitdisplay.
1-3 Measuringmethod:dualintegralA/Dconverter
1-4 Samplingrage:3times/second
15Overrangeindication:display“OL”
1-6 Lowbatteryindication: “ ” appearance(about2.4V)
17RS232serialdatatransmission
1-8 AutoPowerOfffunction(NoAutoPowerOfffunctionatthemodelofRS232)
1-9 Operationenvironment:0~40,relativehumidity<80%
1-10 Storageenvironment:10~50,relativehumidity<80%
1-11 Power:2pcs1.5Vbatteries(AAA7#battery)
1-12 Dimension:192mmx95mmx48mm
113 Weight:Approx.390g(includingbatteries)
1-14 Accessories:operationmanual,leathercarryingcase,holster,giftbox,testlead,
temperaturecableand2pcs1.5Vbatteries.
9
1.Technic Feature
Accuracy: (a%×reading+digits)at23±5,relativehumidity<75%.Oneyear calibration
guaranteesincethetimedispatchedfromthefactory.
2-1 DC Voltage (DCV)
Range Accuracy Resolution
400mV
±(0.5%+4d)
0.1mV
4V 1mV
40V 10mV
400V 100mV
1000V ±(1.0%+6d) 1V
Inputimpedance:10MΩ .
Overloadprotection:1000VDCor750VACpeakvalue.
2-2 AC Voltage (ACA)
Range Accuracy Resolution
400mV ±(1.6%+8d) 100μ V
4V
±(0.8%+10d)
1mV
40V 10mV
400V 100mV
750V ±(1.0%+10d) 1V
Inputimpedance:10MΩ .
Overloadprotection:1000VDCor750VACpeakvalue.
Frequencyresponse:40200Hz.
Indication:averagevalueresponse(RMSofsinewave).
2-3 DC Current (DCA)
Range Accuracy Resolution
400uA
±(1.0%+10d)
0.1μ A
4000uA 1μ A
40mA 10μ A
400mA 100μ A
4A ±(1.2%+10d) 1mA
10A 10mA
Maxinputcurrent:10A(lessthan15seconds).
Overloadprotection:0.5A/250VfuseatRangeuA/mA,10A/250VfuseatRangeA.
2-4 AC Current (ACA)
Range Accuracy Resolution
400uA
±(1.5%+10d)
0.1μ A
4000uA 1μ A
40mA 10μ A
400mA 100μ A
4A ±(2.0%+15d) 1mA
10A 10mA
Maxinputcurrent:10A(lessthan15seconds).
Overloadprotection:0.5A/250VfuseatRangeuA/mA,10A/250VfuseatRangeA.
Frequencyresponse:40200Hz.
2-5 Resistance (Ω )
Range Accuracy Resolution
10
400Ω ±(0.8%+5d) 0.1Ω
4KΩ
±(0.8%+4d)
1Ω
40KΩ 10Ω
400KΩ 100Ω
4MΩ 1KΩ
40MΩ ±(1.2%+10d) 10KΩ
Opencircuitvoltage:400mV.
Overloadprotection:250VDC/ACpeakvalue.
Note:AtRange400Ω ,shortcircuitthetestleadtomeasurethewireresistance,andthen
subtractitfromtherealmeasurement.
2-6 Capacitance (C)
Range Accuracy Resolution
50nF ±(5.0%+50d) 10pF
500nF
±(3.0%+10d)
100pF
5uF 1nF
50uF 10nF
100uF ±(5.0%+50d) 100nF
Overloadprotection:250VDC/ACpeakvalue.
2-7 Frequency and Duty Circle
Range Accuracy Resolution
4Hz
±(0.5%+4d)
0.001Hz
40Hz 0.01Hz
400Hz 0.1Hz
4kHz 1Hz
40kHz 10Hz
400kHz 100Hz
4MHz 1kHz
30MHz 10kHz
0.1~99.9% Forreferenceonly 0.1
Inputsensitivity:0.7VRMS.
Overloadprotection:250VDC/ACpeakvalue.
Note:whenmeasuringthehighvoltagefrequency,pleaseselecttheACVRange,thenpress
“Hz/duty”buttontogetintothemodeofFrequencymeasurement.
2-8 Temperature (℃)
Range Accuracy Resolution
20~400℃ ±(1.0%+5℃) 0.1℃
400~1000℃ ±(1.5%+15℃) 1℃
Overloadprotection:0.5A/250Vfuse.
2-9 Diode and Continuity Measurement
Range Resolution Description
Diode 1mV OpenVoltage:1.4V
Forwardvoltagedrop:
0.5~0.8V
Continuity 0.1Ω Open Voltage:
0.45V,Buzzersoundat
11
lessthan30Ω
Overloadprotection:250VDC/ACpeakvalue.
九、Instrument Maintenance
Thisisahighlypreciseinstrument,donottrytomodifytheinnercircuitatwill.
1. Keeptheinstrumentdry,andkeepitawayformdustandshock.
2. Donotstoreandusetheinstrumentinhighhumility,hightemperature,combustible,
explosiveandstrongmagneticplaces.
3. Cleanthesurfaceoftheinstrumentwiththedampclothandgentledetergent,donot
usethestrongsolventliketheabrasivecleanerandalcohol,etc.
4. Takeoutthebatteriesifdonotusetheinstrumentforalongtimetopreventthebatteries
fromleakingtheliquidtocorrodetheinstrument.
4-1 WhenLCDdisplays“ “symbol,shouldreplacethebatteriesasthefollowingsteps:
4-1-1 Loosethescrewthatfixesthebatteries,andremovethebatterycase.
4-1-2. Removethespent1.5Vbatteries,andreplaythembytwosametypenewbatteries.
Itisbettertousealkalinebatteriesforlengtheningtheusagetime.
4-1-3 Fitonthebatterycaseandlockthescrewtightly.
十、Defect Elimination
IftheInstrumentdoesnotworkproperly,thefollowingmethodscouldhelpyouto
solvethecommonproblemspromptly.Ifthedefectsstillcan’tbeeliminated,please
contactthemaintenancecentersoragents.
Defects solution
Nodisplay
● PowerOff–Turnonthepower;
● Replacethebatteries。
symbolappearance ● Replacethebatteries。
Errorvalue ● Replacethebatteries。
Theinstructionmanualissubjecttochancewithoutnotice.
Thecontentsintheinstructionmanualareconsideredtobecorrect,iftheusersfind
anyerrorsorpretermissions,etc.,pleasecontactthemanufacturer.
Themanufacturerherebywillnotberesponsibleforanyaccidentanddamagecausedby
theimproperoperation.
Thefunctionsdescribedinthisinstructionmanualdonotbethereasonforspecialusage.

Other manuals for 86B

1

Other Victor Measuring Instrument manuals

Victor VR-852A User manual

Victor

Victor VR-852A User manual

Victor VC6243 User manual

Victor

Victor VC6243 User manual

Victor 4000 User manual

Victor

Victor 4000 User manual

Victor VC6243 User manual

Victor

Victor VC6243 User manual

Victor VC890D Installation manual

Victor

Victor VC890D Installation manual

Victor VC60B+ User manual

Victor

Victor VC60B+ User manual

Victor DM3218 User manual

Victor

Victor DM3218 User manual

Victor 03 User manual

Victor

Victor 03 User manual

Victor 5005 User manual

Victor

Victor 5005 User manual

Victor 852A User manual

Victor

Victor 852A User manual

Popular Measuring Instrument manuals by other brands

Avery Weigh-Tronix E1070 Service manual

Avery Weigh-Tronix

Avery Weigh-Tronix E1070 Service manual

PCB Piezotronics HT356B11 Installation and operating manual

PCB Piezotronics

PCB Piezotronics HT356B11 Installation and operating manual

VWR Peqlab peqPETTE eType instruction manual

VWR

VWR Peqlab peqPETTE eType instruction manual

Leica 3D Disto user manual

Leica

Leica 3D Disto user manual

Endress+Hauser Micropilot NMR84 Brief operating instructions

Endress+Hauser

Endress+Hauser Micropilot NMR84 Brief operating instructions

Starrett 3900 Series user manual

Starrett

Starrett 3900 Series user manual

Agilent Technologies E4418B Configuration guide

Agilent Technologies

Agilent Technologies E4418B Configuration guide

Piezus ANZ 200 Operation manual

Piezus

Piezus ANZ 200 Operation manual

Tektronix 1S2 instruction manual

Tektronix

Tektronix 1S2 instruction manual

HunterLab UltraScan PRO Supplemental manual

HunterLab

HunterLab UltraScan PRO Supplemental manual

Agilent Technologies 4284A Operation manual

Agilent Technologies

Agilent Technologies 4284A Operation manual

DLG PHOTOMETER 2 instruction manual

DLG

DLG PHOTOMETER 2 instruction manual

mtts Light Meter user manual

mtts

mtts Light Meter user manual

GEM 1240 operating instructions

GEM

GEM 1240 operating instructions

Farmcomp Wile 27 operating instructions

Farmcomp

Farmcomp Wile 27 operating instructions

Dräger Polytron 7500 Instructions for use

Dräger

Dräger Polytron 7500 Instructions for use

SICK DUSTHUNTER C200 Installation operation & maintenance

SICK

SICK DUSTHUNTER C200 Installation operation & maintenance

Siemens interranger DPS300 Instructional manual

Siemens

Siemens interranger DPS300 Instructional manual

manuals.online logo
manuals.online logoBrands
  • About & Mission
  • Contact us
  • Privacy Policy
  • Terms and Conditions

Copyright 2025 Manuals.Online. All Rights Reserved.