Victorian Plumbing Caldo User manual


Functions and User Operation
On/Off
Press POWER to turn on/off
Temporarily Override Temperature
Note: When frost protection mode is active, the
timerstat will maintain the frost protection
temperature when in ‘off’ mode.
In ‘on’ mode, press or to change the current
period temperature setting.
Press to confirm and go back to the normal
screen.
The timerstat will revert to the normal
programmed settings at the start of the next time
period.
ET-81 PROGRAMMABLE TIMERSTAT INSTRUCTIONS
Technical Specification
Supply voltage: 85-265V 50/60Hz
Maximum switching current: 15A/3.3KW
Standby power: < 1W
IP21
The ET-81 is a smart Timerstat used to control
your electric underfloor heating system to
minimise energy use.
Display Symbols
Clock:
Period:
Temperature:
Return:
Confirm:
Power:
Day:
ON/OFF:
Up:
Down:

Set the Time
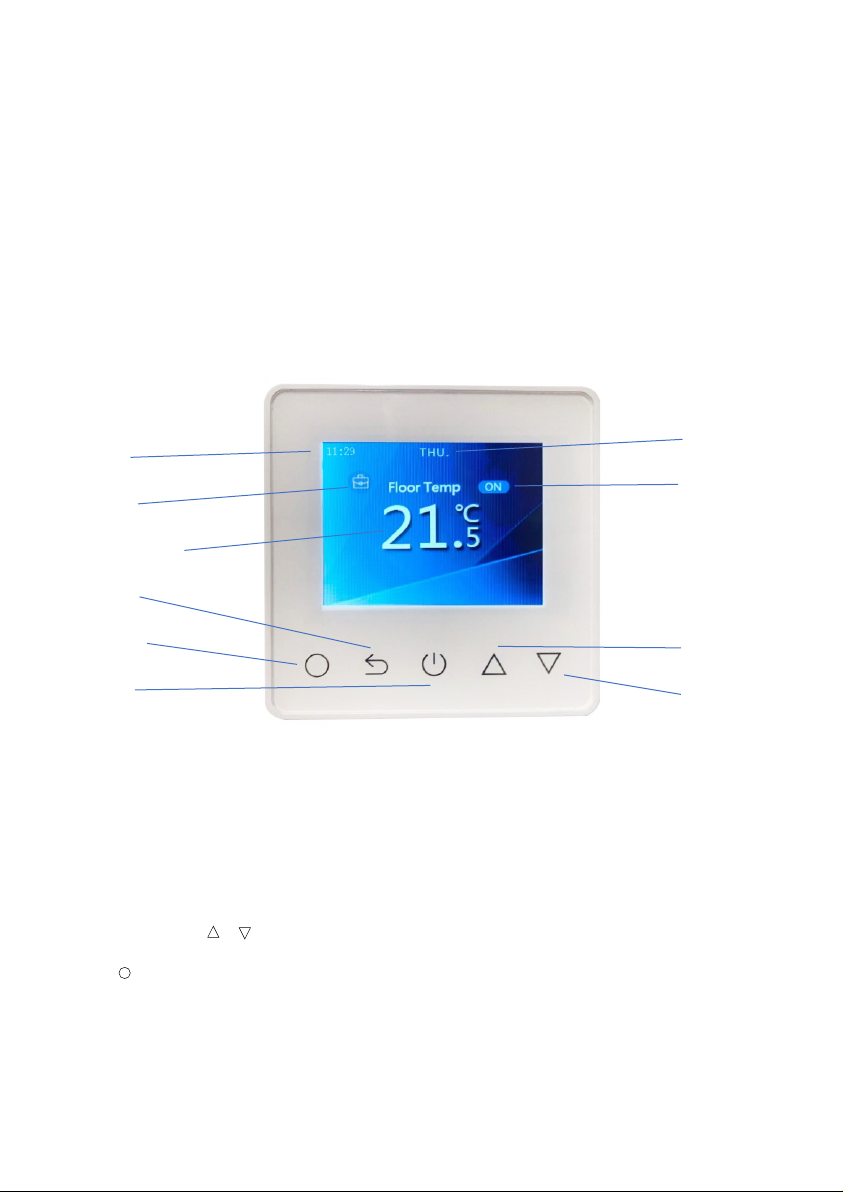
In ‘on’ mode, press ◯and time will be displayed.
Press ◯again to enter day set.
Press △or ▽to set day.
Press ◯to confirm and enter hour set.
Press △ or ▽to set hour.
Press ◯to confirm and enter minute set.
Press △ or ▽to set minute. Press ◯to confirm, then
Key-lock
press ◯again to revert to normal screen.
Setting key-lock can prevent children and others from
switching timerstat parameters.
Holiday mode
In ‘on’ mode, press for 3 seconds to lock the timerstat
and again for 3 seconds to cancel.
In holiday mode, the ET-81 will maintain the frost protection
temperature until the holiday period ends.
In ‘on’ mode, press ◯to enter setting.
Press △ or ▽to select holiday.
Press ◯to enter holiday days set.
Press △ or ▽to set the number of holiday days.
Hold mode
Press ◯to confirm and return to the normal screen.
Note: In holiday mode ‘HOLIDAY LEFT’ days remaining will
show on the display. Double press ◯to cancel holiday
mode.
The ET-81 will maintain the ‘hold temperature’ until hold is
switched off. In ‘on’ mode, press ◯to enter setting.
Press △ or ▽to select hold.
Press ◯to enter hold.
Press △ or ▽to set hold to ON.
Timer setting
Press ◯to enter hold temperature set.
Press △ or ▽to set hold temperature.
Press ◯to confirm and return to the normal screen.
Note: Whilst in hold mode, ‘HOLD’ will show on the display.
Double press ◯to cancel hold mode.
Each day of the week has 4 time periods, you should allot a
temperature to each time period. Set the temperature above
room ambient temperature and the heating will come on until
the desired temperature is reached, or, set
the temperature low and the heating will not come on
during that time period. The default settings are shown
in the table below.
In ‘on’ mode, press ◯to enter setting.
Press △ or ▽to select edit.
Press ◯to enter day selection.
Press △ or ▽to select the day to be set.
Note: Weekdays are set as a group, Saturday & Sunday individually.
Press ◯to enter period selection.
Press △ or ▽to select the period to be set.
Press ◯to enter start time set.
Press △ or ▽to select the start time hour.
Press ◯to enter minute set.
Press △ or ▽to select the start time minute.
Press ◯to enter temperature set.
Press △ or ▽to select the temperature.
Press ◯to confirm which will also take you back to period
selection. Repeat the previous steps for Leave, Return and
Sleep.
When all four time periods have been set, press which
will take you back to day selection. Repeat previous steps
for Saturday and Sunday. Press ◯twice to return to
normal screen or allow to time out at any time and your
settings will be saved.
Default period settings for time and temperature
Week
Wake
Leave
Return
Sleep
Mon - Fri
07:00
22°C
08:30
19°C
17:00
22°C
22:00
19°C
Sat / Sun
08:00
22°C
08:30
22°C
17:00
22°C
22:00
19°C
Note: Do not try to remove time periods or the timerstat may be damaged

Troubleshooting - Fault Codes
E1 = Built-in sensor short-circuit or disconnected. Note: The floor sensor resistance should be in the
E2 = Floor sensor damaged/disconnected/clamped on range of 10K Ohms - please check.
to insulation or incorrect floor sensor installed.
Dimensions
Advanced Settings
Note: These are normally set by the installer.
In ‘on’ mode, press ◯to enter setting.
Press △ or ▽to select setup.
Press ◯to enter advanced setting.
Each parameter can be accessed by pressing ◯and
then adjust the values as required.
No
Name
Default
Ranges
1
Temp calibration - Floor sensor
-Room sensor
0°C
0°C
-5°C to +5°C
-5°C to +5°C
2
Frost protection
Frost protection temperature
ON
5°C
OFF/ON
-5°C to +15°C
3
Sensor selection
Floor
Sensor
Room air sensor/Floor sensor/Both sensors
4
Floor temperature limit
30°C
20°C to 50°C
5
Temperature unit
°C
°C/°F
6
Output delay
0S
0S/30S/60S/90S
7
Temperature tolerance
1°C
0.5°C/1°C/2°C/3°C
8
Brightness
80%
0% - 100%
9
Energy use power rating3500W
0W
0W –3500W
10
Schedule
5+1+1
7/5+1+1
11
Adaptive Function
OFF
OFF/ON
12
Factory Reset
Back
Yes/Back
Press ◯twice to return to normal screen or allow to time out at any time and your settings will be saved.

Wiring Instructions
Notes On Advanced Settings
1. Temp calibration: Calibrate the temp detected by room sensor or
floor sensor.
2. Anti-frozen function: This option allows you to prevent your room
freezing in really cold weather.
3. Sensor select:
Room sensor: Run by room sensor. Floor sensor: Run by floor sensor.
Both sensors: Run by room sensor with floor temp limit.
4. Floor temp limit: Always use floor sensor for underfloor heating.
5. Temp unit: °C and °F can be selected.
6. Output delay: This option help you avoid inadvertent operation on
heating.
7. Temp tolerance: The value is 1°C. The thermostat starts to heat when
the actual temp is 1°C lower than set temp and stops heating when the
actual temp is 1°C higher than set temp.
8. Brightness: This option allows you to change the brightness of the
display.
9. Energy use: N/A.
10. Schedule: Select a weekly schedule to edit. There are 2 options:
7: each day from Mon to Sun can be set individually.
5+1+1: 5 days from Mon to Fri have the same events, Sat and Sun can
be set individually.
11. Adaptive function: After several days of installation and
use, Adaptive function ensures that the required temp has
already been reached when the next event begins. Only
switch on when regular heating pattern is established.
12. Reset: Yes - All parameters are restored to default values.
Installation Instructions
This Timerstat should only be wired by a ‘Part P’ qualified
Electrician as required by IEE regulations. The power supply
must be on an RCD protected circuit and connected via a
correctly fused switched fused spur isolator. Guarantee is void if
these provisions are not followed.
Before connecting, please test the resistance of the heating
cable/s against the values shown in the relevant installation
manual to make sure the cable hasn’t been damaged. Also test
between live/earth and neutral/earth for a zero reading. Check
the floor probe resistance is in the range of 10K Ohms
The ET-81 timerstat should be mounted using an 86x86x35mm
deep wall box.
Loosen the silver fixing screw on the bottom of the timerstat and
separate the front from the back.
Wire the timerstat back section as the above diagram. A
maximum of 2 heating cables will go into the wire connectors.
More than this should be connected into a junction box with a
single correctly sized wire to the timerstat. Main’s earth and
heating cable earth should be connected behind the timerstat
using a block connector. Don’t forget to connect the floor probe
(not polarised) otherwise the timerstat will not work properly.
Reassemble the front to the back and ensure the pins are located
in the socket on the back otherwise it will not work and tighten
up the silver screw.
Table of contents
Popular Heating System manuals by other brands

Bryant
Bryant ZONEBB3Z Installation and operating instructions

Reflex
Reflex Variomat Service instructions

Heatit
Heatit HIP 24-12B manual

Tecnosystemi
Tecnosystemi Apply.co AIR PUR EVO user manual

Immergas
Immergas ERP DIM BASE Instructions and Recommendations

LEO AIR
LEO AIR FR 250 User and maintenance instructions

Bosch
Bosch Worcester Greenstar Oilfit External installation instructions

KWB
KWB Multifire USV 15/25 D/ZI Installation and maintenance manual

Saswell
Saswell SCU209DE user manual

Solar
Solar HC 01 Instructions for the installation and use

Marley
Marley MEnV 180 II Operating & assembly instructions

flamco
flamco Pro PU 131 Operation & maintenance manual