Victorio VKP1225 User manual

VKP1225

Table of Contents
Parts List & Diagram...............................................................................1
Operating Precautions.............................................................................2
Cleaning Instructions .............................................................................2
Accessories................................................................................................2
Assembly Instructions.............................................................................3
Use Instructions........................................................................................4
Recipes.......................................................................................................5
Warranty/Contact Info ........................................................ Back Cover
*For the most up-to-date manual, or for more information regarding
this product, visit our website: www.VICTORIO.info.

1
Nut Roaster by VICTORIO®
Model VKP1225
Parts Diagram:
Your complete Nut Roaster includes everything shown here:
Parts List:
(1) Crank handle (2) Stirring blade
(3) Handle (4) Pot
(1)
(2)
(3)
(4)

2
Accessories
Don’t forget your VICTORIO Nut Glazes and Gift/Serving Bags. To pur-
chase, visit our website, www.VictorioStore.com.
Operating Precautions
• To prevent personal injury or property damage, read and follow all
instructions and warnings.
• Do not use for other than intended use.
• Do not operate if damaged in any manner. For service information see
warranty page.
• For household use only.
• Do not place empty Nut Roaster on heated stove top as damage to Nut
Roaster or stove top can result.
• Do not leave Nut Roaster unattended while cooking.
• Use caution when cooking and emptying contents of the Nut Roaster
as they are very hot.
Cleaning Instructions
Before using for the rst time, wash in warm, soapy water, rinse and dry
thoroughly.
After use, allow the Nut Roaster to cool to room temperature before clean-
ing to avoid damaging it. Add hot water and dish liquid to the nut roaster
to soak for several minutes to dissolve the sugar glaze on the pan and the
stirring rod. Do not allow the Nut Roaster to soak in a sink lled with hot,
soapy water as this may cause damage to the wooden handle.
Do NOT wash in the dishwasher.

3
Assembling Your Nut Roaster:
1. Insert handle into pot.
2. Turn handle clockwise until secure. Do not over-tighten.
3. Insert crank handle into the stirring blade. Be sure the rectangle
parts t together correctly.
4. Insert crank handle and stirring blade into pot and push rmly to
secure.

4
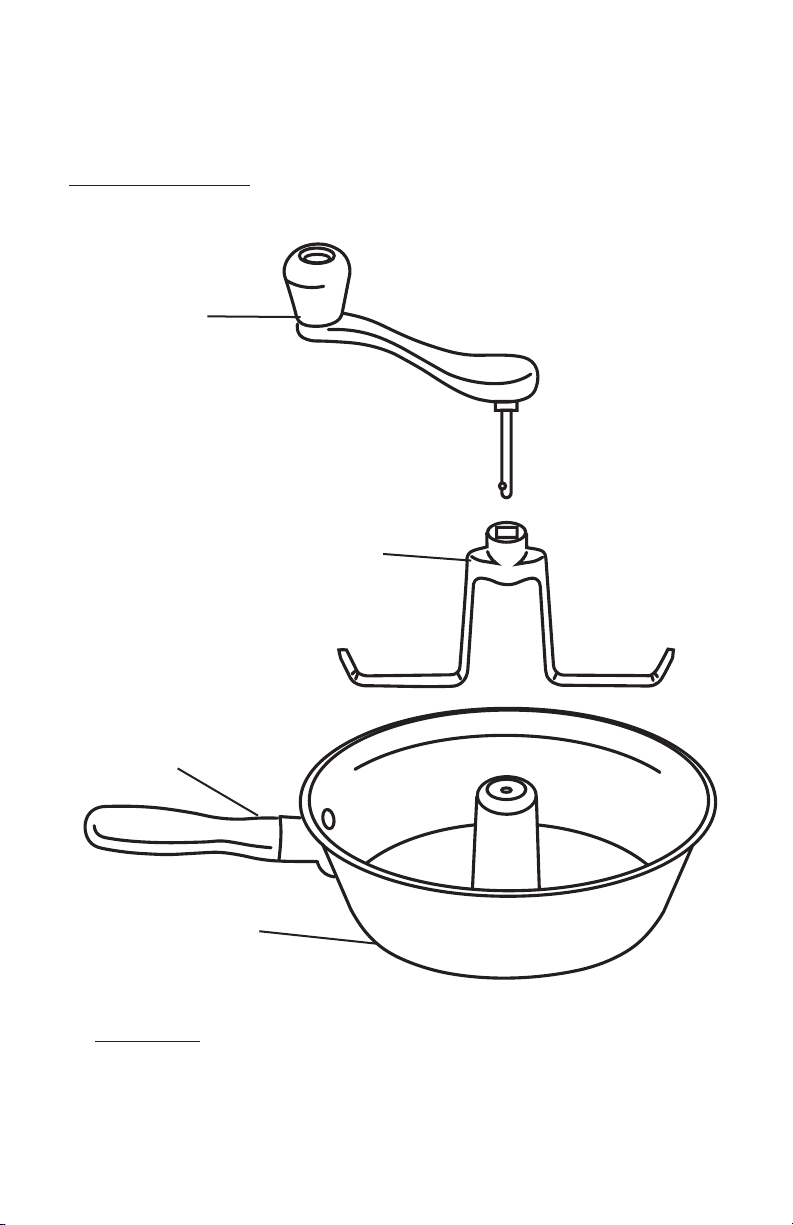
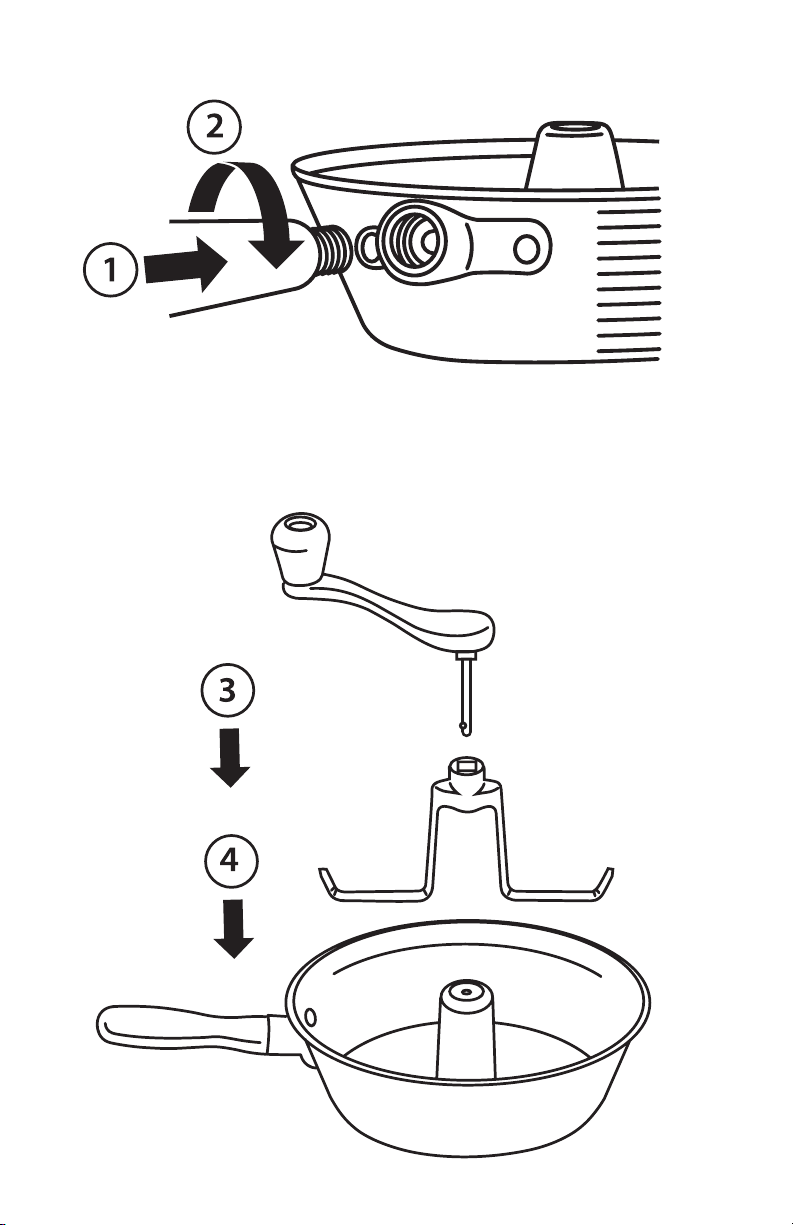
Using Your Nut Roaster:
NOTE: The maximum capacity for this Nut Roaster is 3 cups.
1. Spread your choice of nuts (almonds, peanuts, pecans, walnuts, ca-
shews, or hazelnuts) evenly in the bottom of the pan.
2. Pour glaze evenly over the top of the nuts. Use glaze packaging instruc-
tions to determine amount to use.
3. Turn crank handle to mix the nuts and glaze together.
4. Place pan on burner and turn to medium heat.
5. Stir continuously and slowly. This allows the glaze to keep coating the
nuts. It is normal for the nuts to slide around at rst. They will begin to
tumble as the glaze thickens.
6. As the glaze begins to thicken, you will feel more resistance as you stir
the nuts. When all the liquid evaporates from the glaze, it will quickly
change to a crystalline coating. Remove the pan from the heat.
7. Using a spatula, immediately spread the nuts on a non-stick baking tray,
parchment paper, or silicone baking mat.
8. Separate the nuts with a wooden spoon as needed.
9. DO NOT attempt to eat the nuts until they are completely cooled.
Sure, they smell amazing, but you will burn your tongue! Seriously,
don’t do it!
Recipes:
Spicy Maple Bacon Nuts
Ingredients:
• 2 cups nuts
• 1/4 cup pure maple syrup*
• 2 slices fully cooked bacon, crumbled
• 1/8 tsp cayenne pepper (adjust to taste)
1. Spread nuts evenly on the bottom of the pan.
2. Pour maple syrup evenly over the nuts and stir to coat.
3. Sprinkle crumbled bacon and cayenne pepper over the coated nuts. Stir.
4. Place pan on burner and set to medium.
5. Stir continually until nuts crystallize.
6. Pour nuts onto baking sheet to cool.
7. Enjoy!
*Any corn syrup based syrup will not crystallize and is not recommended.

5
Honey Roasted Nut Brittle
Ingredients:
• 2 cups nuts
• 1/4 cup honey
1. Spread nuts evenly on the bottom of the pan.
2. Pour honey evenly over the nuts and stir to coat them.
3. Place pan on burner and set to medium-low. Note this is lower than nor-
mal as you’ll be roasting longer than usual.
4. Stir continually for approximately 20 minutes. When the honey has
browned just slightly, pour the nuts onto a baking tray to cool.
5. When fully cooled, break into pieces.
6. Enjoy!
Spiced Mixed Nuts
Ingredients:
• 2 Tablespoons butter
• 1/2 teaspoon garlic salt
• 2 Tablespoons Worcestershire sauce
• Dash of onion powder
• 1/8 teaspoon hot pepper sauce
• 2 cups mixed nuts of your choice
1. Add rst ve ingredients to pan and heat on low.
2. Stir to mix thoroughly and add nuts when the butter is melted.
3. Increase heat to medium and continue stirring until nuts are completely
warmed and coated.
4. If you prefer the nuts to be more crisp, place on a baking tray in 300
degree oven for 20 minutes.
5. Enjoy!

Product Warranty
Model VKP1225 - Nut Roaster Warranty: 1 year
We are condent in the quality of our products and back up each one with
a limited warranty for the length of time specied above. Should you expe-
rience any problems with your product, please contact our customer service
department.
All warranty claims must be accompanied by a proof of purchase and are
only valid if the product has been used for its intended purposes. This prod-
uct is for household use only.
Items Not Covered:
• Return shipping costs or returned items lost in transit.
• Damages to the product due to accident, misuse, abuse, negligence, or
if the product has been altered in any way.
VICTORIO Kitchen Products
1804 Sandhill Road
Orem, UT 84058
By phone: 866-257-4741
By email: Help@VICTORIO.info
www.VICTORIO.info
©Copyright 2018 VICTORIO Kitchen Products, Inc.
All rights reserved.
Table of contents
Other Victorio Skillet manuals