Victory Dartboard Cabinet Service manual

CPSIA#2-VT-DARTBOARD CABINET- -VS
Dartboard Cabinet
Installation
Instruction Manual
1. Read this manual carefully before starting assembly. Read each step completely before
beginning each step.
2. Check inside all parts and cartons before assembling or ordering parts.
3. To make assembly as easy as possible, place all parts in a cleared area and remove the
packaging material. Organize all parts as per parts identifier in the assembly manual.
Do not dispose of the packing material until assembly is completed.
4. Avoid scratching dartboard cabinet parts during the assembly process.
5. Assemble product on clean, level and flat surface.
6. Take time to correctly orientate parts exactly as per each assembly diagram.
7. Save this instruction in the event that the manufacturer has to be contacted for replacement parts.
O W N E R ’ S M A N U A L
READ ASSEMBLY, OPERATING AND
SAFETY INSTRUCTIONS CAREFULLY!
Thank you for buying our product. We try hard to ensure that our products are of high quality and free of problems, such as
Manufacturing defects or missing parts. However, if you have any problems with your new product, please DO NOT RETURN IT
TO THE STORE!
CAUTION:
Please visit our website at: victorytailgate.com
ON-LINE TROUBLE SHOOTING TECHNICAL ASSISTANCE
ON-LINE PARTS REQUESTS FREQ UEN TLY ASKED QUE STIO N S
ADDITIOANAL VICTORY TAILGATE PRODUCT INFORMATION
Please provide model number and/or part number of the product and/or part when you call or write. These numbers can be found on the
product, packaging, and/or in this Owner’s Manual.
Please Do Not Return This Product To The Store!
Contact Victory Tailgate customer service department at:
Phone: 1-888-577-4460 Toll-Free!
E-mail: [email protected]
Mailing Address (correspondence only):
Victory Tailgate, LLC.
2437 East Landstreet Road, Orlando, FL 32824
Limited 90-Day Victory Tailgate Warranty
All Victory Tailgate games have a limited 90-day from date of purchase warranty. This warrants the
retail purchaser for any Victory Tailgate game purchased to be free from any defect in materials
and construction for 90 days from the date of purchase. The only exceptions to the warranty include
main frames, tabletops, playing surfaces, batteries or tools. Damaged main frames, tabletops, play-
ing surfaces need to be returned to the store as we are unable to replace these parts. Normal play
wear and usage is not covered under the warranty, nor is wear or damage due to improper use of
the Victory Tailgate game. This will void any and all Victory Tailgate warranties.

PARTS IDENTIFIER
H5 (to scale) H6 (to scale) H7
H1 H2 (to scale) H3 (to scale) H4 (to scale)
Mounting Bracket
1 pc
3.5x10 mm
Phillips Head Screw
2 pcs
3 mm Nut
2 pcs
4 mm Flat Washer
2 pcs
5 x 20 mm
Phillips Head Screw
1 pc
1.5x18 mm
Phillips Head Screw
3 pcs
Bumper
3 pcs
H8 (to scale)
4x50 mm
Phillips Head Screw
4 pcs
H10 (to scale)
20 mm EVA Pad (Peel & Stick) - 4 pcs
(2 pcs customer installs & 2 pcs factory preinstalled)
H9 (to scale)
4.5 mm Flat Washer
4 pcs
H11
16” Template for
Mounting Dart Cabinet -1 pc
H12 H13 (to scale)
Door Hinge - 4 pcs
H14 (to scale)
3x12mm Flat
Head Screw
4 pcs
4x12mm Rounded
Head Screw
28 pcs
P1
Cabinet Body
1 pc
P2
Scoreboard
2 pcs
P3
Cabinet Door - Right
1 pc
P4
Cabinet Door - Left
1 pc
- 2 -

CABINET DOOR & SCOREBOARD INSTALLATION
Install Scoreboard onto Cabinet Door
Step.1
1. Align the 6 holes on P2 Scoreboard onto P3 Right Cabinet Door’s 6 pilot holes.
2. Using 6 pcs H13 Rounded Head Screw, screw P2 Scoreboard onto Cabinet Door like shown on Figure 1.
3. Repeat the same process to install P2 Scoreboard onto P4 Left Cabinet Door.
H13
H13
H13
H13
P2
P3
Flat side is Bottom
Curve side is Top
NOTE: Make sure Victory Tailgate logo
is at upside.
Hinge onto Cabinet Door
Step.2
1. Align 3 holes on each H12 Hinge onto P3 Right Cabinet Door’s 6 pilot holes.
2. Make sure to push the the Hinge to completely stick on Cabinet Door’s edge.
3. Using 2 pcs H13 Rounded Head Screw & 1 pc H14 Flat Head Screw to screw it to each Hinge.
Point 1 to 3 in this step shown on Figure 2.
4. Repeat the same process to install H12 Hinge to P4 Left Cabinet Door.
Figure 1
H13
H13
H14
NOTE: Make sure This area of the Hinges
are totally stick on Cabinet Doors’s edge.
H12
H12
P3
H13
- 3 -
H13
H13
H13
H13
H13
H14
H13
H13
H14

Install Cabinet Door Assembled onto Cabinet Body
Step.3
1. Firstly, please prepare some block such as wooden block with thickness 8.7cm (3-1/2”).
Recommended block minimum size is 45 x 30 (17-3/4” x 11-3/4”) for easier installation.
2. Put Cabinet Door Assembled from Step 2 onto this block, with the side installed with hinge must be flush with the block.
3. Align the the other fold side from the Hinge to the pilot holes on P1 Cabinet Body frame inner side.
4. Using 2 pcs H13 Rounded Head Screw screw it to each Hinge per shown on Figure 3.
5. Repeat above step to install Left Cabinet Door onto Cabinet Body.
6. Make sure the bottom edge of both doors are flush when the doors closed. If it not flush, you can adjust it with loosen
H13 screw on one of the doors, slightly slide the door up or down to get the better result.
Block: recommended minimum
size is 45 x 30 (17-3/4” x 11-3/4”)
H13
H13
H13
H13
P1
NOTE: Must be flush
- 4 -

INSTALL THE DARTBOARD MOUNTING BRACKET INTO CABINET
Install Mounting Bracket
Step.1
1. Align 2 holes on the H1 Mounting Bracket with the 2 backboard center holes.
2. Using 2 pcs H2 Screw and H3 Washer, insert from the cabinet backside and go through the 2 backboard center holes.
3. Install 2 pcs H4 Nut onto 2 pcs H2 screws, tighten using plyers & phillips driver.
Refer to Figure 1 & Figure 1.1.
- 5 -
*NOTE: Cabinet doors not shown for clarity.
NOTE: H1 Mounting Plate
must be orientated slot up
H2
H3
H2
H3
H4
H4
H1
Figure 1
Figure 1.1
Backboard center holes
Mount Dartboard Cabinet onto Wall
Step.2
Important Safety Information:
Install and use this dartboard cabinet with care. Please read the entire manual and all instructions before attempting
installation and carefully follow all instructions contained herein. Use proper safety equipment during installation which
includes ANSI-Approved safety glasses and heavy duty work gloves.
Note: FAILURE TO READ AND FOLLOW THESE INSTRUCTIONS WILL VOID THE WARRANTY.
Please call a qualified installation contractor for help if you:
A. Don’t understand the instructions in this manual or have any doubts about the safety of this installation .
B. You are uncertain about the nature of your wall .
C. You decide to hang the dart cabinet in a manner that does not utilize the “WOOD STUD MOUNTING INSTRUCTIONS
BELOW “.
Do not use this product for any purpose or in any configuration not explicitly specified in these instructions.
Escalade Sports hereby disclaims any and all liability for injury or damage arising from incorrect assembly, incorrect
mounting or any incorrect use of this product.
Note: The mounting hardware supplied with this product is NOT designed for installation to walls with steel or aluminum
studs, cinder block walls, brick, stone, hollow walls, gypsum board, drywall and or similar materials. If the hardware for your
installation is not included , please consult your local hardware store for the proper mounting hardware for this product as
per your application.
Note: As a convenience to our Valued Customers , we have designed this Dart Cabinet Mounting Instruction to be able to
be performed by one adult.
NOTE: Holes with Keyhole
shape is cabinet upside
Backside of
cabinet

- 6 -
Tools required:
ƔStud Finder
ƔTape Measure .
ƔSmall & Medium Phillips driver – Electric OK --- Low torque as to not strip out any screws .
ƔCarpenters Level
ƔAwl and or Pencil
ƔDrill and 1/16” Drill Bit
ƔThin Nail
ƔPlyers
WOOD STUD MOUNTING WITH WOOD STUDS AT 16” ON CENTER:
Verify that the mounting surface has no hidden utility lines before drilling or driving screws.
DO NOT MOUNT THE CABINET TO, A HOLLOW WALL, GYPSUM BOARD, DRYWALL OR SIMILAR MATERIALS
THAT WILL NOT SUPPORT THE WEIGHT OF THE DART BOARD CABINET AND BRISTLE BOARD.
The dart board cabinet must be mounted to two wood studs. Use a stud finder to locate two adjacent wood studs. It is a
good idea to verify exactly where the studs are located with an awl or thin nail.
Note: “Stud Finders “ are available at your local hardware store.
IMPORTANT NOTES:
The height of the cabinet, is decided by the correct height of the dart board’s BULL’S EYE. This measurement is with the
dartboard installed into the cabinet and is 5’8”, or 68”, or 1.7 m from the Bulls Eye to the floor.
Also, double check that the cabinets 4 mounting holes are 16” on center both horizontally and vertically (Just as a double
check).
Make sure the holes you are about to drill are in the center of the stud, and level with each other. The drill bit MUST be
smaller than the Cabinet Wall Mounting Screws.
At this point you have completed the following steps:
A. Decided where you want to hang the Dartboard Cabinet.
B. You have correctly located 2 adjacent 2” x 4 “ wooden studs.
C. You have determined the center of each of the 2” x 4” vertical studs.
1. Next, locate the H11 - 16“ Template for Mounting Dart Cabinet packed with the product.
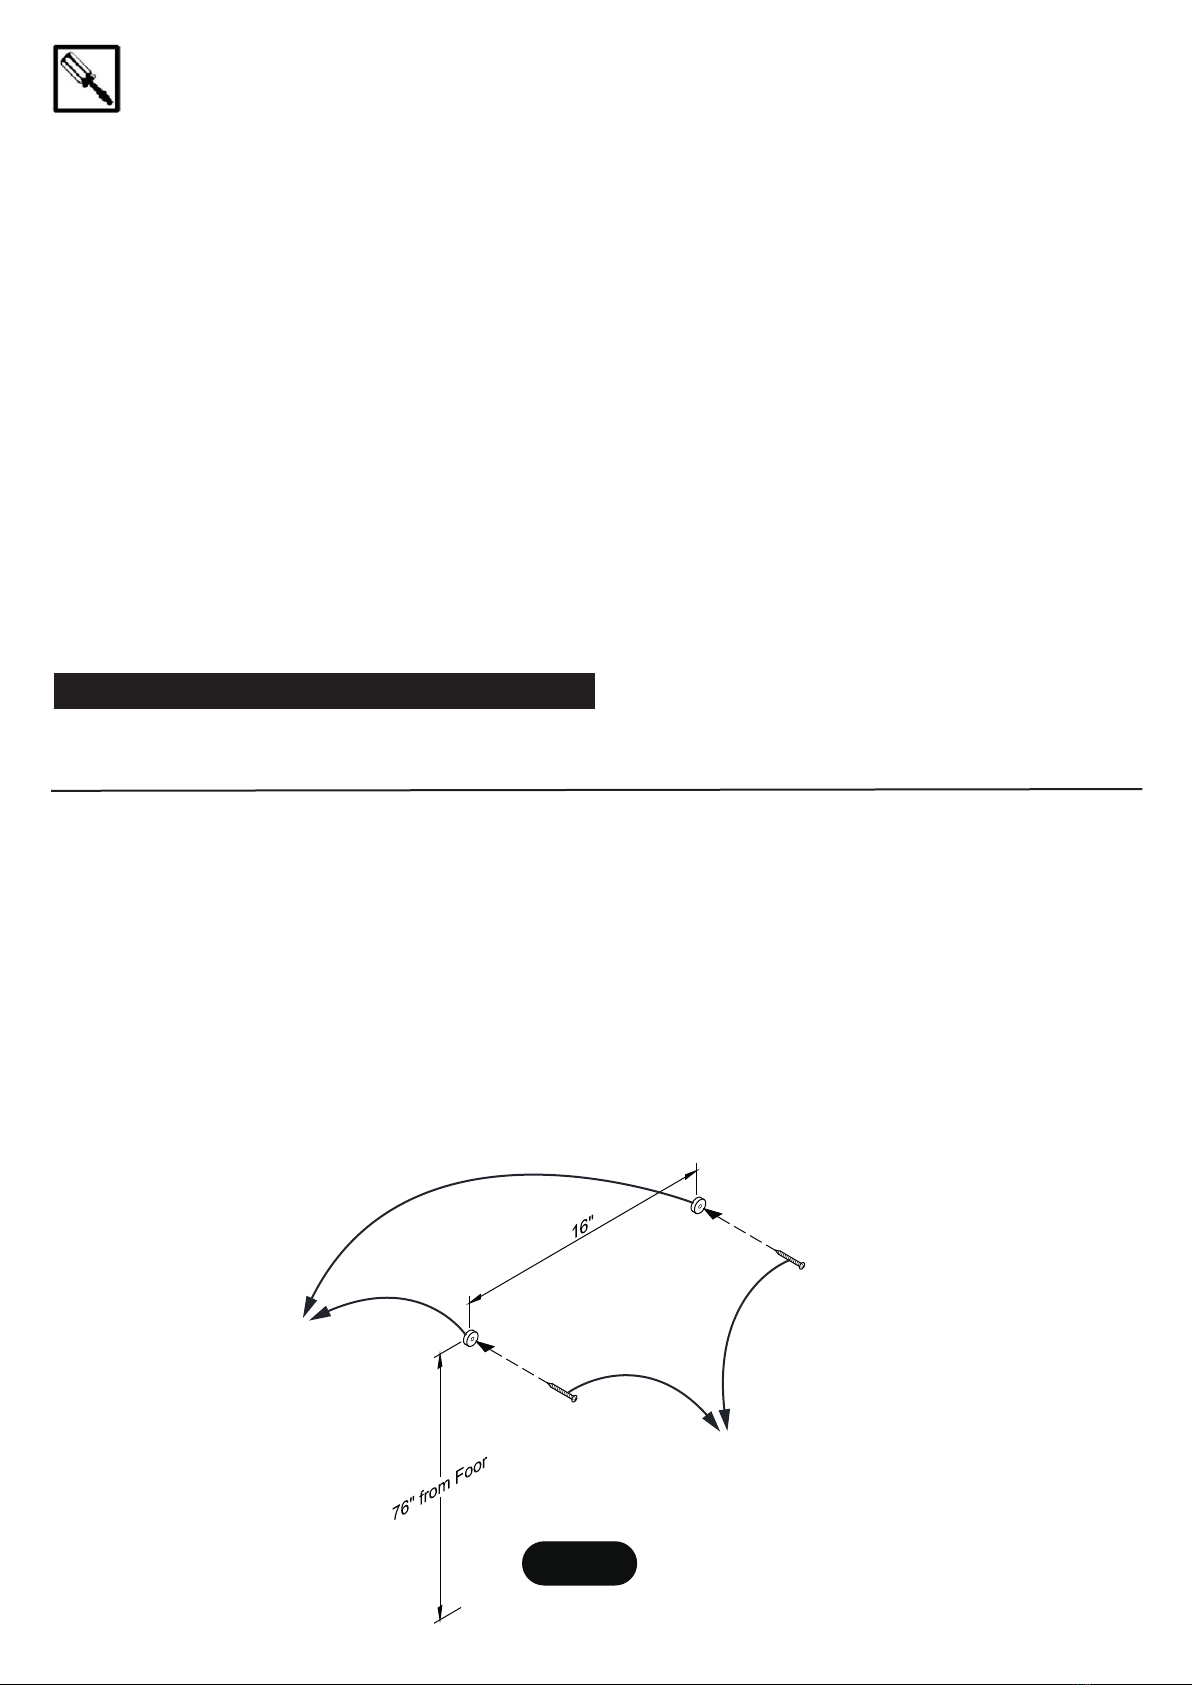
On the left and right stud, measure up from the floor 76” and using an awl or pencil, mark 76” at the center of each stud.
2. Using the H11 template, place the left circle on the template exactly correct over the 76” mark.
3. Now, holding the template horizontal and flat to the wall, use the H11 template and mark the right stud at the 76” mark .
4. Please confirm the 2 measurements now marked on the wall.
A. The vertical measurements from the floor to the mark on each stud is 76”.
B. The horizontal measurement is exactly 16” from the center of the left stud to the center of the right stud.
5. Lastly, use a carpenters level and make sure the two 76” marks are exactly level with each other. Remark the 76” marks
as required to achieve levelness while maintaining the 16” on center distance between the two.
6. Using a 1/16” drill bit carefully drill a Pilot Hole straight into each of the 2 marked areas.
7. Again, confirm exactly 16” on center between the two holes and each is 76“ from the floor, and the holes are level with
each other.
8. Remove H11 template from the wall.
9 . Peel and stick 2 pcs H10 EVA Pad aligned with the 2 pilot holes onto the wall.
10. Next, locate 2 pcs H8 Screws, install through EVA pad holes into the pilot holes as per Figure 2.1.
H8
Figure 2.1
H10
H10
H8
Peel & stick 2 pcs H10
EVA pads centered over
the 2 pilot holes
onto the wall
IMPORTANT NOTE:
Do NOT tighten H8 screws
at this time - Please see Step 11
on center

S
- 7 -
11. Now, install H8 screws into each drilled pilot hole leaving approx. 1/2” of the screw head exposed from the wall as per
Figure 2.2.(This will allow you to “Hang” the Dart Cabinet onto these two screws).
12. Carefully hang the dart cabinet onto these two hanging screws. Make sure the cabinet gently drops down into the “keyhole
slots” on the back of the cabinet. Snug Tighten screws. Snug only as these screws will be temporarily removed and
reinstalled momentarily. Please see Figure 2.3.
13. Now, using the drill and 1/16”drill bit carefully drill pilot holes, using the bottom two holes in the back lower part of the
cabinet as guides. Install 2 pcs H8 Wall Mounting Screws with H9 Washers and tighten, do not strip out the screws.
See Figure 2.3.
*NOTE: Cabinet doors not shown for clarity.
Figure 2.3
H8
H8
H9
H9
1/2”
1/2” gap
Wall
H10
H8
Figure 2.2
15. Next, and only one at a time , remove the top H8 screws, install a H9 Flat Washer onto the screw, reinstall and tighten.
Do not strip out the screws. See Figure 2.4.
1. Remove H8
2. Add H9 Flat Washer and reinstall
Do the same for this screw,
remove H8 Screw, add
H9 Flat Washer & reinstall
Figure 2.4
*NOTE: Cabinet doors not shown for clarity.
H8
H9
H10 EVA pad
(factory pre-installed)
onto back of cabinet
2 lower holes
Backboard Flat Washer
Screw

Darting Game Rules
Various darting websites are available that explain darting rules and other specifics of the game.
- 8 -
Install Dartboard into Cabinet
Step.3
1. Install H5 Mounting Screw to the pilot hole which is marked with black marker on the back center of the dartboard and
leave approx. 1/8” of the screw head exposed from the backboard per shown on Figure 3.1. (This will allow you to
“Hang” the dartboard onto mounting bracket which was intalled in Step 1).
2. Install 3 pcs H7 Bumper to 3 pilot holes onto the back of the dartboard using 3 pcs H6 Bumper Screw and tighten, do
not strip out screws. Please see Figure 3.2.
H5
H6
H7
1/8"
Note: Leave 1/8” gap
Figure 3.1 Figure 3.2
3. Hang the dartboard onto the cabinet by hanging the dartboard center screw onto the H1 Mounting Bracket slot.
Note: While Figure 3.1 shows a 1/8” gap in order to hang the dartboard onto the hanger, a small amount of “adjusting”
may be required on the H5 center screw in order to achieve the best fit for the dartboard onto the cabinet.
4. Rotate and adjust Number “20” at the top.
Please see Figure 3.3.
Number “20” at the top
Figure 3.3
*NOTE: Cabinet doors not shown for clarity.
Bumper
Center
Table of contents
Other Victory Indoor Furnishing manuals
Popular Indoor Furnishing manuals by other brands

OSP Home Furnishings
OSP Home Furnishings CONTEMPO WORK SMART CNT51 Assembly instructions

VECELO
VECELO KHD-XF-NT12-BRN Assembly instructions

Desalto
Desalto SKIN Assembly instruction

Home Decorators
Home Decorators HAMPTON BAY BF-22377 Assembly instructions

Crosley
Crosley CF4202 manual

Songmics
Songmics HSR04 instruction manual